Amazon S3
Overview
The Amazon Simple Storage Service (Amazon S3) is a flexible object storage service optimized for scalability and security. Common use cases for S3 include storage for web applications, backup and recovery, disaster recovery, data lakes, and hybrid cloud storage.
Integrating Lytics with AWS S3 provides the ability to import or export files to your S3 buckets. This makes your data available to the Amazon ecosystem for reporting, analytics and archiving. Many tools provide the ability to import and export to/from S3; therefore, by linking Lytics and S3 you gain access to the wide ecosystem of tools that integrate with S3.
Authorization
If you have not already done so, you will need to set up an Amazon S3 account before you begin the process described below.
If you are using an IP allowlist for your AWS S3 account, contact your account administrator to add Lytics' IP addresses to your allowlist. Reach out to your Lytics Account Manager for the current list of IP addresses.
You may authorize in one of two ways:
- Providing your AWS keys - with option to use PGP Encryption
- Delegating Access via AWS IAM
Providing your AWS keys
Follow the steps below to authorize AWS with Lytics using your AWS keys. For more information on obtaining your keys, see Amazon's documentation on secret and access keys.
If you are new to creating authorizations in Lytics, see the Authorizations documentation for more information.
- Select Amazon Web Services from the list of providers.
- Select the AWS Keys method for authorization.
- Enter a Label to identify your authorization.
- (Optional) Enter a Description for further context on your authorization.
- Enter your Access Key and Secret Key.
- Click Save Authorization.
AWS Keys with PGP Encryption
To create an authorization with AWS keys and PGP encryption, follow the steps as described above, and then select either the Private or Public PGP Keys option.
Note that currently the Ed25519 method of encryption is not supported
- For imports of PGP encrypted files, enter your PGP Private Key
- To encrypt the resulting export file using PGP, enter your PGP Public Key.
Delegating Access via AWS IAM
You can also authorize using AWS Identity and Access Management (IAM). For more information see Amazon's documentation on IAM.
You will need to enter the following policy in your S3 bucket:
{
 "Statement": [
    {
       "Sid": "Grant Lytics Access",
       "Effect": "Allow",
       "Principal": {
          "AWS": "arn:aws:iam::358991168639:root"
       },
       "Action": [
          "s3:GetBucketLocation",
          "s3:ListBucket",
          "s3:PutObject",
          "s3:GetObject",
          "s3:DeleteObject"
       ],
       "Resource": [
          "arn:aws:s3:::YOUR_BUCKET",
          "arn:aws:s3:::YOUR_BUCKET/*"
       ]
    }
 ]
}
Before you start a job, please let Lytics Support know the name of the bucket you are going to use. This will allow delegated access to the given bucket. When you start the job, just select Use Delegated Access To Lytics with AWS IAM instead of an AWS keys authorization.
Import Audiences & Activity Data
Import audiences and activity data into Lytics via a CSV file directly from your AWS S3 bucket.
Integration Details
- Implementation Type: Server-side Integration
- Type: REST API Integration.
- Frequency: One-time or scheduled Batch Integration, frequency can be configured.
- Resulting Data: Raw events or user profiles once the imported data is mapped.
This integration uses the Amazon S3 API to read the CSV file selected for the import. Each run of the job will proceed as follows:
- Query for a list of objects in the bucket selected in the configuration step.
- Read the selected CSV file.
- Import all the fields that are chosen during configuration. If configured to diff the files, it will compare the file to the data imported from the previous run.
- Send the fields to the configured Data Stream.
- Schedule the next run of import if configured to run continuously.
Please see Custom Data Ingestion for more information on file naming, field formatting, headers, timestamps, etc.
Fields
Once you choose the CSV file to import from your S3 bucket during configuration, Lytics will read the file and list all the fields that can be imported. You can then select the fields that you want to import.
Configuration
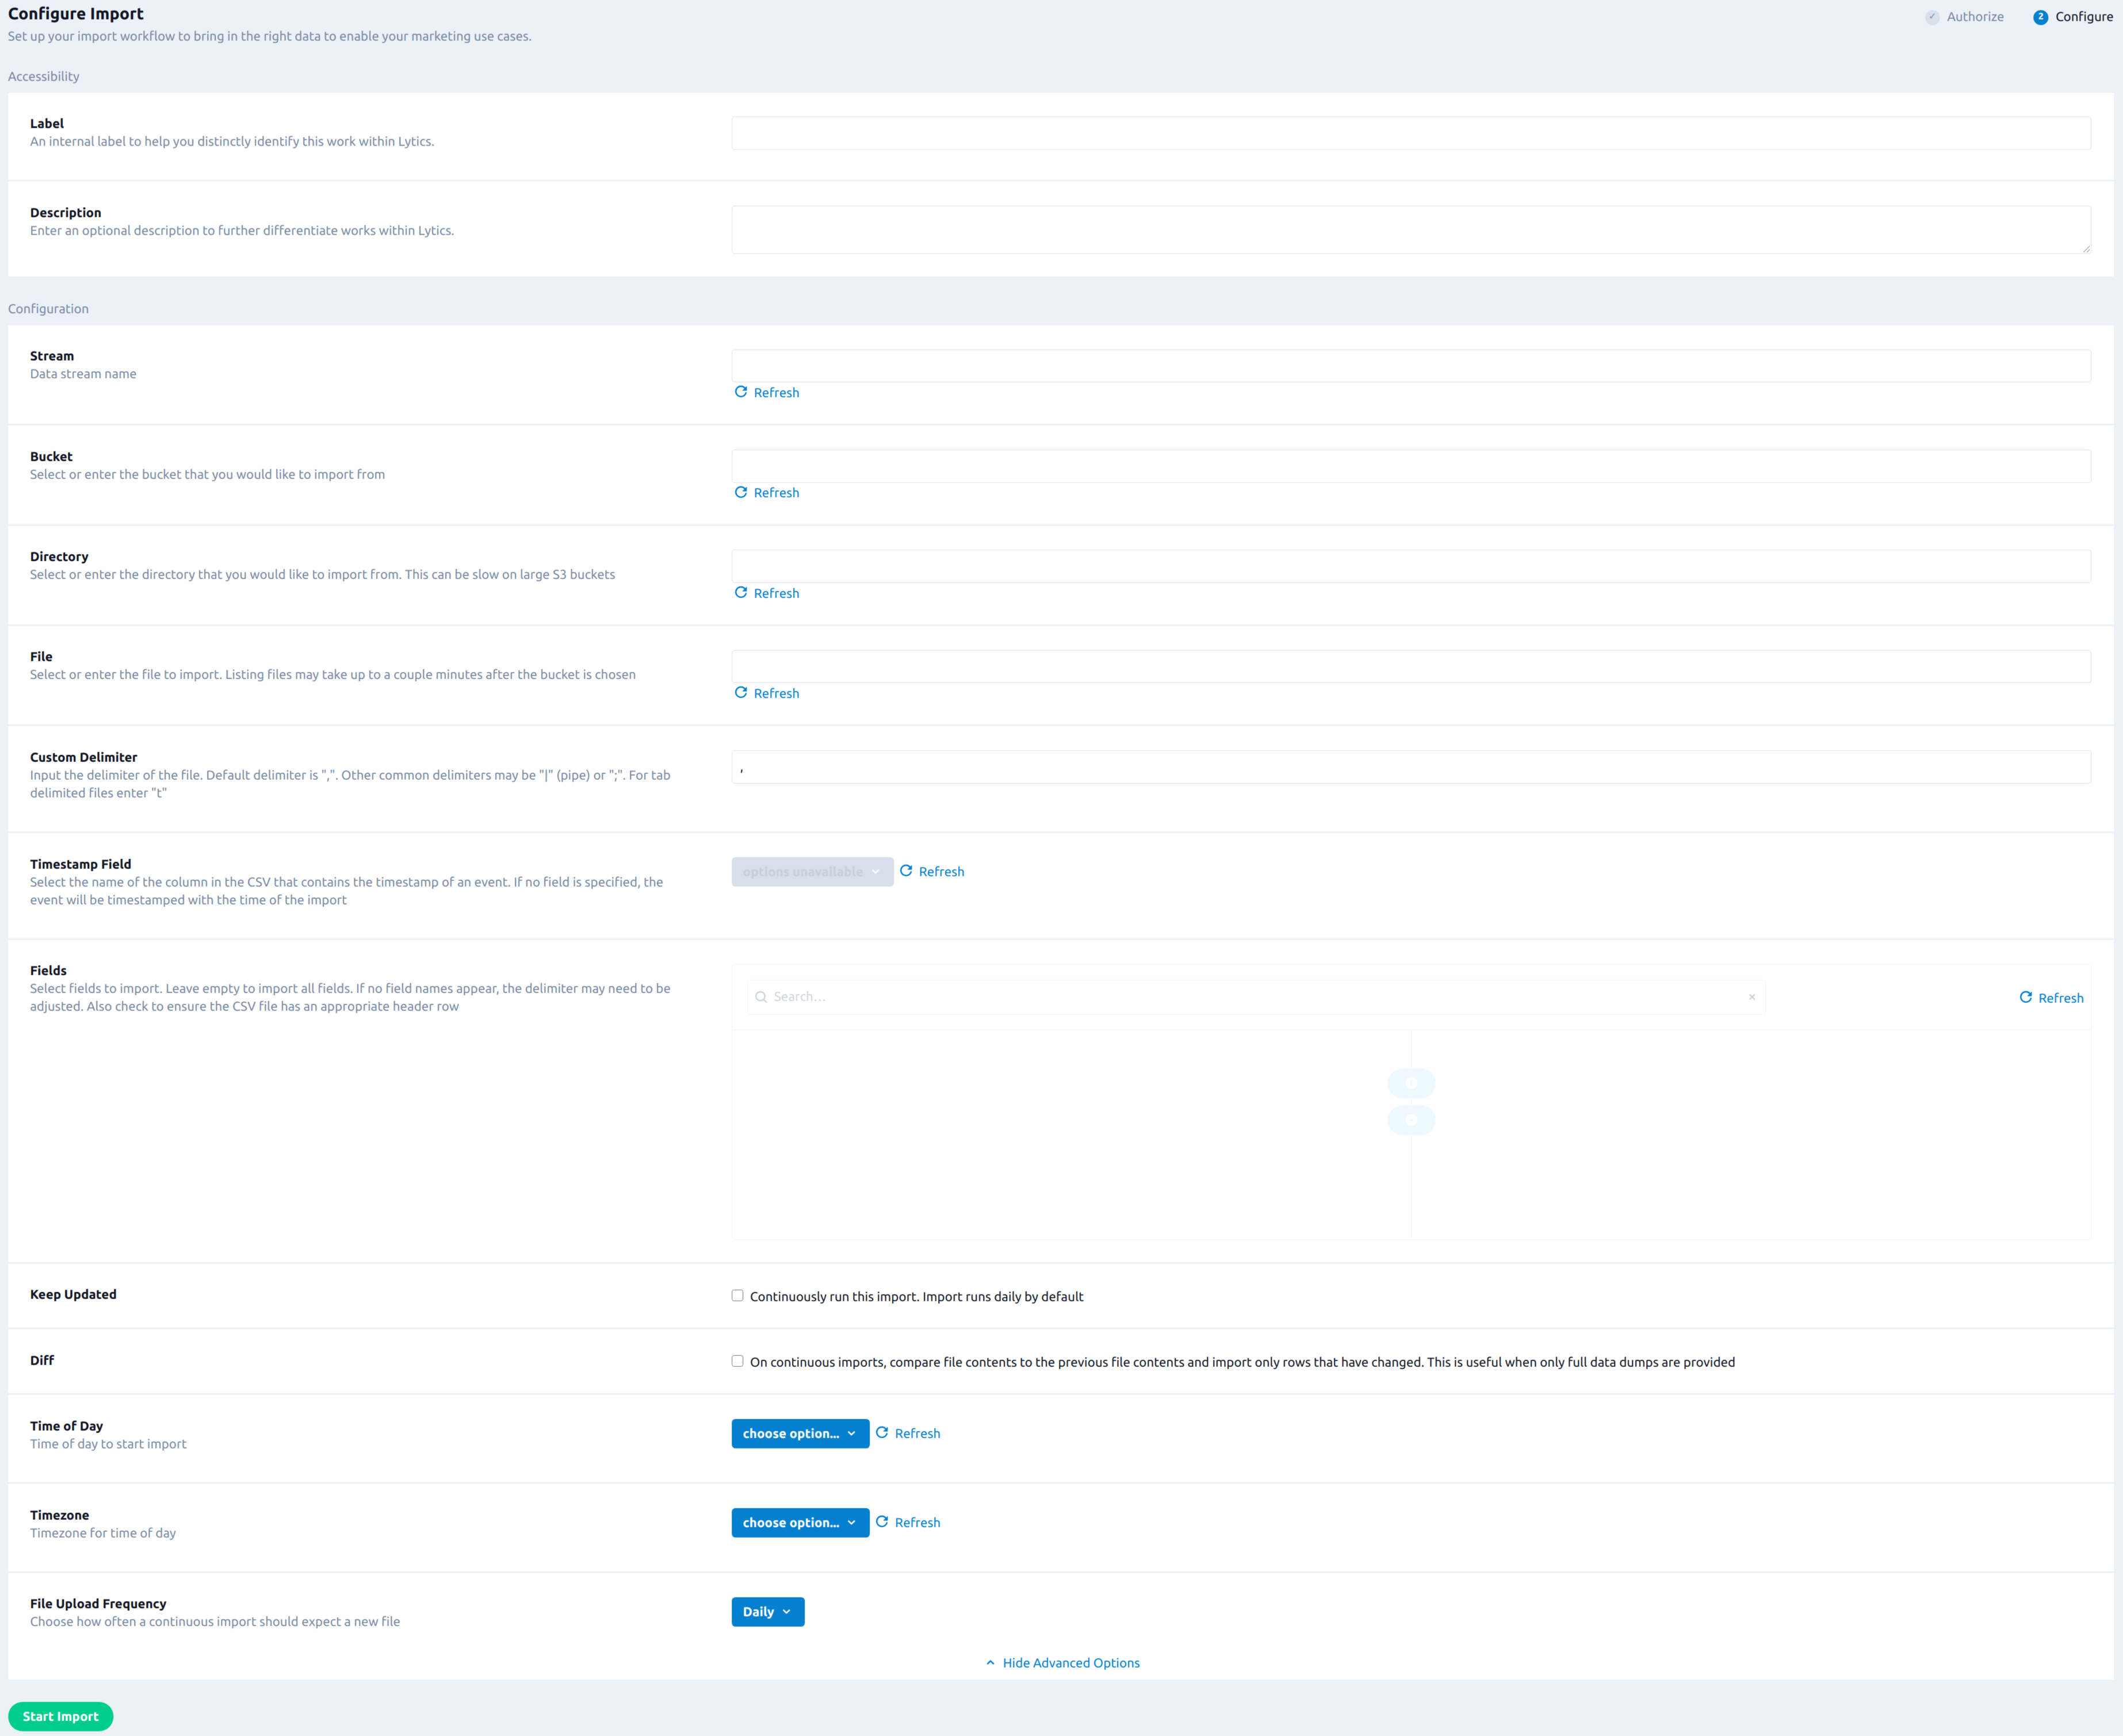
Follow these steps to set up and configure an AWS S3 CSV import job in Lytics. If you are new to creating jobs in Lytics, see the Data Sourcesdocumentation for more information.
- Select Amazon Web Services from the list of providers.
- Select the Import Audiences and Activity Data (S3) job type from the list.
- Select the Authorization you would like to use or create a new one.
- Enter a Label to identify this job you are creating in Lytics.
- (Optional) Enter a Description for further context on your job.
- From the Stream box, enter or select the data stream you want to import the file(s) into.
- From the Bucket drop-down list, select the bucket to import from. If there is an error fetching buckets, your credentials may not have permission to list buckets. You can type the Bucket Name where the CSV file is.
- (Optional) Using the Directory drop-down, select the folder where the CSV file is located. If loading the directory takes too long, you can type the folder name as well.
- From the File drop-down, select the file to import. Listing files may take up to a couple minutes after the bucket is chosen. If you have permission for some specific file, you can type in the File Name.
- (Optional) In the Custom Delimiter text field, enter the delimiter of the file. Default delimiter is a comma,
,. For tab delimited files entert. - (Optional) Using the Timestamps drop-down list, select the column in the CSV file that contains the timestamp of an event. If no fields are specified, the event will be time stamped with the time of the import.
- (Optional) Using the Fields input, select fields to import. The fields listed in the left side are available for the import. If nothing is selected, all fields will be imported. If no field names appear, check to ensure the CSV file has an appropriate header row or the delimiter may need to be changed.
- (Optional) Select the Keep Updated checkbox to run this import continuously.
- (Optional) Select the Diff checkbox to compare file contents to the previous file contents during continuous import and import only rows that have changed. This is useful when large amounts of data remain unchanged in each file.
- Click the Show Advanced Options button.
- (Optional) In the Prefix text box, enter the file name prefix. You may use regular expressions for pattern matching. The prefix must match the file name up to the timestamp. A precalculated prefix derived from the selected file will be available as a dropdown.
- (Optional) Using the Time of Day drop-down, select the time of day to start import.
- (Optional) Using the Timezone drop-down, select the timezone for the time of day you selected above.
- (Optional) Using the File Upload Frequency drop-down, select how often to check for a new file.
- Click Start Import.
Import Custom Data
Many applications let you write JSON files to Amazon S3, you can easily import this custom data to Lytics. Once imported you can leverage powerful insights on this custom data provided by Lytics data science to drive your marketing efforts.
Integration Details
- Implementation Type: Server-side Integration.
- Type: REST API Integration
- Frequency: One-time or scheduled Batch Integration which may be hourly, daily, weekly, or monthly depending on configuration.
- Resulting Data: Raw events or, if custom mapping is applied, new user profiles and/or existing profiles with new user fields.
This integration uses the Amazon S3 API to read the JSON file selected. Each run of the job will proceed as follows:
- Query for a list of objects in the bucket selected in the configuration step.
- Try to find the file selected by matching the name of the prefix.
- If found, fetch the file.
- If configured to diff the files, it will compare the file to the data imported from the previous run.
- Filter fields based on what was selected during configuration.
- Send event fields to the configured stream.
- Schedule the next run of the import if it is a scheduled batch.
Fields
Fields imported via JSON through S3 will require custom data mapping. For assistance mapping your custom data to Lytics user fields, please reach out to Lytics support.
Configuration
Follow these steps to set up and configure the S3 JSON import job in the Lytics platform. If you are new to creating jobs in Lytics, see the Data Sourcesdocumentation for more information.
- Select Amazon Web Services from the list of providers.
- Select the Import Custom Data job type from the list.
- Select the Authorization you would like to use or create a new one.
- Enter a Label to identify this job you are creating in Lytics.
- (Optional) Enter a Description for further context on your job.
- From the Stream box, enter or select the data stream you want to import the file(s) into.
- From the Bucket drop-down list, select the bucket to import from. If there is an error fetching buckets, your credentials may not have permission to list buckets, use the Bucket Name (Alt) box instead.
- (Optional) In the Bucket Name (Alt) box, enter the bucket name to read the file(s) from.
- From the File drop-down list, select the file to import. Listing files may take up to a couple minutes after the bucket is chosen.
- (Optional) From the Timestamp Field drop-down list, select the name of the column in the JSON that contains the timestamp of an event. If no field is specified, the event will be time stamped with the time of the import.
- (Optional) Select the Keep Updated checkbox to run the import on a regular basis.
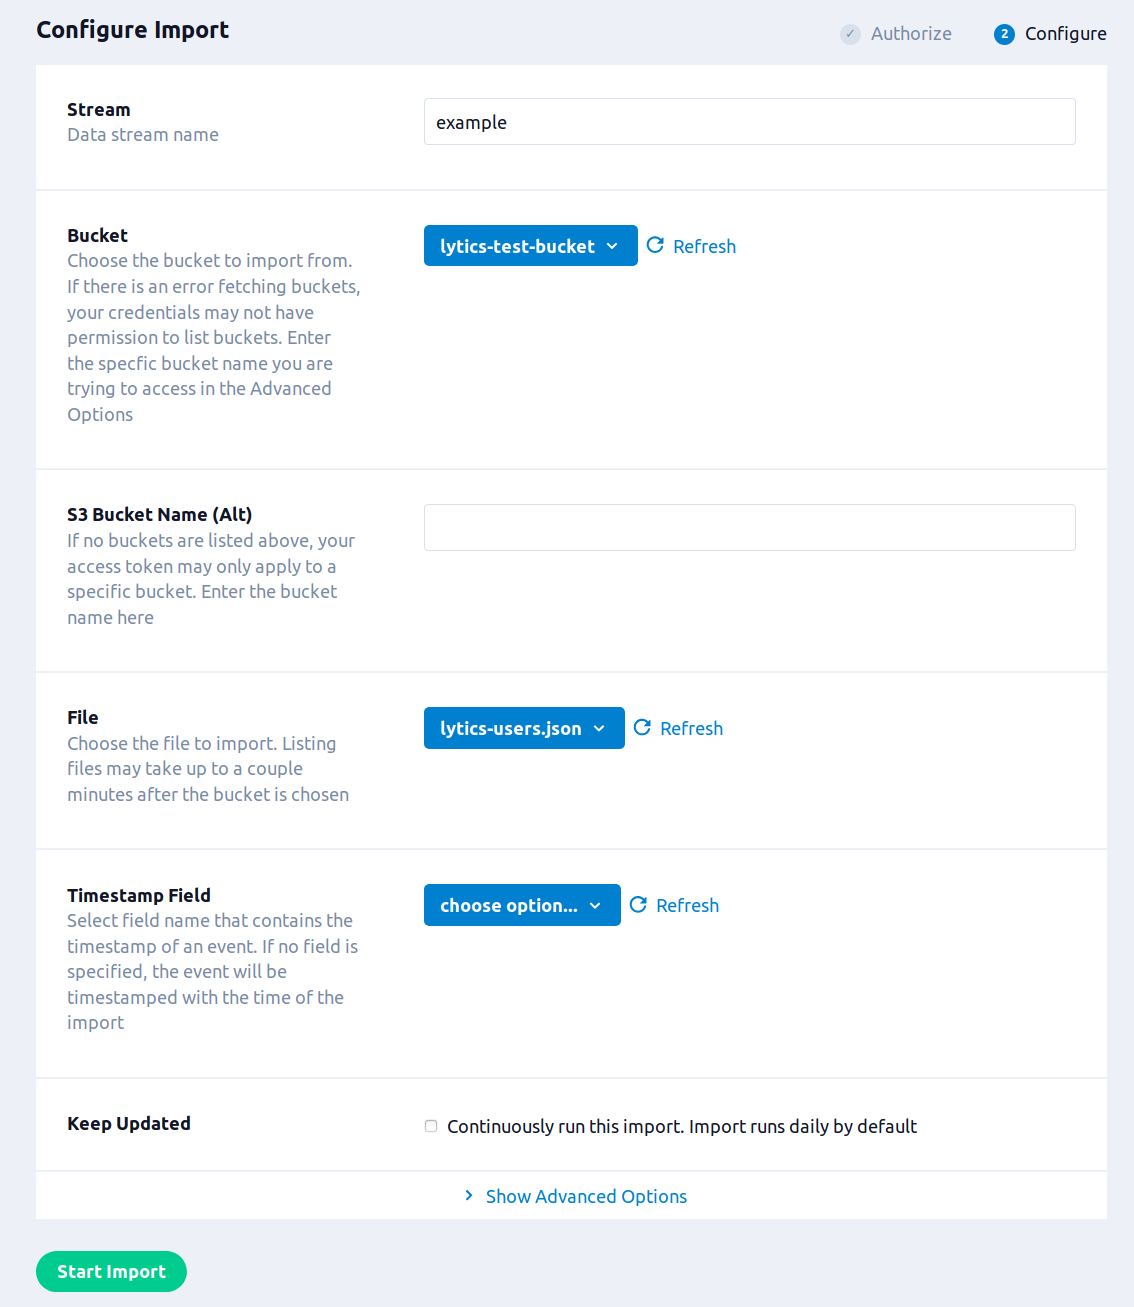
- Additional Configuration options are available by clicking on the Show Advanced Options tab.
- (Optional) In the Prefix text box, enter the file name prefix. You may use regular expressions for pattern matching. The prefix must match the file name up to the timestamp. A precalculated prefix derived from the selected file will be available as a dropdown.
- (Optional) From the Time of Day drop-down list, select the time of day for the import to be scheduled after the first import. This only applies to the daily, weekly, and monthly import frequencies. If no option is selected the import will be scheduled based on the completion time of the last import.
- (Optional) From the Timezone drop-down list, select the time zone for the Time of Day.
- (Optional) From the File Upload Frequency drop-down list, select the frequency to run the import.
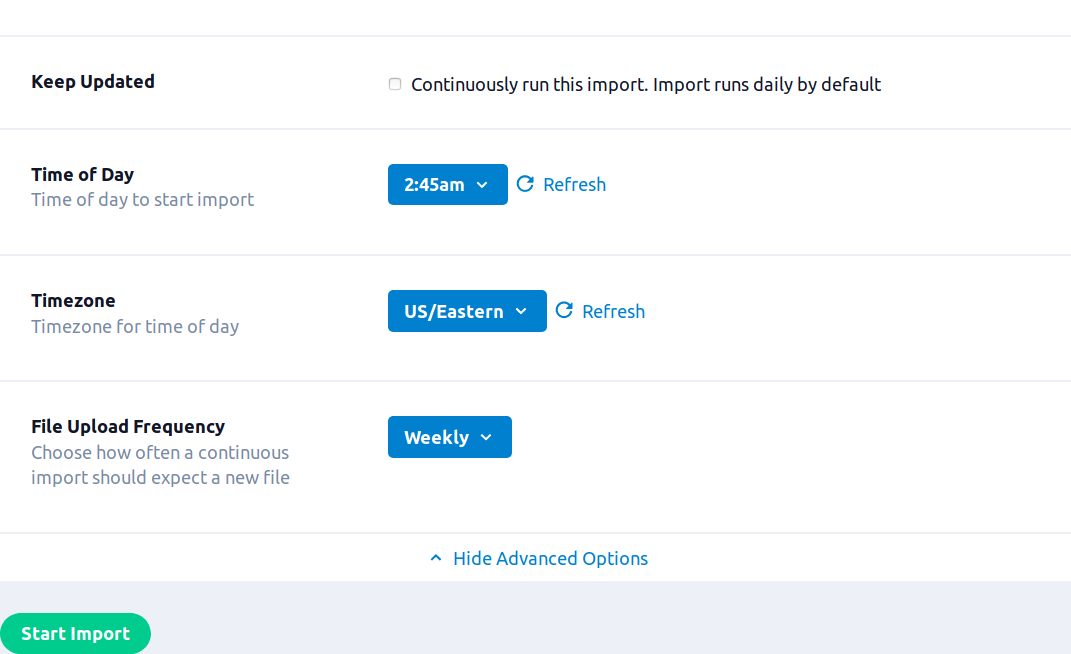
- Click Start Import.
NOTE: For continuous imports, files should be in the following format: prefix_timestamp.json. The workflow will understand the sequence of files based on the timestamp. If no next file is received, the continuous import will stop and a new export will need to be configured.
Export Audiences
A wide ecosystem of tools can read JSON or CSV files from Amazon S3. This export allows you to bring Lytics user profiles based on your identity resolution strategy into other tools or to simply store as an archive of user data.
Integration Details
- Implementation Type: Server-side Integration.
- Type: REST API Integration.
- Frequency: One-time or scheduled Batch Integration which may be hourly, daily, weekly, or monthly depending on configuration.
- Resulting Data: User profile data written to a CSV or JSON format.
This integration uses the Amazon S3 API to upload data to S3. Each run of the job will proceed as follows:
- Create file(s) with the format selected in configuration.
- Scan through the users in the audience selected. Filter user fields based on the export configuration, and write to the file(s) created.
- Compress event data, if selected in the export configuration.
- Upload the User data files to S3 via AWS S3 Manager SDK Uploader Method
Fields
The fields exported to the S3 file will depend on the Fields to Export option in the job configuration Any user field in your Lytics account may be available for export.
Configuration
Follow these steps to set up and configure an export of user profiles to S3 in the Lytics platform.
- Select Amazon Web Services from the list of providers.
- Select the Export Audiences job type from the list.
- Select the Authorization you would like to use or create a new one.
- Enter a Label to identify this job you are creating in Lytics.
- (Optional) Enter a Description for further context on your job.
- From the Audience Name drop-down list, select the Lytics audience you want to export.
- From the S3 Bucket Name drop-down list, select the bucket you wish to export to from the drop down. If you do not select an option from this drop-down you must enter a bucket in the text field below.
- (Optional) In the S3 Bucket Name (Alt) box, you can enter the name of the bucket you want to export to if it is not available in the drop-down above.
- From the Directory drop-down list, select the directory that you would like to save your files in.
- (Optional) In the Email to box,enter an email address, to recieve a link to the completed file.
- From the File Type drop-down list, select the type of file(s) you want to export.
- CSV: the file will be a flat CSV, list and map fields will be joined by
& - Multi-CSV: multiple files will be created; scalar values and non-scalar values will be in diffenent files. A separate file will be created for each non-scalar field that maps the various values to its user. Each user will be assigned a
join keythat can be used to join data accross multiple files. Thisjoin keycan is based on the BY fields of the user and can change between exports. - JSON: The users will be exported as a JSON file.
- CSV: the file will be a flat CSV, list and map fields will be joined by
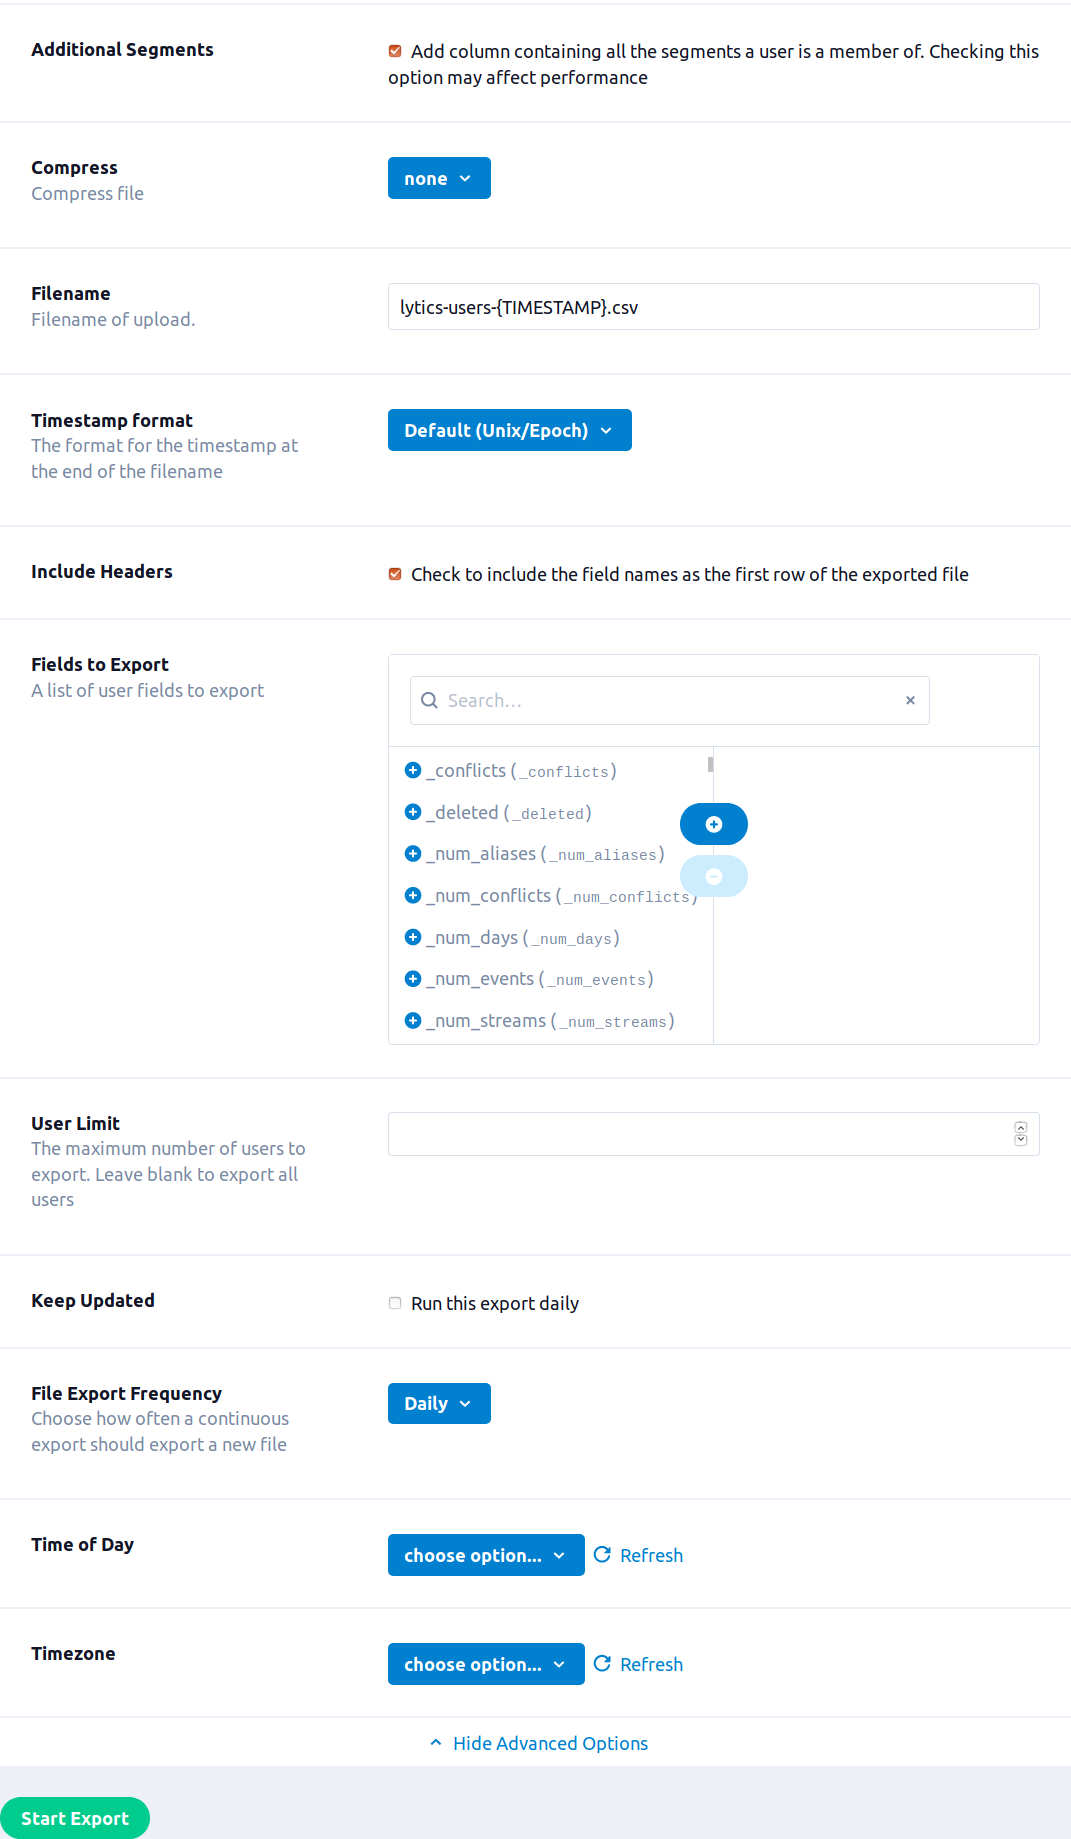
- Select the Additional Segments checkbox to add an additional field containing the full list of audiences the user is a member of. Selecting this option may extend the time it takes for the export to complete.
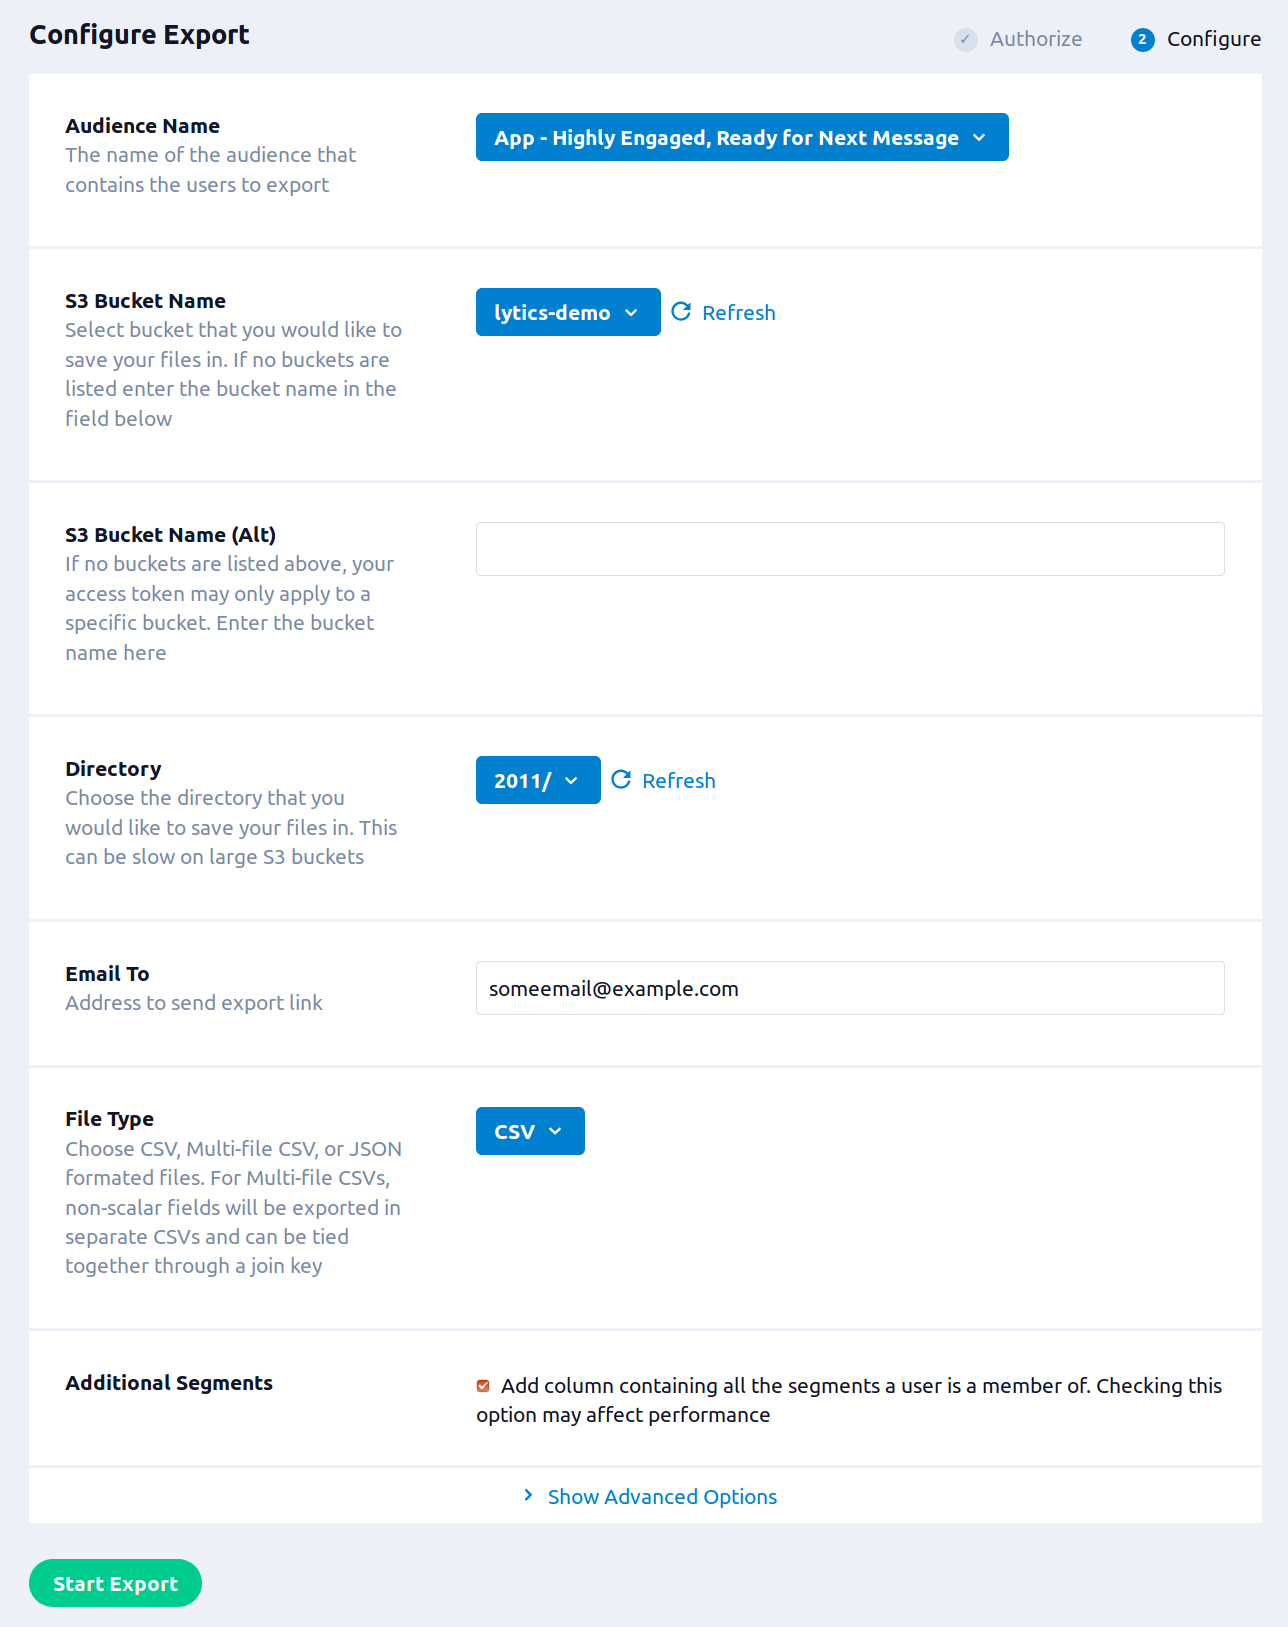
- Additional Configuration options are available by clicking on the Show Advanced Options tab.
- (Optional) From the Compress drop-down list, select a compression method for the file.
- In the Filename box, enter the name of the destination file. You can use
{TIMESTAMP}in this name, and it will be replaced with the timestamp at the time of the export. By default, the filed is exported with the namelytics-events-{TIMESTAMP}. - (Optional) From the Timestamp format drop-down list, select the format for the timestamp in the filename. MM = month, mm = minute
- Select the Include Headers checkbox to include field names as the first row of the CSV (this is selected by default).
- Use the Fields to Export input to select the user fields to include in the exported file. If left blank all fields will be included.
- In the User Limit box, enter the maximum number of users to export. If left blank all users will be exported.
- (Optional) Select the Keep Updated to run the export repeatedly.
- (Optional) From the File Export Frequency drop-down list, select the frequency to run the export, if Keep Updated is selected.
- (Optional) From the Time of Day drop-down list, select the time of day for the export work to be scheduled, if Keep Updated is selected. Note: The export will run once within a few minutes of clicking Start Export, each run after that will be started at the selected time.
- (Optional) Timezone drop-down list, select the timezone for the Time of Day.
- Click Start Export.
Export Activity Data
Export events into S3 so you can access, archive, or run analysis on Lytics events in the AWS S3 ecosystem.
Integration Details
- Implementation Type: Server-side Integration.
- Type: REST API Integration.
- Frequency: One-time or scheduled Batch Integration which may be hourly, daily, weekly, or monthly depending on configuration.
- Resulting Data: Raw events exported to a CSV file format.
This integration uses the Amazon S3 API to read the CSV file selected. Each run of the job will proceed as follows:
- Create a file with the configured file name.
- Start a multi-part upload in S3.
- Read events from the stream selected. If the export is configured to run periodically, only the events since the last run of the export will be included.
- Compress event data, if selected in the export's configuration.
- Write the event data to S3.
- Check that the upload has completed after the last event before the start of the export is written.
Fields
The fields included depend on the raw event in Lytics data. All fields in the selected stream will be included in the exported CSV.
Configuration
Follow these steps to set up and configure an export of event data to AWS S3 in the Lytics platform.
- Select Amazon Web Services from the list of providers.
- Select the Export Activity Data job type from the list.
- Select the Authorization you would like to use or create a new one.
- Enter a Label to identify this job you are creating in Lytics.
- (Optional) Enter a Description for further context on your job.
- In the S3 Bucket Name drop-down list, select the bucket you wish to export to from the drop down. If you do not select an option from this drop-down you must enter a bucket in the text field below.
- (Optional) In the S3 Bucket Name (Alt) box, you can enter the name of the bucket you want to export to if it is not available in the drop-down above.
- From the Directory drop-down list, select the directory that you would like to save your files in.
- Use the Data Streams to Export input to select data streams to export. A stream is a single source/type of data (you may choose more than one). If none are selected, all streams are exported.
- (Optional) In the Email to box,enter an email address, to recieve a link to the completed file.
- (Optional) From the Compress drop-down list, select a compression method for the file.
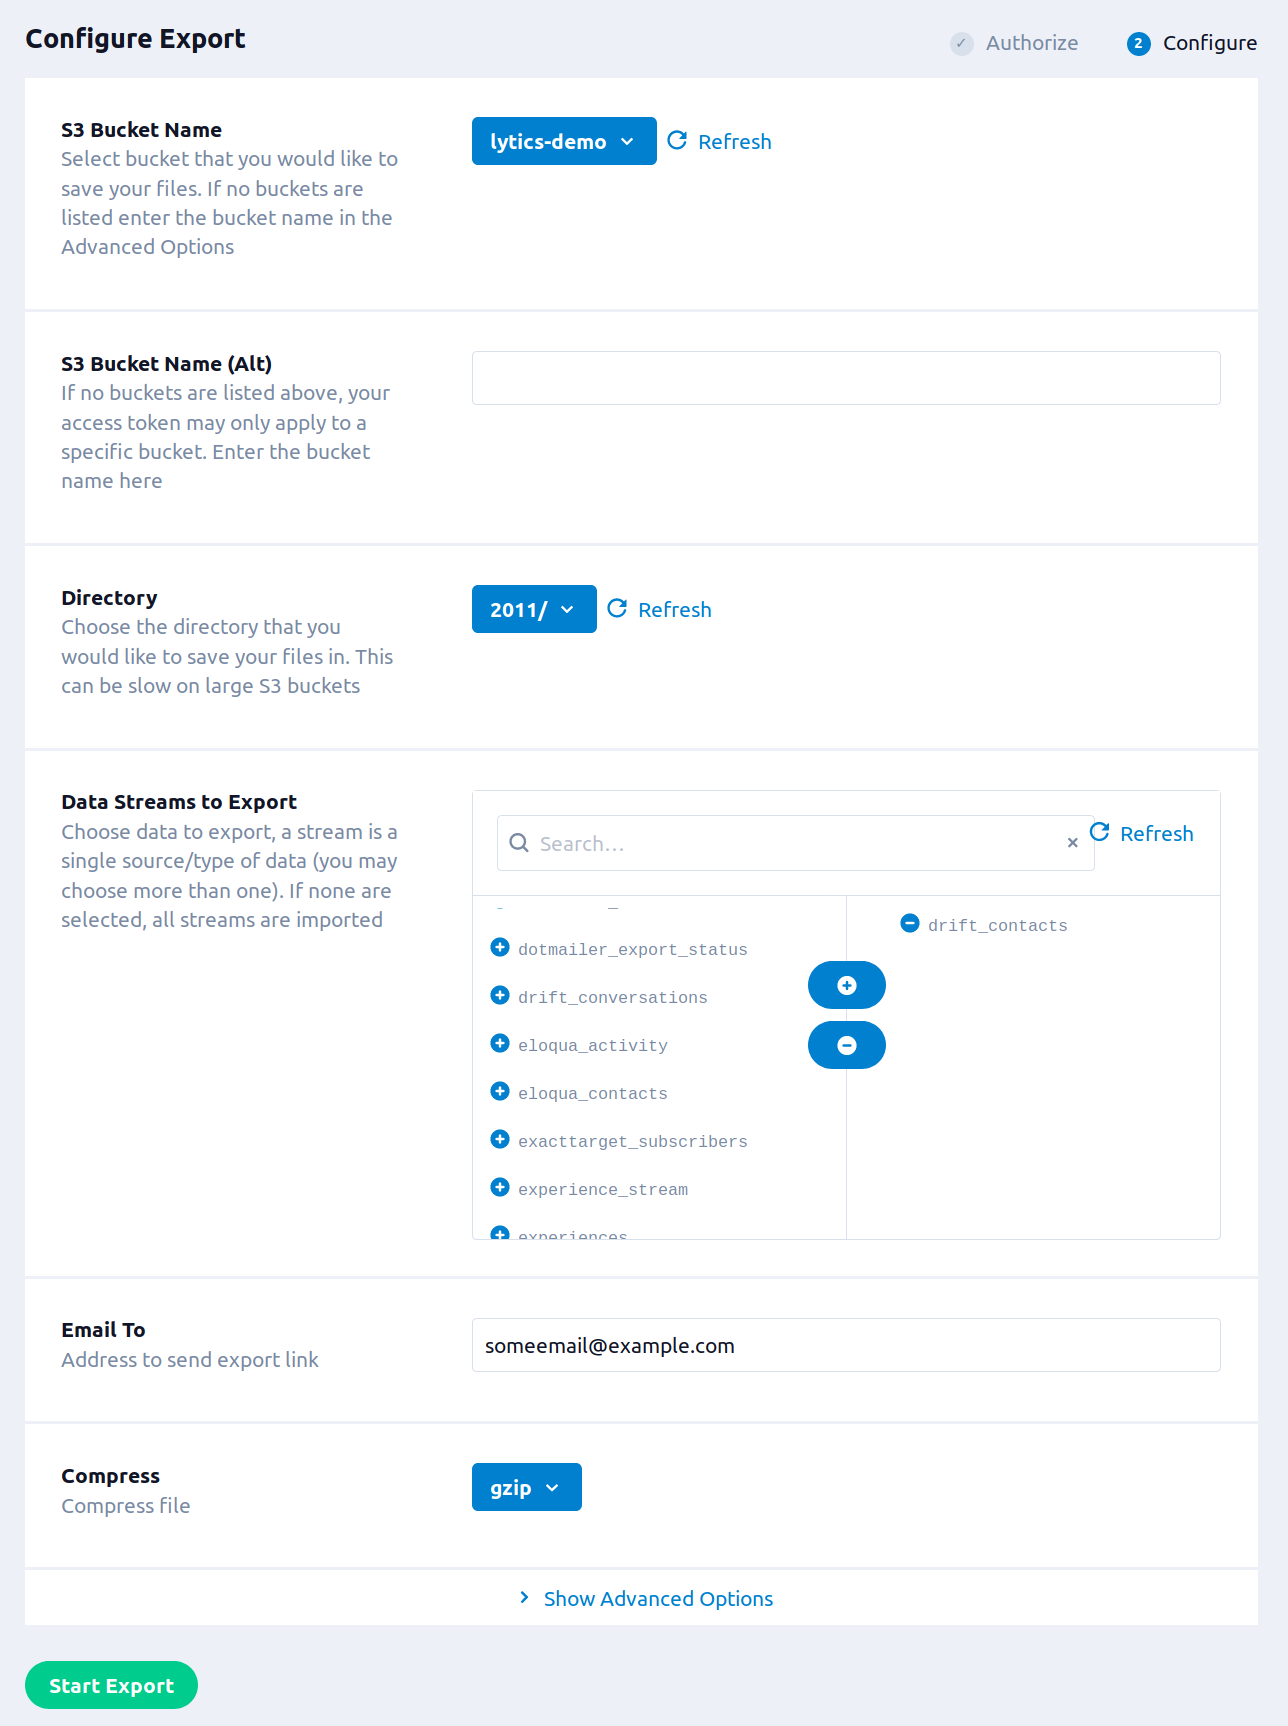
- Additional Configuration options are available by clicking on the Show Advanced Options tab.
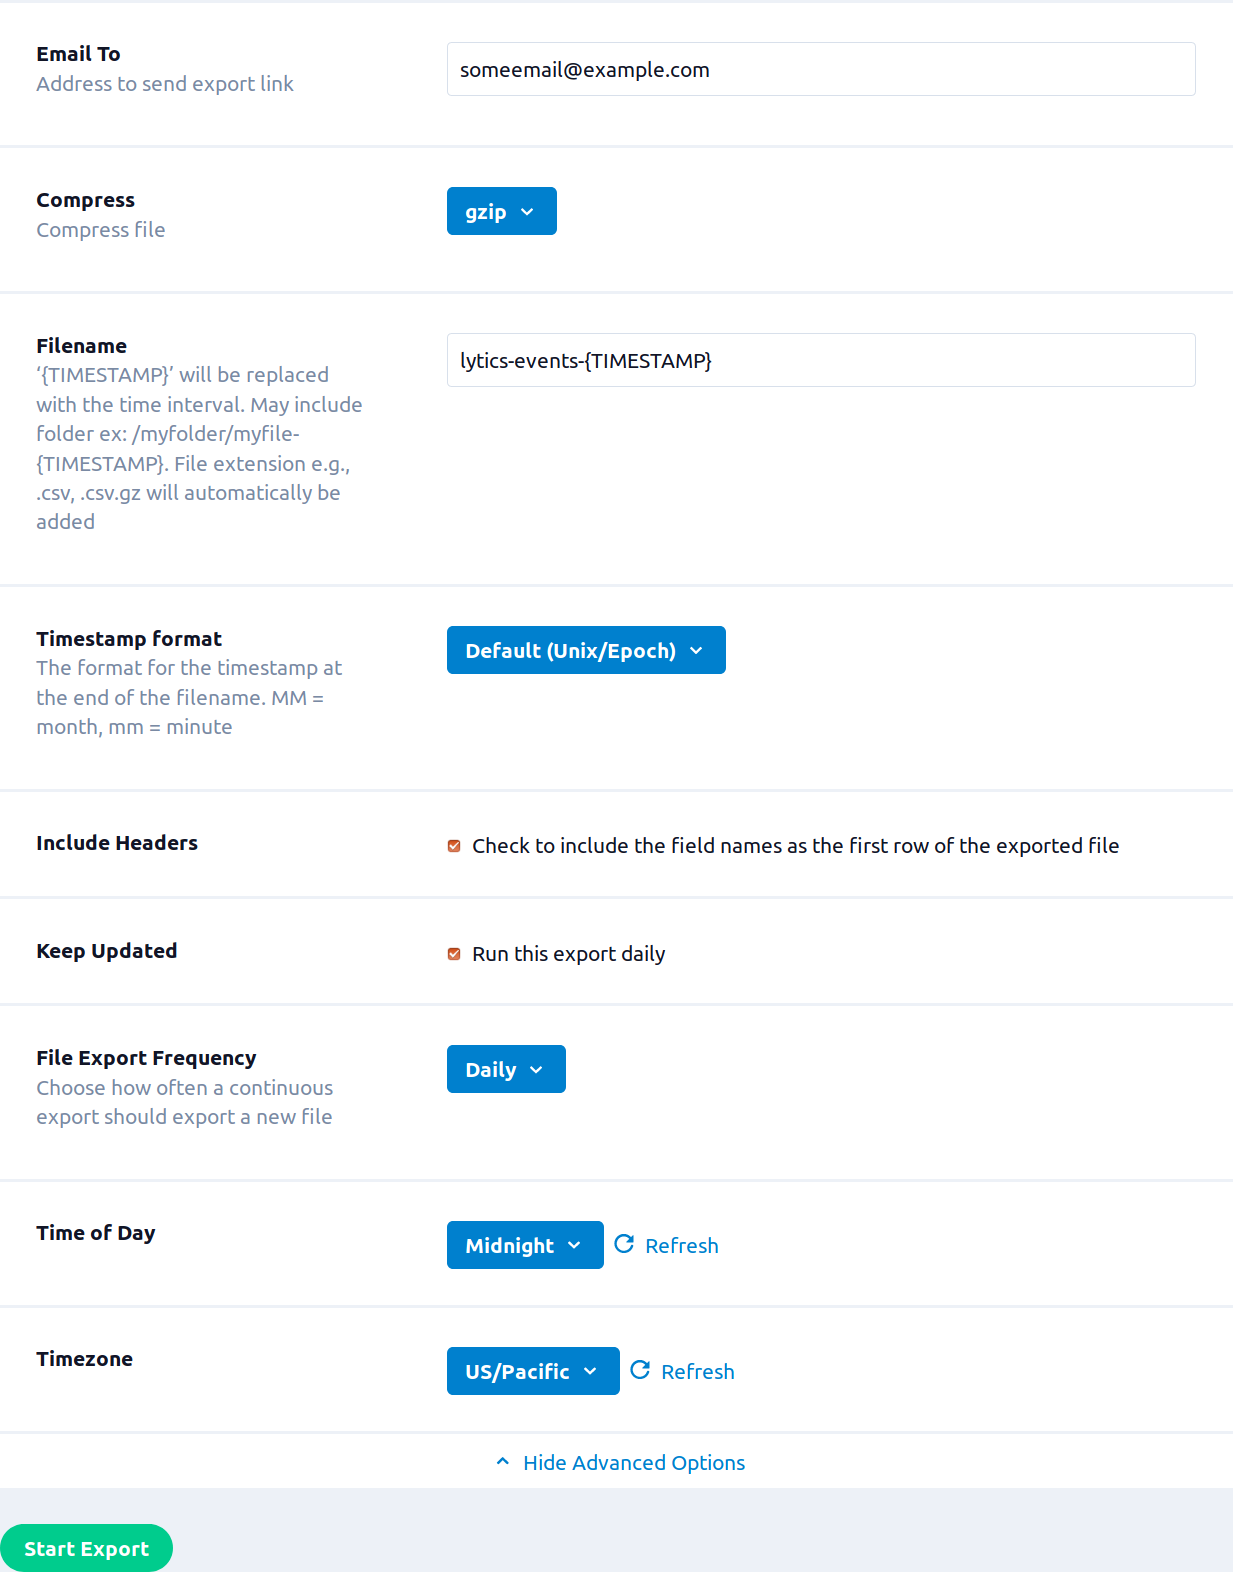
- In the Filename box, enter the name of the destination file. You can use
{TIMESTAMP}in this name, and it will be replaced with the timestamp at the time of the export. By default, the filed is exported with the namelytics-events-{TIMESTAMP}. - (Optional) From the Timestamp format drop-down list, select the format for the timestamp in the filename. MM = month, mm = minute
- Select the Include Headers checkbox to include field names as the first row of the CSV (this is selected by default).
- (Optional) Select the Keep Updated checkbox to run the export repeatedly.
- (Optional) From the File Export Frequency drop-down list, select the frequency to run the export, if Keep Updated is selected.
- (Optional) From the Time of Day drop-down list, select the time of day for the export work to be scheduled, if Keep Updated is selected. Note: The export will run once within a few minutes of clicking Start Export, each run after that will be started at the selected time.
- (Optional) Timezone drop-down list, select the timezone for the Time of Day.
- Click Start Export.
Updated 5 months ago


