JavaScript
Introduction
The Lytics JavaScript Tag commonly referred to as "JS Tag", is responsible for tracking user behavior during their site visit. This anonymous tracking is an essential input for constructing user profiles and enriching them with behavioral scores and content affinities.
In addition to tracking behavior, the Lytics JavaScript Tag is responsible for associating the current visitor with their full user profile in Lytics, known or anonymous. The subset of surfaced fields from that profile, such as Lytics Audience membership, are then available in the browser. At this point, the Lytics JavaScript Tag manages the handoff of this profile data to various web-based integrations such as Facebook Ads or Google Analytics.
The following documentation will guide you to get the most out of the Lytics platform involving your web properties.
Installation
Step 1. Install the Lytics JavaScript Tag
In most cases, installing the Lytics JavaScript Tag version 3 is as easy as copying and pasting a few lines of code to your source code or Tag Manager. Full instructions and the tag itself are available from the web app.
Verifying Your Installation
Option 1: Automated Validation
The simplest method is using the Lytics web app verification checker. Visit your tag installation instructions, and you will find an installation checker in the top right. Be sure to visit your site after installing the tag, as this checker requires data to be fully collected and may take a few minutes to verify.
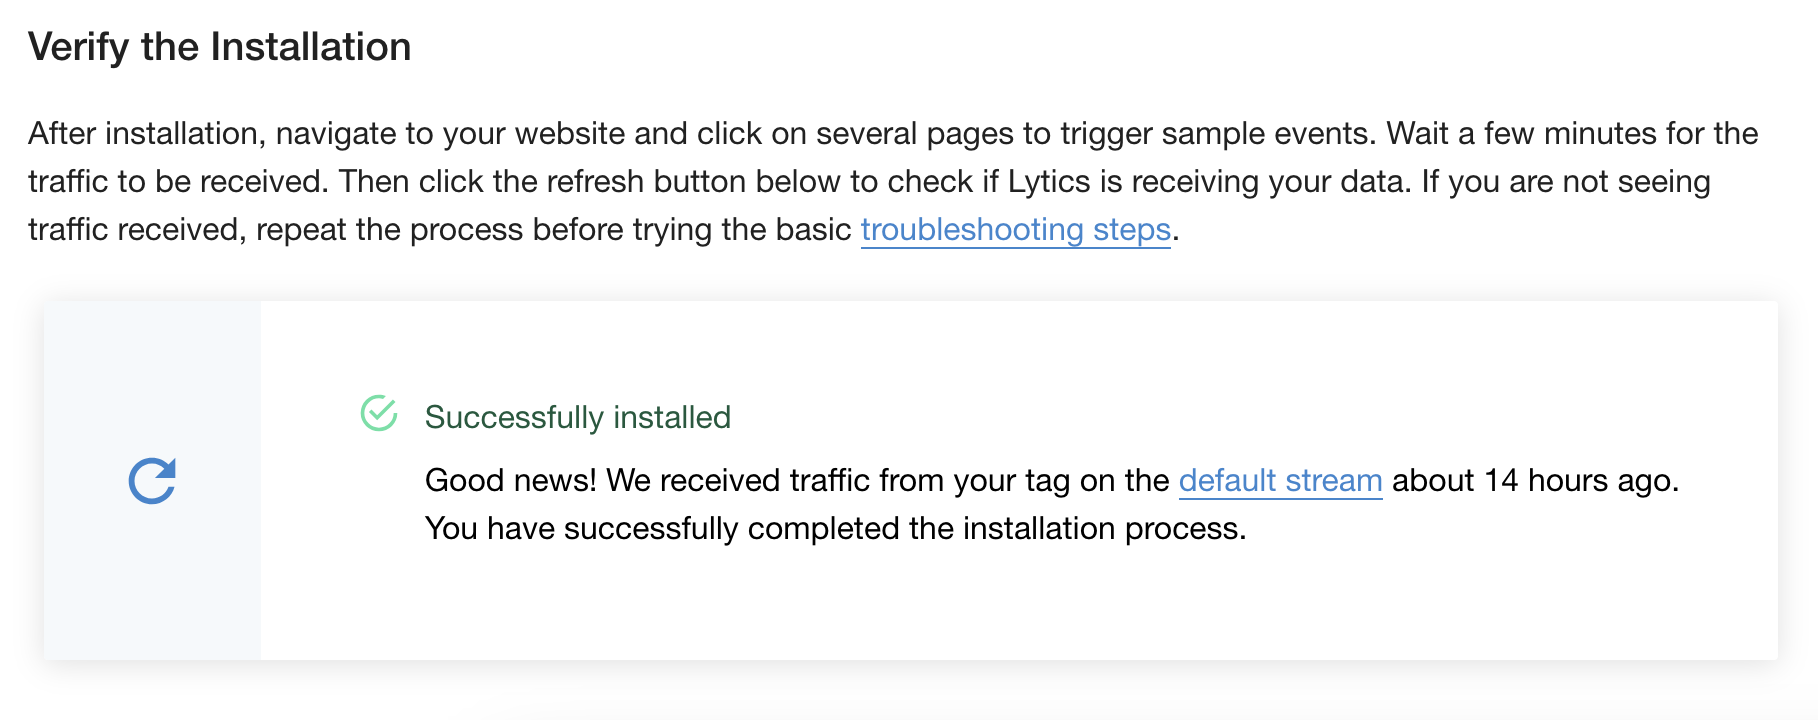
Option 2: Manual Validation
A basic check can be done using your preferred browser's JavaScript developer console. Consult your browser's documentation for access. Once you have enabled the JavaScript console, use the following command to return the installed tag version. If a version number is successfully returned, the Lytics tag has been installed correctly and has begun collecting visitor data.
jstag.config.version;
Step 2. Tracking Activity
With an instance of jstag initialized, you can easily begin collecting data about your users by firing a jstag.send() call to the SDK as demonstrated below.
jstag.send({
  event: "rescued sansa"
});
Technical Documentation
The following outlines the full definition of capabilities supported by the Lytics SDK for JavaScript.
Configuration
Version 3 comes configured out-of-the-box with coverage ready for most use cases. Various configuration options are available to support custom or in-depth use cases. Please find all available configuration options below with additional details listed after the table.
| Key | Type | Example | Description |
|---|---|---|---|
| url | string | //c.lytics.io | URL endpoint to send the collection request. |
| cid | string | {YOUR_LYTICS_CID} | Account ID which can be found in your dashboard Account Settings. |
| loadid | boolean | true | Used when identifying users across domains. |
| blocked | boolean | true | Used to get a user’s most updated audience membership and profile data before sending data to Lytics. |
| stream | string | getlytics | Name of the stream your data will be sent to. |
| sessecs | integer | 1800 | Length of time between requests necessary before starting a new session. 1800 by default. |
| qsargs | []string | ['name','status'] | An array of query parameters that should always be pulled in when collecting data. |
| serializer | string | default | Determines which serializer the JavaScript tag should use when sending data to Lytics. |
Additional details
url: The generated URL should never be changed as it will prevent your data from being sent to Lytics.cid: When using the tag generated from your Lytics account, your ID will be included and should not be altered.loadid: By default, Lytics will store a first and third-party cookie representing a user. Theloadidflag allows Lytics to use the third-party cookie if available, thus pulling cross-domain behavior into a single, unified user profile.blocked: This is set tofalseby default. Only installations highly dependent on reducing latency as much as possible should usetrue.stream: When collecting data across various domains, it is common to use a custom stream for each domain, which will require proper LQL in place to surface the collected data as user fields. Consult customer support for more details.serializer: This is set todefaultby default. During migration from v2 to v3 you may opt to use the legacy serializer which serializes data passed to Lytics in the same way as version 2 of the tag. It will ignore the "grandparent" namespace on deeply nested variable names. You should only opt to use thelegacyserializer if the data you're passing is deeply nested and you previously used v2 of the Lytics JavaScript tag.
Example
When calling jstag.init you will pass in the tag configuration. You can take advantage of the above configuration options by adding them to your configuration. For example, if you want to leverage third-party cookies to enhance your brand’s ability to resolve identities between owned properties, add loadid to the configuration.
jstag.init({
  src: ...,
  loadid: true
});
Data Collection
The Lytics JavaScript Tag makes collecting behavioral data about your website visitors easy. By installing our tag, you will automatically begin to collect page-level information such as URL, referrals, and browser data. This ultimately unlocks the power of a user’s content affinity. In addition to page-level data, custom data can be collected to expand user profiles further and support use cases.
What data is collected?
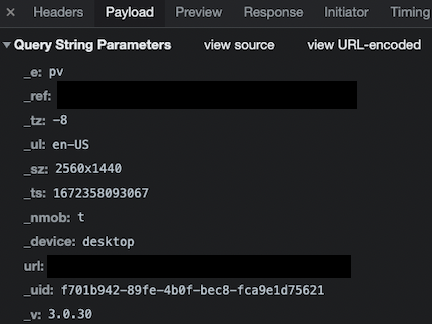
The following raw fields are included along with any collect event managed by the Lytics JavaScript Tag.
| Key | Sample Value | Description |
|---|---|---|
| _e | pv | The type of event responsible for the event emission. pv for example represents a page view |
| _ref | www.lytics.com | The referral domain. |
| _tz | -7 | An integer representation of the user's time zone. Integer represents the difference between current time and standard UTC time. PST for example would be -7 |
| _ul | en-US | The user's language as derived from the browser. |
| _sz | 2560x1440 | The size of the user's display. |
| _ts | 1504306728695 | The current time represented by milliseconds since Unix Epoch. |
| _nmob | t | If the page is being consumed on a mobile device or not. _nmob:true represents not mobile |
| _device | desktop | The users current device type. |
| url | www.getlytics.com | The URL where the data was sent from. |
| _uid | 74481.3222228897 | The users Lytics _uid or cookie ID. |
| _v | 3.0.2 | Version number of the JavaScript tag that sent the data. |
Page Views
By default, an initial page view will be captured each time the browser fully loads a new URL. This ensures that you are collecting the base behavior out-of-the-box. Alternatively, you can capture a page view manually at any point during a session by calling the pageView method.
jstag.pageView();Events
In addition to page views, the Lytics Tag makes collecting arbitrary custom events easy. This is useful regarding user actions such as clicks, form submissions, purchases, etc. Regardless of the reason for collecting, the send method can be leveraged to pass any valid JavaScript object to Lytics.
jstag.send({name:"Jon"});In the above example we are simply passing the key of name to Lytics with a value of Jon to the default data stream. Of course, this is a basic example and something more realistic might be represented by the following examples.
Example User Data
jstag.send({
  userid: "1234",
  facebook_id: "abc123",
  twitter_id: "def123",
  linkedin_id: "hij123",
  email: "[email protected]",
  name: "Jon Snow",
  first_name: "Jon",
  last_name: "Snow",
  title: "King in the North",
  company: "House Stark",
  phone: "555-555-5555",
  cell: "555-555-5555",
  age: 21,
  gender: "m",
  city: "Winterfell",
  state: "Westeros",
  country: "IE",
  zip: "55555",
  origin: "organic",
  status: "known"
});
Example Conversion Data
jstag.send({
  event: "conversion",
  campaign_id: "someconversionid",
  variation_id: "somevariationid",
  currency: "USD",
  value: 25.99
});
Example Event Data
jstag.send({
  event: "rescued sansa"
});
Advanced Options
In addition to a JavaScript object payload, all Lytics JavaScript Tag collection methods accept three optional parameters. These should only be implemented by advanced users who fully understand the implications of using custom streams within Lytics or require feedback on asynchronous actions.
| Option | Type | Description | Example |
|---|---|---|---|
| STREAM | string | The name of the stream collected data should be sent to. | jstag.send('mystream'); |
| PAYLOAD | object | The JavaScript object you want to send to Lytics. | jstag.send({name:'Jon', state:'Westeros'}) |
| CALLBACK | function | The JavaScript function to be called once collect completes. | jstag.send('mystream', {name:'Jon'}, function(r){console.log(r);}) |
jstag.send(STREAM, PAYLOAD, CALLBACK);
jstag.pageView(STREAM, PAYLOAD, CALLBACK);
Accessing Visitor Profiles
In addition to collecting behavioral data related to a user's visit, the Lytics JavaScript Tag can also be configured to deliver real-time profile information back to the browser. By default, Lytics only returns the current audiences the visitor is a member of. However, by surfacing user fields, additional data from the visitor’s profile can be returned. Listed below are the core methods available for understanding your website visitors.
Please ensure you have access to an experienced JavaScript developer. Though most installations are straightforward, Lytics support may not be able to make recommendations or provide troubleshooting assistance as we do not have domain knowledge or access to your web property's unique source code.
Lytics Anonymous ID
Each time the Lytics JavaScript Tag is loaded, it will attempt to identify the visitor. This is done through a variety of means, the first of which is the first party _uid cookie. A unique identifier is generated and stored in the browser. This _uid is then included as part of the outbound payload in all collect methods from the JavaScript Tag aiding in identity resolution. In some cases, a developer must access or manipulate this ID. In those cases, there are two methods available.
_uid is an advanced feature and can significantly impact how your profiles are compiled. Use at your own risk.Get current ID
Because getting the unique identifier can be an asynchronous process, you must pass a callback function with the request. Upon completing the lookup, this callback function will be called and passed an attribute that represents the visitor’s unique identifier.
jstag.getid(function(id){
    // do something with the id here
    console.log(id);
});
Set ID to a custom value
jstag.setid('mynewvalue');User Attributes & Audience Membership
Because loading of the current user's profile is done in real-time, a request to our profile API is required. This request is handled asynchronously as to never negatively impact your web properties. As such, it is recommended that access to this profile is always handled through our callback. This ensures you receive the expected result and do not run the risk of race conditions or other browser issues related to asynchronous requests. For use cases that can't support an asynchronous call, please see audiences cached in local storage below for an alternative option.
Initializing callbacks
To initialize a callback simply add a listener on the entityReady function:
<script type="text/javascript">
    var myCallbackFunction = function(profile){
        // do something here with the profile
        console.log(profile.data); // log full data object
        console.log(profile.data.user.segments); // log array of audiences the visitor is a member of
    }

    jstag.call('entityReady', myCallbackFunction); // register the listener
</script>
Response handling
Once the profile has been loaded, your callback function will be called and passed a data object. By default, this data object will only contain the audiences the visitor is a member of and have also been enabled for API access. In addition to audience membership, any surfaced user fields will also be available on the object.
{
  "email": "[email protected]",
  "segments": [
    "all",
    "employees",
    "known_users"
  ]
}
{
    "data": {
        "user": {
            "email": "[email protected]",
            "segments": [
                "all",
                "employees",
                "known_users"
            ]
        },
        "experiences": [{
            "experience_id": "f53e136b35c498ac944b56a0658ab672",
            "experience_slug": "sample_2",
            "priority": {
                "campaign": -1,
                "stage": -1,
                "experience": -1
            },
            "aggression": 0,
            "provider_id": "93058311a5dc432323114466d0f5ac3c",
            "provider_slug": "custom",
            "attributes": ["universal_experience"],
            "stage_conversion_id": "",
            "ancestors": [],
            "recommendation_collection_id": "",
            "conversion_rate": 0,
            "tags": [],
            "decision_segment_id": "a03333377b6e563363f97dcddb77306d",
            "target_segment_id": "5207e1bb073323117953cfae6fc98298"
        }, {
            "experience_id": "6bca1598ffebf92fcf4e1a44b33a1444",
            "experience_slug": "welcome_email_with_content_recommendations",
            "priority": {
                "campaign": -1,
                "stage": -1,
                "experience": -1
            },
            "aggression": 1,
            "provider_id": "4dd4a2b6e5ebb85688d4b561afe830a2",
            "provider_slug": "sendgrid",
            "attributes": ["transactional"],
            "stage_conversion_id": "",
            "ancestors": [],
            "recommendation_collection_id": "",
            "conversion_rate": 0,
            "tags": [],
            "decision_segment_id": "abc6397b1e2688d772b1fdaf1518b5cf",
            "target_segment_id": "1545437f6a57174ade05dde8fd3abfbd"
        }],
        "errors": null
    }
}
In the example above the three audiences in the segments array have been enabled for API access and the email user field has been explicitly surfaced for the account.
Audiences cached in local storage
By default, Version 3 of the Lytics JS Tag caches the visitor's audience membership in local storage instead of a cookie. A forthcoming integration has been planned to support writing a cookie as well to facilitate some edge use cases but in the case of zero latency needs, local storage represents a better, more scalable storage solution for this type of data. In order to access the cached values on page load before the Lytics JavaScript tag has loaded the profile, you might implement something like:
try {
  var audiences = JSON.parse(localStorage.lytics_segments);
} catch (error) {
  // do something here other than log to handle the parse error
  console.error(error);
}

console.log(audiences);
Custom User Identifier
In some cases it is desired to use an identifier different than the Lytics cookie, for example userid for a logged in user. This configuration option is available by defining byFieldKey and byFieldValue on the entity key of the core Lytics JavaScript Tag configuration.
{
    entity: {
        byFieldKey: 'FIELDNAME',
        byFieldValue: 'FIELDVALUE,
    }
}
Single Page Apps
Some web properties will be built as Single Page Apps (SPA). SPAs should always be configured and managed by an experienced developer. They represent a series of unique behaviors, many unique to particular frameworks, that can impact how the Lytics JavaScript Tag needs to be configured to support the desired use cases.
Version 3 of the Lytics JavaScript Tag has been built with SPAs in mind, along with other significant improvements. For most SPAs, there are two important things to consider as routes change:
- What represents the view of a new
page. - When should the visitor’s profile be reloaded or web-based integrations such as Facebook be updated.
Each of these actions are handled independently with two simple commands.
<script type="text/javascript">
	// optional custom function for receiving the full entity each time it is loaded
	var doSomethingWithProfile = function(p){
		console.log(p.data); // log full data object
	}

	// the following function represents a fake router for a SPA framework
	var onRouteChange = function() {
		// track a pageview
		jstag.pageView();

		// if you are running lytics web campaigns you'll need to clear the current state
		jstag.config.pathfora.publish.candidates = {
			experiences: [],
			variations: [],
			legacyABTests: []
		};
		window._pfacfg = {};
		window.pathfora.clearAll();

		// re-fetch the profile and trigger configured campaigns
		jstag.loadEntity(doSomethingWithProfile); // refreshes the user profile and all configured integrations
	}
</script>
Hosting the Lytics JavaScript Tag
While it's possible to download and examine the core Lytics JavaScript Tag (JS Tag) source files (latest.js, latest.min.js or lio.js), storing or serving these file(s) locally or from another domain is not recommended. Referencing the Lytics JS Tag files from Lytics' servers (i.e., <https://c.lytics.io/api/tag/someid/latest.js>) ensures that you get access to new features and product updates as they become available, giving you the most reliable collection and delivery of your data.
That said, in some extreme cases it may be a requirement to serve all JavaScript files from your own secure environment. In these cases, we've created this document to outline the benefits, drawbacks, and a suggested approach.
What are the benefits?
- Compliance with rigid security requirements.
What are the drawbacks?
- Voids previously agreed upon Service-level agreements (SLAs) and support agreements due to the introduction of new and non-Lytics controlled infrastructure.
- Feature enhancements and bug fixes are made frequently to the Lytics JS Tag. Those that host their tag outside of Lytics will need to manually update the source to benefit from said improvements.
- Leveraging client-side integrations will require manual configuration while having limited support from the Lytics team.
- Additional Services hours or agreement to assist with initial installation and setup issues.
- Many account settings will no longer function as designed since configurations are not able to be updated dynamically.
- The core Lytics JS Tag endpoint has various levels of caching and protections to ensure it is always served no matter load or conditions. By hosting outside of the Lytics architecture, all caching and scalability concerns must be managed by the customer.
Given these benefits and drawbacks, if your organization still wants to proceed with hosting the Lytics JS Tag, see the following steps to get started.
Where should I start?
Before you begin, ensure you are installing version 3 of the Lytics JS Tag. Version 2 can't be hosted outside of Lytics, which means you will be restricted to version 3 of the tag.
Getting up and running with a hosted version of the Lytics JS Tag comes down to three main steps:
-
Accessing the source code and default configuration.
Navigating to the source code is relatively simple. The URL can be found by visiting the Tag Installation section of the Lytics app. The tag sample on that page will include ajstag.initfunction. One line below that you will see asrcdefinition and a URL that looks something like//c.lytics.io/api/tag/.... Copying and pasting that URL into a new browser window will result in the core JavaScript tag to be loaded. Most browsers will allow you to File -> Save the source from this point to your local machine. -
Hosting the source code and default configuration.
The output file that was created above will need to be hosted on a public server within your infrastructure. Unfortunately, there is little to no guidance Lytics can offer here other than to be sure the hosting solution can handle the necessary load generated by your web asset(s). -
Initializing the tag.
Return to the Tag Installation section and copy and paste the entire script tag as you normally would. ThesrcURL in theinitconfig will need to be updated with the URL of your now hosted JavaScript tag. You'll likely end up with something like this:
jstag.init({
  src: '//mycompany.com/assets/tag/lytics.latest.min.js'
});
Once your tag has been hosted and initialized properly, we recommend you complete the verification steps to ensure everything has been installed and is working properly.
Subresource Integrity
Working with Tag Managers
Tag Managers make it easier to work with vendor JavaScript (JS) tags like Lytics for large, dynamic web assets. Lytics can be integrated through virtually every Tag Manager on the market today. Because each Tag Manager is different, the level of integration and development lift can vary so please consult the documentation for your preferred Tag Manager for specific details.
That being said, installation of the Lytics JS Tag is generally as simple as copying and pasting the snippet of code from the installation instructions in the Lytics app to a container within your Tag Manager, and then publishing to your live instance from there.
Installing using Google Tag Manager
Google Tag Manager (GTM) is recommended as a flexible and transparent Tag Manager. Follow the steps below to install the Lytics JS Tag using GTM.
- Log into your GTM account.
- Click New Tag and then Tag Configuration.
- Under the Custom header, select Custom HTML.
- Copy the Lytics JS Tag snippet and paste it here.
- Name it
Lytics JavaScript Tag. - In the Triggering section, select All Pages.
- Click Save.
- Publish the container by clicking Submit.
- Navigate to your website and click on several pages to trigger sample event. Wait a few minutes for the traffic to be received.
- Check the Tag Installation Status at the top right of the installation page.
- If you are not seeing traffic received, try repeating steps 9-10 before trying the basic troubleshooting steps.
API Reference
The Lytics JavaScript library uses two primary APIs:
- The data upload handles the collection for all
jstag.send()calls. - The personalization API retrieves the user's profile and powers onsite personalization and client-side integrations such as Facebook.
Troubleshooting
There are a few steps to ensure the Lytics JavaScript (JS) Tag is properly installed and receives data from your website.
Is the tag loaded?
The core JavaScript tag has a helper method that will return true if all Lytics resources have been loaded properly. Open the console in Chrome Developer tools then copy and paste the following to verify that the tag has finished loaded.
jstag.isLoadedIs data being sent to Lytics? What data? Why?
The Lytics Jstag sends data to Lytics after every page view or on a custom trigger configured by the client. Those "sends" are captured in the network tab in developer tools. When the data is sent, how it is sent, and if it was sent successfully are all stored within the network call metadata.
To start select the network tab and filter on"lytics.io". Once the list is populated, select a line that us structured like the one highlighted below:
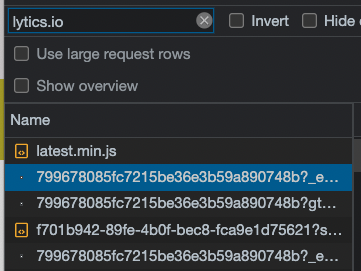
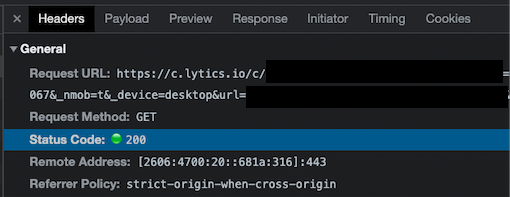
The request URL can be found at the top of the "Header" section. This url indicates that data is being sent to Lytics via the /c endpoint.
The actual attributes that were sent to Lytics can be seen in the "Payload" section as seen below:
Testing
To test the sending method there is also the jstag.send() function from the console and that will send a single payload to the account configured as the cid in the initialization of the tag. Please see the example below for syntax:

The network call should then show an event sending to Lytics:

_Finally, validate the event made it to Lytics by verifying the event has come in the UI via the stream/pipeline:
Is my visitor's profile being retrieved correctly?
The Lytics Jstag will use the /personalize endpoint to retrieve the entity on every pageview. This ensures that the most relevant information is considered when deciding what the consumer experience should be while they are navigating the webpage.
To start select the network tab and filter on"lytics.io". Once the list is populated select a line that us structured like the one highlighted below:
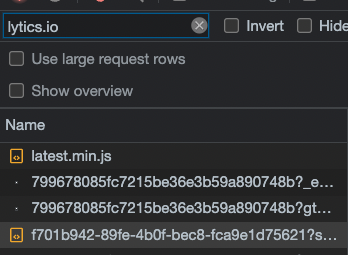
The request URL can be found at the top of the "Header" section. This url indicates that data is being retrieved from Lytics via the /personalize endpoint.

Additionally the preview tab, as seen below, can be very useful in understanding what information has been pulled in to update the consumers profile client side.

What sort of data is being stored client side? How is this controlled?
Several types of consumer data are stored client side:
- Consumer Attributes
- Consumer behavior
Consumer attributes will be actual data from the profile like first_name, last_name etc... This information is stored on the entity itself and can be accessed for personalization. The Lytics user has full control over what attributes appear client side.
_In this example _uids has been allow listed in the account settings to surface client side.
_Account Setting:

Console in Dev Tools:
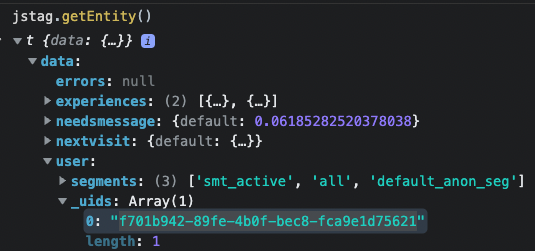
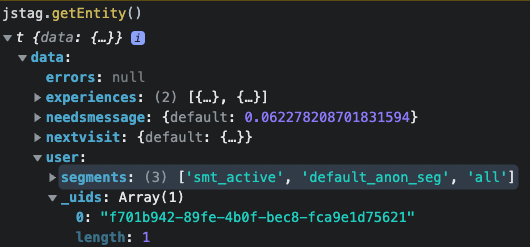
Consumer behaviors expose the different audiences a consumer is currently in and current experiences/campaigns they qualify for.
Both of these behaviors can be found in the payload returned when calling jstag.getEntity in the console as seen below:
Experiences

Audiences
How can I verify that the correct audiences are being returned?
You can see the audiences the current user is a member of using the following in your Chrome developer console:
jstag.getSegments();This callback will return a list of audiences the user is a member of and should only be called after the user profile has loaded.
Best Practices
If you're trying to test a use case that requires a certain audience membership in the browser, follow these general tips in order to create a proper testing environment and not run into merge conflicts and false positives:
-
Always use incognito mode. An incognito window removes all cookies, caches, etc. ensuring you have no history with the site and that no email addresses share a cookie. The entirety of a test session must take place in the same incognito window so that all actions tie to the same profiles. All incognito windows must be closed between testing sessions to clear all cookies. Google provides instructions for opening an incognito window.
-
Document your testing path. Keep a testing doc that reflects the date and time of when you tested, the link of the Lytics audience you are testing, along with results and screenshots. This will assist Lytics support in tracking and debugging any issues.
Known User Audiences
If you are testing audiences that tie email and cookie actions together, you will need to perform a merge event which ties the web cookie and email together, keep the following in mind:
-
Use a test email only once, and then expire it after that. As mentioned above, document and log everything including which email address was used for each test. Google allows you to use punctuation in email addresses, while still sending to the same account. For example:
[email protected]and[email protected]will both be delivered to the same inbox, however, Lytics will create separate profiles for each. This will cut down on how many emails you have to create. -
Ensure that a merge event occurs. This will tie the incognito session cookie with your test email. Here are a few examples of how you may achieve this:
- Fill out a form that sends an email address over to Lytics via
jstag.send(). - Open a link from an email with the email pixel embedded in an incognito window by right-clicking the link and selecting Open link in incognito window .
- Make an API call that will force-append an email to your cookie.
- Fill out a form that sends an email address over to Lytics via
Anonymous User Audiences
Anonymous user audiences consist of audiences containing anonymous users. When testing audiences that rely on the Lytics web cookie ID:
- Find the cookie ID for your anonymous web session. You can use Google Chrome developer tools to get the cookie for your current user.
- On the tagged website, right click and select Inspect
- Select the Console tab
- Enter
jstag.getid(id => console.log(id));to get your cookie/seerid
This will allow you to search for it in the Find a User feature of the Lytics dashboard.
Why aren't my numbers lining up?
If you're troubleshooting numbers such as user counts within Lytics, check out this FAQ on why your numbers may differ and our acceptable margin of error described below.
Acceptable Margins of Error
It is common to perform quality checks against audiences in Lytics vs. your other sources of truth. In a successful implementation, Lytics can reconcile users across channels and merge profiles, which makes one-to-one comparisons tough. However, below are quality checks that can be performed to ensure that the numbers you are seeing in Lytics match up as expected with other common data sources:
- Web Active Counts against Web Analytics for defined periods (for the difference in filters). Be sure you are comparing the same:
- Time period/date range
- Web Property
- Taking into account employee traffic/bots
- Comparing only audiences with a web cookie
- Number of Subscribers by List (for profile merging -- e.g., a user may have more than one email).
- Build various audiences in Lytics based on file sources and compare numbers to original data.
Please contact Lytics support for assistance understanding or troubleshooting these numbers.
Updated 5 months ago
