Google Cloud Storage
Overview
Google Cloud Storage is a secure, scalable, and durable object storage service provided as part of the Google Cloud Platform.
Integrating Lytics with Google Cloud Storage enables you to export Lytics audiences and user fields to CSV files that are stored in a Google Cloud Storage bucket.
Authorization
If you haven't already done so, you will need to set up a Google account that has access to Google Cloud Platform before you begin the process described below. You can follow the Google quickstart guide to help you get started with Google Cloud Storage.
If you are new to creating authorizations in Lytics, see the Authorizations documentation for more information.
- Select Google Cloud from the list of providers.
- Select the Google Cloud Storage OAuth method for authorization.
- From the user selection window, select the Google account you want to use from the list of accounts.
- Click Allow.
- Enter a Label to identify your authorization.
- (Optional) Enter a Description for further context on your authorization.
- (Optional) In the PGP Private Key text box, enter your PGP Private Key if you will be importing PGP encrypted files.
- (Optional) In the PGP Passphrase text box, enter the passphrase for the PGP Privte Key.
- Click Save Authorization.
Import Files
Import user activity and profile files from Google Cloud Storage into Lytics.
Integration Details
- Implementation Type: Server-side Integration.
- Implementation Technique: File Based Transfer Integration.
- Frequency: Batch Integration.
- Resulting data: Raw Event Data.
Once initiated, the import job will:
- Retrieve a list of objects in the bucket that match the prefix.
- Sort the files by date, and ignore any files older than the last file.
- Iterate through the files.
- Convert each row/JSON object into an event.
Fields
Due to the nature of the files that can be imported by the File import, no default LQL is available. All fields available will be added to the data stream.
Configuration
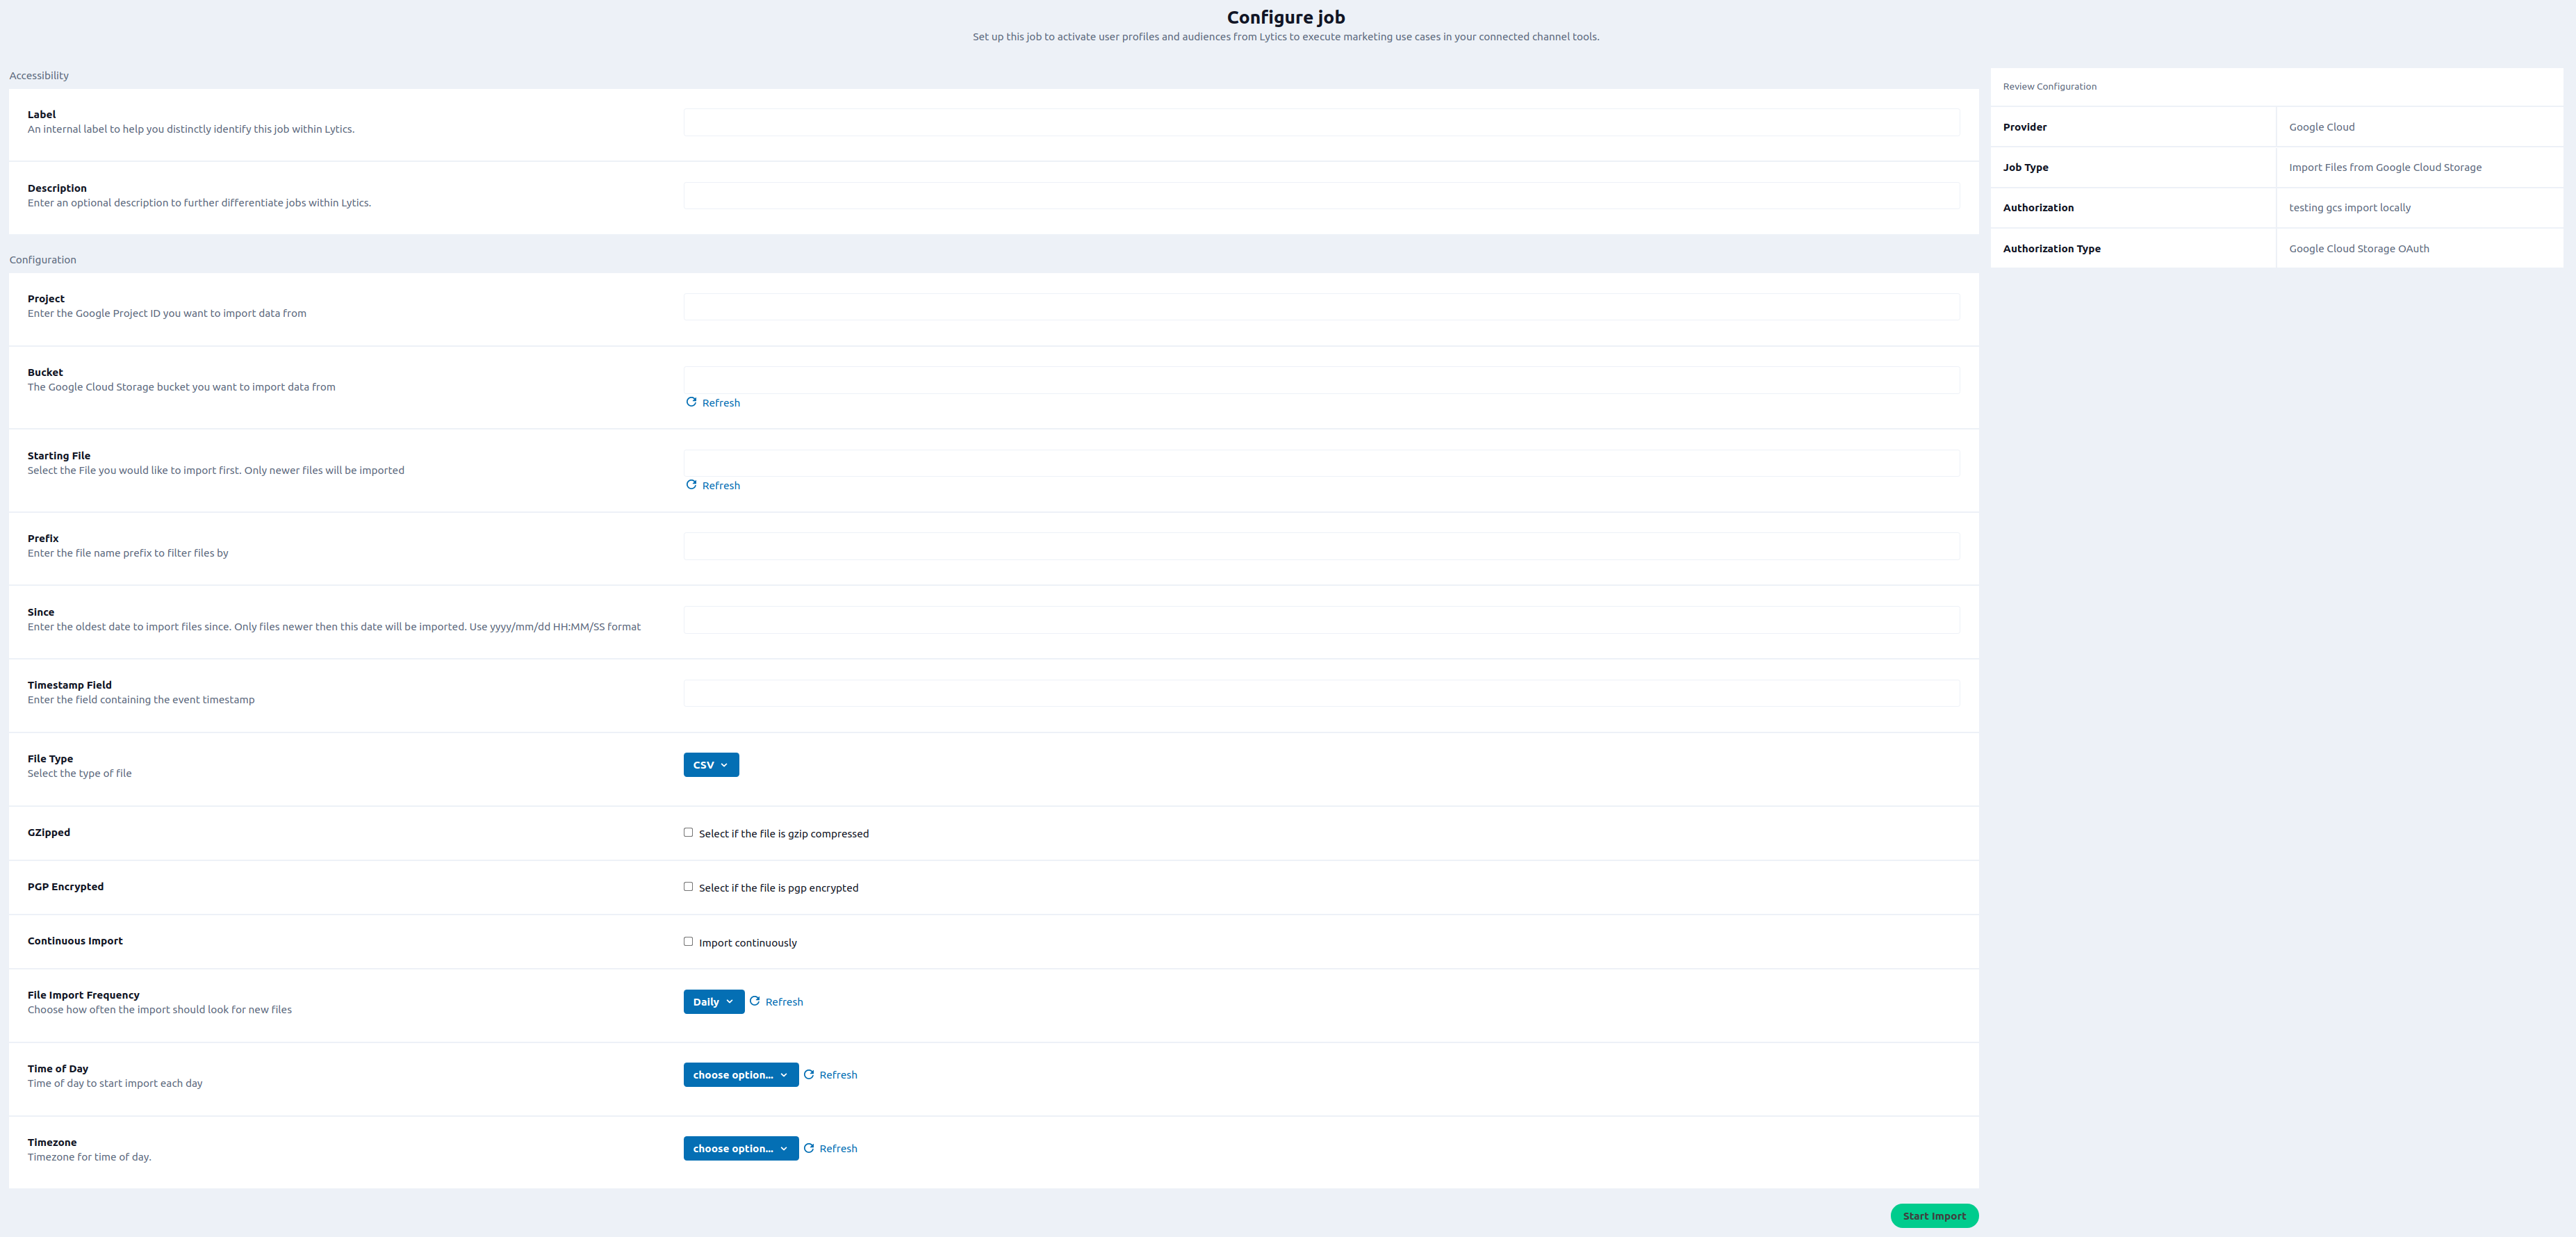
Follow these steps to set up and configure an import job for Google Cloud in the Lytics platform. If you are new to creating jobs in Lytics, see the Data Sources documentation for more information.
-
Select Google Cloud from the list of providers.
-
Select the Import Files from the list.
-
Select the Authorization you would like to use or create a new one.
-
Enter a Label to identify this job you are creating in Lytics.
-
(Optional) Enter a Description for further context on your job.
-
Complete the configuration steps for your job.

-
In the Project text box, enter the Google Project ID you want to import data from.
-
In the Bucket text box, enter the Google Cloud Storage bucket you want to import data from.
-
(Optional) In the Starting File text box, select the file you would like to import first. Only newer files will be imported.
-
(Optional) In the Prefix text box, enter the file name prefix to filter files by. Example: new-users-
-
(Optional) In the Since text box, enter the oldest date to import files since. Only files newer than this date will be imported. Use
yyyy/mm/ddHH:MM/SSformat. If left blank all files created after Starting File will be imported. -
From the File Type input, select the type of file. Select CSV if data is formatted as a CSV with header row (CSV without a header row is unsupported). Select JSON if the file is formatted as a JSON lines file.
-
(Optional) In the Timestamp Field text box, enter the field containing the event timestamp.
-
(optional) Select the GZipped checkbox if the file is gzip compressed.
-
(Optional) Select the PGP Encrypted checkbox if the file is PGP encrypted.
-
(Optional) In the Stream text box, enter the data stream to add events to. If left blank, events will be added to the
gcs_filesdata stream. -
(Optional) Select the Continuous Import checkbox to import continuously.
-
(Optional) From the File Import Frequency input, select how often the import should look for new files.
-
(Optional) From the Time of Day input, select time of day to start the import each day.
-
(Optional) From the Timezone input, select timezone for time of day.
-
Click Start Import.
CSV Export
This job allows you to export Lytics audiences and user fields to a CSV file stored in a Google Cloud Storage (GCS) bucket.
Integration Details
- Implementation Type: Server-side Integration.
- Implementation Technique: File Based Transfer Integration.
- Frequency: Batch Integration, frequency can be configured.
- Resulting data: User Fields in a file.
Fields
The fields exported to the CSV file will depend on the Fields to Export option in the job configuration. Any user field in your Lytics account is available for export.
Configuration
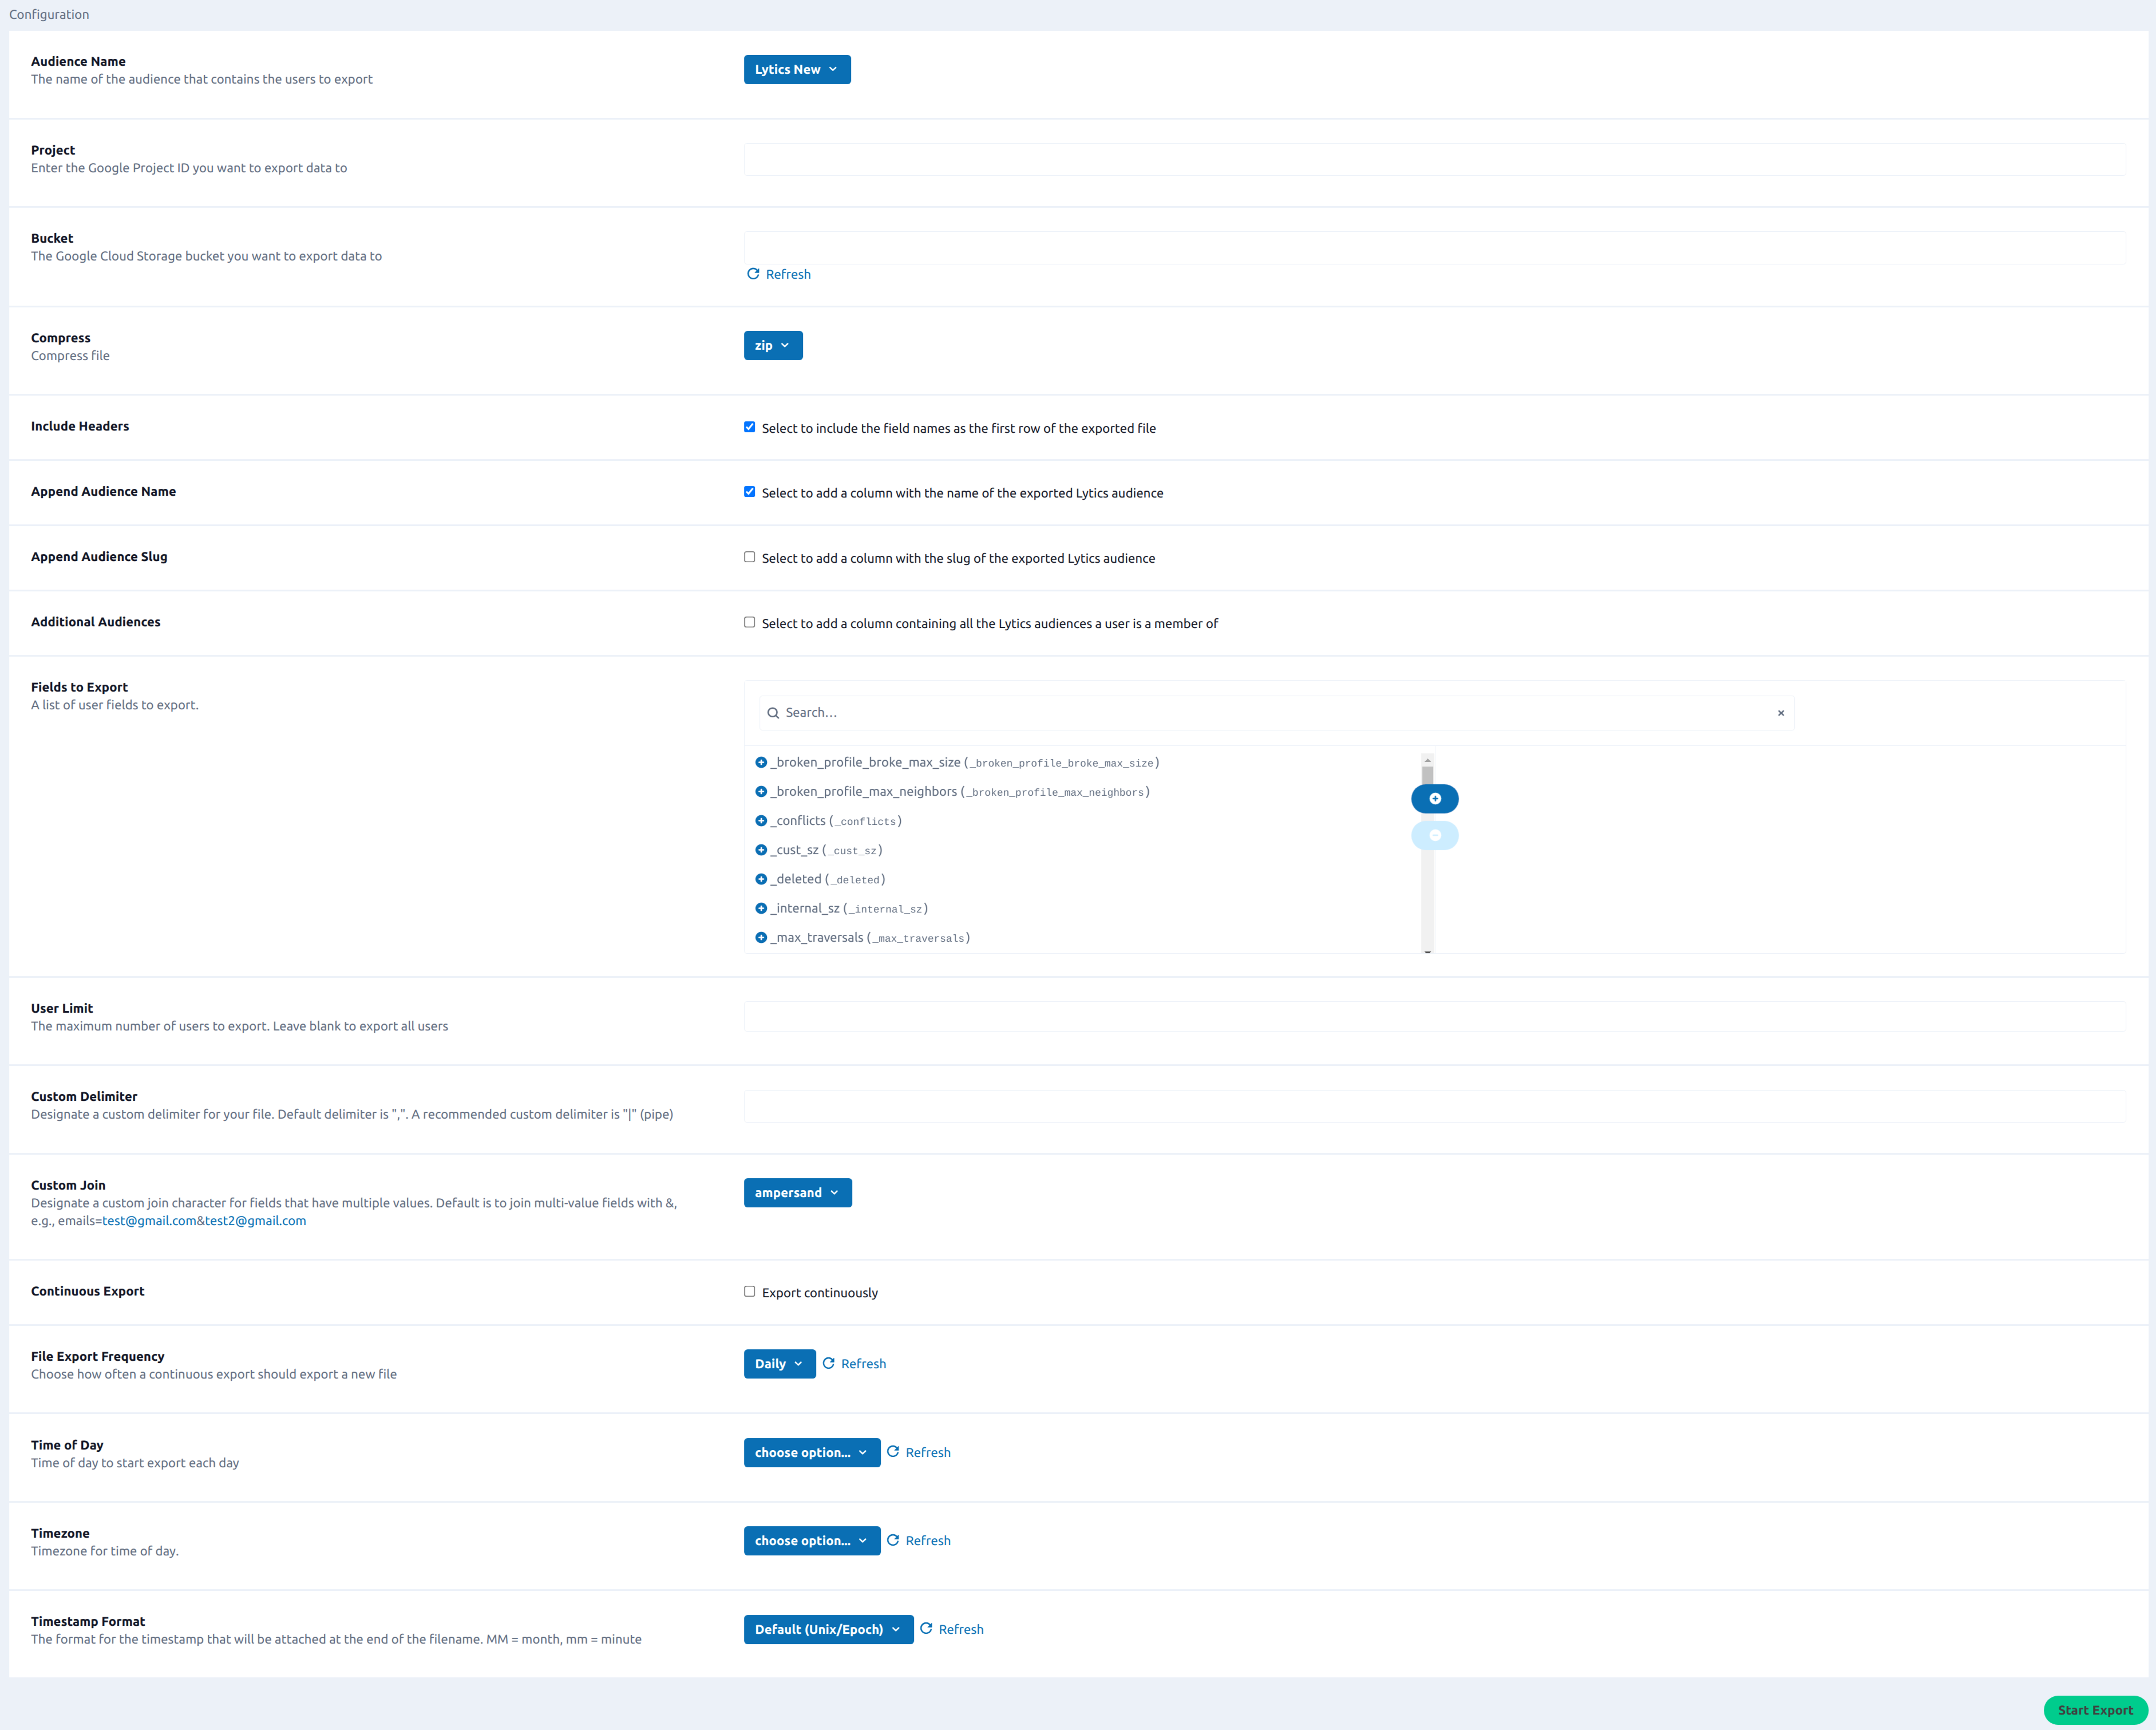
Follow these steps to set up and configure an export of a Lytics Audience to GCS. If you are new to creating jobs in Lytics, see the Destinations documentation for more information.
- Select Google Cloud from the list of providers.
- Select the Export Audiences (Google Cloud) job type from the list.
- Select the Authorization you would like to use or create a new one.
- Enter a Label to identify this job you are creating in Lytics.
- (Optional) Enter a Description for further context on your job.
- From the Audience Name drop-down, select the Lytics audience that contains the users to export.
- In the Project text field, enter the Google Cloud Platform Project ID that contains the GCS bucket where you would like to save the CSV file.
- In the Bucket text field, enter the GCS bucket name where you would like to save the CSV file.
- Using the Compress drop-down, select the compression type for the file to be exported.
- Select the Include Headers checkbox to include the field names as the first row of the exported file.
- Select the Append Audience Name checkbox to add a field with the Lytics audience name.
- Select the Append Audience Slug checkbox to add a field with the Lytics audience slug.
- Select the Additional Audiences checkbox to add a column containing all the Lytics audiences a user is a member of. Selecting this option may affect the performance of this work.
- Using the Fields to Export list, select the list of user fields to export.
- In the User Limit numeric field, enter the maximum number of users to export. Leave it blank to export all users.
- In the Custom Delimiter text field, enter the custom delimiter for your file. The default delimiter is a comma.
- Using the Custom Join drop-down, select a custom join character for fields that have multiple values. Default is to join multi-value fields with
&, for example,[email protected]&[email protected]. - Select the Continuous Export checkbox to export the file once a day.
- From the File Export Frequency drop-down, choose how often a continuous export should export a new file.
- Using the Time of Day drop-down, select the time of day to start export each day.
- Using the Timezone drop-down, select the timezone for time of day.
- Using the Timestamp format drop-down, select the format for the timestamp that will be added at the end of the filename.
- Click Start Export.

Updated 5 months ago


