

Amazon Pinpoint
Overview
Amazon Pinpoint is an AWS service that you can use to engage with your customers across multiple messaging channels. You can use Amazon Pinpoint to send push notifications, emails, SMS text messages, and voice messages.
Integrating Lytics with Amazon Pinpoint allows you to import email, SMS, and push activity from Amazon Pinpoint and then export Lytics cross-channel, behavioral-driven audiences to deliver personalized marketing campaigns.
Authorization
If you have not already done so, you will need to set up an Amazon Pinpoint account before you begin the process described below. For more information on obtaining your AWS keys for authorization, see Amazon's documentation on secret and access keys.
If you are new to creating authorizations in Lytics, see the Authorizations documentation for more information.
- Select Amazon Web Services from the list of providers.
- Select the AWS Keys method for authorization.
- Enter a Label to identify your authorization.
- (Optional) Enter a Description for further context on your authorization.
- Enter your Access Key and Secret Key.
- Click Save Authorization.
Import Activity Data
Import email, push, or mobile activity from Amazon Pinpoint to add behavior data to your user profiles in Lytics.
Integration Details
- Implementation Type: Server-side Integration.
- Implementation Technique: REST API Integration.
- Frequency: Real-time Integration
- Resulting data: Raw event data
Importing Pinpoint activity into Lytics requires setting up an export of Pinpoint Events to Kinesis. See Amazon's documentation for more information, and follow these instructions to set it up via the Pinpoint UI.
This integration uses the Amazon Kinesis Data Streams Service APIs to get Pinpoint activity records from the Kinesis stream in near real-time. You can then start the Pinpoint import job in Lytics.
- Once the import is started, the Pinpoint events will be continuously read off the Kinesis stream into Lytics in near real-time. Data is pulled from Kinesis via the GetRcords endpoint.
- The activity data will be ingested into the Lytics data stream
pinpoint_activity.
Fields
The following fields are included in the default mapping of the pinpoint_activity stream:
| Source Field | Conditional | Lytics User Field | Description | Type |
|---|---|---|---|---|
endpoint.Status | pinpoint_status | Pinpoint Endpoint Status | string | |
| count(event_type) | IF eq(event_type, "click") | pinpoint_clickct | Pinpoint Click Count | int |
| count(event_type) | IF eq(event_type, "_email.open") | pinpoint_openct | Pinpoint Open Count | int |
| count(event_type) | IF eq(event_type, "_email.send") | pinpoint_sendct | Pinpoint Send Count | int |
email(endpoint.Id) | email unique id | string | ||
| max(epochms()) | IF event_type IN ("_email.open", "_email.click") | last_active_ts | Last Active | date |
| max(epochms()) | IF eq(event_type, "_email.open") | pinpoint_last_open_ts | Pinpoint Last Open | date |
| max(epochms()) | IF eq(event_type, "click") | pinpoint_lastclick_ts | Pinpoint Last Click | date |
| min(epochms()) | IF eq(event_type, "click") | pinpoint_firstclick_ts | Pinpoint First Click | date |
| valuect(hourofday()) | IF eq(event_type, "_email.open") | pinpoint_hourly_open | Pinpoint Hourly event_types | map[string]intsum |
| valuect(hourofweek()) | IF eq(event_type, "_email.open") | pinpoint_hourofweek | Pinpoint Hour of Week event_types | map[string]intsum |
| valuect(yymm()) | IF eq(event_type, "_email.open") | pinpoint_monthly | Pinpoint Opens By Month | map[string]intsum |
Configuration
Follow these steps to set up and configure an import of Pinpoint activity in the Lytics platform. If you are new to creating jobs in Lytics, see the Data Sourcesdocumentation for more information.
- Select Amazon AWS Services from the list of providers.
- Select the Import Activity Data job type from the list.
- Select the Authorization you would like to use or create a new one.
- Enter a Label to identify this job you are creating in Lytics.
- (Optional) Enter a Description for further context on your job.
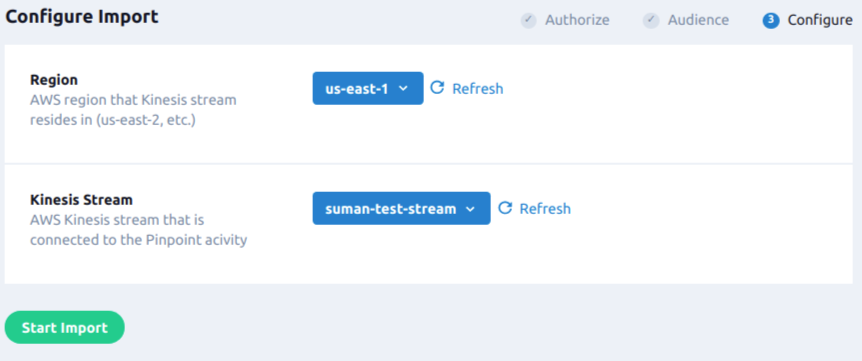
- From the Region input, enter the AWS region that the Kinesis stream resides in (e.g.
us-east-1). - From the Kinesis Stream input, enter the AWS Kinesis stream that is connected to the Pinpoint activity.
- Click Start Import.

If activity data is avaiable in the Kinesis Pinpoint stream, the data will appear in Lytics within a few minutes.
Export Audiences
Export Lytics audiences to add audience membership data to your Pinpoint endpoints, and send targeted notifications using Pinpoint as users enter or exit Lytics audiences.
Integration Details
- Implementation Type: Server-side Integration.
- Implementation Technique: REST API Integration.
- Frequency: Real-time Integration.
- Resulting data: User fields.
This integration utilizes the Pinpoint REST APIs to send Pinpoint events that set an attribute for a Pinpoint Endpoint as a user enters or exits an audience in Lytics.
- As users enter or exit the Lytics audience, a new event is sent with the identifier
lytics_audiencewith the slug of the exported Lytics audience. For example,lytics_highly_engagedis sent with the valuetrueif they have entered the audience, andfalseif they have exited the audience. - When building a campaign in Pinpoint, this attribute can be used to trigger a send event. In the Pinpoint campaign setup step "Choose when to send the campaign" you can target the attribute
Lytics Audiencefor when the exported Lytics audience slug is set totrue. - The Lytics audience is also added as a Pinpoint endpoint attribute which can be used in Pinpoint to create custom segments.
Fields
By default, Lytics exports the following fields to Pinpoint.
| Lytics User Field | Description | Pinpoint Field | Type |
|---|---|---|---|
| custom | Address Field | Address for channel | string |
| Audience | Exported Audience | lytics_audience | bool |
Configuration
Follow these steps to set up and configure an export of a Lytics audience to Pinpoint.
- Select Amazon AWS Services from the list of providers.
- Select the Export Audiences job type from the list.
- Select the Authorization you would like to use or create a new one.
- Enter a Label to identify this job you are creating in Lytics.
- (Optional) Enter a Description for further context on your job.
- From the Audience input, select Lytics Audiences to emit events from. Each enter/exit event from the selected audience will be sent as a Pinpoint email event.
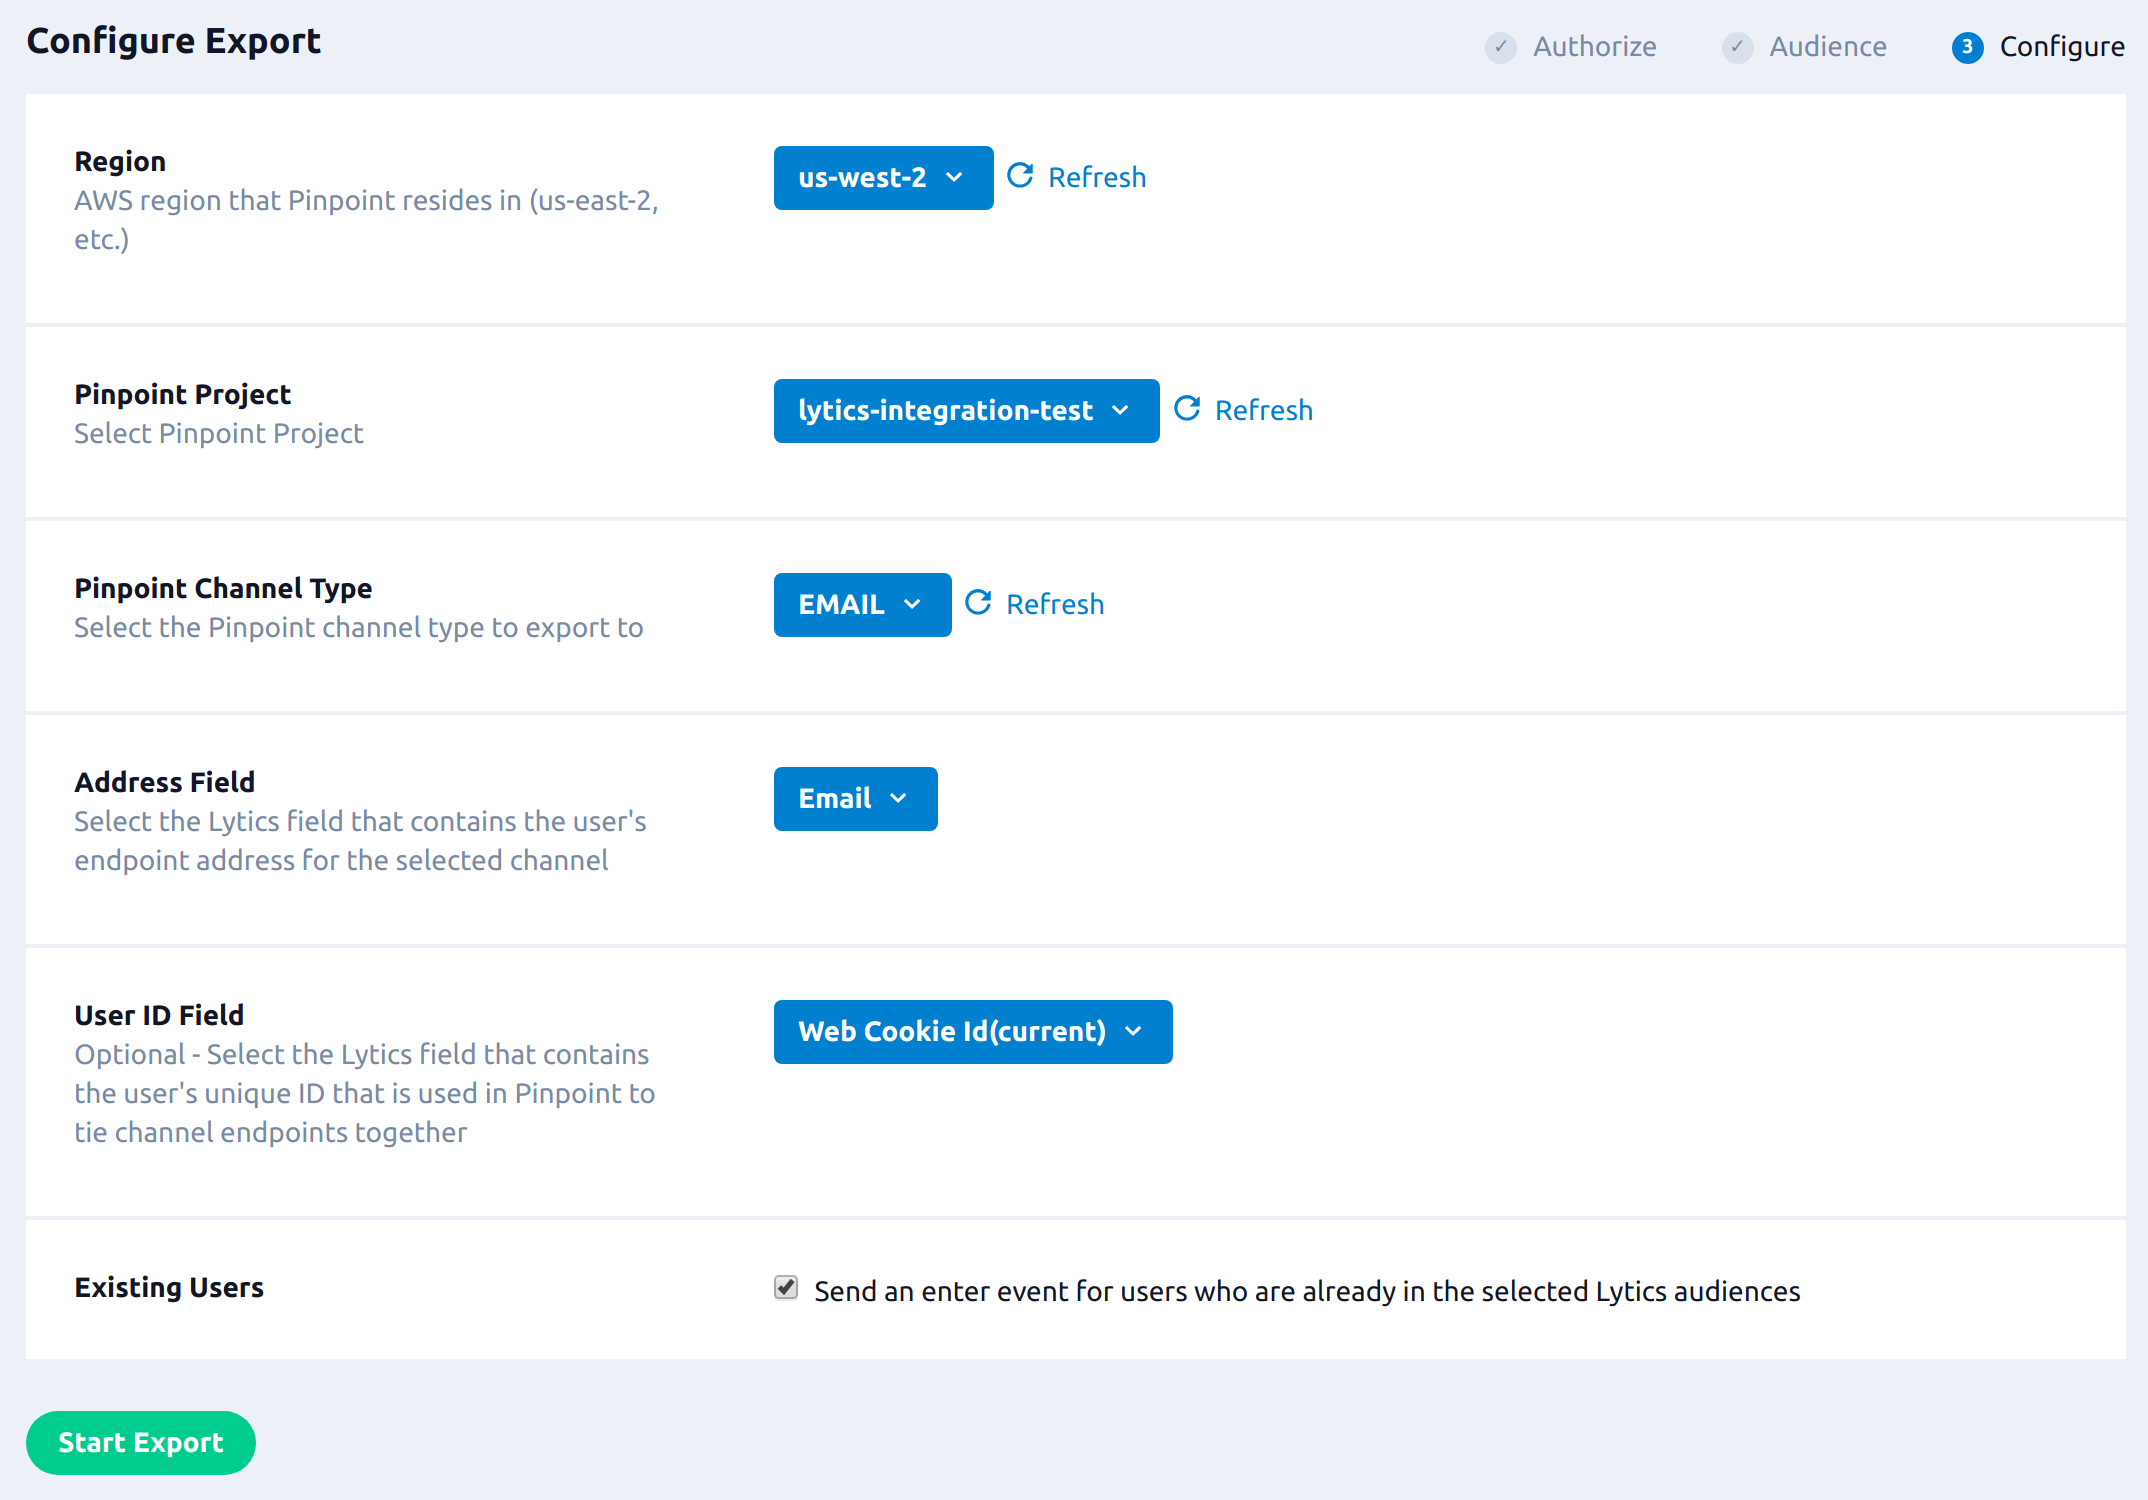
- From the Region input, select the AWS region that Pinpoint resides in (e.g.
us-east-2). - From the Pinpoint Project input, select your Pinpoint Project.
- From the Pinpoint Channel Type input, select the channel type, e.g., Email or SMS, to send to (channel must first be activated in Pinpoint).
- From the Address Field input, select the Lytics field that contains the user's endpoint address for the selected channel, e.g. "Email Address" if the selected channel type is "EMAIL".
- (Optional) From the User ID Field input, select the Lytics field that contains the user's unique ID that is used in Pinpoint to tie channel endpoints together.
- Select the Existing Users checkbox to send an enter event for users who are already in the selected Lytics audience.
- Click Start Export.

If the Existing Users option is selected, audience data should be in Pinpoint within minutes. Otherwise, data will be seen when a new user enters or exits the exported audience.
In Pinpoint, segments can be created to target the Lytics audience by defining a segment with the exported Lytics segment slug name set to true.

Export Audience Triggers
You can use Lytics to send messages to your customers via various AWS Pinpoint channels (Email/SMS/GCM/APNS) when they enter a Lytics audience.
Integration Details
- Implementation Type: Server-side Integration.
- Implementation Technique: REST API Integration (Audience Trigger Integration).
- Frequency: Real-time Integration.
- Resulting data: A notification message sent to users entering the selected Lytics audiences. The message can be populated with Lytics profile data for the user depending on the job configuration.
The job uses the Pinpoint API to send the Email, SMS, APNS and GCM messages. Before you can set up this job, you must enable the desired channel in your AWS Pinpoint project via which you would like to send a notification message. Once started, this job will proceed as follows.
- If backfill is enabled, construct the message with the
user fields(if any) and send the notification message to each user using the configured channel. - For each user entering the selected audience, construct the message with the
user fields(if any) and send the notification message using the configured channel.
Fields
As mentioned above, the notification message can be configured with user fields so that it can be populated with corresponding user field values and the resulting message will be sent to the user using your chosen AWS Pinpoint channels.
Please refer to the Templating section for more information on configuring messages with the desired user fields.
Configuration
Follow these steps to set up and configure an export from Lytics to Amazon Pinpoint.
-
Select Amazon AWS Services from the list of providers.
-
Select the Export Audiences Triggers job type from the list.
-
Select the Authorization you would like to use or create a new one.
-
Enter a Label to identify this job you are creating in Lytics.
-
(Optional) Enter a Description for further context on your job.
-
From the Audience input, select the Lytics audiences to send the notification message.
-
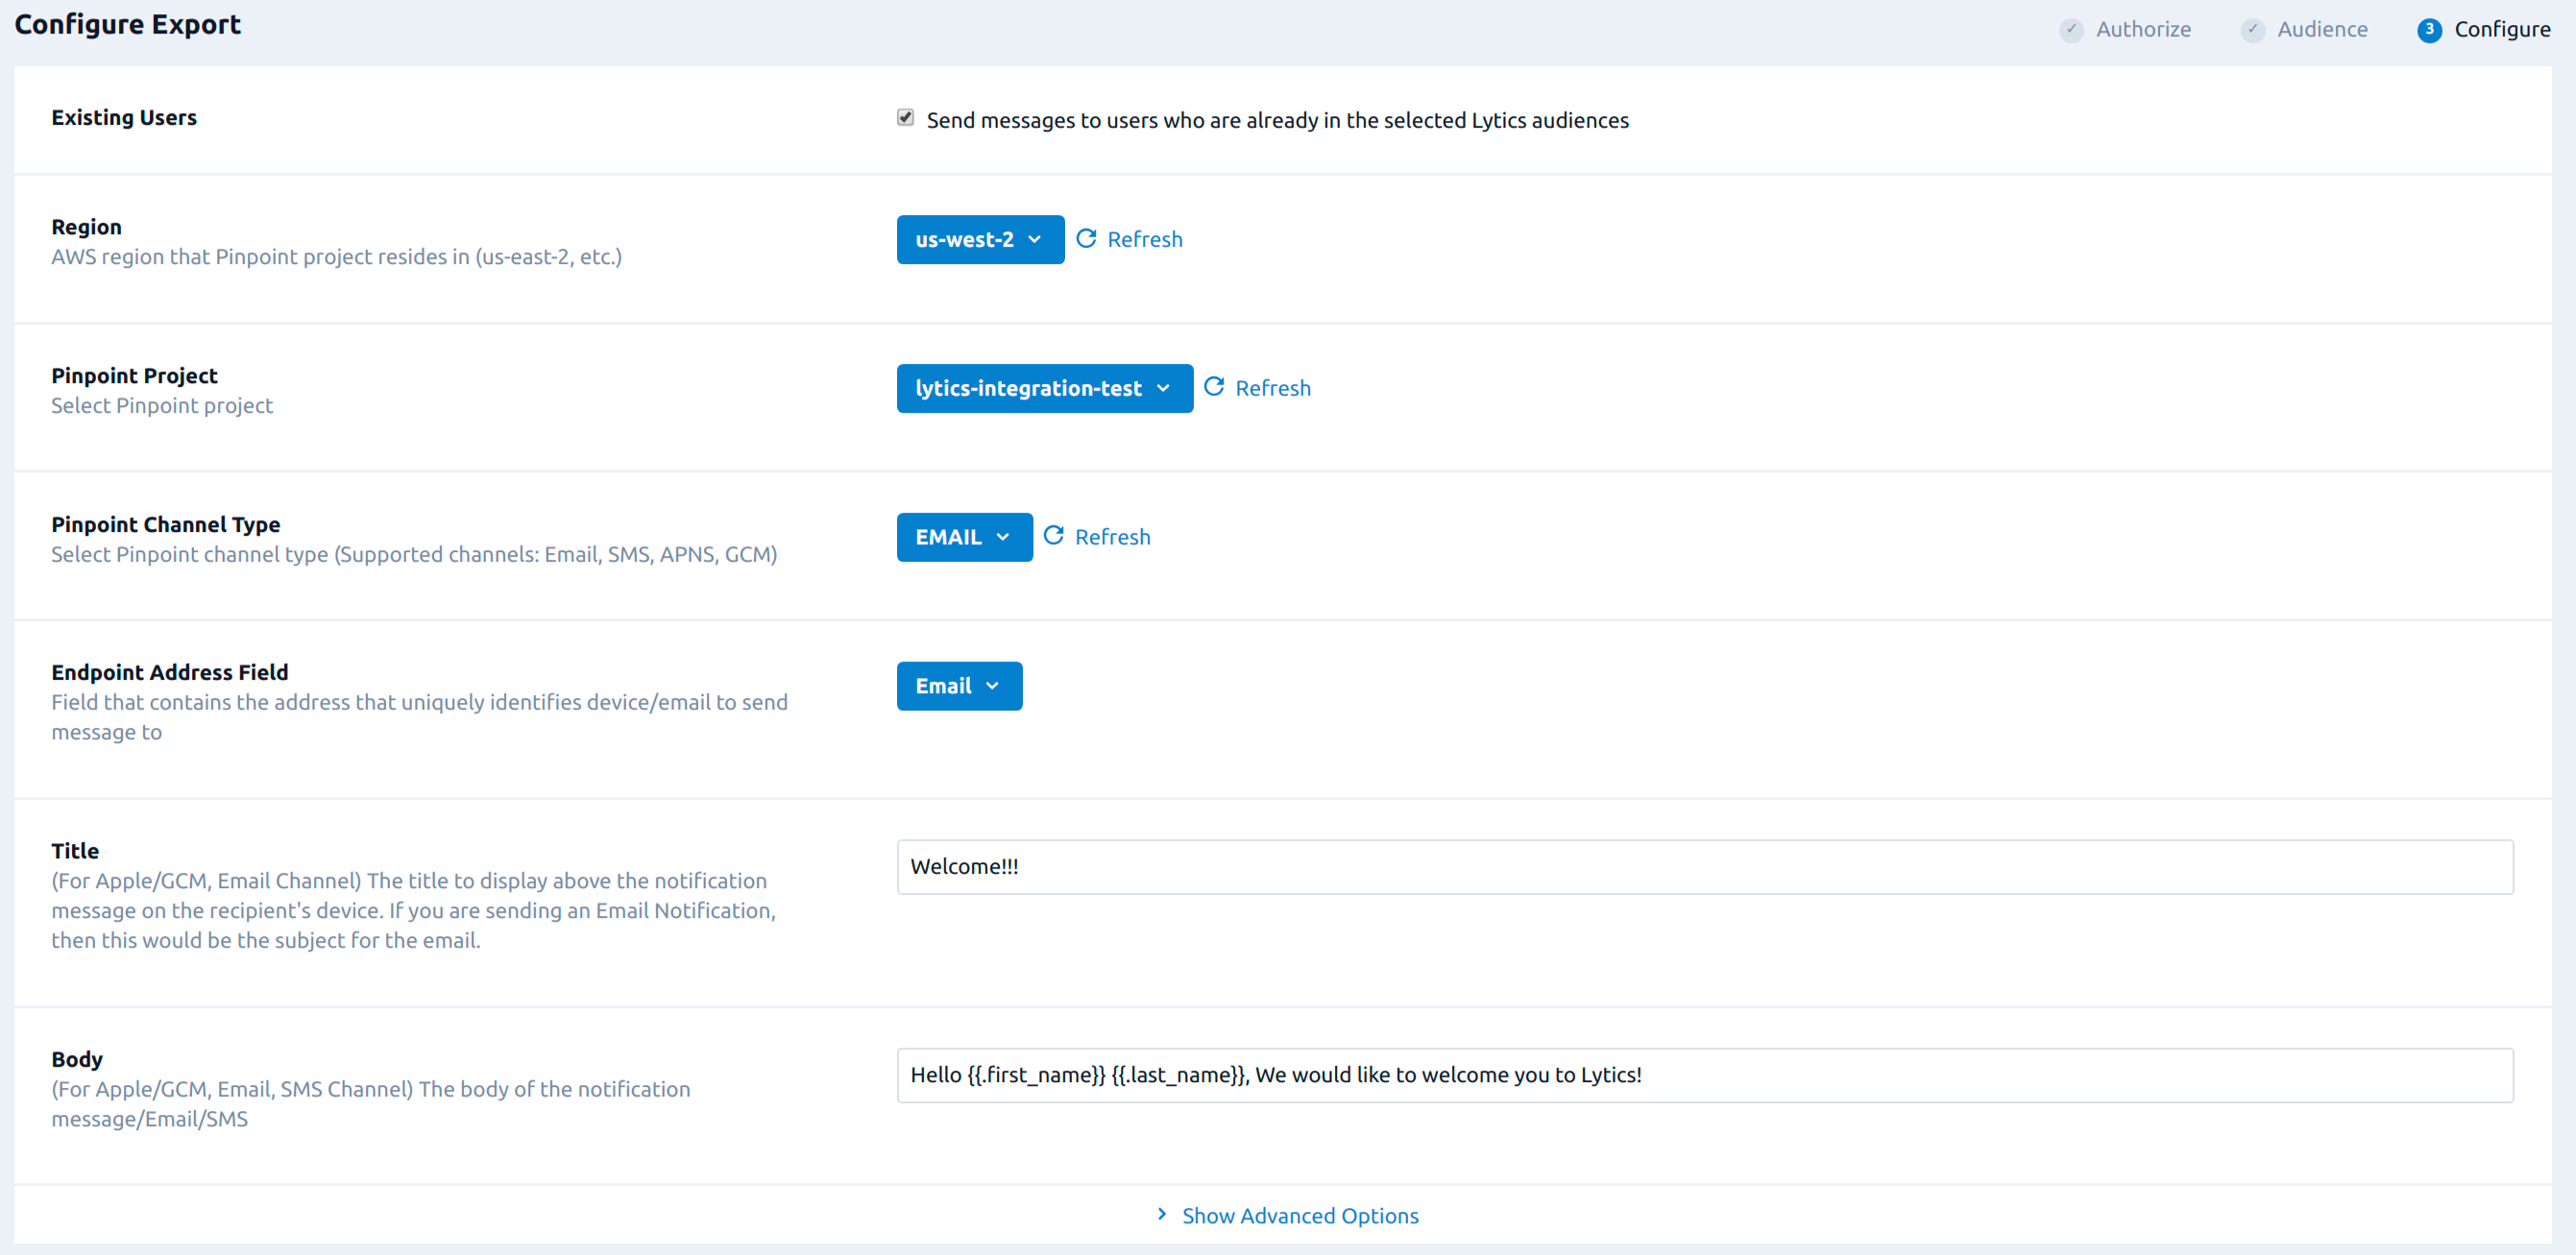
(Optional) Select the Existing Users checkbox to send the message to users who are already in the selected Lytics audiences.
-
Using the Region dropdown, select the AWS region that your Pinpoint project resides in.
-
Using the Pinpoint Project dropdown, select the AWS Pinpoint project you would like to use.
-
Using the Pinpoint Channel Type dropdown, select the Pinpoint channel type to send the message.
-
From the Endpoint Address Field dropdown, select the Lytics user field that contains the address that uniquely identifies the device or email to send messages to.
-
(Required except for SMS) In the Title field, enter the title to display above the notification message on the recipient's device. If you are sending an email notification, this would be the subject for the email.
-
In the Body field, enter the body of the notification message/Email/SMS.
-
Click Show Advanced Options to set additional configuration option, all of which are optional:
-
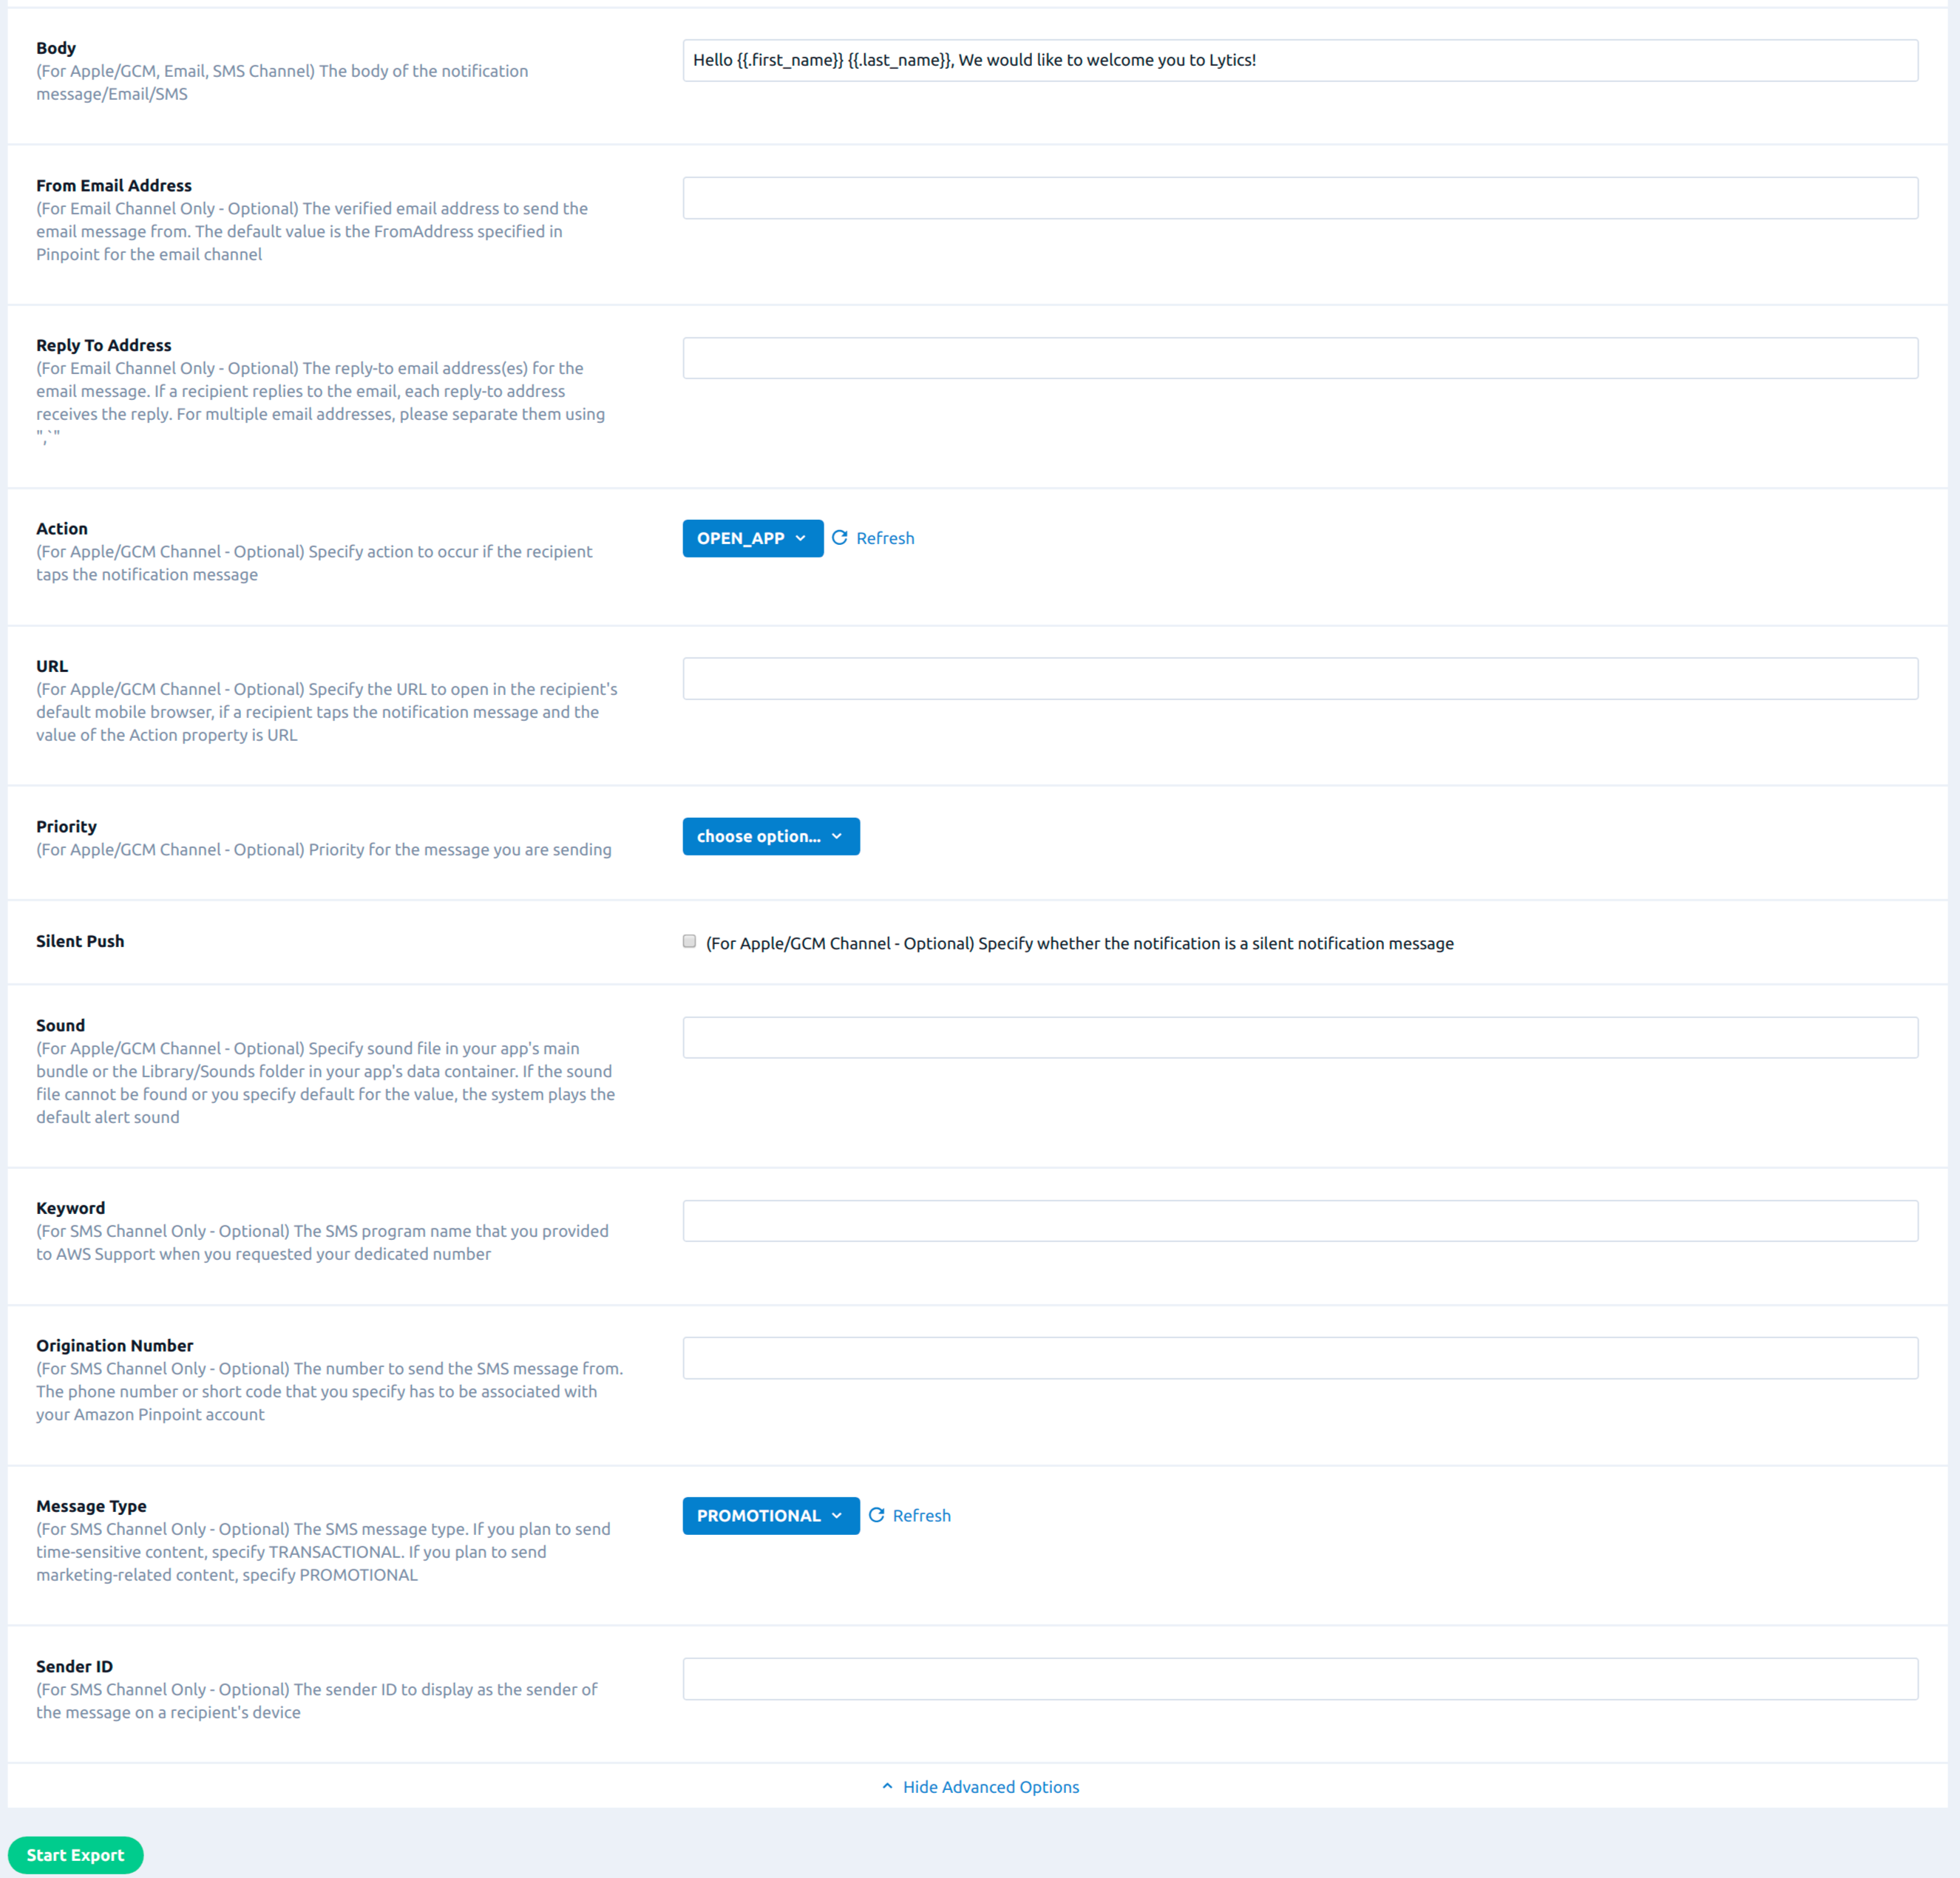
(For Email Channel Only) In the From Email Address field, enter the verified email address to send the email message from. The default value is the FromAddress specified in Pinpoint for the email channel.
-
(For Email Channel Only) In the Reply To Address field, enter the reply-to email address(es) for the email message. If a recipient replies to the email, each reply-to address receives the reply. For multiple email addresses, please separate them using a comma.
-
(For Apple/GCM Channel) Using the Action dropdown, select the action to occur if the recipient taps the notification message. Please refer to Pinpoint documentation on Action for more information.
-
(For Apple/GCM Channel) In the URL field, enter the URL to open in the recipient's default mobile browser, if a recipient taps the notification message and the value of the Action property in above input is URL.
-
(For Apple/GCM Channel) Using the Priority dropdown, select the Priority for the message you are sending.
-
(For Apple/GCM Channel) Check the Silent Push checkbox to send the message as a silent notification message .
-
(For Apple/GCM Channel) In the Sound field, enter the name of the sound file in your app's main bundle or the Library/Sounds folder in your app's data container. If the sound file cannot be found or you specify default for the value, the system plays the default alert sound.
-
(For SMS Channel Only) In the Keyword field, enter the SMS program name that you provided to AWS Support when you requested your dedicated number.
-
(For SMS Channel Only) In the Origination Number field, enter the number to send the SMS message from. The phone number or short code that you specify has to be associated with your Amazon Pinpoint account.
-
Using the Message Type dropdown, select the SMS message type. If you plan to send time-sensitive content, specify TRANSACTIONAL. If you plan to send marketing-related content, specify PROMOTIONAL. Please refer to Pinpoint documentation on Message Type for more information.
-
(For SMS Channel Only) In the Sender ID field, enter the Sender ID to display as the sender of the message on a recipient's device.
-
Click Start Export.


Updated 18 days ago