

Personalize your Iterable emails With Lytics content recommendations
Lytics content recommendations provide powerful personalized, one-to-one recommendations. Sending content recommendations to your users via email is a great way to reengage them with your brand.
This guide will cover how to implement content recommendations in email with Iterable as the email service provider (ESP). It will use the Lytics content recommendation API and Iterable's data feed to render them inline in your email template. This technique can be combined with other email use cases such as content modularization or triggered sends for a truly rich, personalized experience.
Although you will be using the Lytics API, no code is necessary to implement this solution beyond configuring some HTML and custom variables in your email template.
Before you begin
You should have an Iterable account with an audience export running and an HTML email template with a section prepared for one or more content recommendations within it. The recommendations can include any/all of the following:
- Title
- Description
- Image
- URL or link to the document
- Author
- Date of publication
You can start by setting up your template with some static content. For context, here's how the content recommendations look in the example template that is used in this guide, it includes all of the fields listed above:

In addition, make sure you have a Lytics account with the content affinity engine activated. You will also need to generate an API token with read access to content and user search.
Build a content collection
To make recommendations, you will need a content collection. You can see our documentation on building content collections for more information. Once saved, you will also need the id of the content collection as you will use it in the next step.
Add content recommendation API as a data feed
To populate recommendations in the email, you will use the Iterable feature called a Data Feed to hook into the Lytics API before sending.
- Login to your Iterable account.
- Navigate to Integrations > Data Feeds in the side bar.
- Click + Create New Feed.
- Enter "Lytics Content Recommendations" or some other descriptive title in the Name text input.
- Make sure the JSON option is selected from the Format dropdown.
- Copy and paste the following URL into the URL text input:
At the end of that URL, paste the ID of the content collection you created in the previous step. This ID is the hash in the URL, not the name or slug of the content collection.https://api.lytics.io/api/content/recommend/user/email/{{#urlEncode}}{{email}}{{/urlEncode}}?contentsegment= - In the Authorization Token field paste a Lytics API token with read permission for content and user search.
- Verify that your settings look correct and then click Save Feed.
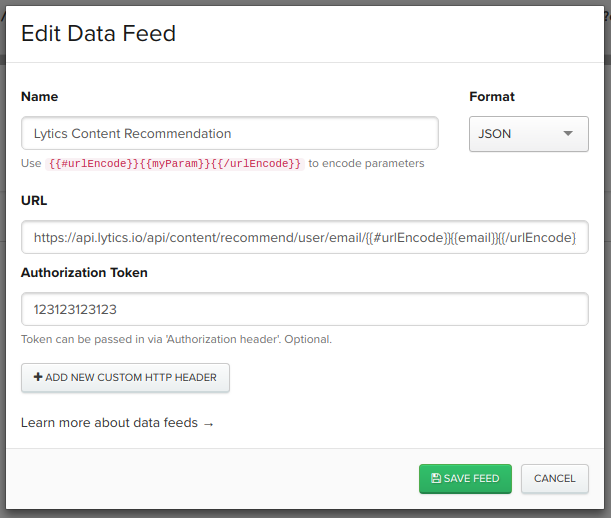

Enabling this data feed in a template allows Iterable to call the Lytics content recommendation API before each email send. Iterable will replace {{#urlEncode}}{{email}}{{/urlEncode}} with the URL encoded version of the recipient's email address. The next step will cover how to access the content returned and format it to be surfaced in the email template.
You can add additional query parameters to the URL in the data feed to control things like the ranking of the recommendations or the number of documents returned. See our Content Recommendation API documentation for a list of possible query parameters for this end point.
Modify your email template
Now that the data feed has been configured, it's time to apply it to your email template.
-
In Iterable open the template in edit mode.
-
Click the Advanced options tab and configure the following settings.
- Check the Enable template generation using a data feed... checkbox.
- From the dropdown, select the data feed you created in the previous step.
- Check the Cache data feed response (cached for up to 1 hour).
- (Optional) Check the Merge the data feed and user contexts checkbox.
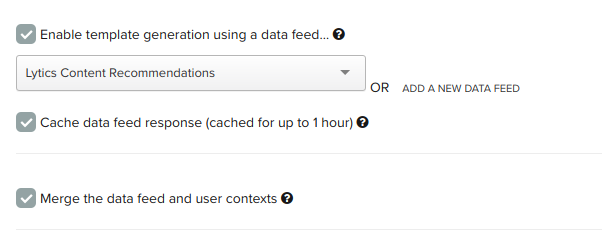
If you do not select Merge the data feed and user contexts, you will need to use square brackets
[[value]]instead of curly brackets{{value}}when accessing values from the data feed. The examples in this guide assume that this option is checked.
-
Under the HTML version of the template, click Source to view the HTML source of your template.
-
Locate the HTML of the recommendation section. You will need to implement templates for each of the fields you wish to use returned from the content API. Feel free to reference the response example in our API documentation, but in general each field should match the following format:

{{data.[i].fieldname}}Where i is the current index of the recommendation (starting at 0), and fieldname is one of the following:
title: Title of the documentdescription: Description of the documentprimary_image: URL of the document's imageurl: URL of the document (excluding the protocol).author: Name of the author of the document (this field may not be available for all content types).created: Date that the article was published.
Here is some example HTML laying out all of these fields for 3 separate recommendations:
<!-- Recommendation 1 -->
<div>
<img alt="rec image" src="{{data.[0].primary_image}}" />
<h5>{{data.[0].title}}</h5>
<span>By {{data.[0].author}} | {{dateFormat data.[0].created format="full"}}</span>
<p>{{data.[0].description}}</p>
<a href="https://{{data.[0].url}}">Read More</a>
</div>

<!-- Recommendation 2 -->
<div>
<img alt="rec image" src="{{data.[1].primary_image}}" />
<h5>{{data.[1].title}}</h5>
<span>By {{data.[1].author}} | {{dateFormat data.[1].created format="full"}}</span>
<p>{{data.[1].description}}</p>
<a href="https://{{data.[1].url}}">Read More</a>
</div>

<!-- Recommendation 3 -->
<div>
<img alt="rec image" src="{{data.[2].primary_image}}" />
<h5>{{data.[2].title}}</h5>
<span>By {{data.[2].author}} | {{dateFormat data.[2].created format="full"}}</span>
<p>{{data.[2].description}}</p>
<a href="https://{{data.[2].url}}">Read More</a>
</div>
As seen above, you must add the http or https protocol in the href protocol before the URL field. Also the example above includes date formatting for the published date field, you can read more about this in Iterable's handlebars documentation.
Once you have finished editing the template, click Save Template. In the next step we'll verify that the data feed is working and recommendations are rendering correctly.
Previewing and verifying the recommendations
Iterable allows you to preview a rendered version of your email in the browser with live data from your data feed. Follow the instructions in this tutorial to preview your email with content recommendations.

Once you're happy with the preview, you are ready to send your campaign. You can implement your template into a workflow or send it as a blast campaign.
Rate Limiting
For best results, please talk to your Iterable representative about setting up a Message Send Rate Limit. The Lytics' Content Recommendation API can handle up to 250 requests per second, or 15,000 requests per minute. If the rate-limit is not enabled with Iterable, Lytics may return a 429 HTTP Status Code, preventing emails from being delivered.
Troubleshooting
For more information on troubleshooting your templates, see Iterable's documentation on templating. If you're not receiving a valid response from the Lytics content recommendation API, please make sure that the email you are testing with exists as a valid profile in Lytics. You can verify this, by navigating to Audiences > Find a User from the Lytics dashboard, and searching for the user you are trying to preview as. The API documentation for content recommendations may also help you verify that you're calling the endpoint correctly. If issues persist, feel free to contact [email protected] for further assistance in troubleshooting the Lytics API.