

Single Sign-On
Lytics supports Single Sign-On (SSO) by using Google Cloud Identity Platform as a service provider using SAML protocol. Lytics integrates with Identity Providers (IdPs) in such a way that the Service Provider (SP) initiates SSO. IDP-initiated SSO has been deprecated and is no longer supported by Lytics.
Overview
Single Sign-On (SSO) allows employees to safely and securely access a host of Internet tools with a single username and password. There are four primary reasons why your business should consider leveraging Single Sign-On:
-
SSO helps the end user. Implementing SSO means employees are required to commit just one password to memory. With one password to remember, a user can easily create and remember a unique and secure password without writing it down. SSO reduces password fatigue and frustration and makes the employee more efficient.
-
SSO benefits the company. Fewer passwords to remember equals fewer calls to the helpdesk, resulting in more time spent on other tasks for both the end user and IT. Fewer calls to the helpdesk (which is oftentimes outsourced) means a reduction in cost to the company as well.
-
SSO improves security. When employees are required to remember numerous passwords, it is easy to fall into lazy habits, such as using simple, easy-to-remember passwords, which are more susceptible to hacking. Or writing passwords down on Post-it notes where they can easily be stolen or fall into the wrong hands.
-
SSO helps with compliance. SSO helps companies increase control over the user's access to certain information as well as easily enforce password change policies. This makes it simpler for organizations to comply with HIPAA, SOX, and other regulatory groups.
SP-Initiated SSO
Lytics supports enterprise Single Sign-On (SSO) by using Google Cloud Identity Platform as a service provider using SAML protocol. Lytics integrates with Identity Providers (IdPs) in such a way that the Service Provider (SP) initiates SSO.
Once implemented, users will log in to Lytics via a special SSO form that only requires an email address. Lytics will recognize the email address and open a pop-up to the user's IdP to complete the login. Once the IdP verifies credentials, the pop-up will close, redirecting the user to a logged-in instance of their Lytics dashboard. Behind the scenes, a customer's IdP will communicate with the Lytics APIs, which use Google Cloud Identity Platform to validate the login. This document describes the process for integrating with a new IdP that uses SAML.
Service Provider Configuration
To configure SAML for the Lytics service provider, some information is required about your IdP. If you have a metadata file that contains SAML provider information, this may be appropriate, but please ensure that the following information is provided to Lytics Support:
- Entity ID
- Sign In URL
- X509 Signing Certificate
Further configuration details, such as mappings, may need to be provided, but the Lytics implementation only requires the email address field to be mapped. Once this information has been received, Lytics can configure the SAML connection in the Google Cloud Identity Platform.
IdP Configuration
After Lytics configures the SAML connection on the service provider, Lytics Support will provide the following key fields of information to the customer to complete the configuration in their IdP.
- Assertion Consumer Service (ACS) URL (aka postback or callback URL)
- Entity ID of the Service Provider
- Sign-in URL
With this information, your IdP connection can be configured to complete the SSO integration.
At this time, Lytics does not support providing this information in an XML metadata file. Additional information about the Service Provider may be provided on request.
Testing SSO
Once all the information has been configured in both the IdP and the Lytics service provider, you can test and verify that the SSO implementation works as expected. If you are using SSO as your only sign-in method, please disable any password restriction or expiration settings that may have been enabled in the UI.
During the testing process, Lytics can be configured to allow both SSO login and regular username and password (or Google OAuth) login through the app. This allows users to test SSO without disrupting the day-to-day usage of the app.
If requested, once the SSO implementation has been tested and verified, Lytics can disable the use of other login types for an account.
Troubleshooting SSO
If it's known that SSO will be added to an account, the user email addresses added to the account should match the email address present within the IdP. If the email address doesn’t match, the login will fail as Lytics will not be able to verify that there is a user with that email address.
For instance, if the email listed in the IdP is abc@123 and within Lytics, it is def@456, then there will be potentially multiple error points for a user trying to log in via the SSO form on Lytics.
If the user enters abc@123 into the IdP pop-up, it will immediately fail as we use the Lytics account user to determine which IdP to redirect to. You would see an error message like the following:

However, should the user enter def@456 (their Lytics account email), they will be redirected to their IdP, but the verification of the login will fail once information is sent back to Lytics.
To remedy this situation, you would need to create a new user within Lytics with the email address abc@123 for the SSO login to be successful. You can check, add, and remove users for an account using the Managing Users guide as a reference.
Lytics Support can assist in the troubleshooting process. When testing for the first time, Lytics can enable logging to help troubleshoot any issues you encounter. With this, the team can help debug if you provide information on the login attempt, such as the login time, user, and account.
If you’re encountering a verification error, but you've checked that your emails from the IdP and Lytics match, this may be an issue with the SAML configuration either on the IdP or SP side. Contact Lytics Support with details of the issue, and our team can coordinate a fix.
Account Structure with SSO
It should also be noted that primary accounts (master accounts) are decided as the first account that a user was added to. Due to this, users from a single group/organization will often have different primary accounts. This is important for SSO as it will also be the account the user is logged into at the start of their session. If SSO is enabled as the only means of login on one account and a user attempts to log in using Google OAuth or their username and password, the login session will fail. The following options are possible solutions:
- Add that user to your IdP.
- Add other logging methods (Google OAuth, username/password).
- Remove that user from all accounts and then add them back, with the first account being the one you want to be their primary account.
Assigning Roles using SSO
Configuring Role Assertions for SSO in Lytics
The Lytics team can configure Single Sign-On (SSO) to assign roles via SSO. This configuration must be applied to the primary (master) accounts and any additional accounts to which users need access. For more information, refer to the account structure with SSO.
Important Note:
Users cannot be assigned to additional accounts via SSO alone; they must be manually invited to each Lytics account to which they need access.
To set up role assignments via SSO, customers must configure their Identity Provider (IDP) to include a group assertion for each account the user can access. The role of each user must be specified in the format:
lytics_<AID>_<Role>
Example of a SAML assertion for a user whose default account is 123 and also has access to account 234:
<samlp:Response xmlns:ds="<http://www.w3.org/2000/09/xmldsig#">
    xmlns:saml="urn:oasis:names:tc:SAML:2.0:assertion"
    xmlns:samlp="urn:oasis:names:tc:SAML:2.0:protocol" xmlns:xs="<http://www.w3.org/2001/XMLSchema">
    xmlns:xsi="<http://www.w3.org/2001/XMLSchema-instance">
    Destination="<https://api.lytics.io/api/user/verifyauth">
    Version="2.0">
    <saml:Assertion xmlns:saml="urn:oasis:names:tc:SAML:2.0:assertion"
        ID="id1" IssueInstant="2024-08-29T16:02:42Z"
        Issuer="<https://your-idp.example.com">
        Version="2.0">
        <ds:Signature xmlns:ds="<http://www.w3.org/2000/09/xmldsig#">123456>\</ds:Signature>
        <saml:AttributeStatement>
            <saml:Attribute Name="Email">
                <saml:AttributeValue xsi:type="xs:string">[email protected]</saml:AttributeValue>
            </saml:Attribute>
            <saml:Attribute Name="groups">
                <saml:AttributeValue
                    xmlns:xsi="<http://www.w3.org/2001/XMLSchema-instance">
                    xsi:type="xs:string">lytics_123_content_manager</saml:AttributeValue>
                <saml:AttributeValue
                    xmlns:xsi="<http://www.w3.org/2001/XMLSchema-instance">
                    xsi:type="xs:string">lytics_123_admin</saml:AttributeValue>
                <saml:AttributeValue
                    xmlns:xsi="<http://www.w3.org/2001/XMLSchema-instance">
                    xsi:type="xs:string">lytics_234_admin</saml:AttributeValue>
            </saml:Attribute>
        </saml:AttributeStatement>
    </saml:Assertion>
</samlp:Response>
Note: This example is simplified to focus only on the group's assertion; a real-world example would be more detailed.
Assignable roles
The following roles can be assigned:
| Assignable Role | Name | Description |
|---|---|---|
admin | Account Admin | Grants read/write access to all features and management functions. |
content_manager | Content Manager | Grants read/write access to content classification, collections, and topics. |
segment_manager | Audience Manager | Grants read/write access to audiences. |
marketer | Marketer | Grants read/write access to audiences and campaigns but cannot publish campaigns or export audiences. |
user_search | User Search | It grants the ability to search for users, view their profiles |
report_viewer | Discovery Insights | Grants access to explore Discovery insights |
report_manager | Report Manager | Can view, create, and delete audience insight reports |
observer | Observer | Grants read access to audiences and campaigns. |
data_manager | Data Manager | Grants read/write access to schemas, queries, users, content, and integrations, including PII user field access. |
campaign_manager | Campaign Manager | Grants read/write access to campaigns and audiences without PII, including exporting audiences without PII and publishing campaigns. |
orchestrate | Goal Manager | Grants read/write access to Goals and Experiences features. |
experience_manager | Experience Manager | Grants read/write access to Experiences. |
In addition to the predefined roles above, every granular permission slug can be used in a SAML group assertion. For example, lytics_<AID>_v2_segment_manage assigns the Audience Manage permission for that account. The full list of granular permission slugs and what each one grants is in Predefined Roles and Granular Permissions.
Implementing SSO with Okta
This document will walk you through how to implement Single Sign-On to the Lytics application with Okta as an identity provider. Lytics has applied to become an official Okta partner application. Still, while the partnership is being established, you can follow these instructions to set up the custom application in Okta, which covers the IDP configuration portion of the implementation.
-
From your Okta Administration panel, navigate to Applications and then Add Application and Create New App.
-
Under Platform, select Web, and for Sign on Method, choose SAML 2.0.

-
Under General Settings, you can enter the following values:
- App name: Lytics
- App Logo: You can save and upload the following image of the Lytics Logo:

-
Under SAML Settings, enter the following values:
- Single Sign-on URL:
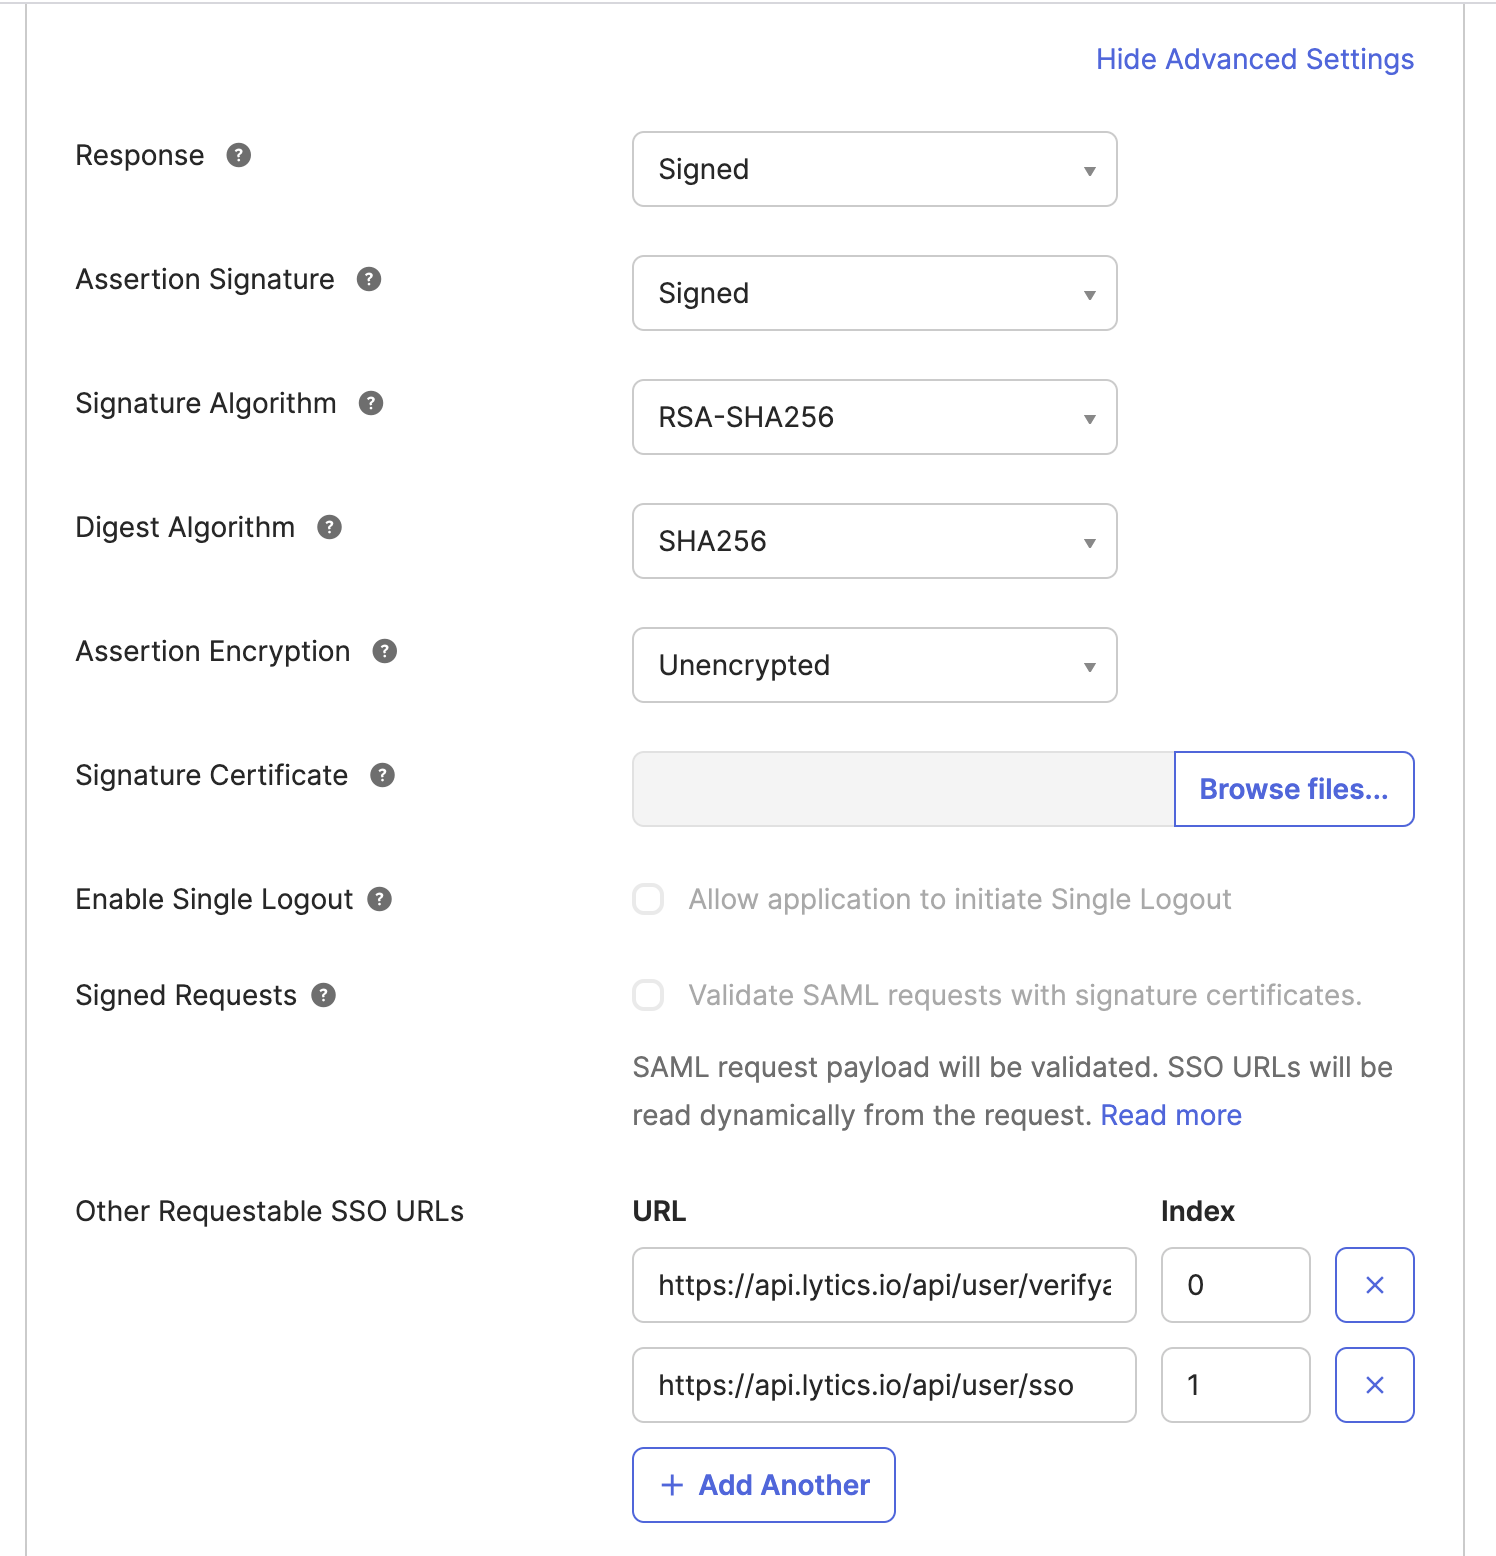
https://api.lytics.io/api/user/sso\ - Requestable SSO URLs: Add the following two URLs:
https://api.lytics.io/api/user/verifyauth(index 0)https://api.lytics.io/api/user/sso(index 1)
- Recipient URL:
https://api.lytics.io/api/user/verifyauth - Destination URL:
https://api.lytics.io/api/user/verifyauth - Audience URI (SP Entity ID):
app.lytics.com - Name ID format:
EmailAddress
NOTE: The
https://api.lytics.io/api/user/ssoURL should only be used for Okta. Other SSO providers use the default URLhttps://api.lytics.io/api/user/verifyauth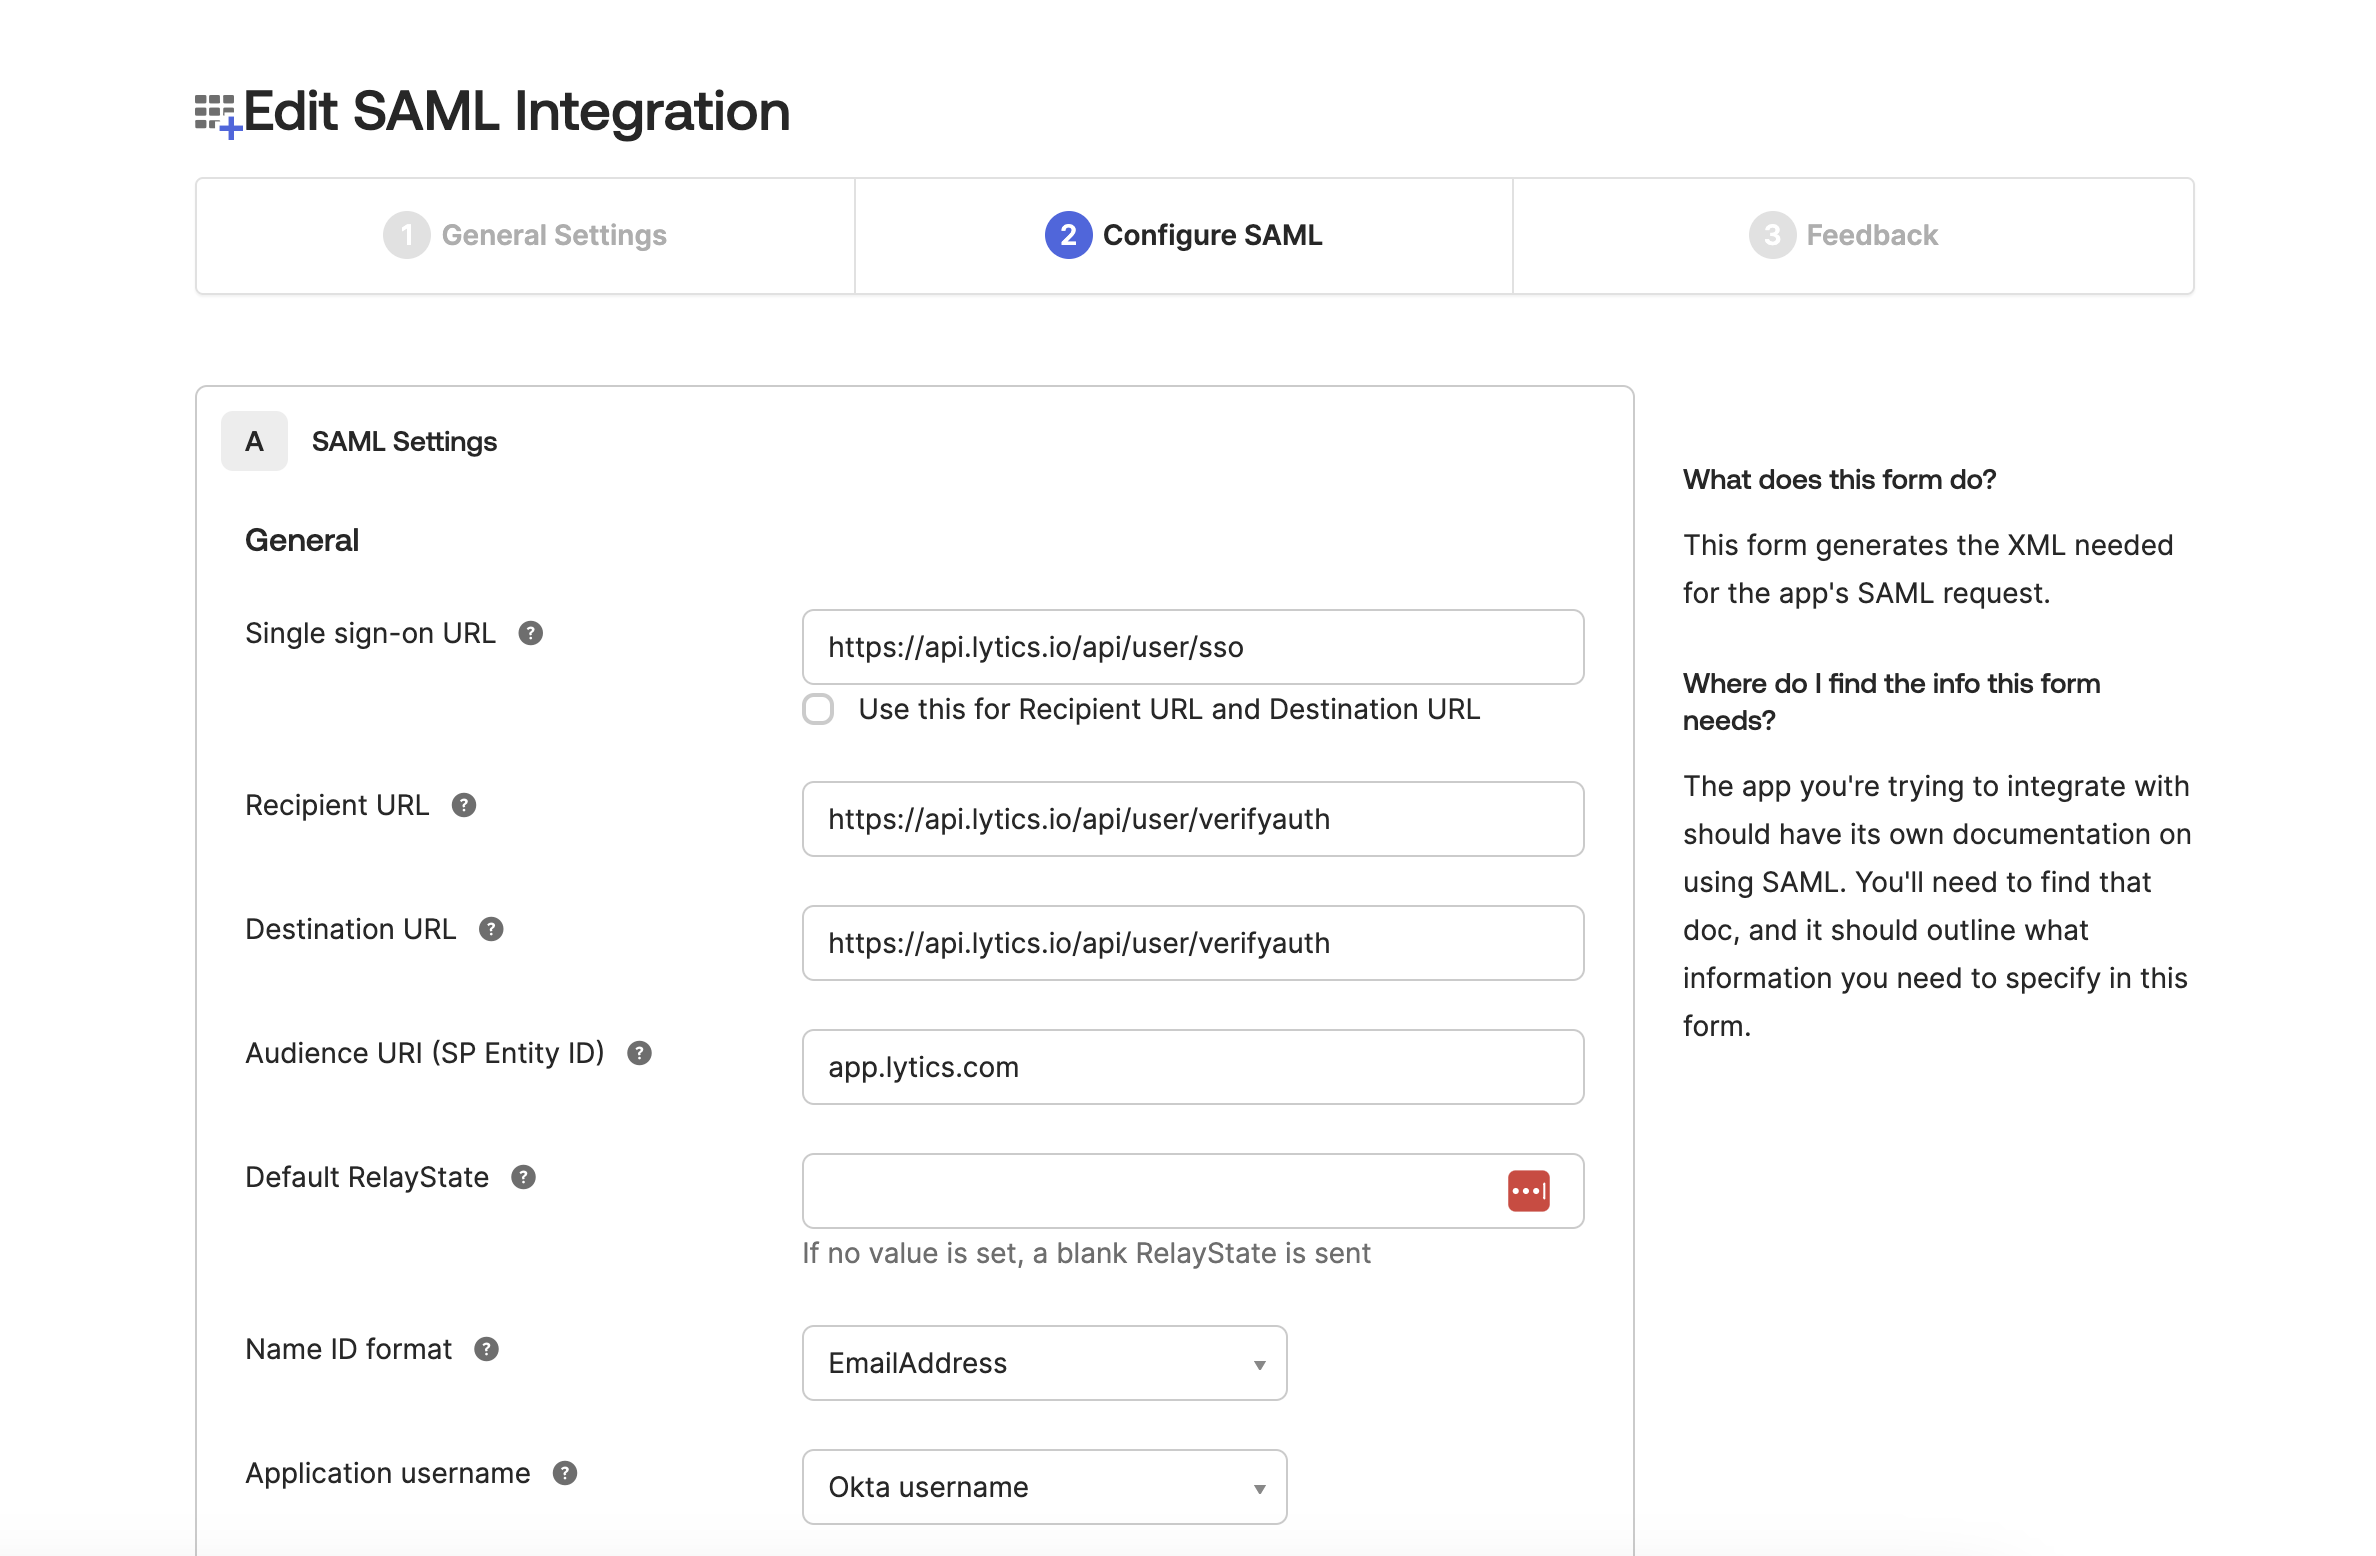
- Single Sign-on URL:
-
Click through the next step, and select Finish.
-
You can add users to view this application in their portal using the Assignments tab.
-
Navigate to the Sign On tab. And under settings, click on View Setup Instructions.
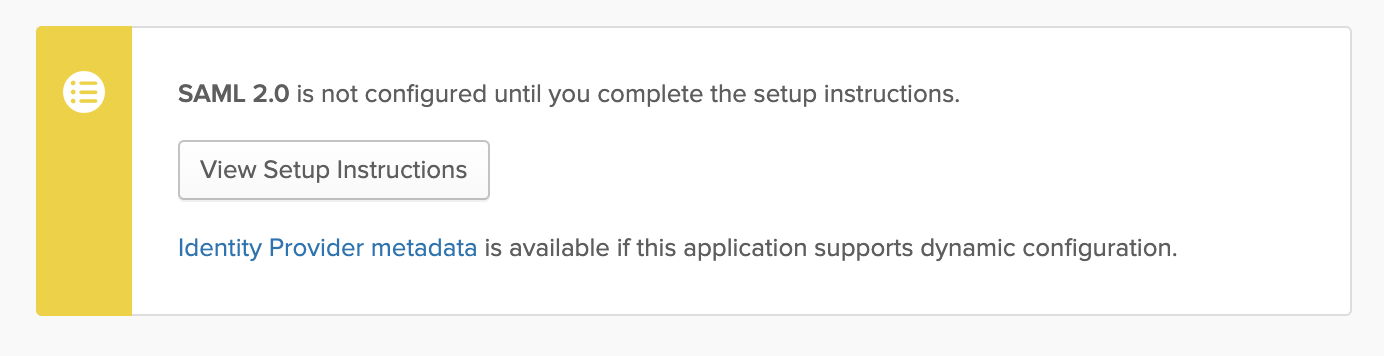
-
You will need to gather the information on this page and send it to Lytics for configuration of the Service Provider:
- Identity Provider Single Sign-On URL
- Identity Provider Issuer
- X.509 Certificate


Once Lytics has completed the service provider implementation, you may begin to test the SSO implementation through your Okta portal.
Implementing SSO with OneLogin
This document will walk you through how to implement Single Sign-On to the Lytics application with OneLogin as an identity provider. You can follow these instructions to set up the custom application in OneLogin, which covers the IDP configuration portion of the implementation.
- From the Administration menu, select Applications and then click Add App. Search for SAML Test Connector (Advanced) and select that app type.
- Under Configuration > Portal enter the following:
- Display Name:
Lytics - Make sure Visible in Portal is selected.
- For the rectangular icon, you can save and upload the following image:

- For the square icon, you can save and upload the following image:

- Display Name:
- Click Save to continue to the configuration process. Then click on the Configuration tab to set up the SAML details.
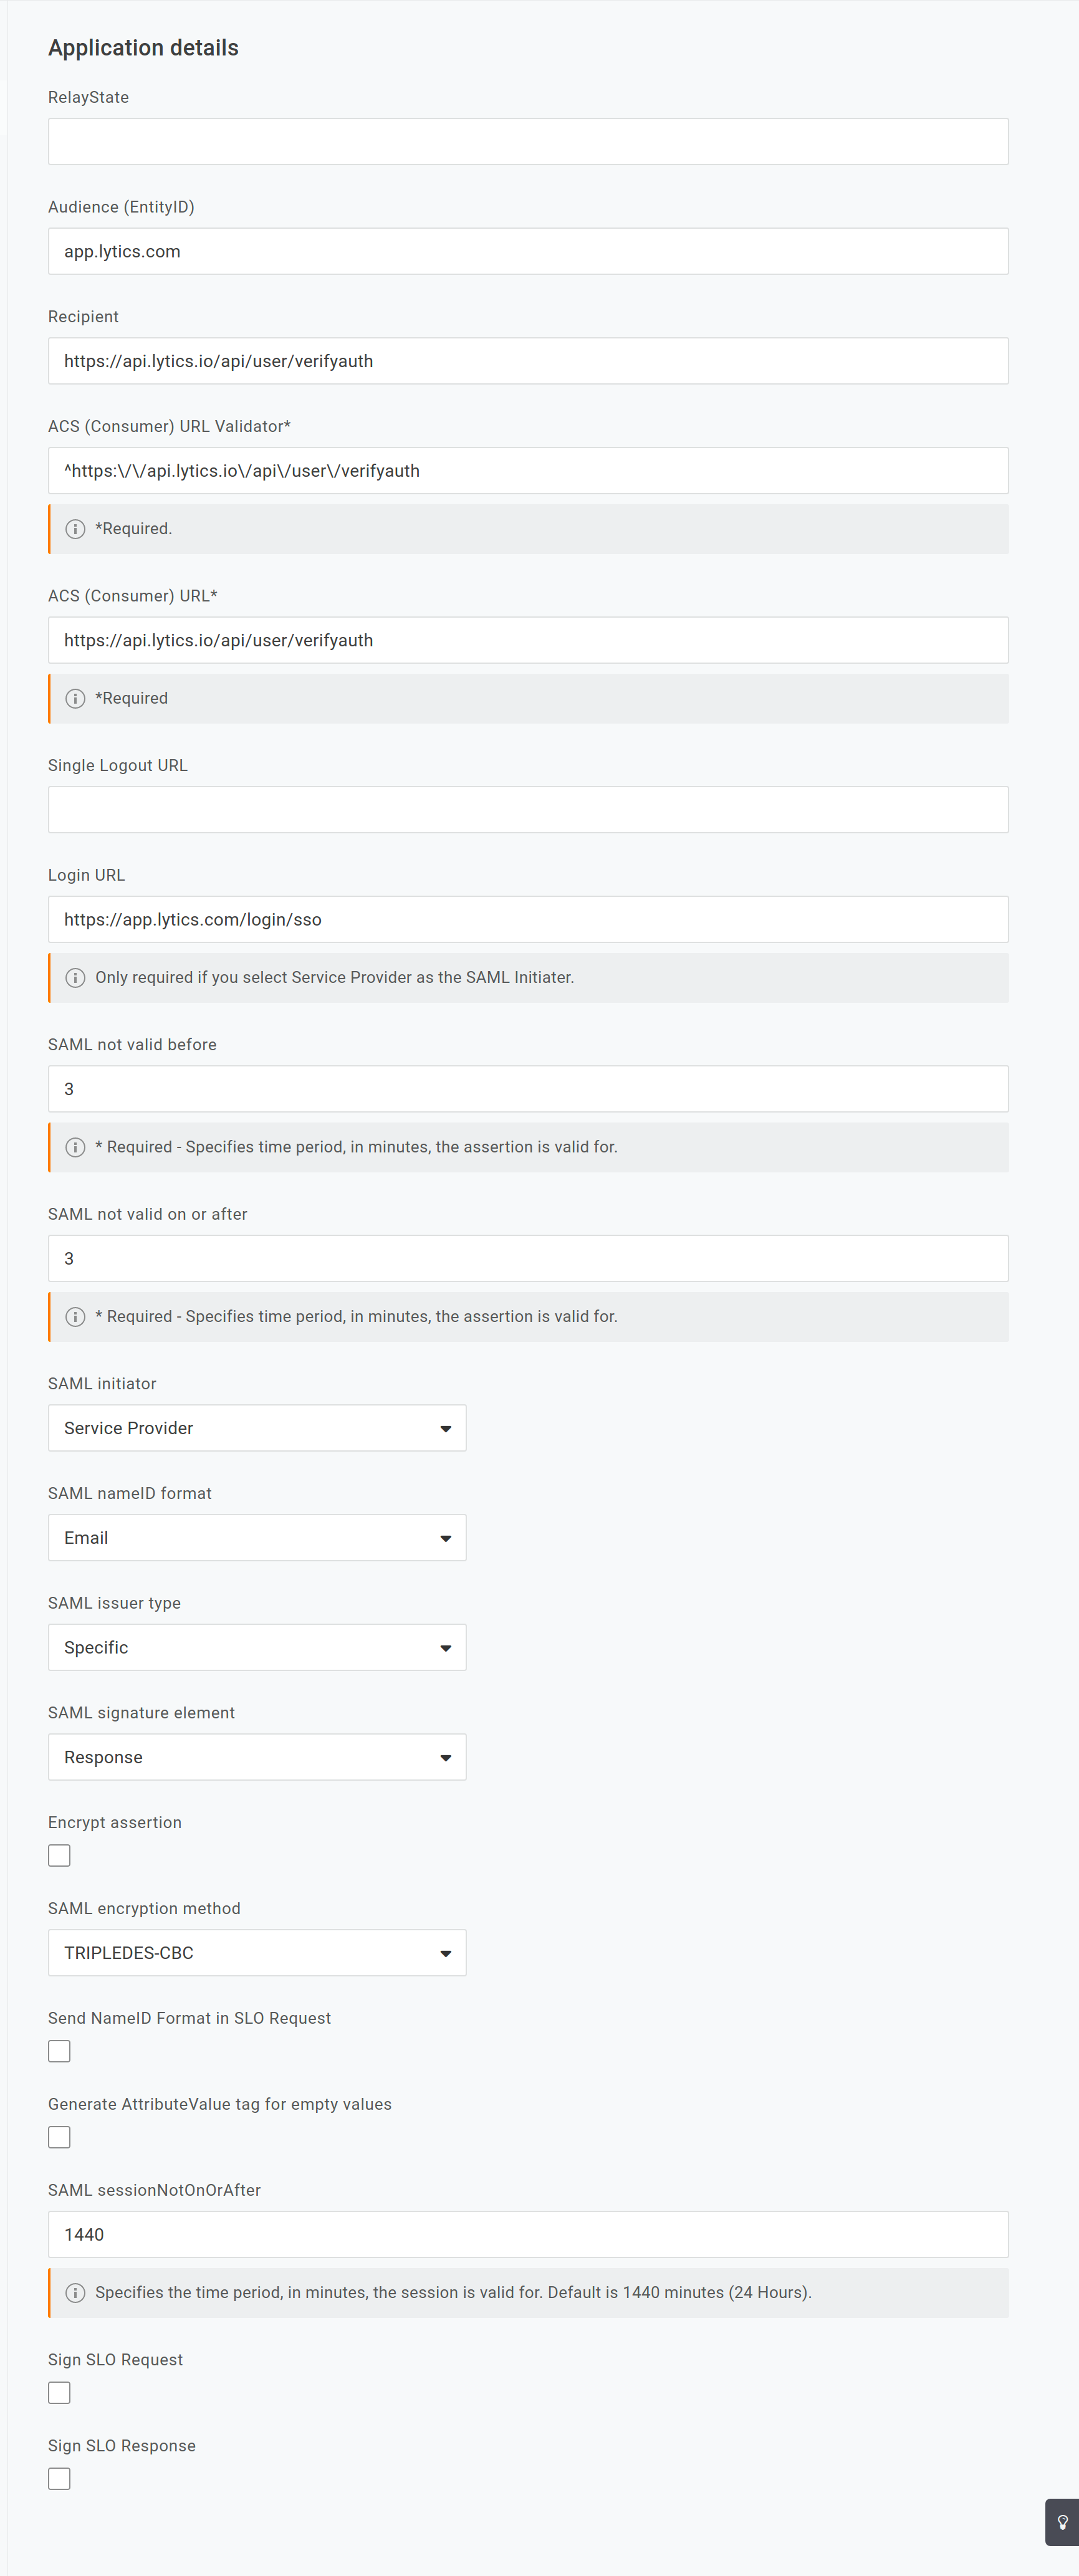
- Enter the following into the Application details:
- Audience (EntityID):
app.lytics.com - Recipient:
https://api.lytics.io/api/user/verifyauth - ACS (Consumer) URL Validator:
^https:\/\/api.lytics.io\/api\/user\/verifyauth - ACS (Consumer) URL:
https://api.lytics.io/api/user/verifyauth - Login URL:
https://app.lytics.com/login/sso - SAML initiator:
Service Provider - SAML nameID format:
Email
- Audience (EntityID):
- Click on the Save to save your configuration changes.
- You may configure any additional access details, such as users accessing this app in their portal for testing the integration under the User tab.
- Click on the SSO tab, and you will need to gather the information on this page and send it to Lytics for configuration of the Service Provider:
- X.509 Certificate (click View Details to see the full cert).
- Issuer URL
- SLO Endpoint (HTTP)


Once Lytics has completed the service provider implementation, you may begin to test the SSO implementation through your OneLogin portal.
Updated 2 months ago