

Fields & Mappings
Introduction
User fields and mappings are essential for materializing user profiles in such a way that provides businesses with a comprehensive view of their customers. User fields capture specific attributes and characteristics, while mappings transform and cleanse data for consistency and accuracy. This ensures your profiles are materialized in an ideal way to support highly relevant and personalized marketing campaigns. It's important to note that fields and mappings should be in place before any data is ingested on a stream.
What are fields?
Fields can include demographic data, behavioral data, or any other data point that is relevant to understanding and engaging with customers. In addition, fields themselves are defined by one of many common data types, such as strings, integers, sets, and maps.

What are mappings?
Sometimes, you may want to transform or cleanse messy data before it hits a profile. Other times, you may want to perform an operation or aggregation to reflect its usefulness for business decisions or segmentation — like aggregating multiple purchases into a combined lifetime spend metric. In either case, mappings provide the necessary translation layer to ensure each data point collected is clean and consistent. Most importantly, mappings guide the relationship between disparate data points and the final materialized user profile.
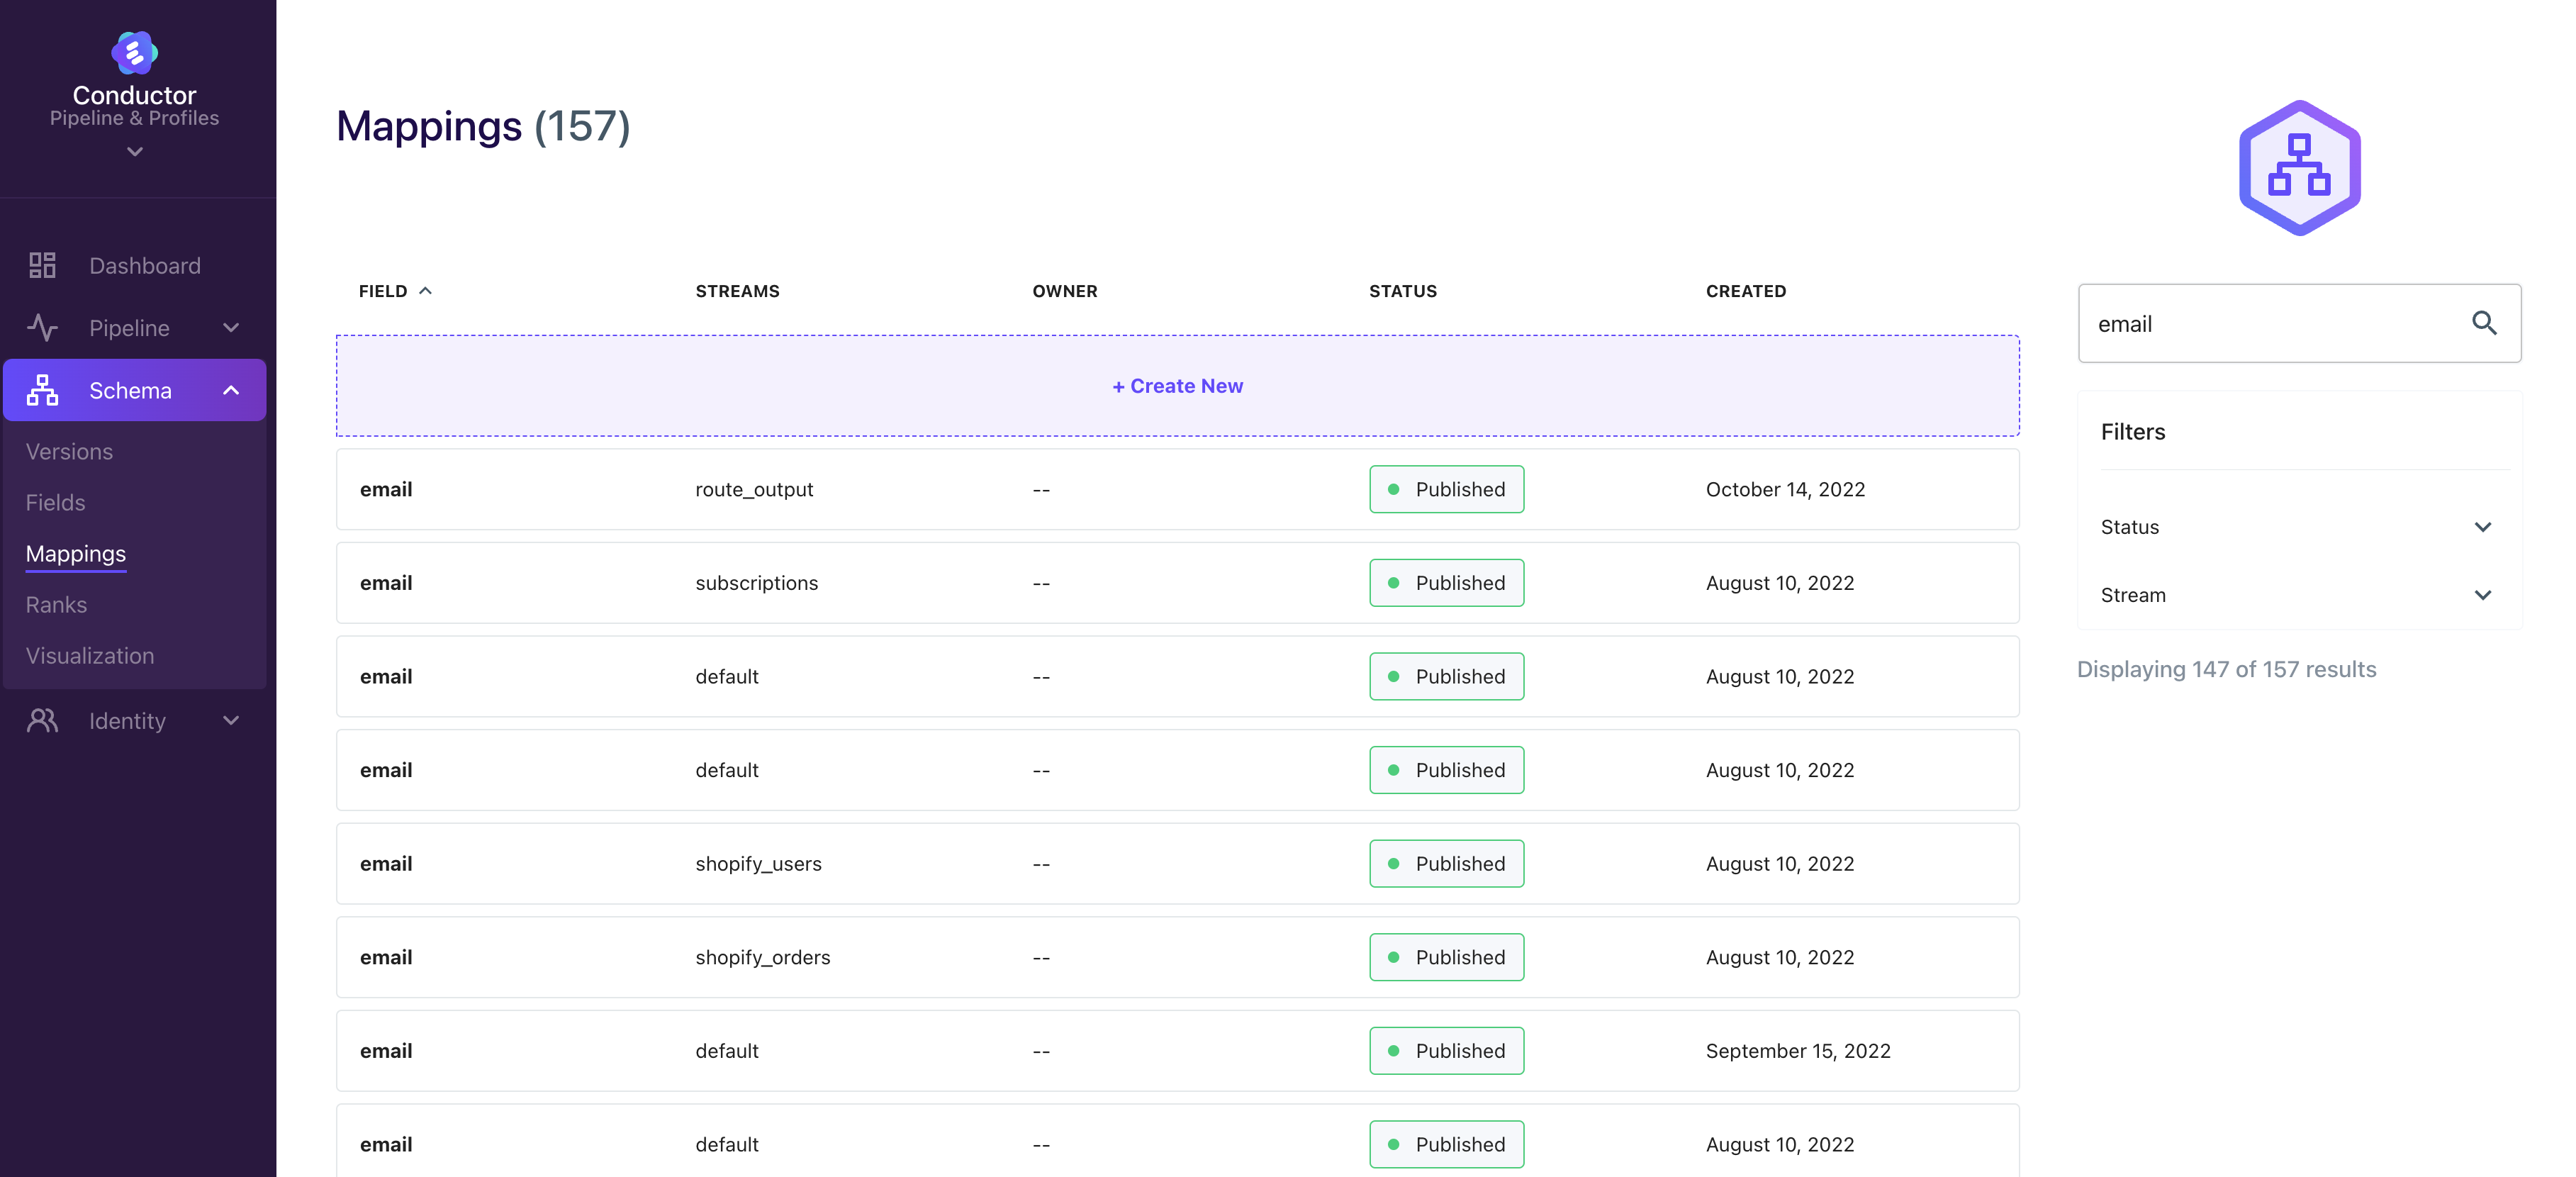
Managing User Fields
Lytics' profiles are composed of a collection of user fields. These fields have standard metadata (name, description) and typical properties you'd expect from a traditional database column (kind/type, capacity). In addition, each field has a merge operator that describes how we want to combine data from different sources at different times into a single field. For example, a field describing a customer's first purchase date would use a minimum operator to ensure that, regardless of the order in which Lytics sees purchase data, the first purchase date for the field would represent the earliest possible value.
Creating a User Field
To create a user field, go to Fields under the Schema tab in the main navigation. You'll see every field already defined in your account. Click + Create New to open the New Field drawer. To change a field that already exists, click Edit on its summary. The same drawer opens as Edit Field. Lytics-managed fields can't be edited.

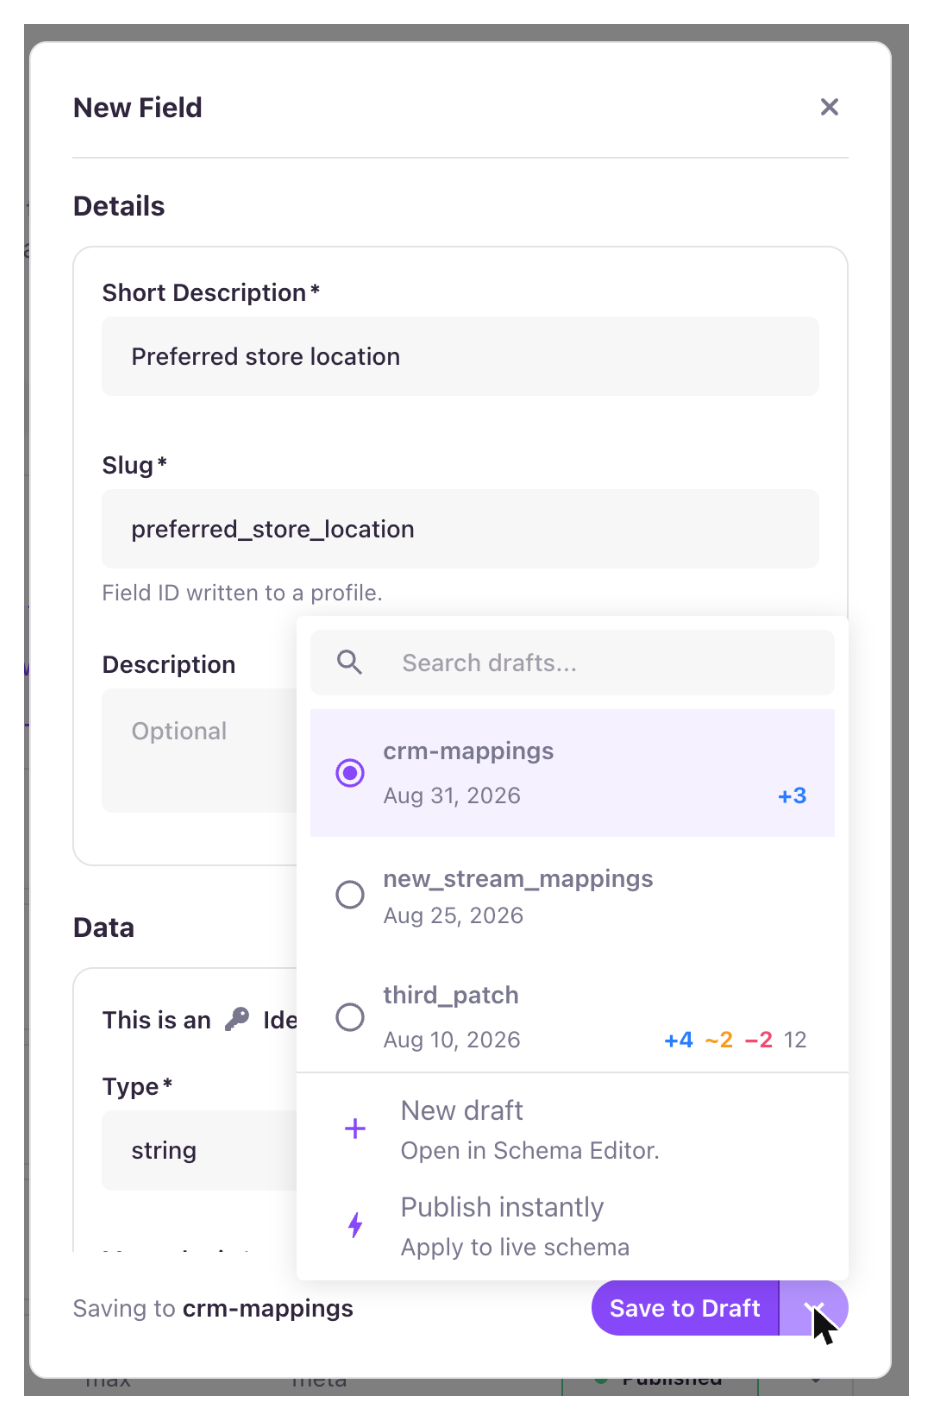
When you're done, save from the drawer footer. If your account uses Schema Drafts, the footer offers a few options for where the change goes. See Saving Changes.
The drawer collects the following properties for the field.
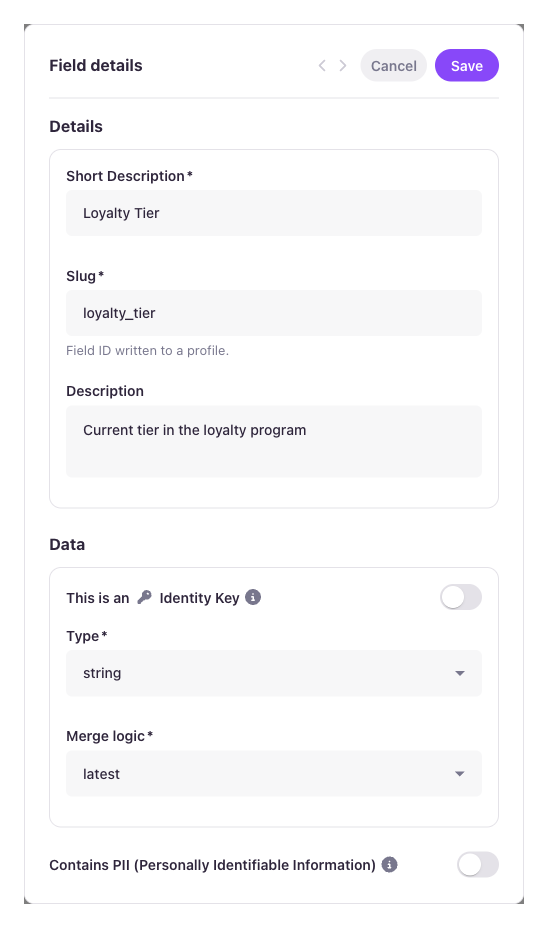
- Short Description: A user-friendly name that will be used throughout the UI to provide additional context to the field.
- Slug: An alphanumeric key that defines how this user field will be stored on the profile.
- Description: An optional long description that provides additional context in a few areas throughout the UI.
- Type: The type of data that will be stored in this field.
- Categories: An optional categorization for the field in question. This helps further inform the intent of the field and enhances our ability to measure the comprehensiveness of your user profile and overall C360 readiness index (coming soon).
- Identity: A field to identify a user within Lytics or in a downstream channel tool.
- Governance: Any context related to consent, governance, etc.
- Interests: Information supporting surfacing and understanding a consumer's interests, such as a product purchase.
- Behavior: Interactions to be used in understanding behavioral patterns such as page views and non-conversion-related clicks.
- First Party: Any standard first-party data.
- Intelligence: ML/AI-related attributes such as LTV ingested from BigQuery or scores related to Lytics models.
- Activation: Data points related to supporting or monitoring activation in downstream channels.
- Merge Logic: How the merge between two different data points mapped to the same field will be handled.
- Identity Key: Whether the field should be used as a key to link two or more independent events together. Identity keys also offer advanced identity optimization settings — Hierarchy-Based Merge Resolution, Compact Over, and Compact After Days — which control graph compaction for that key. Only change these if you understand their effect on identity resolution.
- Keep Days: The number of days to keep values for this field.
- Capacity: The number of values to store in the set.
- Contains PII (Personally Identifiable Information): A true or false statement identifying if the field is to be considered PII (Personally Identifiable Information).
Data Types
Standard:
| Data Type | Description |
|---|---|
| string | Stores a sequence of characters (letters, numbers, punctuation) with no set limitation for length. |
| integer | Stores positive or negative whole numbers without decimals. 64-bit. |
| number | Stores positive or negative numbers with decimals. 64 bit. |
| boolean | Stores only true or false values. |
| date | Stores datetime. |
Advanced:
| Data Type | Description |
|---|---|
[]string | Stores an array of unique string values |
[]time | Stores an array of unique datetime values |
ts[]string | Stores a time-ordered unique array of strings (useful for keeping track of the order in which users performed a set of unique events) |
map[string]datatype | Stores a set of key-value pairs. The key is a unique string and the value is the specified data type. The value by default will be the most recent value (with the exception of map[string]intsum which sums the new value with the previous value stored in the same key). Examples: map[string]string, map[string]int, map[string]number, map[string]bool, map[string]time |
Merge Operators
Supported merge operators are as follows:
- Minimum: When comparing two values, take the smallest one.
- Maximum: When comparing two values, take the largest one.
- Oldest: When comparing two values, take the one with the oldest timestamp.
- Latest: When comparing two values, take the one with the most recent timestamp.
- Merge: When comparing two sets, take the union of the two.
- Sum: When adding numerics together
Capacity and Keep Days
The keep_days and capacity properties specify the amount of time to keep values, and the number of values to retain in a field with a set or map data type, respectively. Any values in the field older than keep_days in the past will be discarded when the profile is evaluated, and no more than capacity values will be stored in the set. When values are removed from a field due to exceeding the capacity limit, they are removed in FIFO (first in, first out) order. If keep_days or capacity are set to 0 or omitted when creating a field, they are ignored.
Maintaining a User Field
As your schema grows in complexity, keeping an eye on the defined relationships is essential. The field summary provides a window into how a single user field is being populated from various channels. This view is excellent for diagnosing what may be causing a conflict or that things are operating healthily.

Deleting User Fields
Sometimes you may want to remove a user field from your schema altogether. This can be done from the field summary pictured above. Click the menu with three dots to the right of Edit and you will be presented with a sub-menu. This menu contains a Delete option.

Deleting a field can have major implications once the change has been published. It is important to understand the implications of deleting a field and how it will impact how data is processed and mapped to user profiles.
What happens when I delete a field?
As shown in the screenshot above, confirming a deletion doesn't take effect right away. The deletion is saved as an unpublished change. Without Schema Drafts, it goes into the unpublished schema version. With Schema Drafts, you choose a draft when you confirm. Either way, you must publish a new version of your schema for the change to take effect. At that point, it is essential to understand the following:
- Data previously collected and mapped to that field will no longer be accessible on the user profile.
- Any existing mappings related to that field will no longer be implemented as new events occur.
- Any mappings that are associated with this field will need to be independently deleted. Failing to delete associated mappings manually will result in validation errors when attempting to publish the schema version.
Managing Mappings
Mappings are expressions that provide instructions for how to perform transformations (if any) on raw data. They can range from simple to expressive or even include conditional logic.
Mappings occur when data is processed or observed within Lytics' real-time profile pipeline. Multiple mappings can map data into a single field, where the field's merge operator controls updates.
Let's say we have a user currently visiting the lytics.com website, and we observe the following data sent from JSTag:
{
  "email_address": "[email protected]",
  "_uid": "123e4567-e89b-12d3-a456-426614174000",
  "utm_campaign": "exciting_campaign",
  "url": "www.lytics.com/get-started",
  "event_type": "page-view"
}
Based on the data from the event, we might consider some of the following mappings:
email_address: no transformation performed, and takes the value of the email as-is.email(email_address): use the email function to validate that the email address is syntactically valid.email(oneof(email_address, emailAddress)): coalesce either email_address or emailAddress to extract the value of the email address.count(event_type) IF event_type == "page-view": sets up a counter to track page views, only if the event is of type "page-view".
Creating a Mapping
To create a mapping visit Mappings under the Schema tab in the main navigation at the left of your window. Here you will find a list of all current mapping definitions. Clicking on + Create New opens the New Mapping drawer over the list.

In the drawer, define the parameters for your new mapping:
- Stream name: The name of the stream for which to apply the mapping to. This can't be changed after the mapping is created.
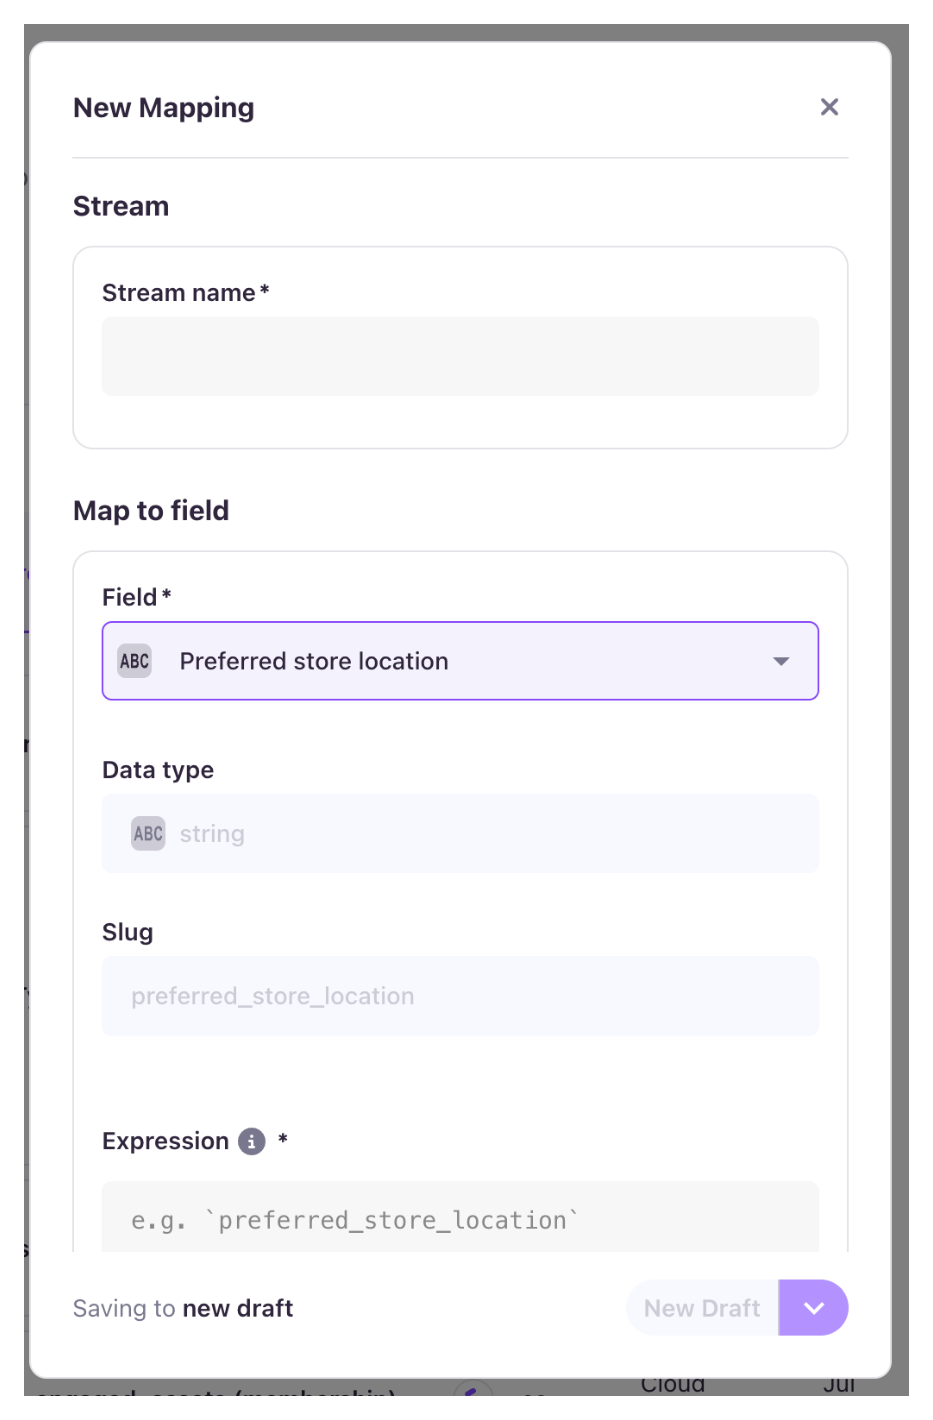
- Field: The user field the mapping writes to. Its type and slug are shown once you pick it. If the field doesn't exist yet, you can create it right from the picker. See Creating the field from the mapping.
- Expression: The rules to apply to the mapping.
- Condition: An optional condition statement of when to apply the mapping. Turn on the Condition toggle to add one.
When you're done, save from the drawer footer. See Saving Changes for the options on your account.
To change an existing mapping, open it from the list and click Edit Mapping. The same drawer opens. A mapping's stream and field can't be changed after it's created. To move a mapping to a different stream or field, delete it and create a new one.
Creating the field from the mapping
You don't have to create the target field first. Open the Field picker and choose + Create new field at the top of the list. A panel slides in beside the mapping with the same options as in Creating a User Field. Click Done to go back to the mapping, or Cancel to discard the field.
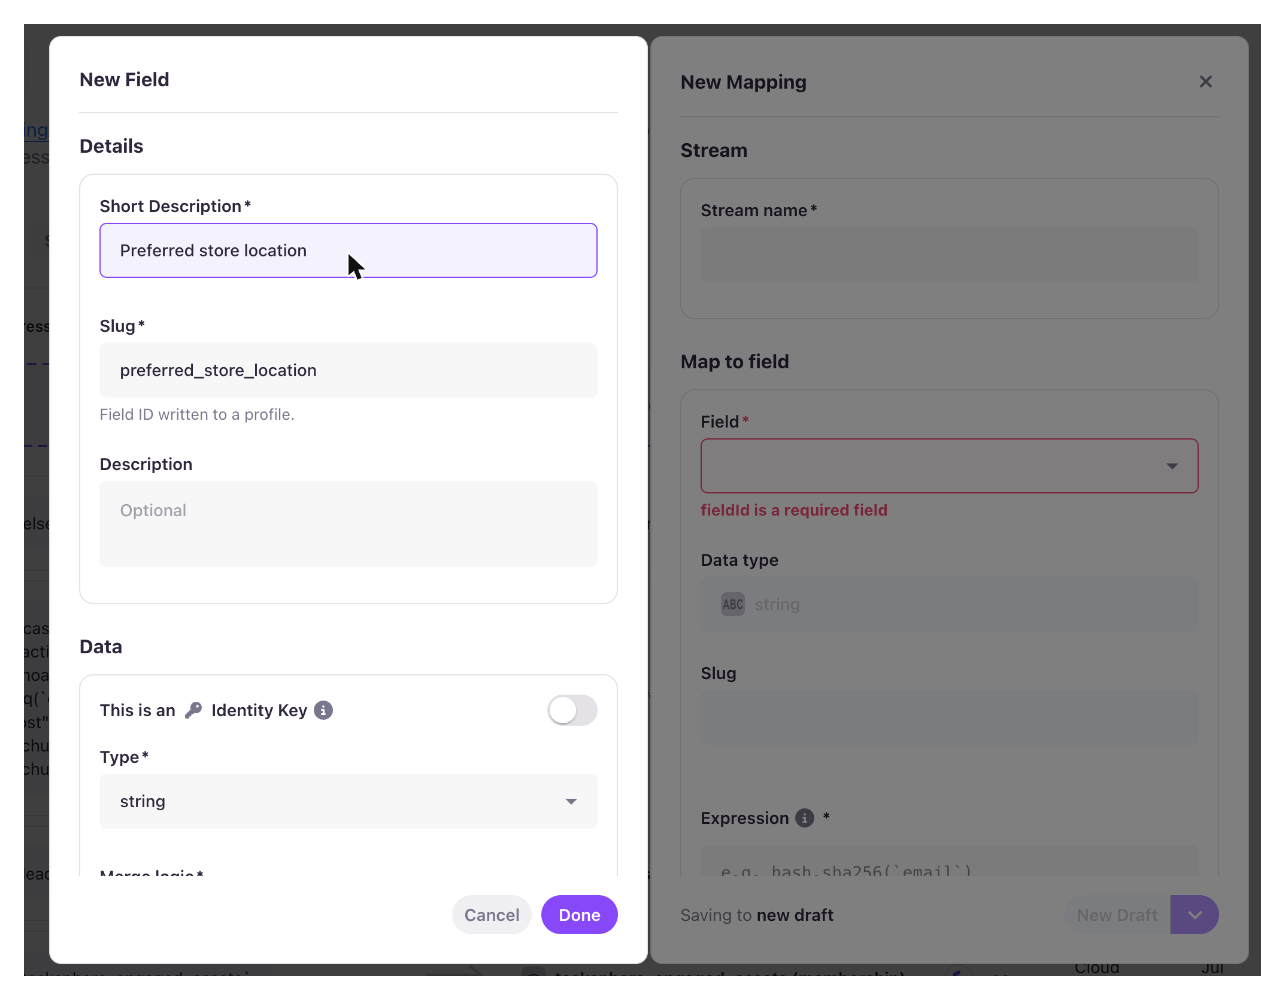
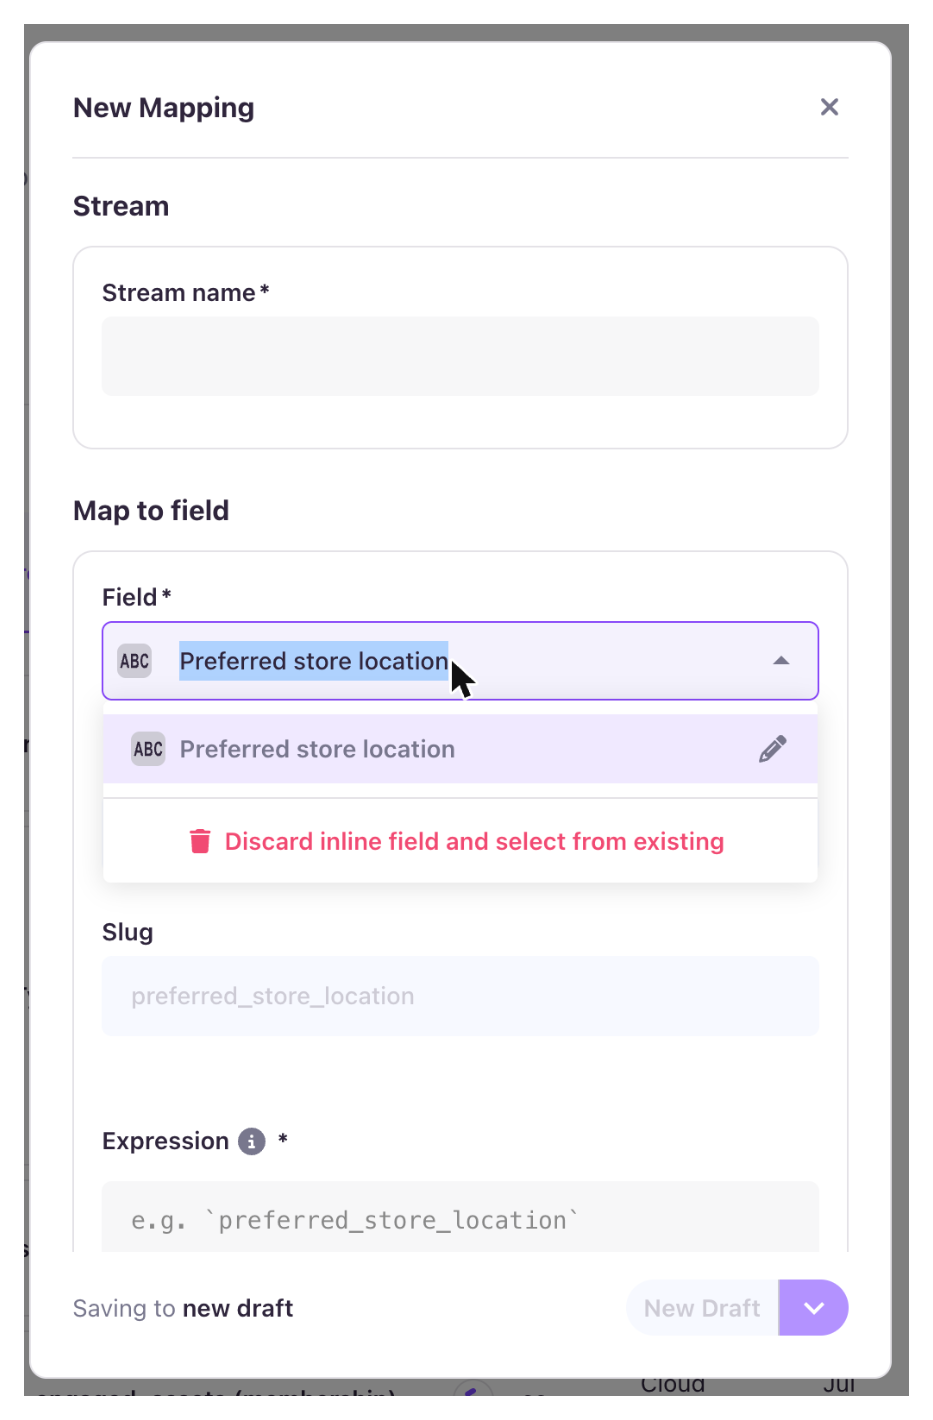
The new field isn't saved on its own. Saving the mapping saves both together. Once the new field is selected, the picker shows only that field. Use the pencil icon to reopen the panel and make changes, or choose Discard inline field and select from existing to go back to the full list. With Schema Drafts, both go into the same draft. Without it, the save button reads Create field and mapping.
Maintaining Mappings
Since mappings depend on the data available to a stream, monitoring that things are working as desired is important. For instance, if a key changes or stops streaming entirely, it may negatively impact your profiles and, ultimately, your marketing efforts. As such, the mapping summary view is available to review the health of mappings and provide a path for editing mappings in the future if necessary.
Deleting Mappings
Sometimes you may want to remove a mapping from your schema altogether. This can be done from the mapping summary pictured above. Simply click the menu with three dots to the right of Edit Mapping and you will be presented with a sub-menu. This menu contains a Delete option.

Deleting a mapping can have major implications once the change has been published. It is important to understand the implications of deleting a mapping and how it will impact how data is processed and mapped to user profiles.
What happens when I delete a mapping?
As shown in the screenshot above, confirming a deletion doesn't take effect right away. The deletion is saved as an unpublished change. Without Schema Drafts, it goes into the unpublished schema version. With Schema Drafts, you choose a draft when you confirm. Either way, you must publish a new version of your schema for the change to take effect. At that point, it is crucial to understand the following:
- Data previously collected via the mapping being deleted will remain on the profile as mapping changes only impact event processing from when the change has been published.
- Fields associated with the mapping will not be impacted or deleted.
Saving Changes
The New Field, Edit Field, New Mapping, and Edit Mapping drawers save from their footers. What you see there depends on whether your account uses Schema Drafts.
Accounts without Schema Drafts
The footer has one button: Create field, Create mapping, or Save, depending on what you're doing. Your change goes into the unpublished schema version. It reaches the live schema only after you publish that version from Building Profiles > Schema > Versions. See Schema Versions.
Accounts with Schema Drafts
The footer has a split button. Use the arrow to choose what happens when you save, then click the main button to run it. The main button becomes active once you change something in the form.
- Save to Draft adds the change to a draft you pick from the list. The draft then opens in the Schema Editor.
- New draft creates a draft with just this change and opens it in the Schema Editor.
- Publish instantly publishes the change straight to the live schema. You name the version first. Only users with permission to publish the schema see this option.
See Saving a single field or mapping on the Schema Drafts page for more detail on each action.
Deletions don't go through the drawer. On accounts with Schema Drafts, confirming a deletion asks which draft it should go into.
Updated about 4 hours ago