

Lead Capture
TL;DR
This document outlines how to leverage Lytics' real-time personalization engine to identify visitors who lack the strong identifiers necessary to link web-based behavioral insights with other activation channels such as email.
Background
What is lead capture?
Traditionally, lead capture involves gathering information from individuals interested in your products or services, such as names, email addresses, and phone numbers. This occurs when people visit your website, subscribe to your newsletter, download resources, or interact with your content. However, in recent years, the role of lead capture within your global consumer engagement strategy has undergone significant transformation.
Why is it important?
- Accurate measurement of attribution and conversions is paramount to assessing the effectiveness of your marketing efforts.
- With the challenges posed by the deprecation of third-party cookies, particularly impacting top-of-funnel ad campaigns, lead capture becomes a crucial data collection and targeting strategy.
- In an era of short attention spans, every interaction must be hyper-relevant and efficient, making lead capture instrumental in delivering personalized content.
- As marketing budgets face constraints, each dollar spent must yield maximum potential, and lead capture aids in optimizing resource allocation.
- Building comprehensive consumer profiles representing behavioral patterns over time is essential to get the most out of the latest advancements in AI.
See it in action.
Lytics' real-time personalization engine lets you first identify the current web visitor, programmatically review their profile, and ultimately decide if a campaign should be delivered to their browser to close gaps in that profile.
Instructions
Below, you'll find a detailed guide on how to execute this use case. At the end, you'll find additional reading, which will help you learn how to extend and customize this use case further.
Requirements
- Have access to an active Lytics account.
- Ability to add JavaScript to your website via tag manager or CMS.
- Entry-level knowledge of JavaScript. (Don't worry; it is mostly "copy and paste" here.)
Install Lytics Core SDK
Before executing this use case, your website must be properly configured with the core Lytics SDK (JavaScript tag). Please refer to our installation documentation to confirm the tag is present before continuing.
Activate Required Attributes
As an admin user of Lytics, you can enable or disable any attributes from being surfaced to the web via our JavaScript SDK. Depending on how your account has been configured, you may need to allow some of the required attributes for this particular use case.
Required Attributes:
| Attribute | |
|---|---|
| anonymous_profiles | This computed attribute, available by default in all accounts, represents visitors who do not yet have a strong identifier, such as an email address. |
| known_profiles | This computed attribute, available by default in all accounts, represents visitors with strong identifiers such as email addresses. |
Configure Web Experience
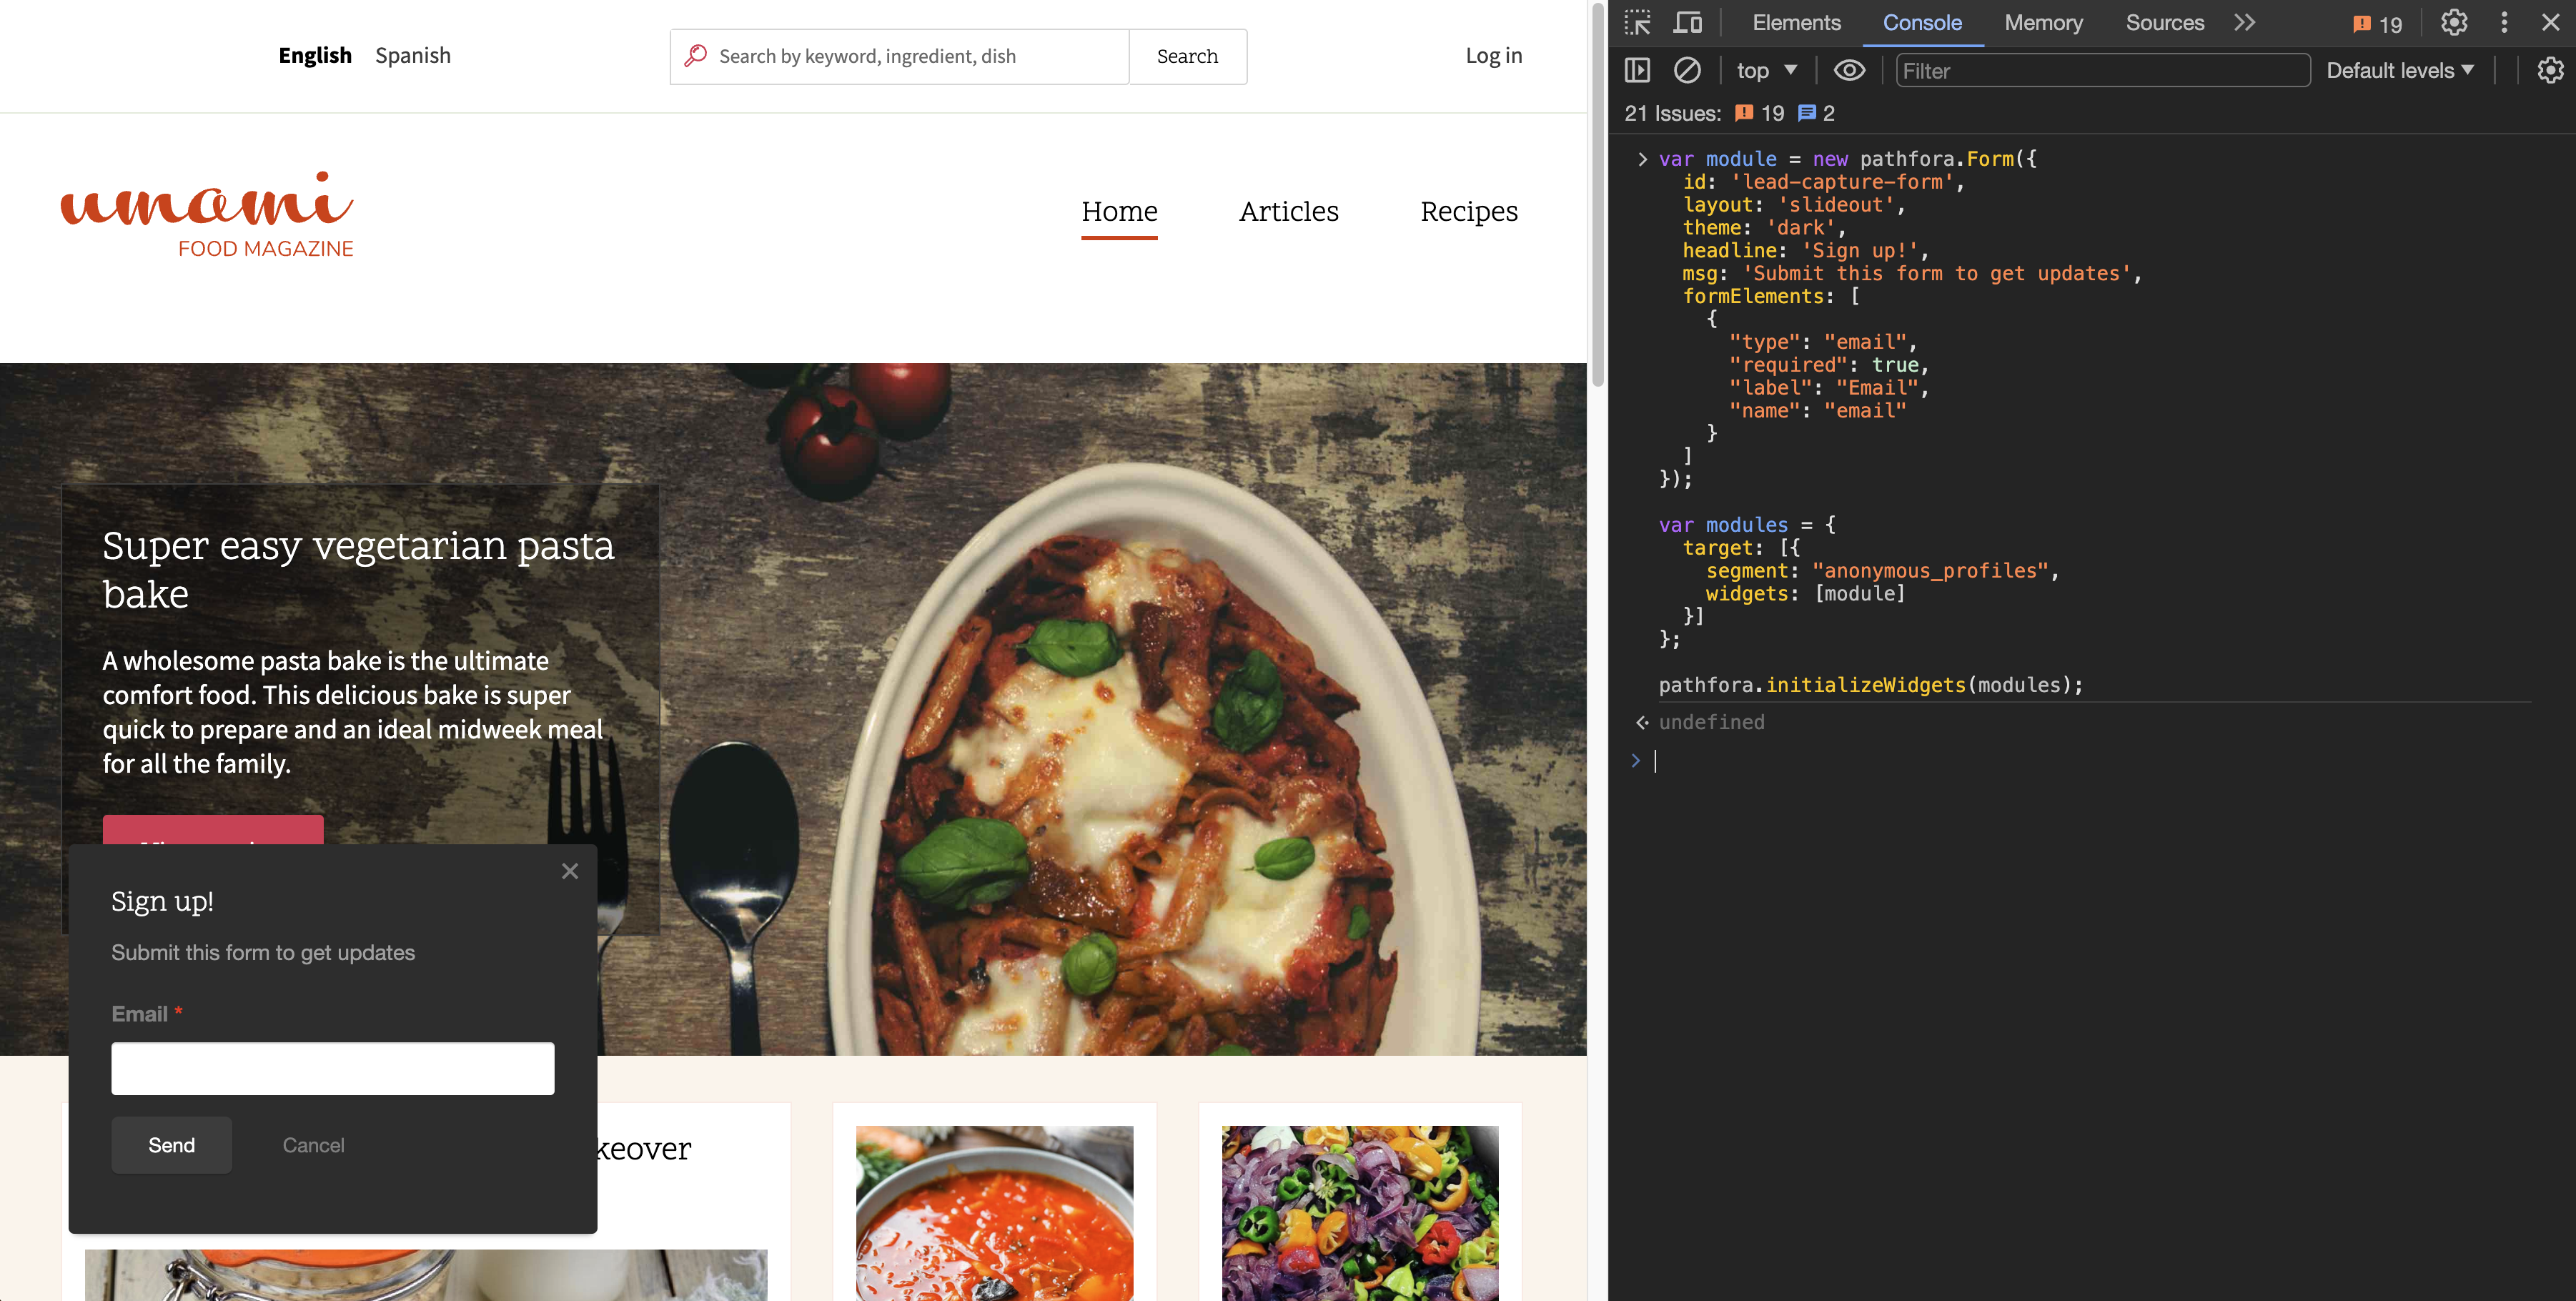
To execute this use case, we will launch a simple lead capture form at the bottom left of your site. The lead capture will focus on collecting email addresses for the user and use a generic "dark" theme along with some boilerplate messaging. For best results, we recommend leveraging an offer of some sort that will resonate with your customers to entice them to "sign up" and identify themselves. In return, you'll gain much knowledge about this visitor, strengthen your consumer record, and unlock the ability to connect in channels outside of just the web.
<script type="text/javascript">
  jstag.on('pathfora.publish.done', function(topic, event){

    var module = new pathfora.Form({
      id: 'lead-capture-form',
      layout: 'slideout',
      theme: 'dark',
      headline: 'Sign up!',
      msg: 'Submit this form to get updates',
      formElements: [
        {
          "type": "email",
          "required": true,
          "label": "Email",
          "name": "email"
        }
      ]
    });

    var modules = {
      target: [{
        segment: "anonymous_profiles",
        widgets: [module]
      }]
    };

    pathfora.initializeWidgets(modules);
  });
</script>
Bonus Idea
You can extend this use case to progressively improve your visitor profiles by surfacing data capture forms specific to gaps in their profile data. For instance, when they are unknown, only ask for email. As soon as you have an email, perhaps you want to know more about their preferences or learn how to improve a particular portion of your product/offering.
Configure Reporting
The Lytics platform has a pre-defined schema to facilitate this use case. As such, we recommend building a custom report from within our UI to showcase your progress in converting unknown or anonymous visitors to known visitors with a strong identifier. There are many ways to configure this type of reporting, but here we'll guide you through a basic example to measure impact.
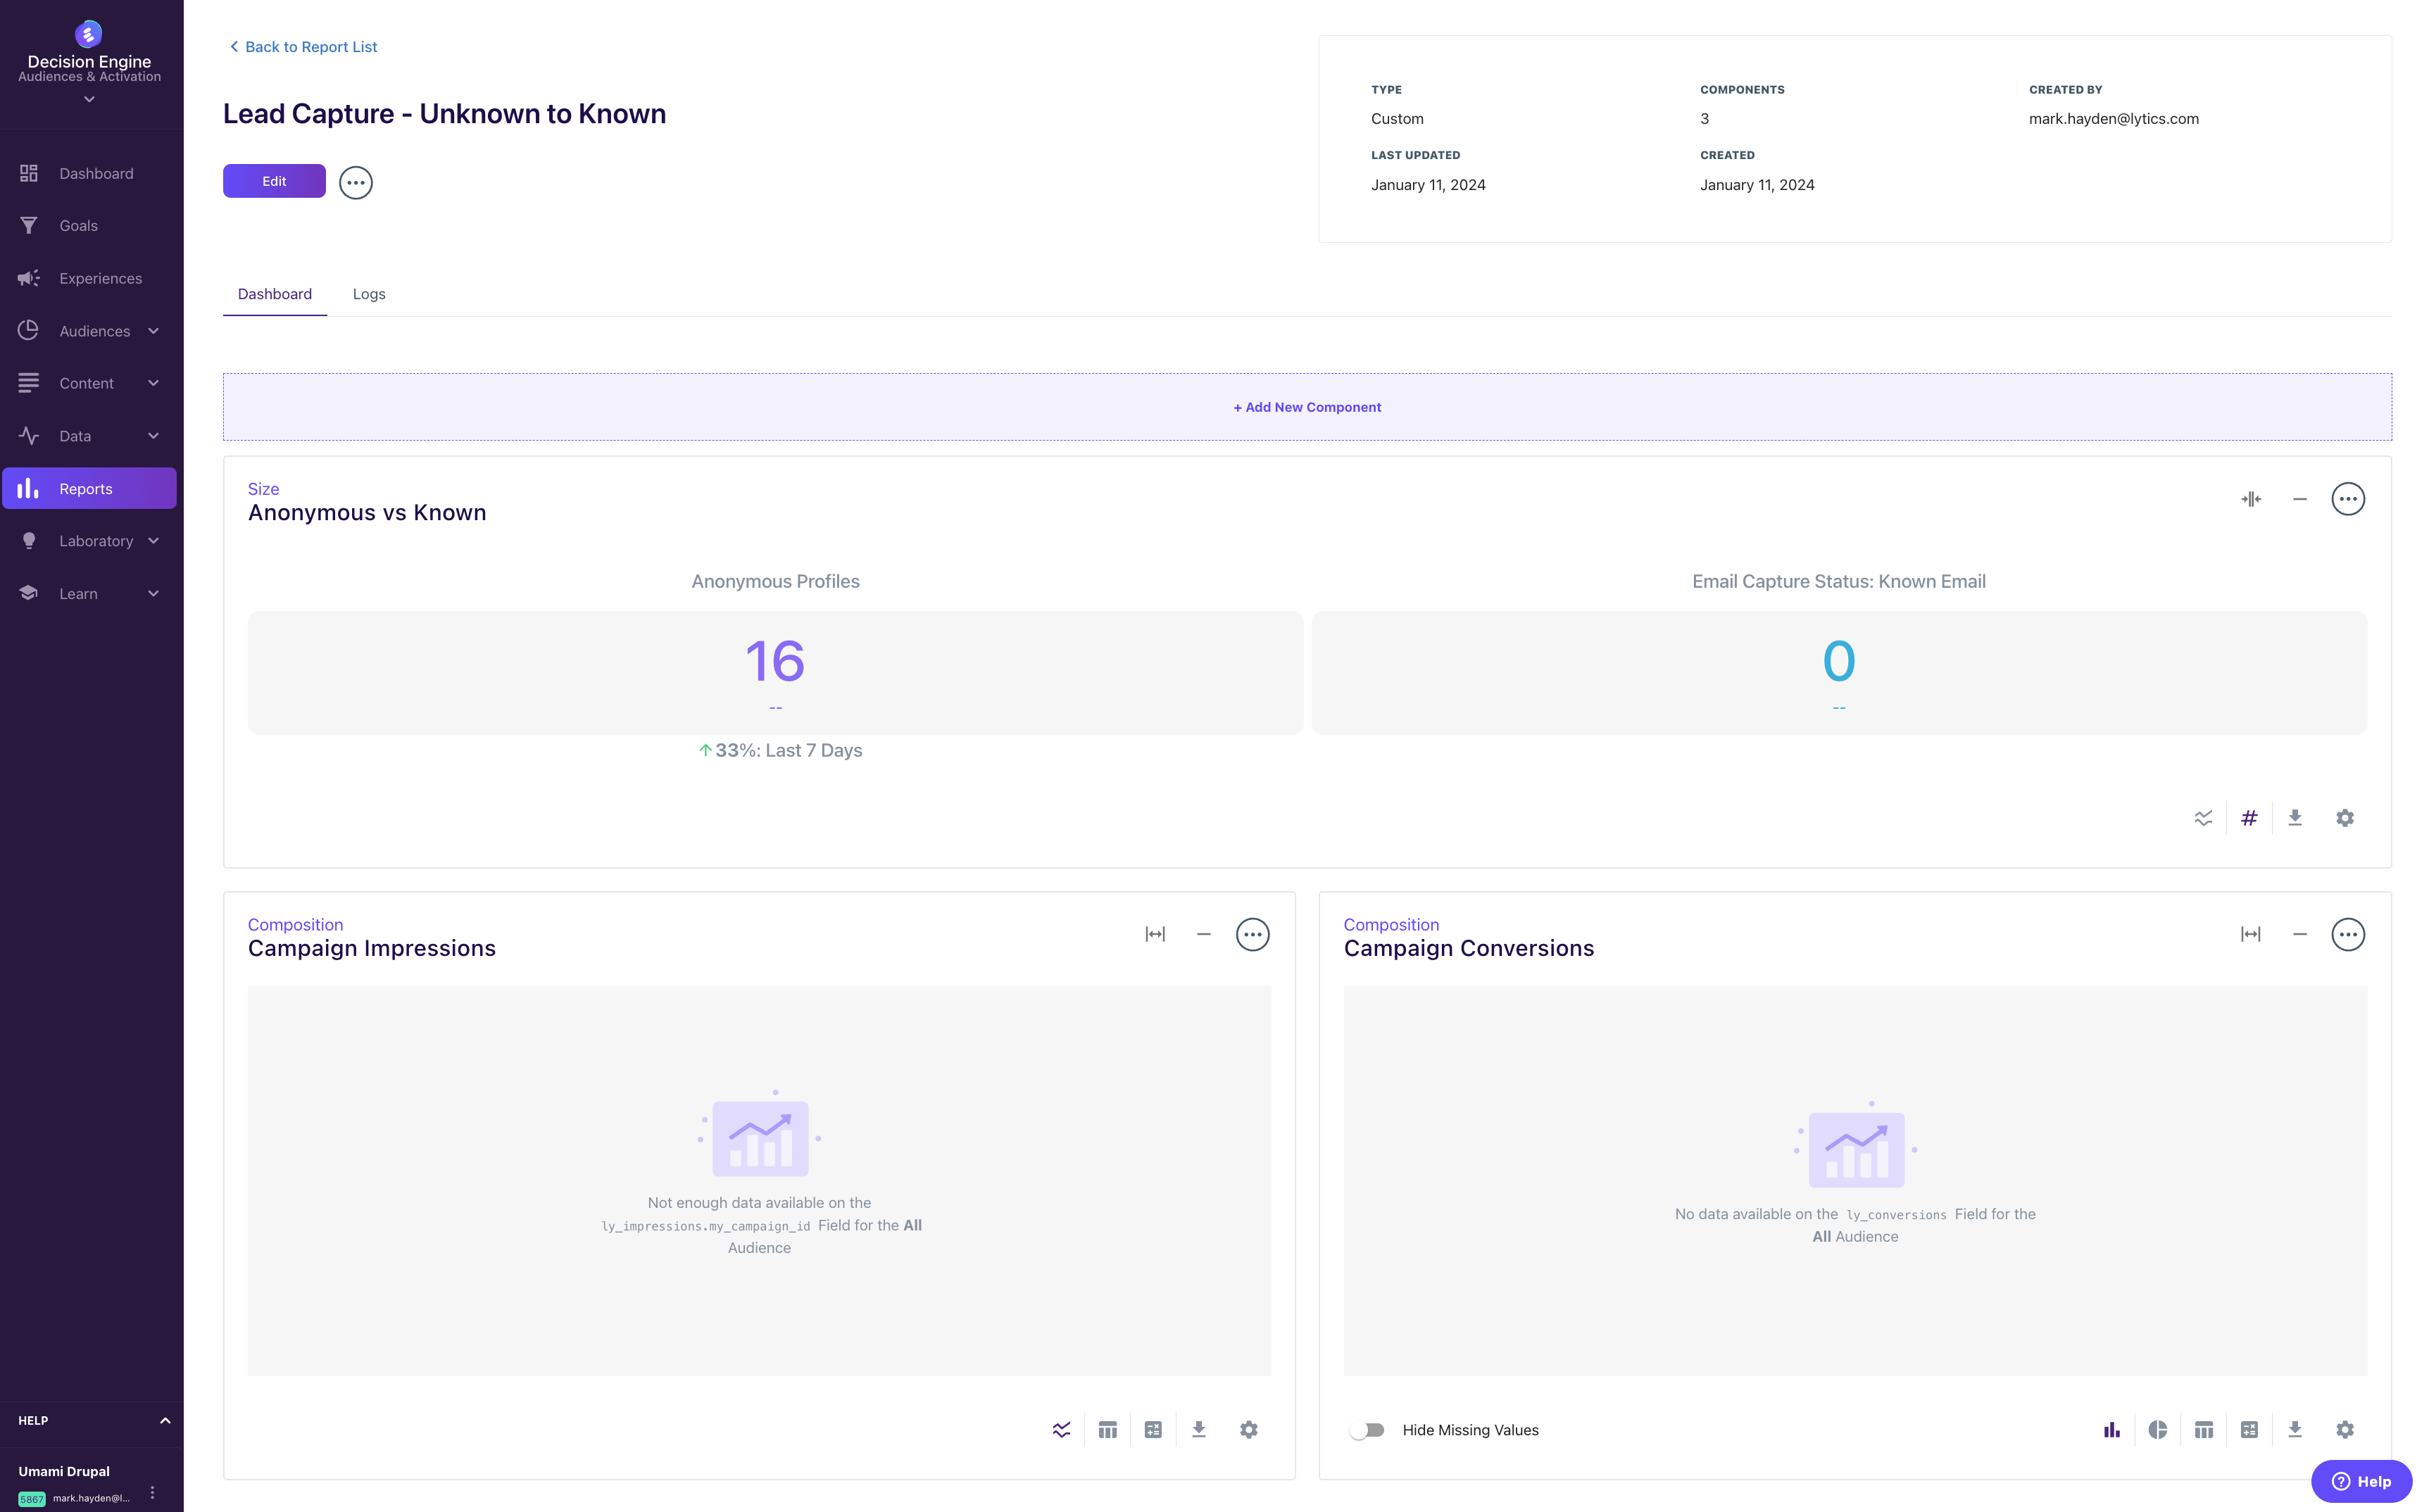
Create New Report
Add Anonymous vs. Known "Size" Component
Step 1: Once you have created your new report, add a component using the "+ Add New Component" button at the top of the report.
Step 2: Select "Size" as your component type.
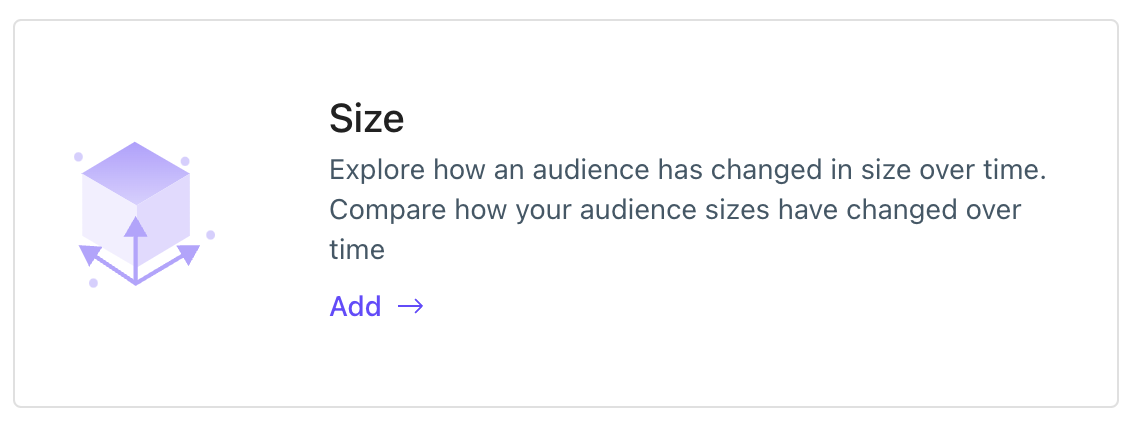
Step 3: Name your component. We recommend something simple like "Anonymous vs. Known".
Step 4: Add an optional description to explain the goal of this report to ease the consumption for others later.
Step 5: Select the audiences you'd like to highlight. In this use case, we'll select "Anonymous Profiles" and "Known Profiles", which are both available by default.
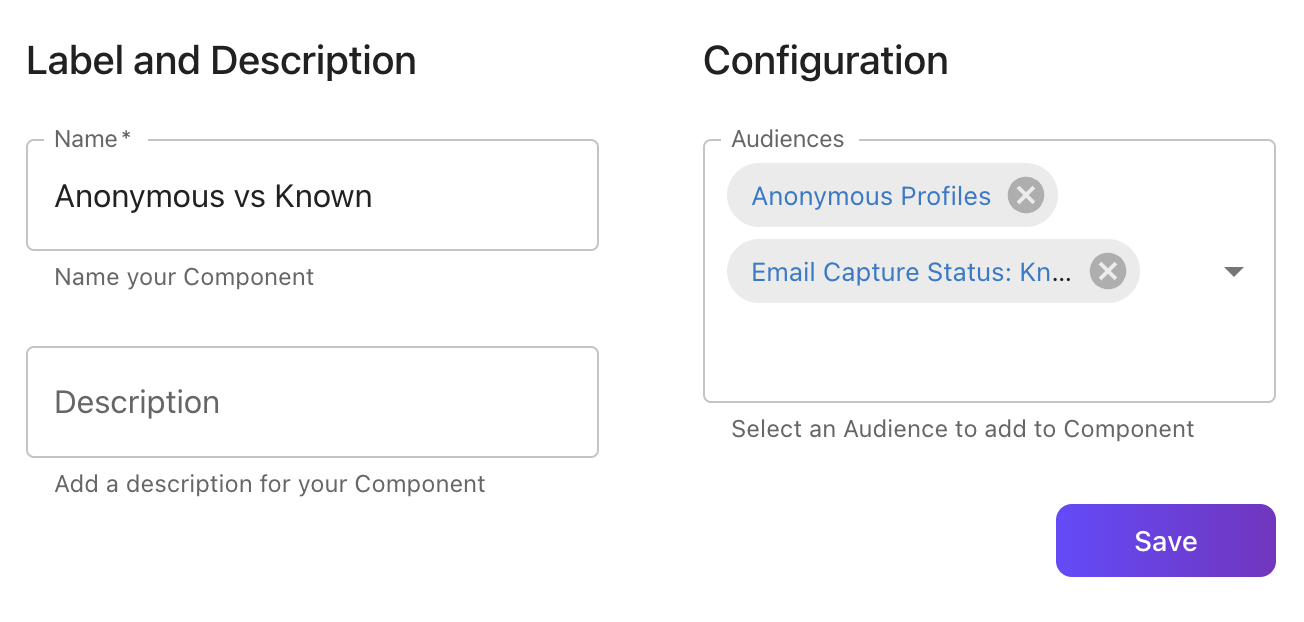
Step 6: Save your component. Please note it may take some time for the report to populate once you have configured it, but as long as you see the empty "Not enough data" state, you are good to go.
Add Impression "Composition" Component
Step 1: Following steps similar to the previous component, we'll add another component, but this time, we use the "Composition" component type.
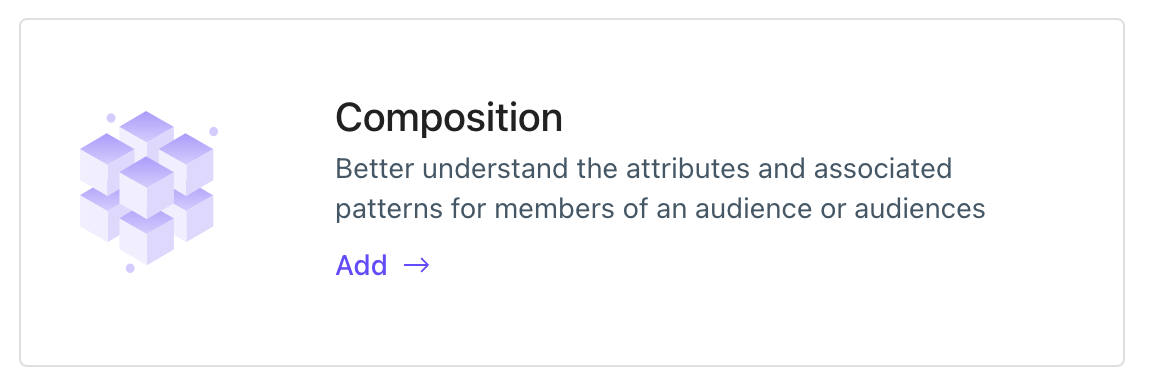
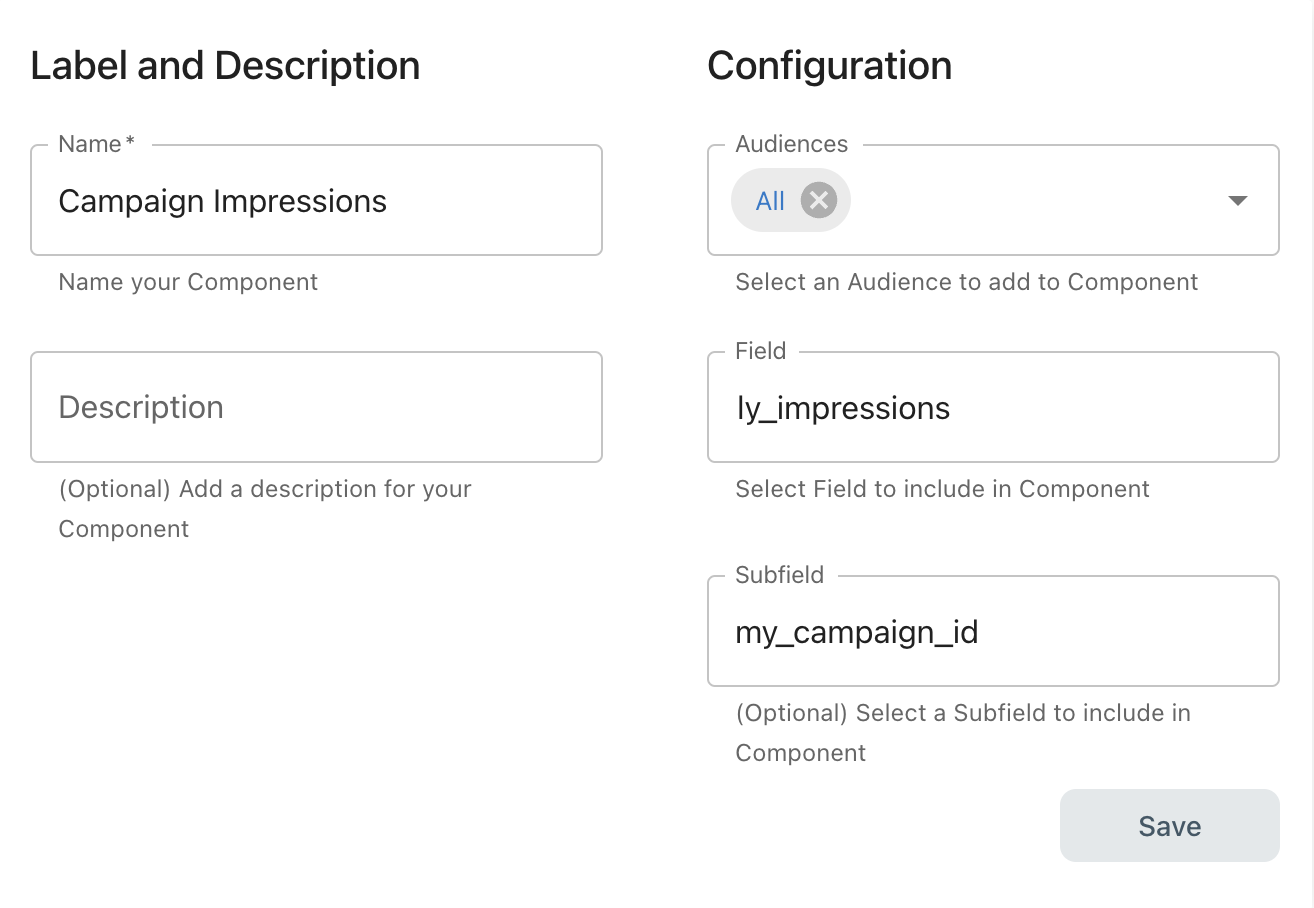
Step 2: Name your component "Campaign Impressions," as this component will focus on showcasing impression information to validate that the campaign is being shown.
Step 3: Select the "All" audience to ensure all visitors, regardless if they are known or unknown, are included in the report.
Step 4: Select the field "ly_impressions." This field represents an array of all campaigns each visitor has interacted with and is available by default. The values returned for custom campaigns will match the "ID" you set above in the campaign configuration.
Step 5: Finally, replace "my_campaign_id" in the example below with the ID of your campaign above to highlight only interactions for that campaign.
Add Conversion "Composition" Component
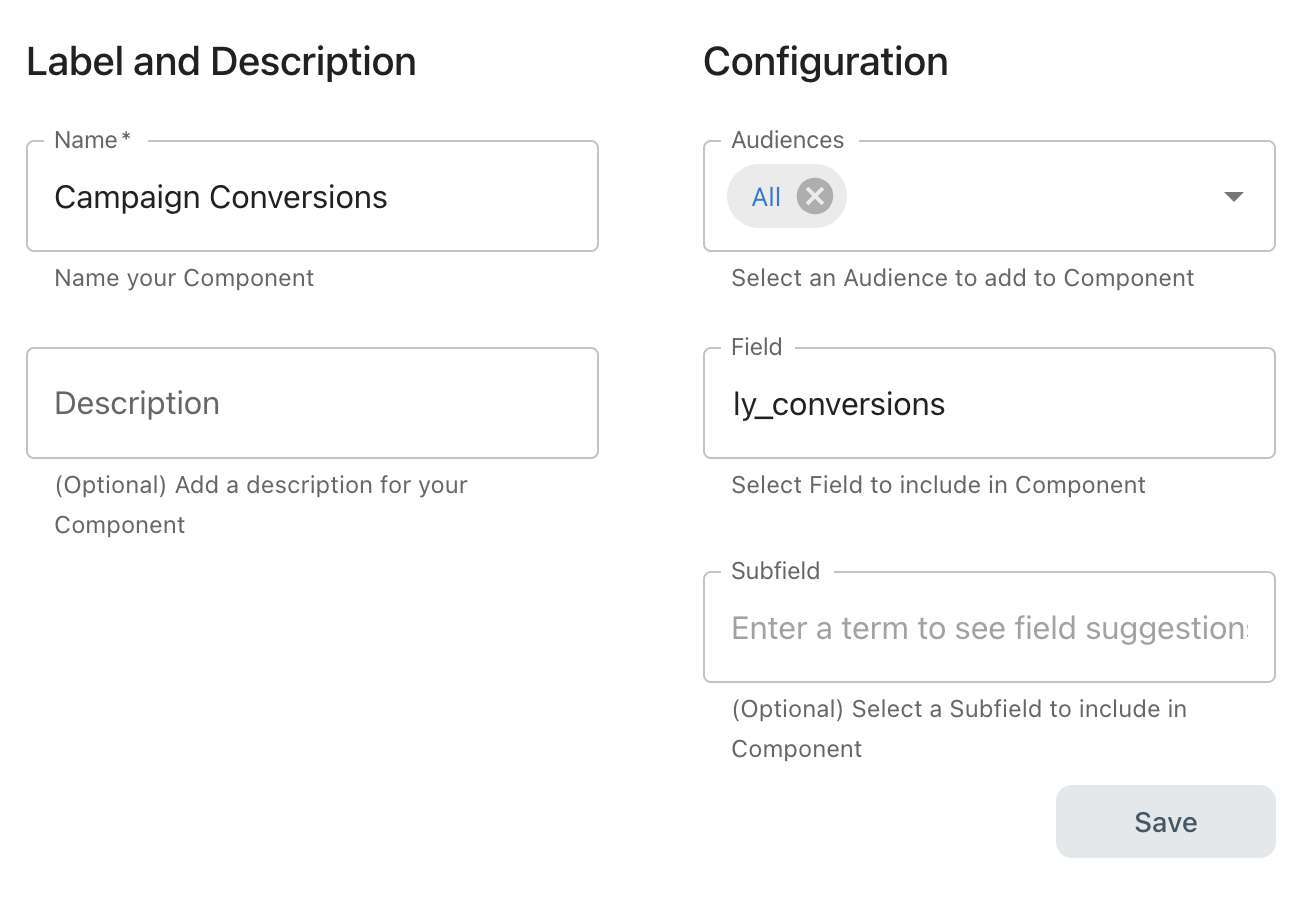
Following the same steps as above, configure another "Composition" component, but this time, use the field "ly_conversions" as it will be an array of all campaigns your users have converted on instead of the impressions used previously.
Thats it. Your report has been configured. As you begin to gain impressions and conversions, this report will populate. Generally, every hour or two, to highlight the impact.
Bonus!
Get additional guidance on how to pass interaction information related to your campaign to the following common sources for additional reporting and insight discovery:
- Google Analytics [coming soon]
- Custom BI via Data Warehouse [coming soon]
Execute Your Experience
Once you have configured and tested your Experience, activation is as simple as publishing the JavaScript code to your site. This may be done via a tag manager like Google Tag Manager or using another mechanism such as Drupal blocks or WordPress.
Updated 10 months ago