LiveRamp
Overview
LiveRamp is an identity resolution platform that provides data onboarding and connectivity services. It connects campaign exposure data, offline purchase data, and third-party data at the consumer level to help create a unified view of customer activity.
Integrating Lytics with LiveRamp lets you leverage Lytics insights, behavioral data, and content affinities with LiveRamp's identity resolution to better understand and target your consumers.
Before starting a workflow, it's important to understand the terminology differences of “audiences” and "segments" between LiveRamp and Lytics:
-
LiveRamp “audiences” are a collection of users included for cross-device identity resolution. The corresponding concept in Lytics is the file being exported from Lytics into LiveRamp.
-
Lytics “audiences” are sent as attributes (columns) within the file exported to a single LiveRamp audience. Each Lytics audience inside a file will become a “segment” in LiveRamp.
Authorization
If you haven't already done so, you will need to setup a LiveRamp account before you begin the process described below. There are additional configuration steps that will need to be done in LiveRamp before the exported file can be fully processed. Reach out to your technical point of contact at LiveRamp to complete this configuration.
If you are new to creating authorizations in Lytics, see the Authorizations documentation for more information.
- Select LiveRamp from the list of providers.
- Select one of the following methods for authorization:
- Enter a Label to identify your authorization.
- (Optional) Enter a Description for further context on your authorization.
- Complete the configuration steps for your authorization. These steps will vary by method.
- Click Save Authorization.
S3 CSV Authorization
Follow the steps below if you want to drop the file in a S3 bucket before importing into LiveRamp.
- Select Enter AWS Keys.
- In the Access Key box, enter your AWS S3 access key.
- In the Secret Key box, enter your AWS S3 secret key.
SFTP CSV Authorization
Follow the steps below if you want to drop the file on an SFTP server before importing into LiveRamp.
- Click LiveRamp SFTP Server with Username/Password.
- In the Host box, enter the host name or IP address of the SFTP server you want to upload to.
- In the Port box, enter the port number for the SFTP server.
- In the Username box, enter the username for the SFTP server.
- In the Password box, enter the password for the SFTP server.
- In the Folder box, enter the relative path to the folder to place the CSV. Contact your technical point of contact at LiveRamp to ensure this directory is in place.
Export Audiences (S3)
Exporting user profiles and audience membership to LiveRamp allows you use behavioral data, content affinities, and insights from Lytics combined with LiveRamp's identity resolution to fine-tune your targeting. Export your audience to S3 in a LiveRamp CSV format. Use S3 to stage your files before importing into LiveRamp.
Integration Details
- Implementation Type: Server-side Integration.
- Implementation Technique: File Based Transfer Integration.
- Frequency: Batch Integration with Backfill, frequency can be configured.
- Resulting data: User Profiles and audience membership.
Data is exported as a CSV with a header row. The columns are an identifier field in the first column, followed by user profile fields, followed by audience membership. Audience membership is represented by columns containing the digit 1 if the user is a member of that audience and blank if not. Headers for the audience membership columns are the audience slugs.
This integration operates by creating a CSV file in S3 to be imported by LiveRamp. Once started, the integration will:
- Create a multipart upload in the selected S3 bucket.
- Write CSV headers to the S3 file.
- Scan the audience and process users into CSV lines.
- Write CSV lines to the S3 file.
- Complete a multipart upload after writing all users to the file.
- Schedule the next run.
- LiveRamp imports the file for processing. See LiveRamp's documentation for details on setting up LiveRamp to import the file.
It usually takes 1-2 days for a file to fully process into LiveRamp, another 1-2 days to distribute that audience to ad platforms, then another 1-2 days for statistics on match rates to be available in the LiveRamp UI. So, for a first time setup end-to-end, it can take about a week.
Fields
By default, Lytics will export the full user profile and audience membership to LiveRamp. Note that you can customize the Lytics source fields as part of the job configuration:
| Lytics User Field | Description | LiveRamp Field | Type |
|---|---|---|---|
| Email Address | string | ||
| N/A | audience membership | lytics_audience_slug | int |
Configuration
Follow these steps to set up and configure an export of LiveRamp in the Lytics platform. If you are new to creating jobs in Lytics, see the Destinations documentation for more information..
- Select LiveRamp from the list of providers.
- Select the Export Audiences (S3) job type from the list.
- Select the Authorization you would like to use or create a new one.
- Enter a Label to identify this job you are creating in Lytics.
- (Optional) Enter a Description for further context on your job.
- From the Audiences input, select the audience(s) that contains the users to export.
- From the S3 Bucket Name input, select the bucket to save your file in. If no buckets are listed, enter the bucket name in the field below.
- From the S3 Bucket Name (Alt) text input, enter the S3 bucket name here if no buckets are listed above. This may occur if your access token does not have permission to list S3 buckets.
- From the Directory input, choose the directory to save your file in. This option can be slow on large S3 buckets.
- From the Identifier input, select the field that will be placed in the first column of the file. This field should be a unique identifier and be selected in the Fields to export.
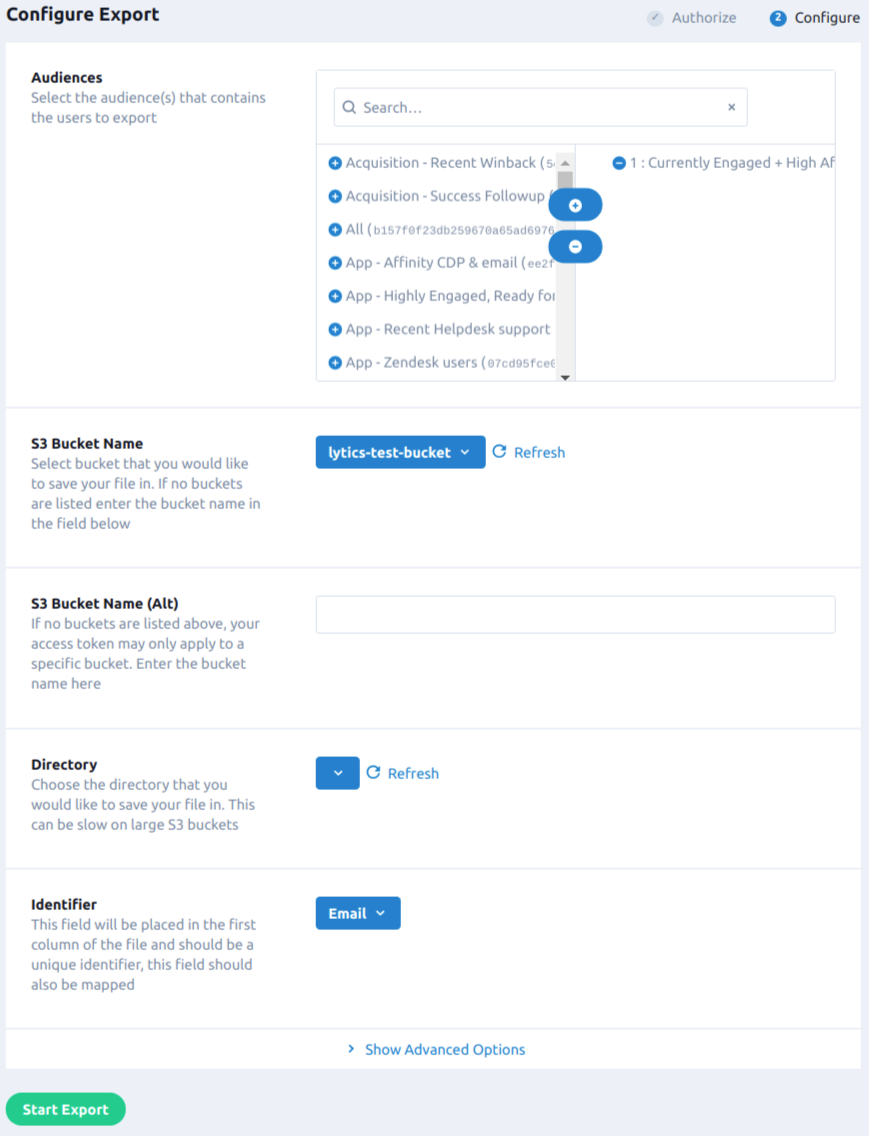
- Click on the Show Advanced Options tab to expand the advanced configuration.
- From the Filename text input, enter the name of the file to upload.
{TIMESTAMP}will be replaced by the timestamp when the export occurred, in Unix format. - From the Timestamp format input, select the format for the timestamp in the filename.
- From the Audience Membership input, select the audiences to include in the audience membership.
- From the Compress input, select your compression preference for the exported file.
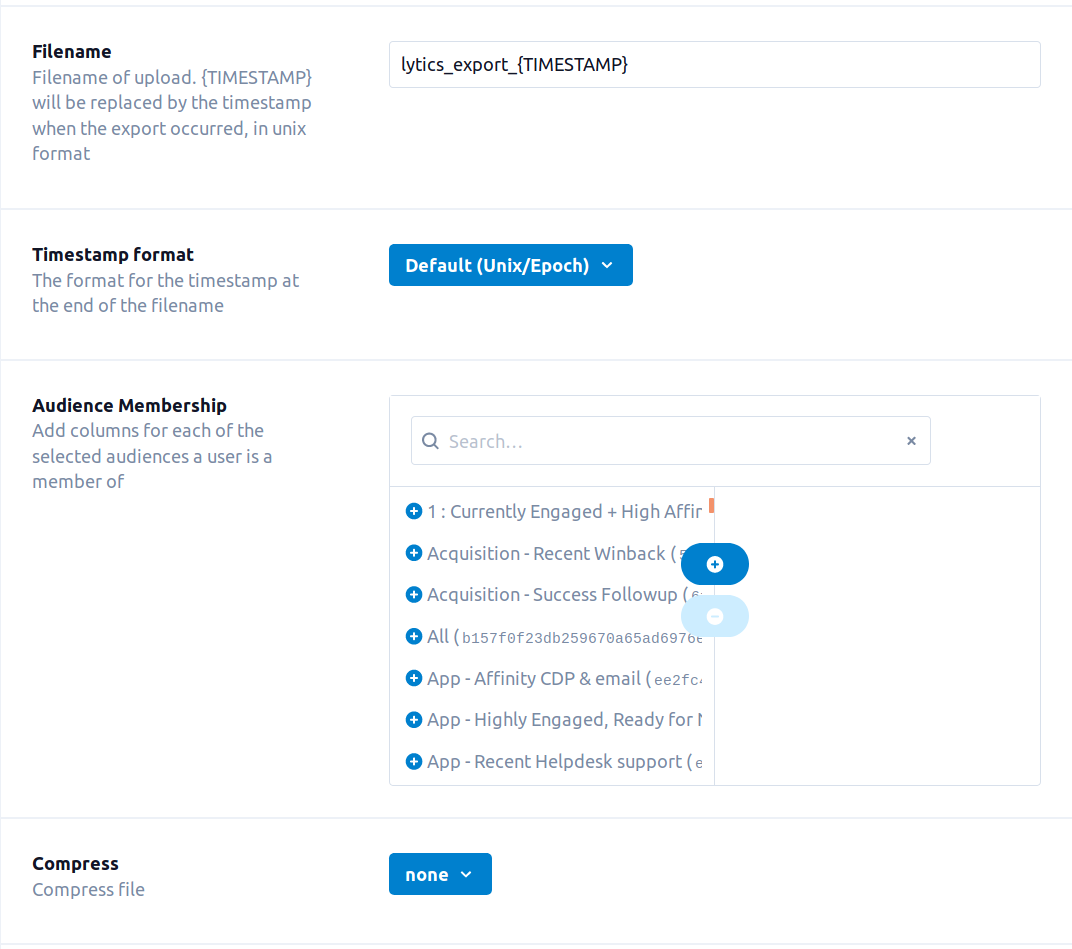
- Select the Additional Audiences checkbox to add a column containing all the audiences a user is a member of.
- From the Fields to Export input, select the user fields to export.
- From the Custom Delimiter text input, enter a custom delimiter for your file. The default is a comma, a recommended alternate is a pipe "|".
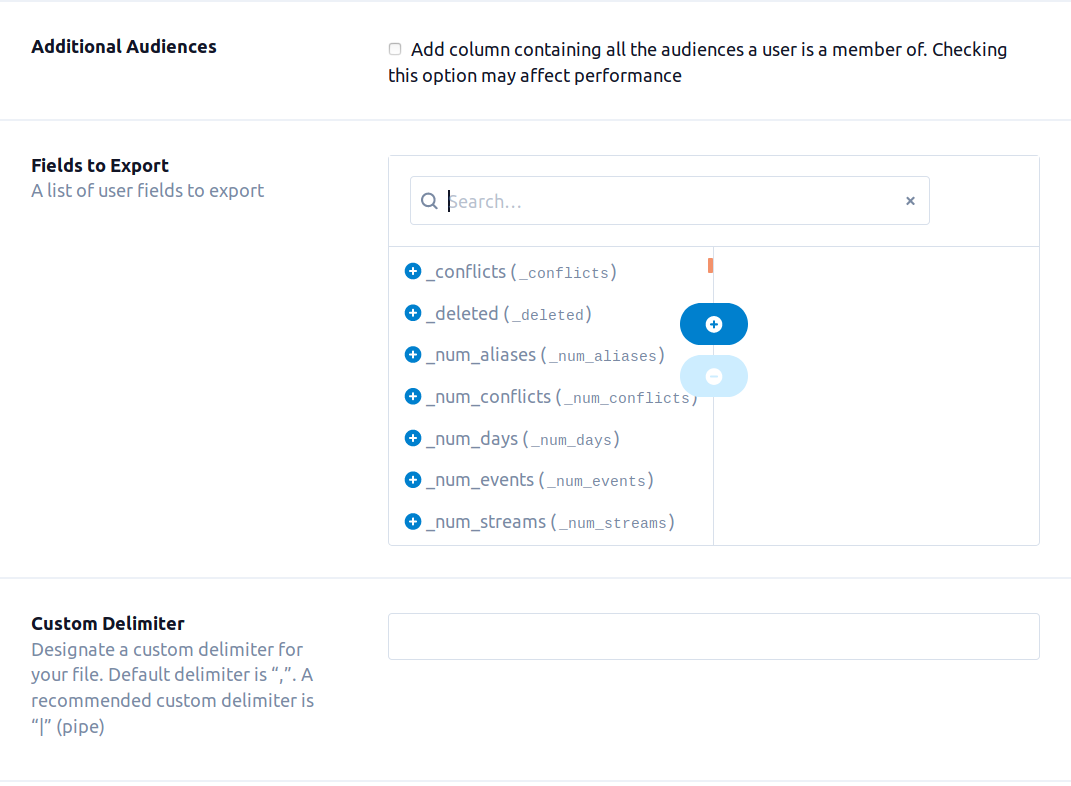
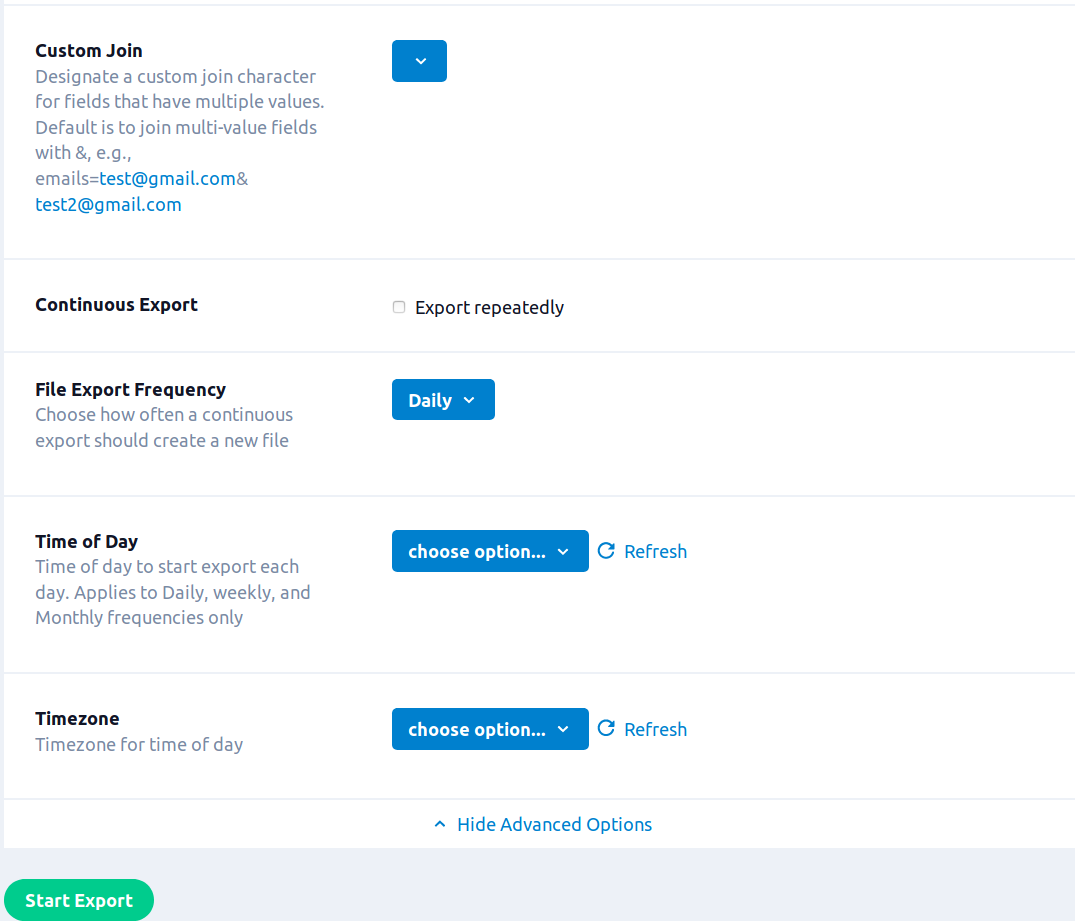
- From the Custom Join input, enter a custom join character for fields that have multiple values. The default is "&". E.g.
[email protected]&[email protected]. - Select the Continuous Export checkbox to export the audience repeatedly.
- From the File Export Frequency input, select how often a continuous export should create a new file.
- From the Time of Day input, select the time of day to start the export each day. This applies to daily, weekly, and monthly frequencies only.
- From the Timezone input, select the timezone for time of day.
- Click Start Export.
Export Audiences (SFTP)
Exporting user profiles and audience membership to LiveRamp allows you use behavioral data, content affinities, and insights from Lytics combined with LiveRamp's identity resolution to fine-tune your targeting. Export your audience to an SFTP server in a LiveRamp CSV format. Use SFTP to stage your files before importing into LiveRamp.
Integration Details
- Implementation Type: Server-side Integration.
- Implementation Technique: File Based Transfer Integration.
- Frequency: Batch Integration with Backfill, frequency can be configured.
- Resulting data: User Profiles and audience membership.
Data is exported as a CSV with a header row. The columns are an identifier field in the first column, followed by user profile fields, followed by audience membership. Audience membership is represented by columns containing the digit 1 if the user is a member of that audience and blank if not. Headers for the audience membership columns are the audience slugs.
This integration operates by creating a CSV file formatted for LiveRamp on an SFTP server so it can be imported by LiveRamp. Once the integration is started it will:
- Connect to the SFTP server.
- Navigate to the configured folder in the SFTP server.
- Create a CSV file in the SFTP server.
- Write CSV headers to the file.
- Scan the audience and process users into CSV lines.
- Write CSV lines to the file.
- Close the completed file and disconnect from the SFTP server.
- Schedule the next run.
- LiveRamp imports the file for processing. See LiveRamp's documentation for details on setting up LiveRamp to import the file.
It usually takes 1-2 days for a file to fully process into LiveRamp, another 1-2 days to distribute that audience to ad platforms, then another 1-2 days for statistics on match rates to be available in the LiveRamp UI. So, for a first time setup end-to-end, it can take about a week.
Fields
By default, Lytics will export the full user profile and audience membership to LiveRamp. Note that you can customize the Lytics source fields as part of the job configuration:
| Lytics User Field | LiveRamp Field | Type |
|---|---|---|
| string | ||
| N/A | lytics_audience_slug | int |
Configuration
Follow these steps to set up and configure an export of LiveRamp in the Lytics platform. If you are new to creating jobs in Lytics, see the Destinations documentation for more information.
-
Select LiveRamp from the list of providers.
-
Select the Export Audiences (SFTP) job type from the list.
-
Select the Authorization you would like to use or create a new one.
-
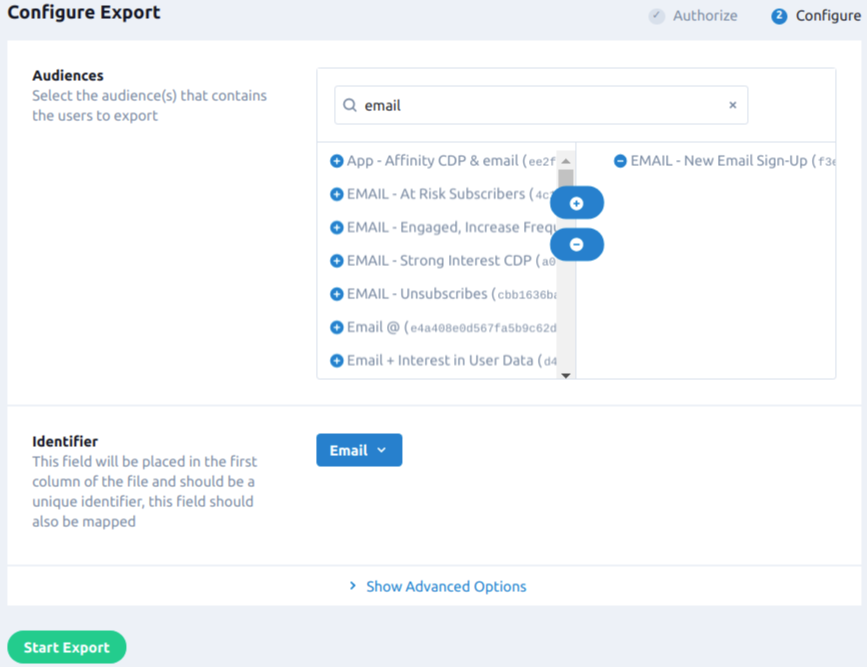
From the Audiences input, select the audience(s) that contains the users to export.
-
From the Identifier input, select the field that will be placed in the first column of the file. This field should be a unique identifier and be selected in the Fields to export.
-
Click on the Show Advanced Options tab to expand the advanced configuration.
-
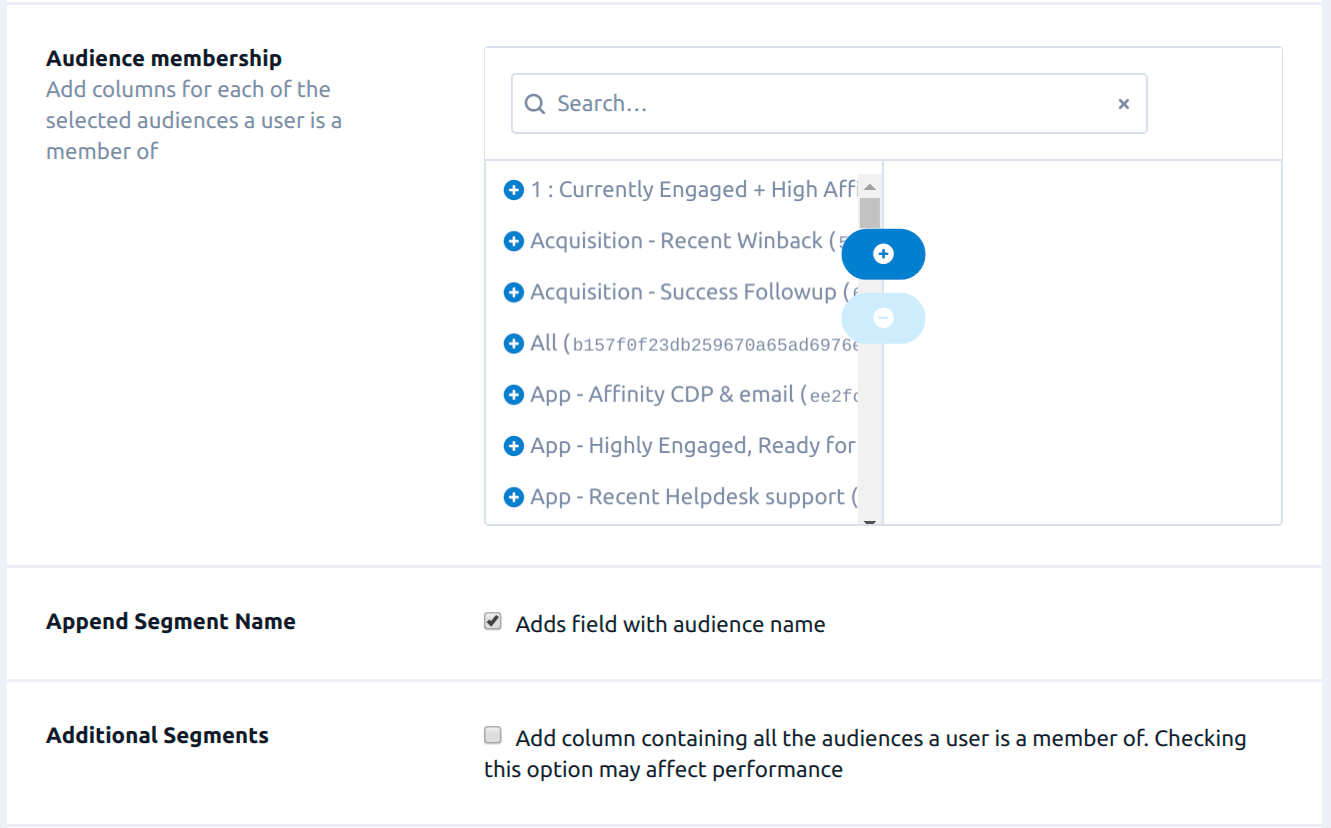
From the Audience membership input, select the audiences to include in the audience membership.
-
Select the Append Segment Name checkbox to add a field with the audience name.
-
Select the Additional Segments checkbox to add a column containing all the audiences a user is a member of.
-
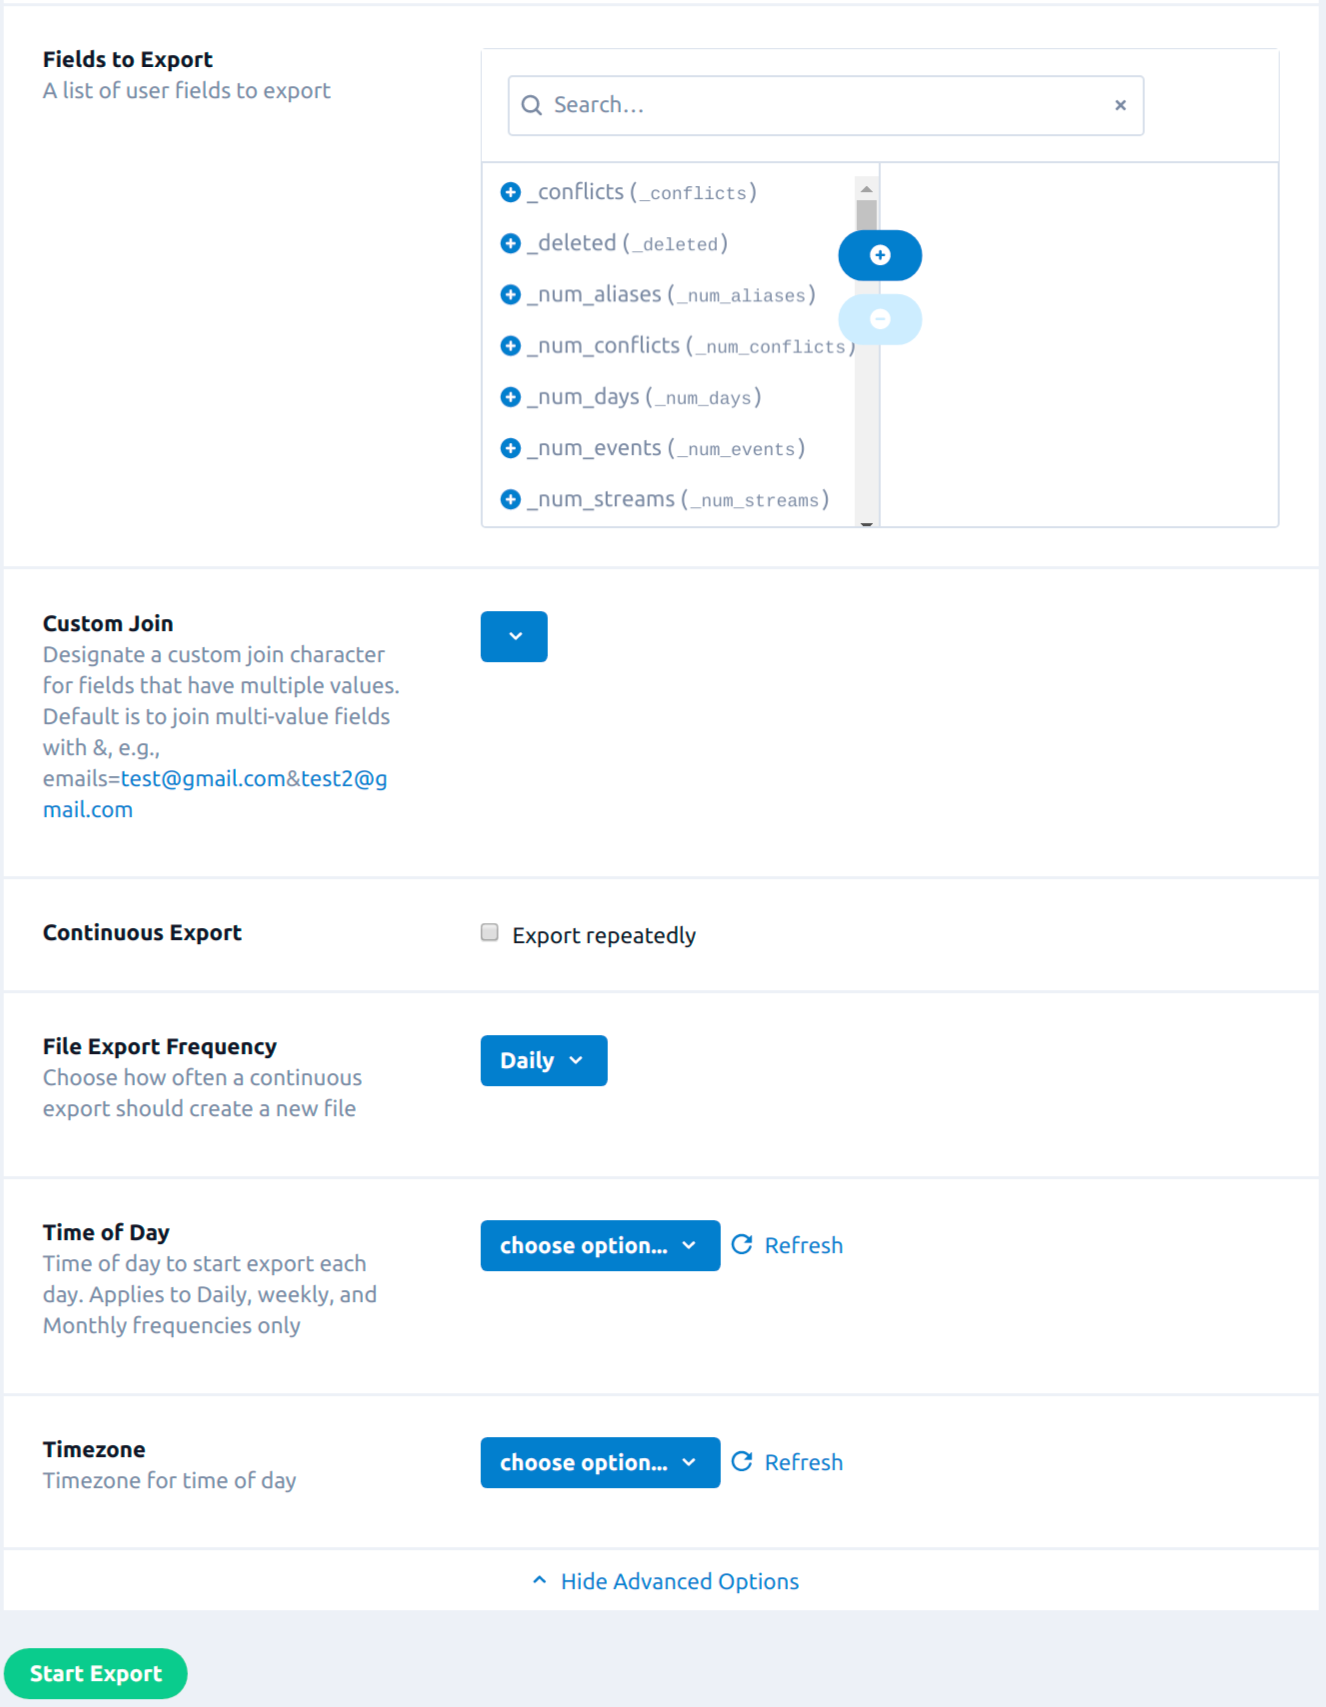
From the Fields to Export input, select the user fields to export.
-
From the Custom Join input, enter a custom join character for fields that have multiple values. The default is "&". E.g.
[email protected]&[email protected]. -
Select the Continuous Export checkbox to export the audience repeatedly.
-
From the File Export Frequency input, select how often a continuous export should create a new file.
-
From the Time of Day input, select the time of day to start the export each day. This applies to daily, weekly, and monthly frequencies only.
-
From the Timezone input, select the timezone for time of day.
-
Click Start Export.
Export Audiences (EU Format)
Exporting user profiles and audience membership to LiveRamp allows you to use behavioral data, content affinities, and insights from Lytics combined with LiveRamp's identity resolution to fine-tune your targeting.
Export your audience to an SFTP server in a LiveRamp CSV EU format. Use SFTP to stage your files before importing into LiveRamp.
Integration Details
- Implementation Type: Server-side Integration.
- Implementation Technique: File Based Transfer Integration.
- Frequency: Batch Integration with Backfill, frequency can be configured.
- Resulting data: User Profiles and audience membership.
This job exports the user profiles as a CSV file. The CSV file format is specific and follows the Liveramp EU CSV format. The number of User Fields that will be exported is limited. We also append an audience column which will contain the Lytics audience name or slug the user is part of and can be configured.
This integration once started it will:
- Connect to the SFTP server.
- Navigate to the configured folder in the SFTP server.
- Create a CSV file in the SFTP server.
- Write CSV headers to the file.
- Scan the audience and process users into CSV lines.
- Write CSV lines to the file.
- Close the completed file and disconnect from the SFTP server.
- Schedule the next run.
- LiveRamp imports the file for processing. See LiveRamp's documentation for details on setting up LiveRamp to import the file.
Fields
We follow the Liveramp SFTP file format to create the SFTP file. Following table shows the fields that can be mapped and exported. By default, none of the below fields are mapped except for Customer ID which will be filled by the Unique Identifier. Note that you can customize the Lytics source fields as part of the job configuration.
| Lytics User Field | Description | LiveRamp Field | Type |
|---|---|---|---|
Any (Unique ID) | Field that is unique to each User | CustomerID | string |
| Any | Lytics Field | FIRSTNAME | string |
| Any | Lytics Field | LASTNAME | string |
| Any | Lytics Field | ADDRESS1 | string |
| Any | Lytics Field | ADDRESS2 | string |
| Any | Lytics Field | ADDRESS3 | string |
| Any | Lytics Field | ADDRESS4 | string |
| Any | Lytics Field | TOWN | string |
| Any | Lytics Field | POSTCODE | string |
| Any | Lytics Field | EMAIL1 | string |
| Any | Lytics Field | EMAIL2 | string |
| Any | Lytics Field | EMAIL3 | string |
| Any | Lytics Field | MOBILE1 | string |
| Any | Lytics Field | MOBILE2 | string |
| Any | Lytics Field | LANDLINE1 | string |
| Any | Lytics Field | MD5EMAIL1 | string |
| Any | Lytics Field | MD5EMAIL2 | string |
| Any | Lytics Field | MD5EMAIL3 | string |
| Any | Lytics Field | SHA1EMAIL1 | string |
| Any | Lytics Field | SHA1EMAIL2 | string |
| Any | Lytics Field | SHA1EMAIL3 | string |
| Any | Lytics Field | SHA256EMAIL1 | string |
| Any | Lytics Field | SHA256EMAIL2 | string |
| Any | Lytics Field | SHA256EMAIL3 | string |
| Audience Name 1 (slug) | Audience Name | Audience Name 1 (slug) | string |
| Audience Name 2 (slug) | Audience Name | Audience Name 2 (slug) | string |
Configuration
Follow these steps to set up and configure an export of LiveRamp data in EU format in the Lytics platform. If you are new to creating jobs in Lytics, see the Destinations documentation for more information.
- Select LiveRamp from the list of providers.
- Select the Export Audiences (EU Format) job type from the list.
- Select the Authorization you would like to use or create a new one.
- From the Audiences input, select the audience(s) that contains the users to export.
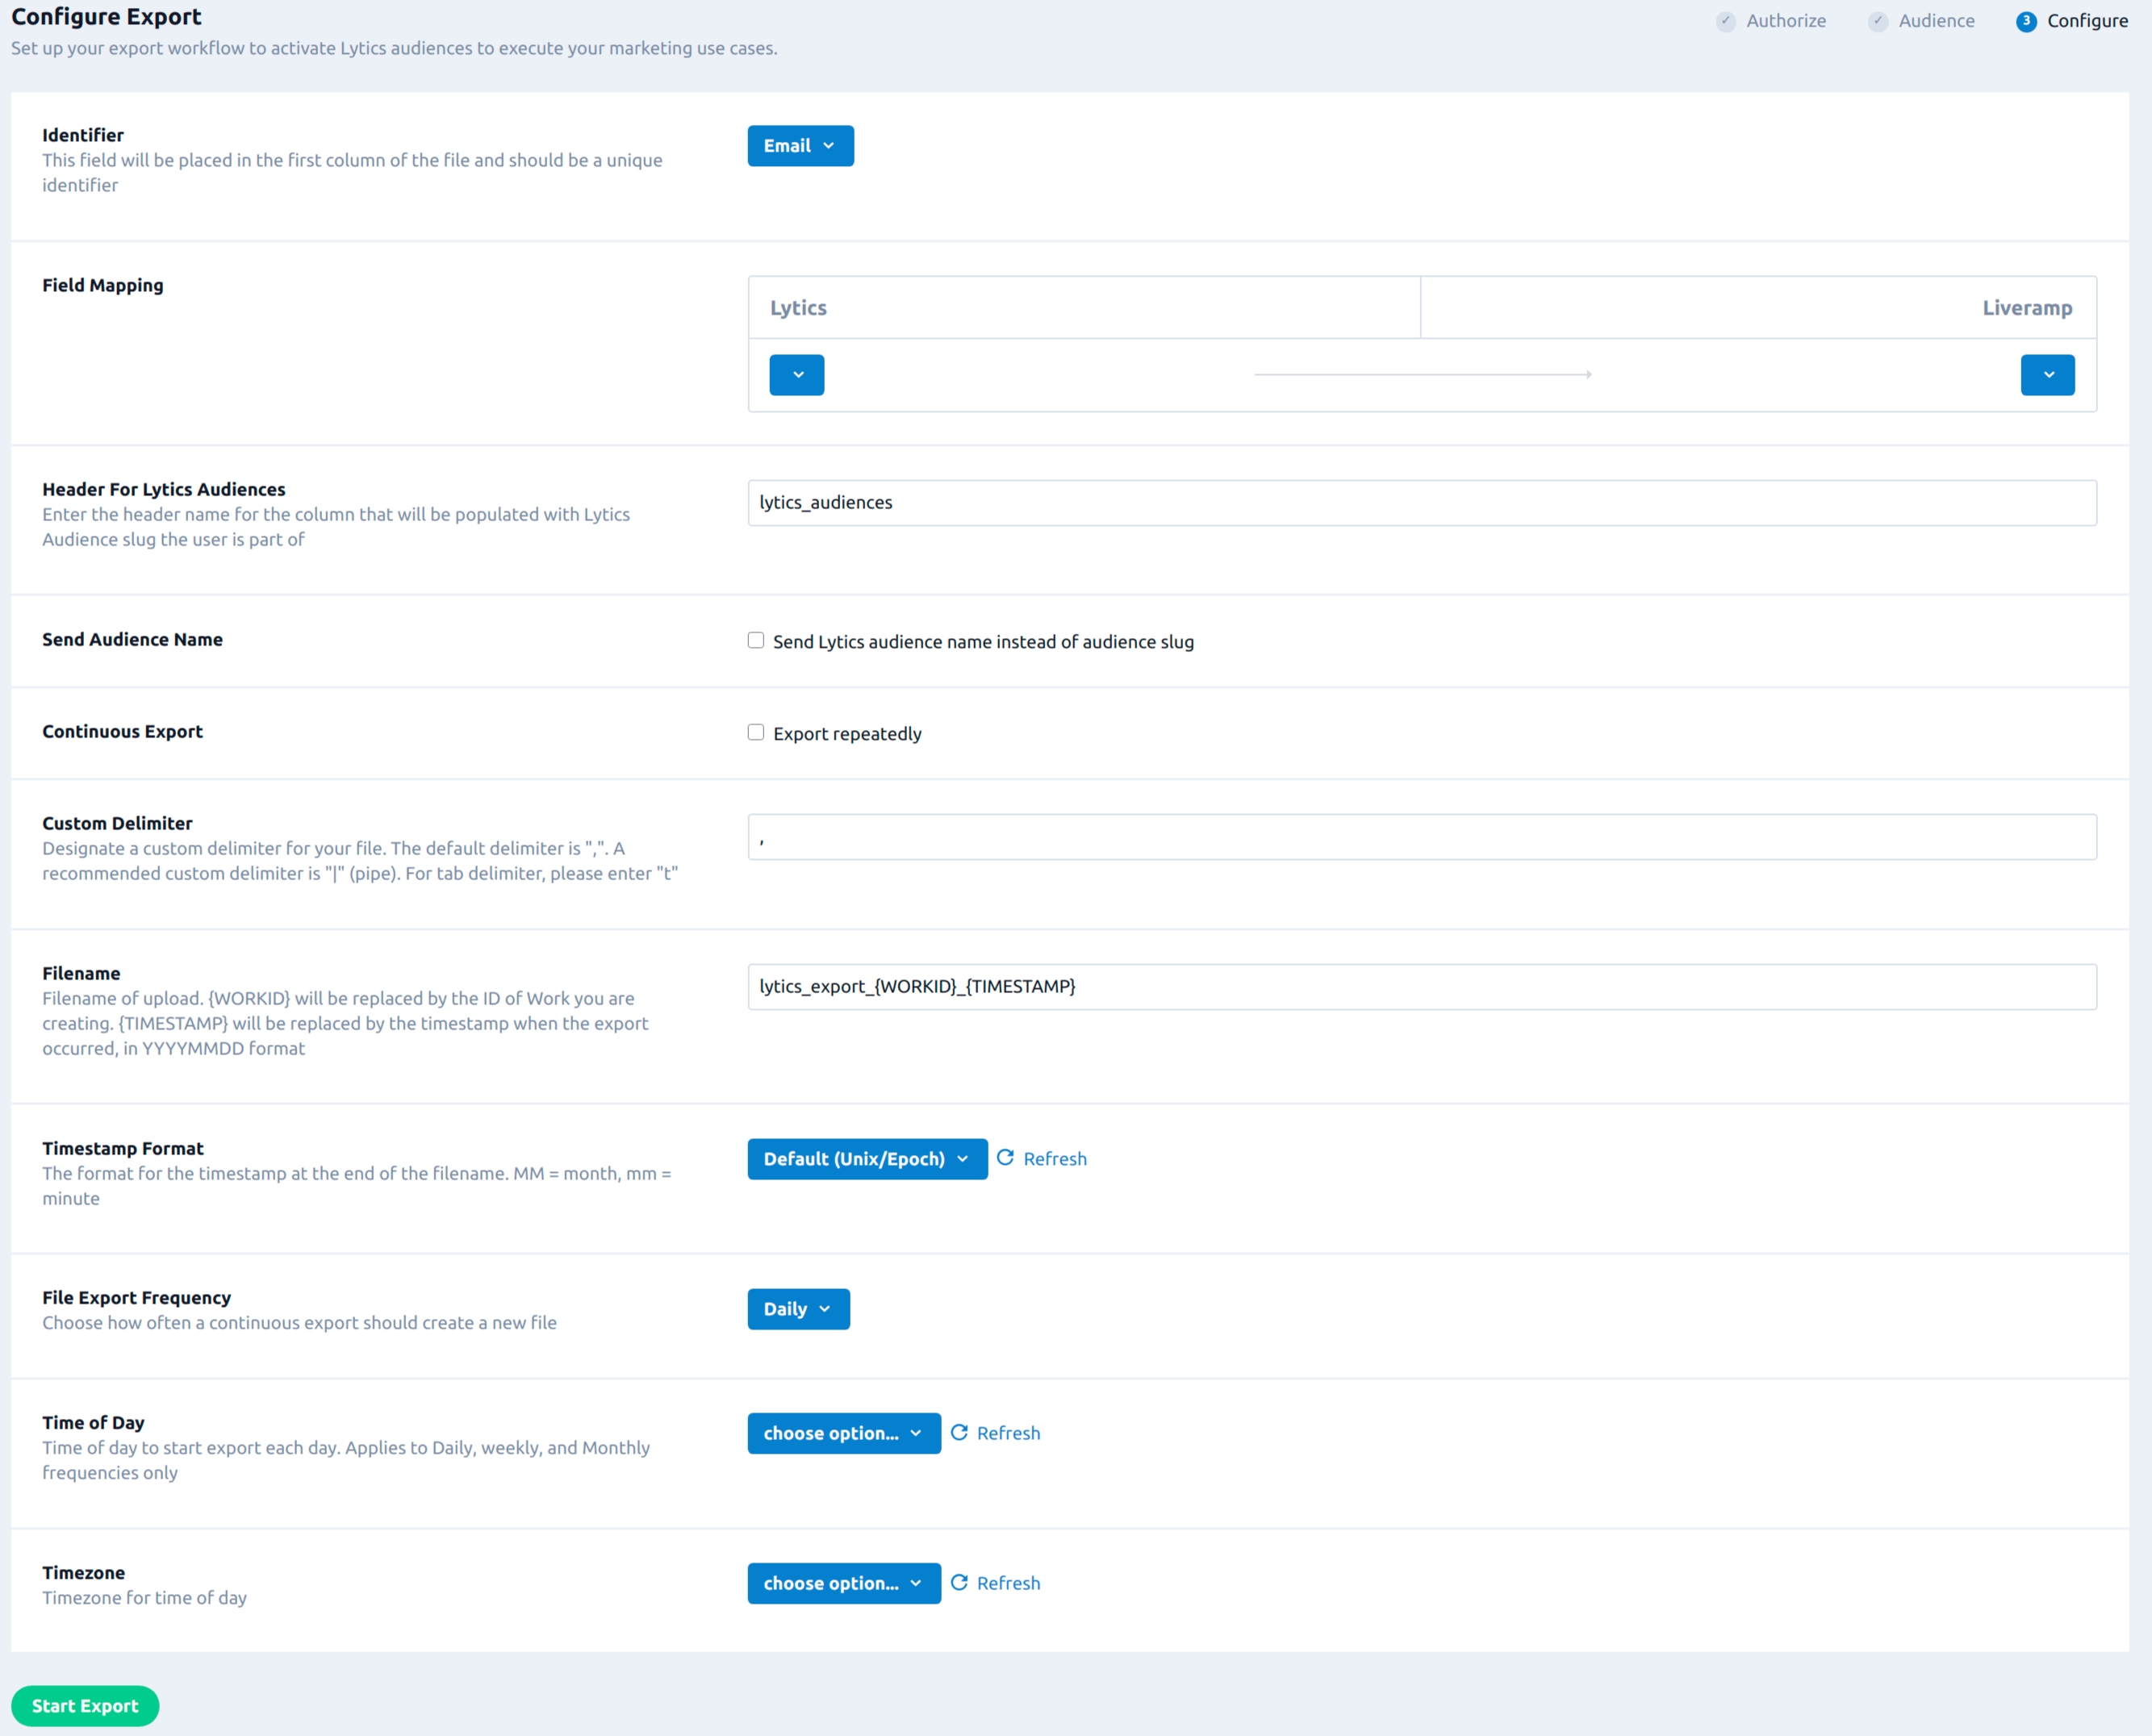
- From the Identifier input, select the field that will be placed in the first column of the file as CustomerID. This field should be a unique identifier.
- Use the Field Mapping input to map Lytics fields to Liveramp fields. Select Lytics data fields from the left drop-down list and Liveramp fields from the right drop-down list.
- In the Header For Lytics Audiences textbox, enter the column name for the field that will be populated with Lytics audience slug. By default, the column name is set to
lytics_audiences. - Check the Send Audience Name checkbox to send the Lytics audience name instead of Lytics audience slug. Lytics audience slug is the readable form of Lytics Audience. For example: if
Engaging Customer for ABC Productis the Lytics audience name then, its slug could beengaging_customer_for_abc_product. You can also edit Lytics audience to set the slug you want. - Check the Continuous Export checkbox to export the audience repeatedly.
- In the Custom Delimiter textbox, enter the delimiter for the file to be exported.
- In the Filename textbox, provide the desired filename for the CSV file to be exported.
- From the Timestamp Format drop-down, select the desired timestamp format that would be appended in the provided filename above.
- From the File Export Frequency input, select how often a continuous export should create a new file.
- From the Time of Day input, select the time of day to start the export each day. This applies to daily, weekly, and monthly frequencies only.
- From the Timezone input, select the timezone for time of day.
- Click Start Export.
Export Identifier
Upload user identifier like RampID, Cookie ID or Mobile ID to leverage LiveRamp's Identity Resolution to improve the ads campaign.
Integration Details
- Implementation Type: Server-side Integration.
- Implementation Technique: File Based Transfer Integration.
- Frequency: Batch Integration with Backfill, frequency can be configured.
- Resulting data: User Identifier and audience membership.
This job exports the identifiers as a CSV file. The CSV file format is specific and follows the LiveRamp's file format. The csv file will have two columns: one for the identifier and the other for the Lytics audience name that the user is part of. In the case of multi audience export, multiple lines (one for each audience) are added for the user if the user is part of multiple audience.
Once the integration is started it will:
- Connect to the LiveRamp's SFTP server.
- Navigate to the configured folder in the SFTP server.
- Create a CSV file in the SFTP server.
- Write CSV headers to the file.
- Scan the audience and process users into CSV lines.
- Write CSV lines to the file.
- Close the completed file and disconnect from the SFTP server.
- Schedule the next run.
Fields
By default, Lytics will export the user identifier and audience membership to LiveRamp. Note that you can customize the Lytics source fields as part of the job configuration:
| Lytics User Field | LiveRamp Field | Type |
|---|---|---|
| Any | IDENTITYLINK(RampID) | COOKIEID | MOBILEID | string |
| N/A | lytics_audiences | string |
Configuration
Follow these steps to set up and configure an export of LiveRamp data in EU format in the Lytics platform. If you are new to creating jobs in Lytics, see the Destinations documentation for more information.
- Select LiveRamp from the list of providers.
- Select the Export Identifier job type from the list.
- Select the authorization you would like to use or create a new one.
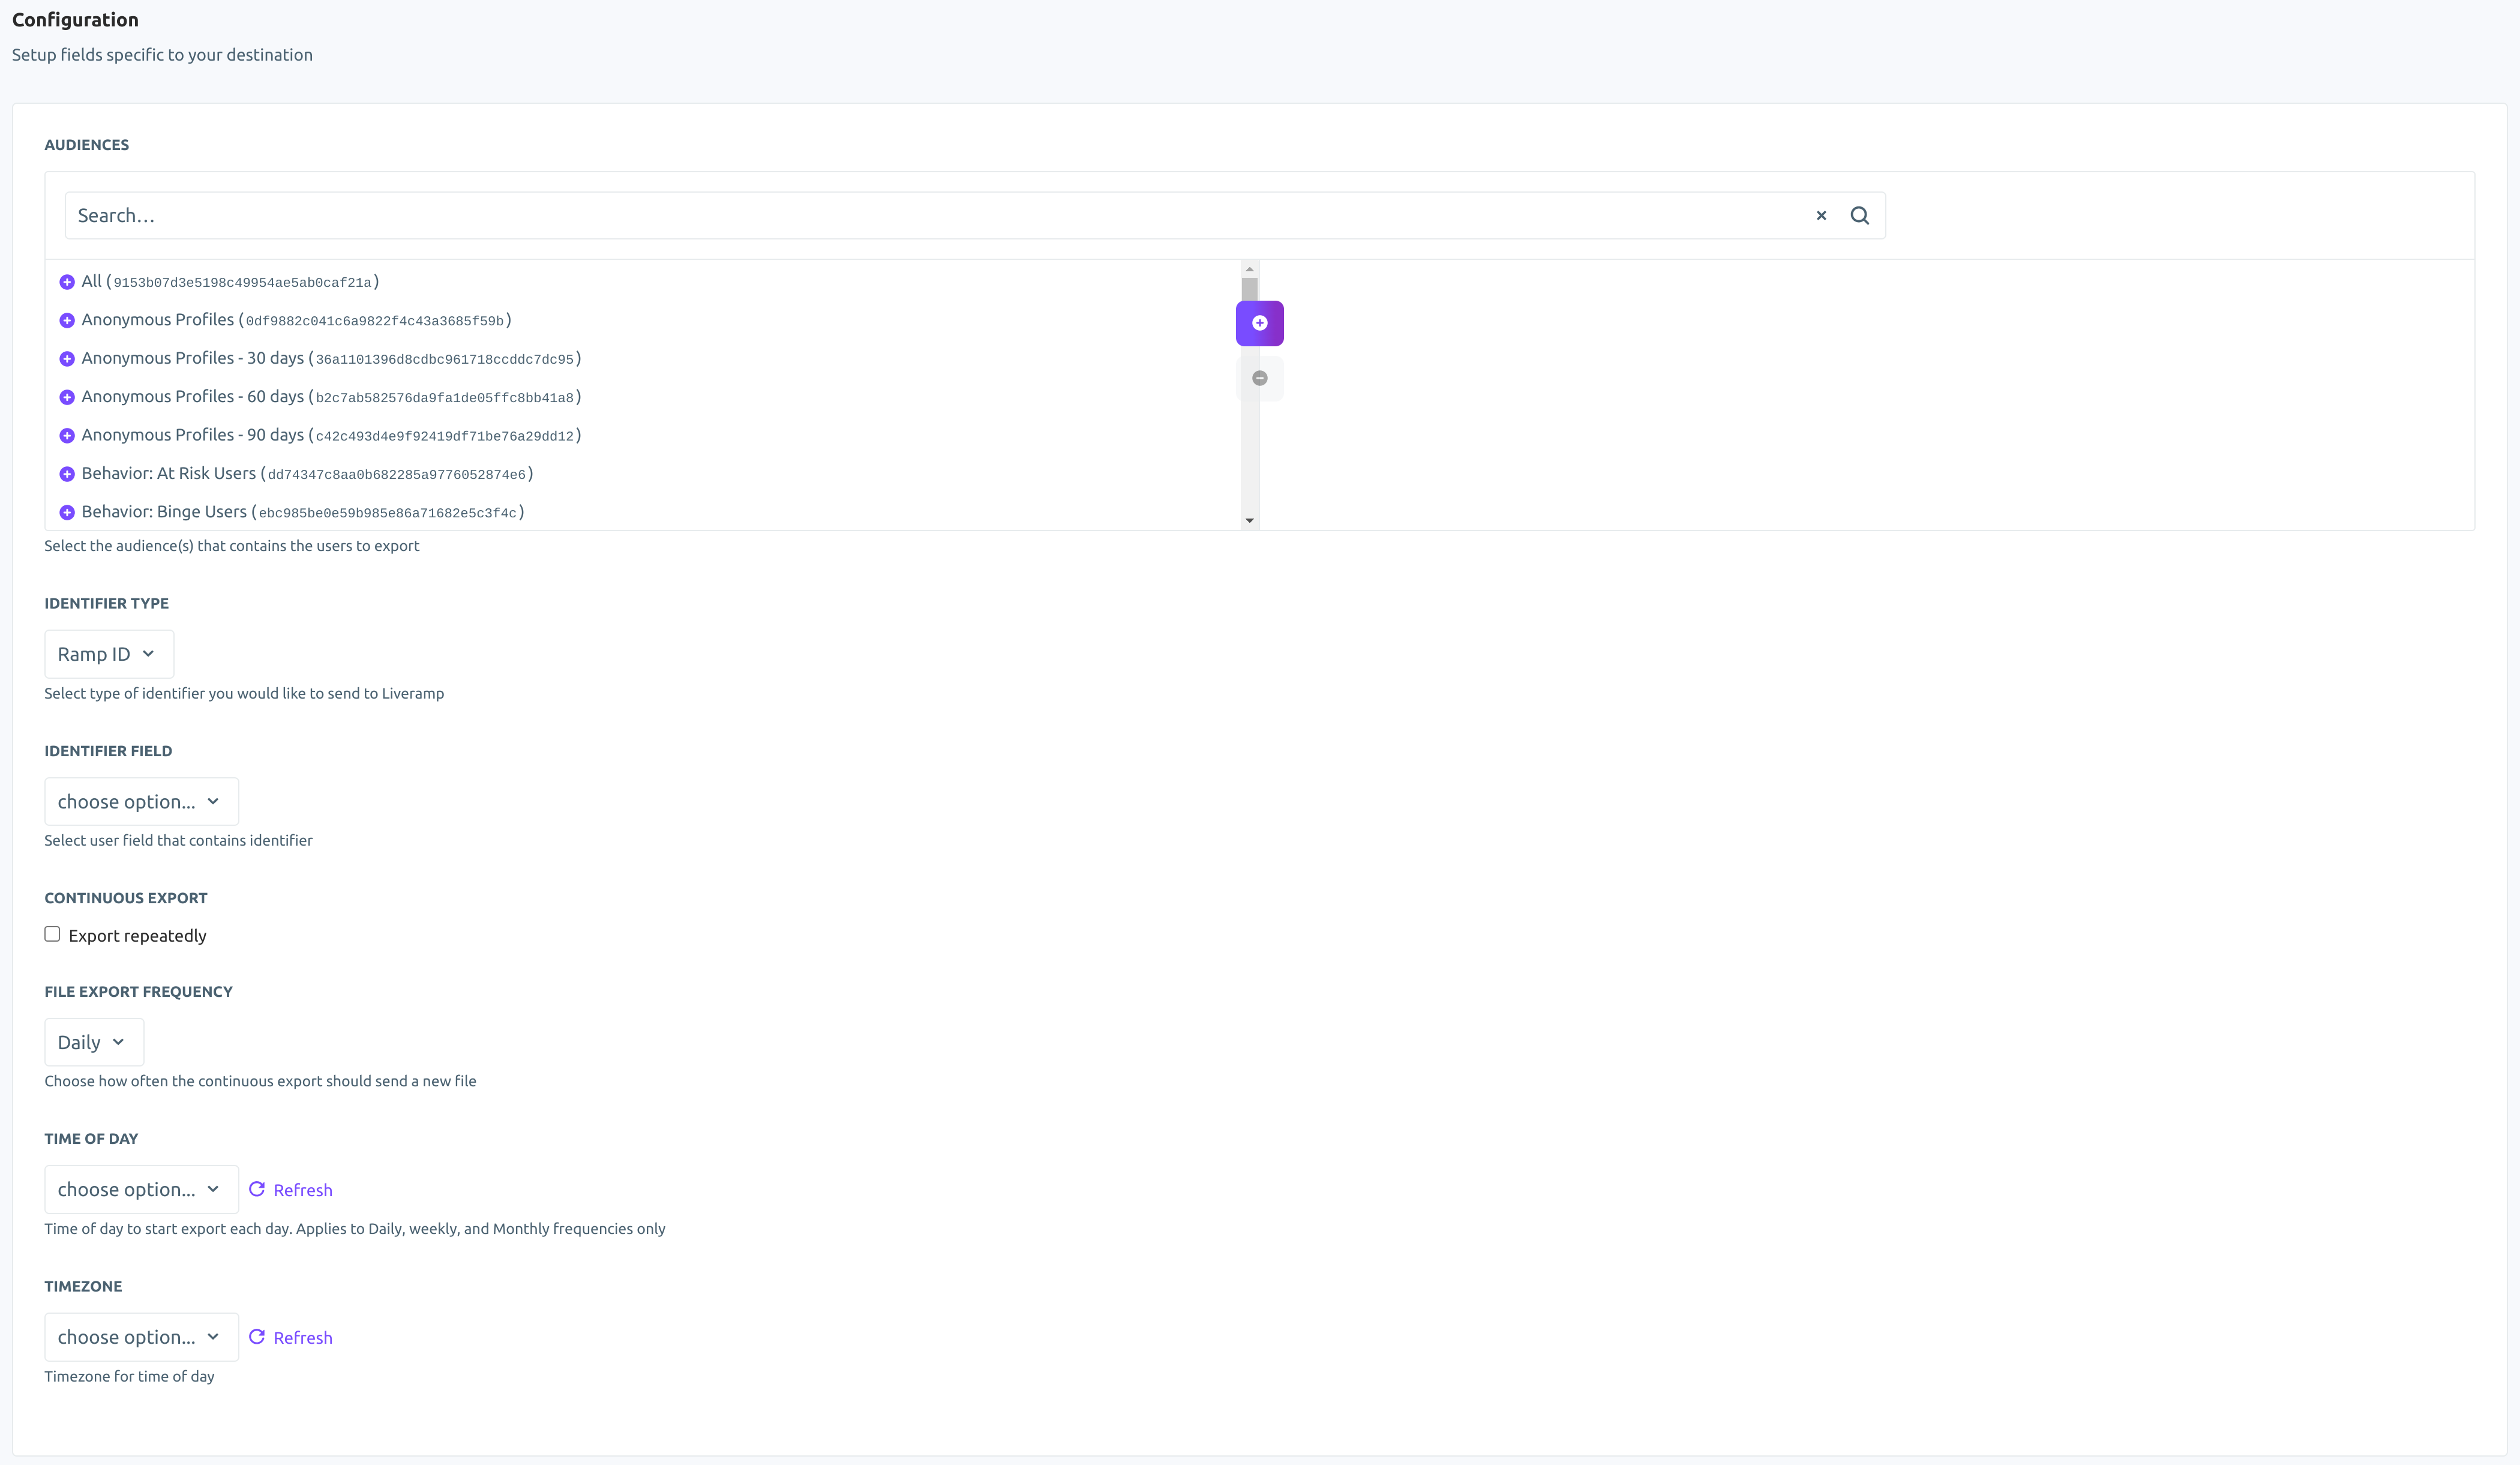
- From the Audiences input, select the Lytics audience(s) that contains the users to export.
- From the Identifier Type input, select the type of identifier you would like to export.
- From the Identifier Field input, select the Lytics user field that has identifier for above type.
- Check the Continuous Export checkbox to export the audience repeatedly.
- From the File Export Frequency input, select how often a continuous export should create a new file.
- From the Time of Day input, select the time of day to start the export each day. This applies to daily, weekly, and monthly frequencies only.
- From the Timezone input, select the timezone for time of day.
- Click Start Export.
RampID Enrichment
Enrich Lytics users to add RampID to their user profile. Use this RampID to identify consumers to target with more relevant ad campaigns.
Integration Details
- Implementation Type: Server-side Integration.
- Implementation Technique: REST API Integration - Audience Trigger Integration.
- Frequency: Real-time Integration.
- Resulting data: User Fields, Raw Event Data.
This integration uses the LiveRamp API to acquire the RampID for the envelope belonging to the user. Please refer to the documentation on Ramp IDs to learn more about it.
Each job run will proceed as follows:
- Creates a temporary Lytics Audience with users that have LiveRamp envelope ID configured during job creation.
- Sends the envelope ID to LiveRamp's Envelope Decryption endpoint to acquire the user's RampID.
- Sends the user's RampID data along with their envelope ID to stream
liveramp_id_enrichso that it can be mapped as a user profile field.
Fields
The following fields are included in the default mapping of the liveramp_id_enrich stream:
| Source Field | Lytics User Field | Description | Type |
|---|---|---|---|
| rampid | ramp_id | Last LiveRamp ID | string |
| rampid_ts | rampid_ts | LiveRamp ID Last Updated Time | date |
| set(ramp_id) | ramp_ids | All LiveRamp IDs | []string |
| set(last_ramp_envelope) | ramp_envelopes | All LiveRamp Envelopes | []string |
Configuration
Follow these steps to set up and configure an enrich job for Liveramp in the Lytics platform.
- Select LiveRamp from the list of providers.
- Select the RampID Enrichment job from the list under the Enrich category.
- Select the Lytics Managed Key authorization type.
- Enter a Label to identify this job you are creating in Lytics.
- (Optional) Enter a Description for further context on your job.
- From the Envelope ID Field input, select the Lytics user field that contains LiveRamp Envelope ID.
- Click Start Enrich.

Collect LiveRamp Envelope via ATS
Associate a Lytics profile with a LiveRamp encrypted envelope as a means to power the LiveRamp RampID Enrichment integration. This approach should be leveraged only when a known identifier is present such as email.
Integration Details
- Implementation Type: Client-side Integrations.
- Implementation Technique: Client-side Integrations JavaScript Tag Integration
- Frequency: Real-time Integration.
- Resulting data: Event
Implementation
Ensure that your website is already configured with the LiveRamp ATS tag. Implementation of this tag is outside of the pervue of Lytics but is a requirement to collect and send the envelope from your customer's browser to Lytics.
Option 1
Option 1 for implementation is recommended. This option leverages an event listener to send ATS envelope information to Lytics as soon as it is received from ATS. Additional information about this approach is available in LiveRamps documentation.
window.addEventListener("fbEnvelopePresent", async () => {
   const envelope = await ats.retrieveEnvelope(undefined, '_lr_fb_env');
   try{
      var parsedEnvelope = JSON.parse(envelope);
      if(parsedEnvelope.envelope !== ''){
         jstag.send('default', {'liveramp_idl': parsedEnvelope.envelope});
      }
   }catch(e){
      console.log("Error parsing and deliverying envelope to Lytics: ", e);
   }
});
Option 2
Option 2 for implementation is focused on sending data to Lytics if you are confident that an ATS-managed envelope will already be in place when the page loads. It is always best to consult with your web development team to ensure that suggested implementation patterns are compatible with your environment(s).
ats.retrieveEnvelope((envelope)=>{
   try{
      var parsedEnvelope = JSON.parse(envelope);
      if(parsedEnvelope.envelope !== ''){
         jstag.send('default', {liveramp_idl: parsedEnvelope.envelope});
      }
   }catch(e){
      console.log("Error parsing and deliverying envelope to Lytics: ", e);
   }
})
Adding Additional Context
Regardless of the implementation option, adding additional context may be beneficial. For instance, you can incorporate a variable into the payload to track a specific LiveRamp envelope originating from ATS. As illustrated below, for any envelope sourced from ATS, the event will include a variable named _e holding the value "ATS_AUTHENTICATED." This variable can subsequently be utilized for mapping profiles, reporting, data analysis, and more.
ats.retrieveEnvelope((envelope)=>{
   try{
      var parsedEnvelope = JSON.parse(envelope);
      if(parsedEnvelope.envelope !== ''){
         jstag.send('default', {liveramp_idl: parsedEnvelope.envelope, _e: "ATS_AUTHENTICATED"});
      }
   }catch(e){
      console.log("Error parsing and deliverying envelope to Lytics: ", e);
   }
})
Collect LiveRamp Envelope via RTIS
Associate a Lytics profile with a LiveRamp encrypted envelope as a means to power the LiveRamp RampID Enrichment integration. This approach should be leveraged when there is no known identifier present.
Integration Details
- Implementation Type: Client-side Integrations.
- Implementation Technique: Client-side Integrations JavaScript Tag Integration
- Frequency: Real-time Integration.
- Resulting data: Event
Implementation Steps
- Configure Endpoint for Receiving Pixel & UID Link
- Configure Client Side Pixel
Configure Endpoint for Receiving Pixel & UID Link
Upon completion, a tracking pixel will be initialized to a LiveRamp domain (we'll cover this in step 2). LiveRamp will associate the anonymous _uid from Lytics with their Ramp Envelope and return that association to an API endpoint at Lytics. To get started, we must ensure that LiveRamp sends the link data to the proper Lytics endpoint and your account is configured to receive and associate that data with user profiles.
-
(Required) Provide proper URL to the LiveRamp team for forwarding RTIS pixel call to (Manged in LiveRamp).
https://c.lytics.io/c/provider/liveramp -
(Optional) Stream configuration
By default, all link data will be delivered to theliveramp_idldata stream. If you would like this data to be delivered to an alternate stream, you can configure the account settingliveramp_idl_streamto point to your desired stream. -
(Required) Map link data to your user profiles.
For each identity that is linked, the configured stream will receive the following key/value pairs:- origin_acct: the full ID of the account for which the initial request was made.
- _uid: the user in question anonymous Lytics web cookie.
- liveramp_idl: the LiveRamp Envelope associated with the _uid.
Though you may map this data any way you see fit, we highly recommend following this pattern:SELECT epochms() AS lr_idl_timestamp SHORTDESC "Date of Resolution" KIND DATE , origin_acct AS lr_origin_acct SHORTDESC "Account of Origin" ,liveramp_idl AS last_ramp_envelope SHORTDESC "Last LiveRamp Envelope" --BY FIELDS , set(_uid) AS _uids SHORTDESC "Web Cookie Ids(all)" KIND []string ,set(liveramp_idl) AS ramp_envelopes SHORTDESC "All LiveRamp Envelopes" KIND []string FROM liveramp_idl INTO user BY _uids OR ramp_envelopes ALIAS liveramp_idl
Configure Client Side Pixel
RTIS leverages a cookie sync integration between Lytics and LiveRamp. Below is an example implementation. It is always best to consult your web development team to ensure the proper checks and balances are in place to prevent unplanned errors and impacts on site traffic based on your unique environment.
jstag.getid(function(id){
   // ensure a valid _uid is available
   if(id === ''){
      console.warn('Lytics ID is empty');
      return;
   }

   // ensure we haven't recently envoked this integration
   var previouslySent = jstag.getCookie("lyticsLrIdl");
   if (previouslySent != null && previouslySent !== '') {
      console.log('liveramp idl integration already sent');
      return;
  }

   // add pixel
   var src = '[liveramp_pixel_url]' + '?cparams=' + jstag.config.cid[0] + '-' + id;
   var img = document.createElement("img");
   img.src = src;
   img.style = "display:none;"
   document.body.appendChild(img);

   // set a cookie to prevent envoking pixel again within the next week
   jstag.setCookie("lyticsLrIdl", id, 604800)
});The
liveramp_pixel_urlwill be provided by the LiveRamp team and generally will look similar to the following https://id.rlcdn.com/xxxxxxxx.gif.
Updated 5 months ago


