

Salesforce Marketing Cloud
Overview
Salesforce Marketing Cloud is a digital marketing platform that allows you to create and manage marketing relationships and campaigns with customers.
Connecting Lytics and Salesforce Marketing Cloud allows you to export Lytics audience membership to a data extension or trigger an event definition journey in real-time, and receive activity data in Lytics for further segmentation.
The Lytics Canvas supports Salesforce Marketing Cloud Experiences. Using Lytics to enrich user data with cross-channel behavior and content affinities, you can send responsive campaigns through Salesforce Marketing Cloud.
Authorization
In order to allow Lytics to access your Salesforce Marketing Cloud account, you'll need the following:
- Client ID
- Client Secret
- Authentication Base URI
To get Salesforce Marketing Cloud client keys, see the Marketing Cloud API Integration guide. Your Salesforce Marketing Cloud client keys will need the following access permissions to work with your Lytics and Marketing Cloud workflows:
| Lytics Workflow | Marketing Cloud Permission | Read | Write |
|---|---|---|---|
| Import Subscriber and Activity | Contacts - List and Subscribers | x | |
| Import Subscriber and Activity | Provisioning - Organizations | x | |
| Import Subscriber and Activity | Data - Tracking Events | x | |
| Import Audiences & Activity Data | Data - Data Extensions | x | |
| Import Audiences & Activity Data | Provisioning - Organizations | x | |
| Export Audiences to Data Extension | Data - Data Extensions | x | x |
| Export Audiences to Data Extension | Provisioning - Organizations | x | |
| Export Lists | Contacts - List and Subscribers | x | x |
| Export Lists | Provisioning - Organizations | x | |
| Triggered Journey | Automation - Journeys | x | x |
| Triggered Journey | Contacts - Audiences | x | x |
| Triggered Journey | Provisioning - Organizations | x | |
| Experiences | Channels - Email | x | |
| Experiences | Provisioning - Organizations | x |
If you are new to creating authorizations in Lytics, see the Authorizations documentation for more information.
- Select Salesforce Marketing Cloud from the list of providers.
- Select the Rest V2 API Tokens method for authorization.
- Enter a Label to identify your authorization.
- (Optional) Enter a Description for further context on your authorization.
- Enter your Salesforce Marketing Cloud Client keys in the Client ID, Client Secret, and Authentication Base URI fields.
- Click Save Authorization.
Import Subscriber and Activity
Importing subscribers and activity data from Marketing Cloud results in new users or existing user profiles supplemented with Marketing Cloud campaign activity data. You can use this data to build and refine your existing Lytics audiences to power better, cross-channel campaigns.
Integration Details
- Implementation Type: Server-side Integration
- Implementation Technique: REST and SOAP API Integration
- Frequency: Batch Integration(scheduled hourly by default).
- Resulting data: User Profiles
This integration utilizes both the Marketing Cloud REST and SOAP API Integration to pull in subscriber and event data.
- Every hour the job will scan for new subscribers via the SOAP retrieve call for SubscriberList to pull in new subscribers for the imported lists and written to the
sfmc_subscribersdata stream in Lytics. - If importing subscriber attributes is selected, full Subscriber is retrieved and written to the
sfmc_subscribersdata stream in Lytics. Note: subscriber attributes are only imported on the initial import, or if the subscriber list membership is updated. If list subscription is not updated, Lytics will not get new subscriber attribute updates. - Every hour, if activity data import is selected, activity data since the last run is retrieved through the SOAP retrieve endpoints for each of the following events, BounceEvent, ClickEvent, ForwardEmailOptInEvent, FowardEmailEvent, OpenEvent, SentEvent, SurveyEvent, and UnsubEvent. All activity data is written to the
sfmc_eventsdata stream in Lytics. - If historical subscriber or activity data is selected to be imported, the above calls are repeated for a days worth a data at a time, going backward in time, until all selected historical data is imported.
Fields
sfmc_events fields
The following fields are included in the default mapping of the sfmc_events stream:
| Source Field | Lytics User Field | Description | Type |
|---|---|---|---|
| subscriber_key | sfmc_subscriber_keys unique id | []string | |
| channels | All Channels Used | []string | |
| url | hashedurls | Hashed Urls Visited | map[string]intsum |
| last_active_ts | Last Active | date | |
| last_channel_activities | Last Activity By Channel | map[string]time | |
| bounce_category | sfmc_bounce_category | SFMC Bounce Category | string |
| bounce_type | sfmc_bounce_type | SFMC Bounce Type | string |
| campaign_name | sfmc_campaign_name | SFMC Campaign Name | string |
| url | sfmc_click_urls | SFMC Urls Clicked on | []string |
| event_type | sfmc_clickct | SFMC Click Count | int |
| event_type | sfmc_events | map[string]intsum | |
| sfmc_firstclick_ts | SFMC First Click | date | |
| sfmc_firstopen_ts | SFMC First Open | date | |
| sfmc_hourlyopen | SFMC Hourly Opens | map[string]intsum | |
| sfmc_hourofweek | SFMC Hour of Week Events | map[string]intsum | |
| sfmc_lastclick_ts | SFMC Last Click | date | |
| sfmc_lastopen_ts | SFMC Last Open | date | |
| list_name | sfmc_list_name | SFMC List Name | string |
| event_type | sfmc_openct | SFMC Open Count | int |
| opt_in_sub_key | sfmc_opt_in_sub_key | SFMC Forward Opt-In | string |
| send_id | sfmc_send_id | SFMC Send ID | string |
| event_type | sfmc_sendct | SFMC Send Count | int |
| smtp_reason | sfmc_smtp_bounce_reason | SFMC SMTP Bounce Reason | string |
| survey_answer | sfmc_survey_answer | SFMC Survey Answer | string |
| survey_question | sfmc_survey_question | SFMC Survey Question | string |
| sfmc_unsub_ts | SFMC Unsub date | date | |
| sfmc_yymm | SFMC Opens By Month | map[string]intsum | |
| send_id | total_clicks_by_message | The number of clicks for a message | map[string]intsum |
| send_id | total_opens_by_message | The number of opens for a message | map[string]intsum |
sfmc_subscribers fields
The following fields are included in the default mapping of the sfmc_subscribers stream:
| Source Field | Lytics User Field | Description | Type |
|---|---|---|---|
| subscriber_key | sfmc_subscriber_keys unique id | []string | |
email unique id | string | ||
| subscriber_id | sfmc_subscriber_ids unique id | []string | |
| emaildomain | Email Domain | string | |
| business_id | sfmc_business_id | SFMC Business ID | string |
| business_name | sfmc_business_name | SFMC Business Name | string |
| created_date | sfmc_created_date | SFMC Created Date | date |
| list_id, status | sfmc_list_ids_status | Subscription Status by List ID | map[string]string |
| list_name, status | sfmc_list_name_status | Subscription Status by List Name | map[string]string |
Configuration
Follow these steps to set up and configure an import of Marketing Cloud subscriber data and activity into the Lytics platform.If you are new to creating jobs in Lytics, see the Data Sources documentation for more information.
-
Select Salesforce Marketing Cloud from the list of providers.
-
Select the Import Subscribers and Activity job type from the list.
-
Select the Authorization you would like to use or create a new one.
-
Enter a Label to identify this job you are creating in Lytics.
-
(Optional) Enter a Description for further context on your job.
-
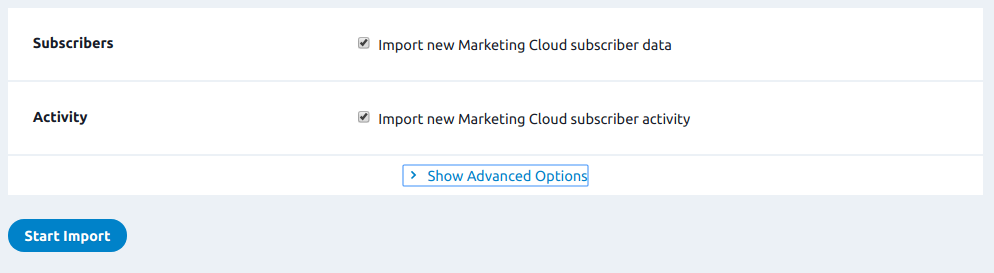
Select what data you would like to import from Salesforce Marketing Cloud, Subscribers and/or Activity.
-
Click to Show Advanced Options to reveal additional settings.
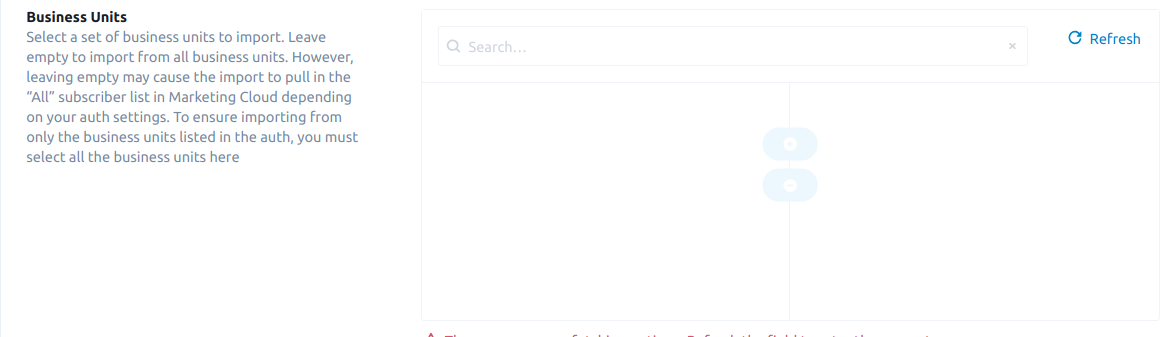
- Business Units: Use this input to select a set of Salesforce Marketing Cloud business units to import. Business unit available to be imported from Salesforce Marketing Cloud are located in the left column. Business units added to the right column will be imported into Lytics. Leave the right column empty to import from all business units. Depending on your authorization settings, leaving empty may cause the import to pull in the All subscriber list from Salesforce Marketing Cloud. To ensure importing from only the business units available to the selected authorization, you must select all the listed business units.
- Get Custom Subscriber Attributes: Select to import custom subscriber attributes. This will cause your imports to take a longer time.
- Subscriber Properties: Select the subscriber properties to import. One of subscriber key or ID must be selected. Properties in the left column are Salesforce Marketing Cloud properties available to import. Properties in the right column will be imported into Lytics. If no properties are selected, all properties will be imported.
- Subscriber Backfill Start Date: Use in conjunction with Subscriber Backfill End Date to import a set of subscribers who already exist in Salesforce Marketing Cloud. Enter a date string, for example
2019-05-11, in the text box. All subscribers created beginning on this date until the end date will be imported into Lytics. - Subscriber Backfill End Date: Use in conjunction with Subscriber Backfill Start Date to import a set of subscribers who already exist in Salesforce Marketing Cloud. Enter a date string, for example
2019-05-11, in the text box. All subscribers created before this date but after the start date will be importing into Lytics.
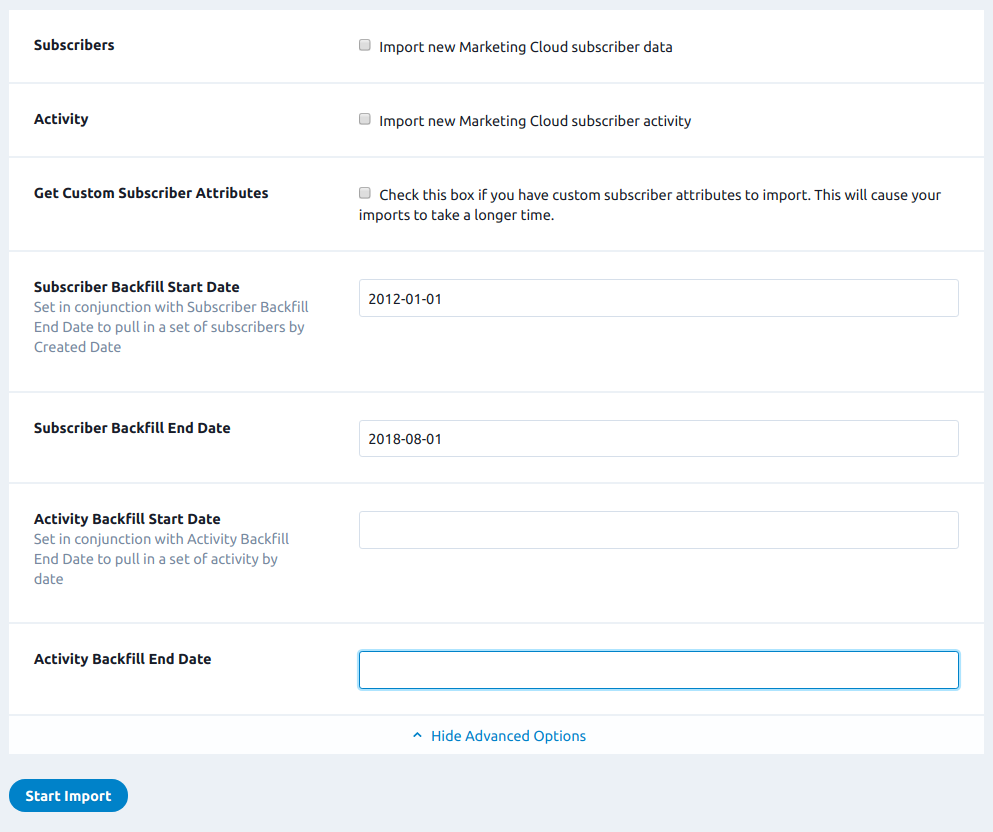
- Activity Backfill Start Date: Use in conjunction with Activity Backfill End Date to import a set of activity data that already exists in Salesforce Marketing Cloud. Enter a date string, for example
2019-05-11, in the text box. All activity recorded beginning on this date until the end date will be importing into Lytics. NOTE: Importing more than 6 months of activity data can slow down processing time with little actionable benefit. - Activity Backfill End Date: Use in conjunction with Activity Backfill Start Date to import a set of activity data that already exists in Salesforce Marketing Cloud. Enter a date string, for example
2019-05-11, in the text box. All activity recorded before this date but after the start date will be importing into Lytics.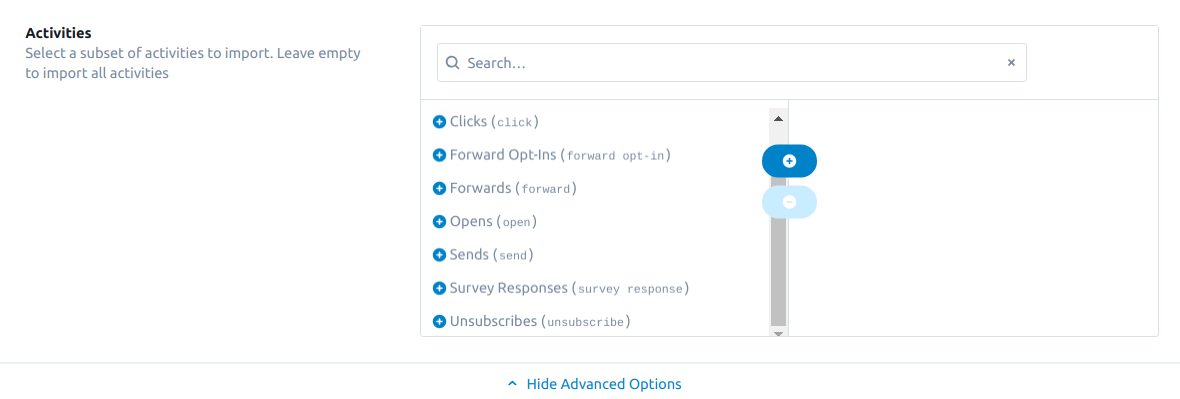
- Activities: Use this input to select a subset of Salesforce Marketing Cloud activities to import. In most cases you can leave the right column empty to import all activities. Activities in the left column are Salesforce Marketing Cloud activities available to import. Activities in the right column will be imported into Lytics. NOTE: In large accounts importing all activities, particularly
Opensmay cause the activity import to not keep up in real time.
- Business Units: Use this input to select a set of Salesforce Marketing Cloud business units to import. Business unit available to be imported from Salesforce Marketing Cloud are located in the left column. Business units added to the right column will be imported into Lytics. Leave the right column empty to import from all business units. Depending on your authorization settings, leaving empty may cause the import to pull in the All subscriber list from Salesforce Marketing Cloud. To ensure importing from only the business units available to the selected authorization, you must select all the listed business units.
-
Click Start Import.


Salesforce Marketing Cloud data should start populating in Lytics within a few minutes.
Import Audiences & Activity Data
Data Extensions can be used to store a wide variety of information in Salesforce Marketing Cloud. The Data Extension Import allows you to bring that data into Lytics to get a more complete picture of your users.
Integration Details
- Implementation Type: Server-side Integration
- Implementation Technique: REST and SOAP API Integration
- Frequency: Batch Integration (continuous update by default).
- Resulting data: User Profiles , User Fields , Raw Event Data, Metrics
This integration utilizes the Salesforce Marketing Cloud APIs to send user data. Once the import is started the job will:
- Construct the retrieve request for the Data Extension's rows.
- If no timestamp field was selected, or this is the first run of the import, all rows are requested.
- If a timestamp field was selected, and this is not the first run of the export, the rows are filtered to only include rows with a timestamp later than the last timestamp previously imported.
- Page through the retrieved Data Extension's rows and ingest them into the selected data stream.
Fields
There are no default mapped fields because of the variety of information that can be stored in a Data Extension. You will select which Fields to import during the configuration described below.
Configuration
Follow these steps to set up and configure an import of Salesforce Marketing Cloud data in the Lytics platform.If you are new to creating jobs in Lytics, see the Data Sources documentation for more information.
- Select Salesforce Marketing Cloud from the list of providers.
- Select the Import Audiences & Activity Data job type from the list.
- Select the Authorization you would like to use or create a new one.
- From the Data Extension input, select the Marketing Cloud Data Extension to import data from.
- From the Stream text input, enter the data stream you would like to import data to.
- From the Timestamp Field input, select the field that represents the event time for the data in the Data Extension. If this field is not selected for a continuous import, all data will be imported during each cycle.
- From the Fields input, select the fields to import from the Data Extension.
- Select the Keep Updated checkbox to run this import continuously. A timestamp field should be selected to prevent duplicate data.
- Click on the Show Advanced Options tab to expand the advanced configuration.
- From the Import Frequency input, choose how often a continuous import should attempt to read new data.
- From the Time of Day input, select the time of day to start the import.
- From the Timezone input, select the timezone for the time of day.
- Click Start Import.
Export Audience To Existing Data Extension
Exporting a Lytics audience to Salesforce Marketing Cloud data extensions allows you to send email, push notifications, or SMSs to your users based on your own, relevant targeting criteria, such as cross-channel behavior, content affinities, and more.
Integration Details
- Implementation Type: Server-side Integration
- Implementation Technique: REST and SOAP API Integration
- Frequency: Batch Integration (continuous update by default).
- Resulting data: Data pushed to a Marketing Cloud data extension.
This integration utilizes both the Marketing Cloud REST and SOAP API Integration to push a Lytics Audience to a data extension in Marketing Cloud.
- If non-scalar fields are selected, then new data extensions may be created for them. The data extensions for non-scalar fields will be named
Lytics_<field name>_fieldwhere<field name>is the name of the non-scalar field. - The mapped user fields for the users in the Lytics audience will be continually updated in the data extension, with rows being added or removed by calling a DataExtensionObject add/remove call as users enter/exit the audience.
Fields
There are no default fields exported into the data extension. If you are creating a new data extension, you will select a field to be the Marketing Cloud subscriber key. Usually email or the Marketing Cloud subscriber key is selected as the identifier. If you are exporting to an existing data extension, you will map the Lytics fields to your data extension fields during the configuration.
Configuration
Follow these steps to set up and configure an export from Lytics to a Marketing Cloud Data Extension.If you are new to creating jobs in Lytics, see the Destinations documentation for more information.
Select Salesforce Marketing Cloud from the list of providers.
- Select Salesforce Marketing Cloud from the list of providers.
- Select the export Export Audience To Existing Data Extension from the list.
- Select the Authorization you would like to use or create a new one.
- Enter a Label to identify this job you are creating in Lytics.
- (Optional) Enter a Description for further context on your job.
- Select the audience to export.
- Complete the configuration steps for your job.
- (optional) From the Business Unit input, select the business unit where the data extension exists. Leave empty to export to your base Marketing Cloud account.
- From the Data Extension input, select the Data Extension to export to.
- From the Subscriber Key Field input, select the Lytics field containing the subscriber key for the exported data extension. NOTE: you must map your selected key field in the mapping section below.
- From the Map Fields input, select all the fields to send to Marketing Cloud by mapping the Lytics user profile field on the left to the Marketing Cloud field on the right. If you select set fields here, they will be sent as a comma-separated list in the field. To send set fields in a separate join table, select in the non-scalars list below. NOTE: This section is only applicable if you are exporting to an existing data extension. You must map your selected subscriber key field in this section.
- (optional) From the Non-Scalar Fields input, choose the non-scalar fields to export NOTE: these will each be created in a separate data extensions.
- (optional) From the Folder input, select the Marketing Cloud Folder to export user data to.
- (optional) Select the Existing Users checkbox, to select to add users who already exist in the selected Lytics audience.
- Click the Complete button to start the job.
Export Audience To New Data Extension
Exporting a Lytics audience to Salesforce Marketing Cloud data extensions allows you to send email, push notifications, or SMSs to your users based on your own, relevant targeting criteria, such as cross-channel behavior, content affinities, and more.
Integration Details
- Implementation Type: Server-side Integration
- Implementation Technique: REST and SOAP API Integration
- Frequency: Batch Integration (continuous update by default).
- Resulting data: Data pushed to a Marketing Cloud data extension.
This integration utilizes both the Marketing Cloud REST and SOAP API Integration to push a Lytics Audience to a data extension in Marketing Cloud.
- A new data extension will be created to store the non-scalar fields selected. If non-scalar fields are selected, then new data extensions may be created for them. The data extensions for non-scalar fields will be named
Lytics_<field name>_fieldwhere<field name>is the name of the non-scalar field. - The mapped user fields for the users in the Lytics audience will be continually updated in the data extension, with rows being added or removed by calling a DataExtensionObject add/remove call as users enter/exit the audience.
Fields
There are no default fields exported into the data extension. If you are creating a new data extension, you will select a field to be the Marketing Cloud subscriber key. Usually email or the Marketing Cloud subscriber key is selected as the identifier. If you are exporting to an existing data extension, you will map the Lytics fields to your data extension fields during the configuration.
Configuration
Follow these steps to set up and configure an export from Lytics to a Marketing Cloud Data Extension. If you are new to creating jobs in Lytics, see the Destinations documentation for more information.
Select Salesforce Marketing Cloud from the list of providers.
Select Salesforce Marketing Cloud from the list of providers.
- Select the export Export Audience To New Data Extension from the list.
- Select the Authorization you would like to use or create a new one.
- Enter a Label to identify this job you are creating in Lytics.
- (Optional) Enter a Description for further context on your job.
marketingcloud - Select the audience to export.
- Complete the configuration steps for your job.
- (optional) From the Business Unit input, select the business unit where the data extension exists. Leave empty to export to your base Marketing Cloud account.
- From the Subscriber Key Field input, select the Lytics field containing the subscriber key for the exported data extension. NOTE: If you are exporting to an existing data extension, you must map your selected key field in the mapping section below.
- From the Subscriber Key Field Type input, select the Marketing Cloud type of the Subscriber Key.
- From the Scalar Fields input, when creating a new data extension, choose the all the fields to export to the user table. If you select set fields here, they will be sent as a comma-separated list to a single field in the user table. To send set fields in a separate join table, select the field in the non-scalars list below. NOTE: these all will be created in the same data extension.
- From the Non-Scalar Fields input, choose the non-scalar fields to export NOTE: these will each be created in a separate data extensions.
- (optional) From the Folder input, select the Marketing Cloud Folder to export user data to.
- (optional) Select the Existing Users checkbox to add users who already exist in the selected Lytics audience.
- (optional) Select the Sendable and Testable checkbox to when creating a new data extension, select this to make the new data extension sendable and testable.
- Click the Complete button to start the job.
Export Lists
This job type allows you to sync Lytics audiences and profile data in real-time to Salesforce Marketing Cloud for targeting your email communications.
Integration Details
- Implementation Type: Server-side Integration
- Implementation Technique: SOAP API Integration, Audience Trigger Integration
- Frequency:
Real-time Integration - Resulting data:
Each profile in the Lytics audience is added to the Marketing Cloud list as a Subscriber. User fields are included as Subscriber Attributes.
This integration utilizes the Marketing Cloud SOAP API to send user data. Once the export is started the job will:
-
If the Existing Users option is selected (see below), the job will generate enter events for every user in the Lytics audience. After these are processed via steps 2-4 below, the job will listen for enter/exit events and process them accordingly.
-
Ensure the user has an email field.
-
Package the user as a Marketing Cloud Subscriber. If fields are mapped (see step 8 of Configuration), they are added to the subscriber as attributes.
-
If it's an enter event, the user is added to the list using a SOAP "CREATE" method. If the user already exists, it will be added to the list and updated with the mapped fields.
-
If it's an exit event, one of the following will occur:
- If the Unsubscribe on Exit option is NOT selected, the event will be ignored.
- If the Unsubscribe on Exit option is selected, the user will be unsubscribed from the list via the process described here.
Fields
By default, Lytics exports the following field to Salesforce Marketing Cloud for the Export Lists job.
| Lytics User Field | Description | SFMC Field | Type |
|---|---|---|---|
| Email Address | string |
Configuration
Follow these steps to set up and configure an export of lists to Salesforce Marketing Cloud from the Lytics platform. If you are new to creating jobs in Lytics, see the Destinations documentation for more information.
- Select Salesforce Marketing Cloud from the list of providers.
- Select the Export Audiences (Lists) job type from the list.
- Select the Authorization you would like to use or create a new one.
- From the Audience dropdown, choose the Lytics audience to send to Marketing Cloud.
- From the Email Field dropdown, select the field that has the user's email.
- From the List to Update input, select the Marketing Cloud list to update. If none is selected, a new list will be created with the form
lytics_{audience_name}. - From the Map Fields, select all the fields to send to Marketing Cloud by mapping the Lytics user profile field on the left to the Marketing Cloud field on the right.
- (Optional) From the Subscriber Key Field input, select the Lytics field containing the subscriber key for the exported list. It allows multiple Marketing Cloud subscribers to have the same email address.
- (Optional) Select the Existing Users checkbox to immediately push users who currently exist in the selected Lytics audience. Deselecting will only push users as they enter or exit the audience.
- (Optional) Select the Unsubscribe on Exit checkbox to unsubscribe a user from the list when they exit the Lytics audience. Deselecting will ignore exit events
- Click Complete to start the job.
Trigger Journey
Push users into a Marketing Cloud journey when users enter a Lytics audience to send event-driven, responsive campaigns across any channel.
Integration Details
- Implementation Type: Server-side Integration
- Implementation Technique: REST and SOAP API Integration
- Frequency: Real-time Integration
- Resulting data: Selected data is sent to Marketing Cloud journey.
This integration utilizes the REST and SOAP API Integration to push data to a Marketing Cloud journey. When the export is started the job will:
- As users enter the selected Lytics audience, a Marketing Cloud journey event is fired with the selected user data being mapped to data fields.
Fields
There are two required fields, ContactKey and EventDefinitionKey, that are selected in configuring the job and sent to the Marketing Cloud journey. Additional Lytics user fields can be mapped to Marketing Cloud journey data fields when setting up the job.
Configuration
Follow these steps to set up and configure the export to a Marketing Cloud journey in the Lytics platform. If you are new to creating jobs in Lytics, see the Destinations documentation for more information.
- Select Salesforce Marketing Cloud from the list of providers.
- Select the Export Audiences to Trigger Journey job type from the list.
- Select the Authorization you would like to use or create a new one.
- From the Audience input, select the Lytics audience to send to Marketing Cloud.
- Select the Event Definition to select the Marketing Cloud Event Definition to write to. This selection is populated from Marketing Cloud.
- From the Map Fields , select all the fields to send to Marketing Cloud by mapping the Lytics user profile field on the left to the Marketing Cloud field on the right.
- From the Contact Key input, select the mapped field from above that contains the ID that uniquely identifies a Marketing Cloud subscriber.
- From the Audience Field input, select a field to write the additional Lytics audiences to.
- From the Additional Audience Membership input, select additional Lytics audiences to send to the Audience Field specified above. Audience slugs will be sent concatenated by a comma, field may be limited by size
- From the Existing Users checkbox, trigger events for users who already exist in the selected Lytics audience. The default option is to leave this unchecked and only initiate events as users enter the Lytics audience from the start of the work onward. However, to send events for all the users that are currently in the Lytics audience, check this checkbox.
- Click Complete to start the job.
This export will run continuously until it is terminated by a user. For every new user that enters the chosen Lytics audience, the selected data will be written to the Marketing Cloud trigger journey data extension within a couple of minutes.
Experiences
Lytics Experiences support Salesforce Marketing Cloud journeys based on your data extensions or triggered API events. These Experiences are best kept as simple email journeys with a single email send action. Any actions beyond the first email send will not be counted in reach and conversion metrics. To manage the full customer lifecycle, you can create multiple Salesforce Marketing Cloud Experiences, each with a single email send, in the Lytics Canvas.
Experience Import
Like all Experience enabled providers, you can import Experiences from Salesforce Marketing Cloud to Lytics. During the import process, you will be asked to select an authorization. Read the Salesforce Marketing Cloud authorization documentation for more information.

Tactics
Tactics are determined by the journey's entry source.
Salesforce Marketing Cloud Experiences in Lytics support the following tactics:
- API Event - Send responsive campaigns in real-time using API-driven entry to a journey. This option supports Delivery Optimization from Lytics.
- Data Extension - Send scheduled emails (e.g. newsletters and event notifications) using data extension-driven entry to a journey.
Configuration
After importing a Salesforce Marketing Cloud Experience you can configure it for activation. All tactics for Salesforce Marketing Cloud have the same three configuration steps within the Experience Editor:
- Target - select the target audience for your Experience.
- Configure SalesForce Marketing Cloud - set up how the audience for your Experience will be exported. This step will match the configuration instructions of the following jobs based on tactic:
- Triggered Journey export for API Event tactics.
- Data Extension export for Data Extension tactics.
The activation will generally function the same as the export jobs, but with some changes:
- There will be no Audience selection as it is configured by the Target step in the Experience editor.
- The Event Definition or Data Extension will not be available (depending on tactic), as these are set by the Experience.
- Configure Delivery - choose to turn the Delivery Optimization feature on or off, which only applies to the API Event tactic since it is real-time. The Data Extension tactic does not benefit from Delivery Optimization since the journey is scheduled to activate at a specific time.
Once you've finished configuring the Experience you can save and activate it.
Activation
Activating Salesforce Marketing Cloud Experiences will export users and populate a Data Extension, but the exact method depends on the Experience tactic.
API Event Tactics
The API Event tactic will push users via the Triggered Journey export. The users sent to Salesforce Marketing Cloud will be stored in a data extension.
NOTE: For this tactic, you will activate the Salesforce Marketing Cloud journey before activating the Lytics Experience so that it is ready to process incoming events. If Delivery Optimization is enabled, the API event will be sent at the best time to email the user. No delay should be configured in the Salesforce Marketing Cloud journey between user entry and email send.
- Navigate to the Journey Builder in Salesforce Marketing Cloud.
- Select your journey from the list of journeys in Salesforce Marketing Cloud.
- Click the Activate button to activate the journey in Salesforce Marketing Cloud.

- Navigate to your Lytics Experience.
- Click on your Experience.
- Click Activate. If the Activate button is disabled, you will need to follow the instructions in the Configuration section above to set up the Experience.

Data Extension Tactics
The Data Extension tactic will push users via the Data Extension export. The Salesforce Marketing Cloud journey will evaluate the Data Extension once the journey is activated.
NOTE: For this tactic, you will activate the Experience in Lytics before activating the journey in Salesforce Marketing Cloud, which gives the export time to populate the Data Extension. Exact timing will depend on your audience size, among other factors.
- Navigate to your Lytics Experience.
- Click on your Experience.
- Click Activate. If the Activate button is disabled, you will need to follow the instructions in the Configuration section above to set up the Experience.
- Navigate to the Journey Builder in Salesforce Marketing Cloud.
- Select the journey from the list of journeys.
- Click the Activate button to activate the journey. If the journey is configured with a schedule, the journey will trigger on the selected date(s). If the journey is configured to trigger immediately, then the journey will run once you click Activate. There are options for configuring a data extension journey.

Metrics
Salesforce Marketing Cloud metrics are collected through the Retrieve API to populate the reach and conversion metrics for Salesforce Marketing Cloud Experiences.

Metrics from the SalesForce Marketing Cloud are mapped to Lytics as follows:
-
Reach - Impressions are counted by the number of users who have opened the email sent by the Experience. Lytics will retrieve all the OpenEvents from Salesforce Marketing Cloud for the Experience.
-
Converted - Conversions are counted by the number of users who have clicked a link in the email sent by the Experience. Lytics will retrieve all the ClickEvents from Salesforce Marketing Cloud for the Experience.
These events are also mapped to the Lytics user fields Reached with SFMC Experience and Converted on SFMC Experience, which are available in the audience builder so that you can create audiences of users who have been reached by or converted on your Salesforce Marketing Cloud Experiences.
Updated 15 days ago