

Lytics File Service
Overview
Lytics File Service allows you to import or export data from sources that Lytics does not have a built-in integration with. Data can imported in either a JSON or CSV file and exported as a CSV or JSON lines file for use in ads or campaign targeting.
Authorization
Lytics uses SSH File Transfer Protocol (SFTP) to import files into Lytics and to export user data into files on an SFTP server. You can use your own SFTP service or Lytics can provide a managed SFTP server account. Adding an authorization for use in an import or export job differs if you use our own or a Lytics SFTP account.
If you are new to creating authorizations in Lytics, see the Authorizations Dashboard documentation for more information.
- Select Lytics File Service from the list of providers.
- Select the method for authorization. Note that different methods may support different job types. Custom supports the following authorization methods:
- Enter a Label to identify your authorization.
- (Optional) Enter a Description for further context on your authorization.
- Complete the configuration steps needed for your authorization. These steps will vary by method.
- Click Save Authorization.
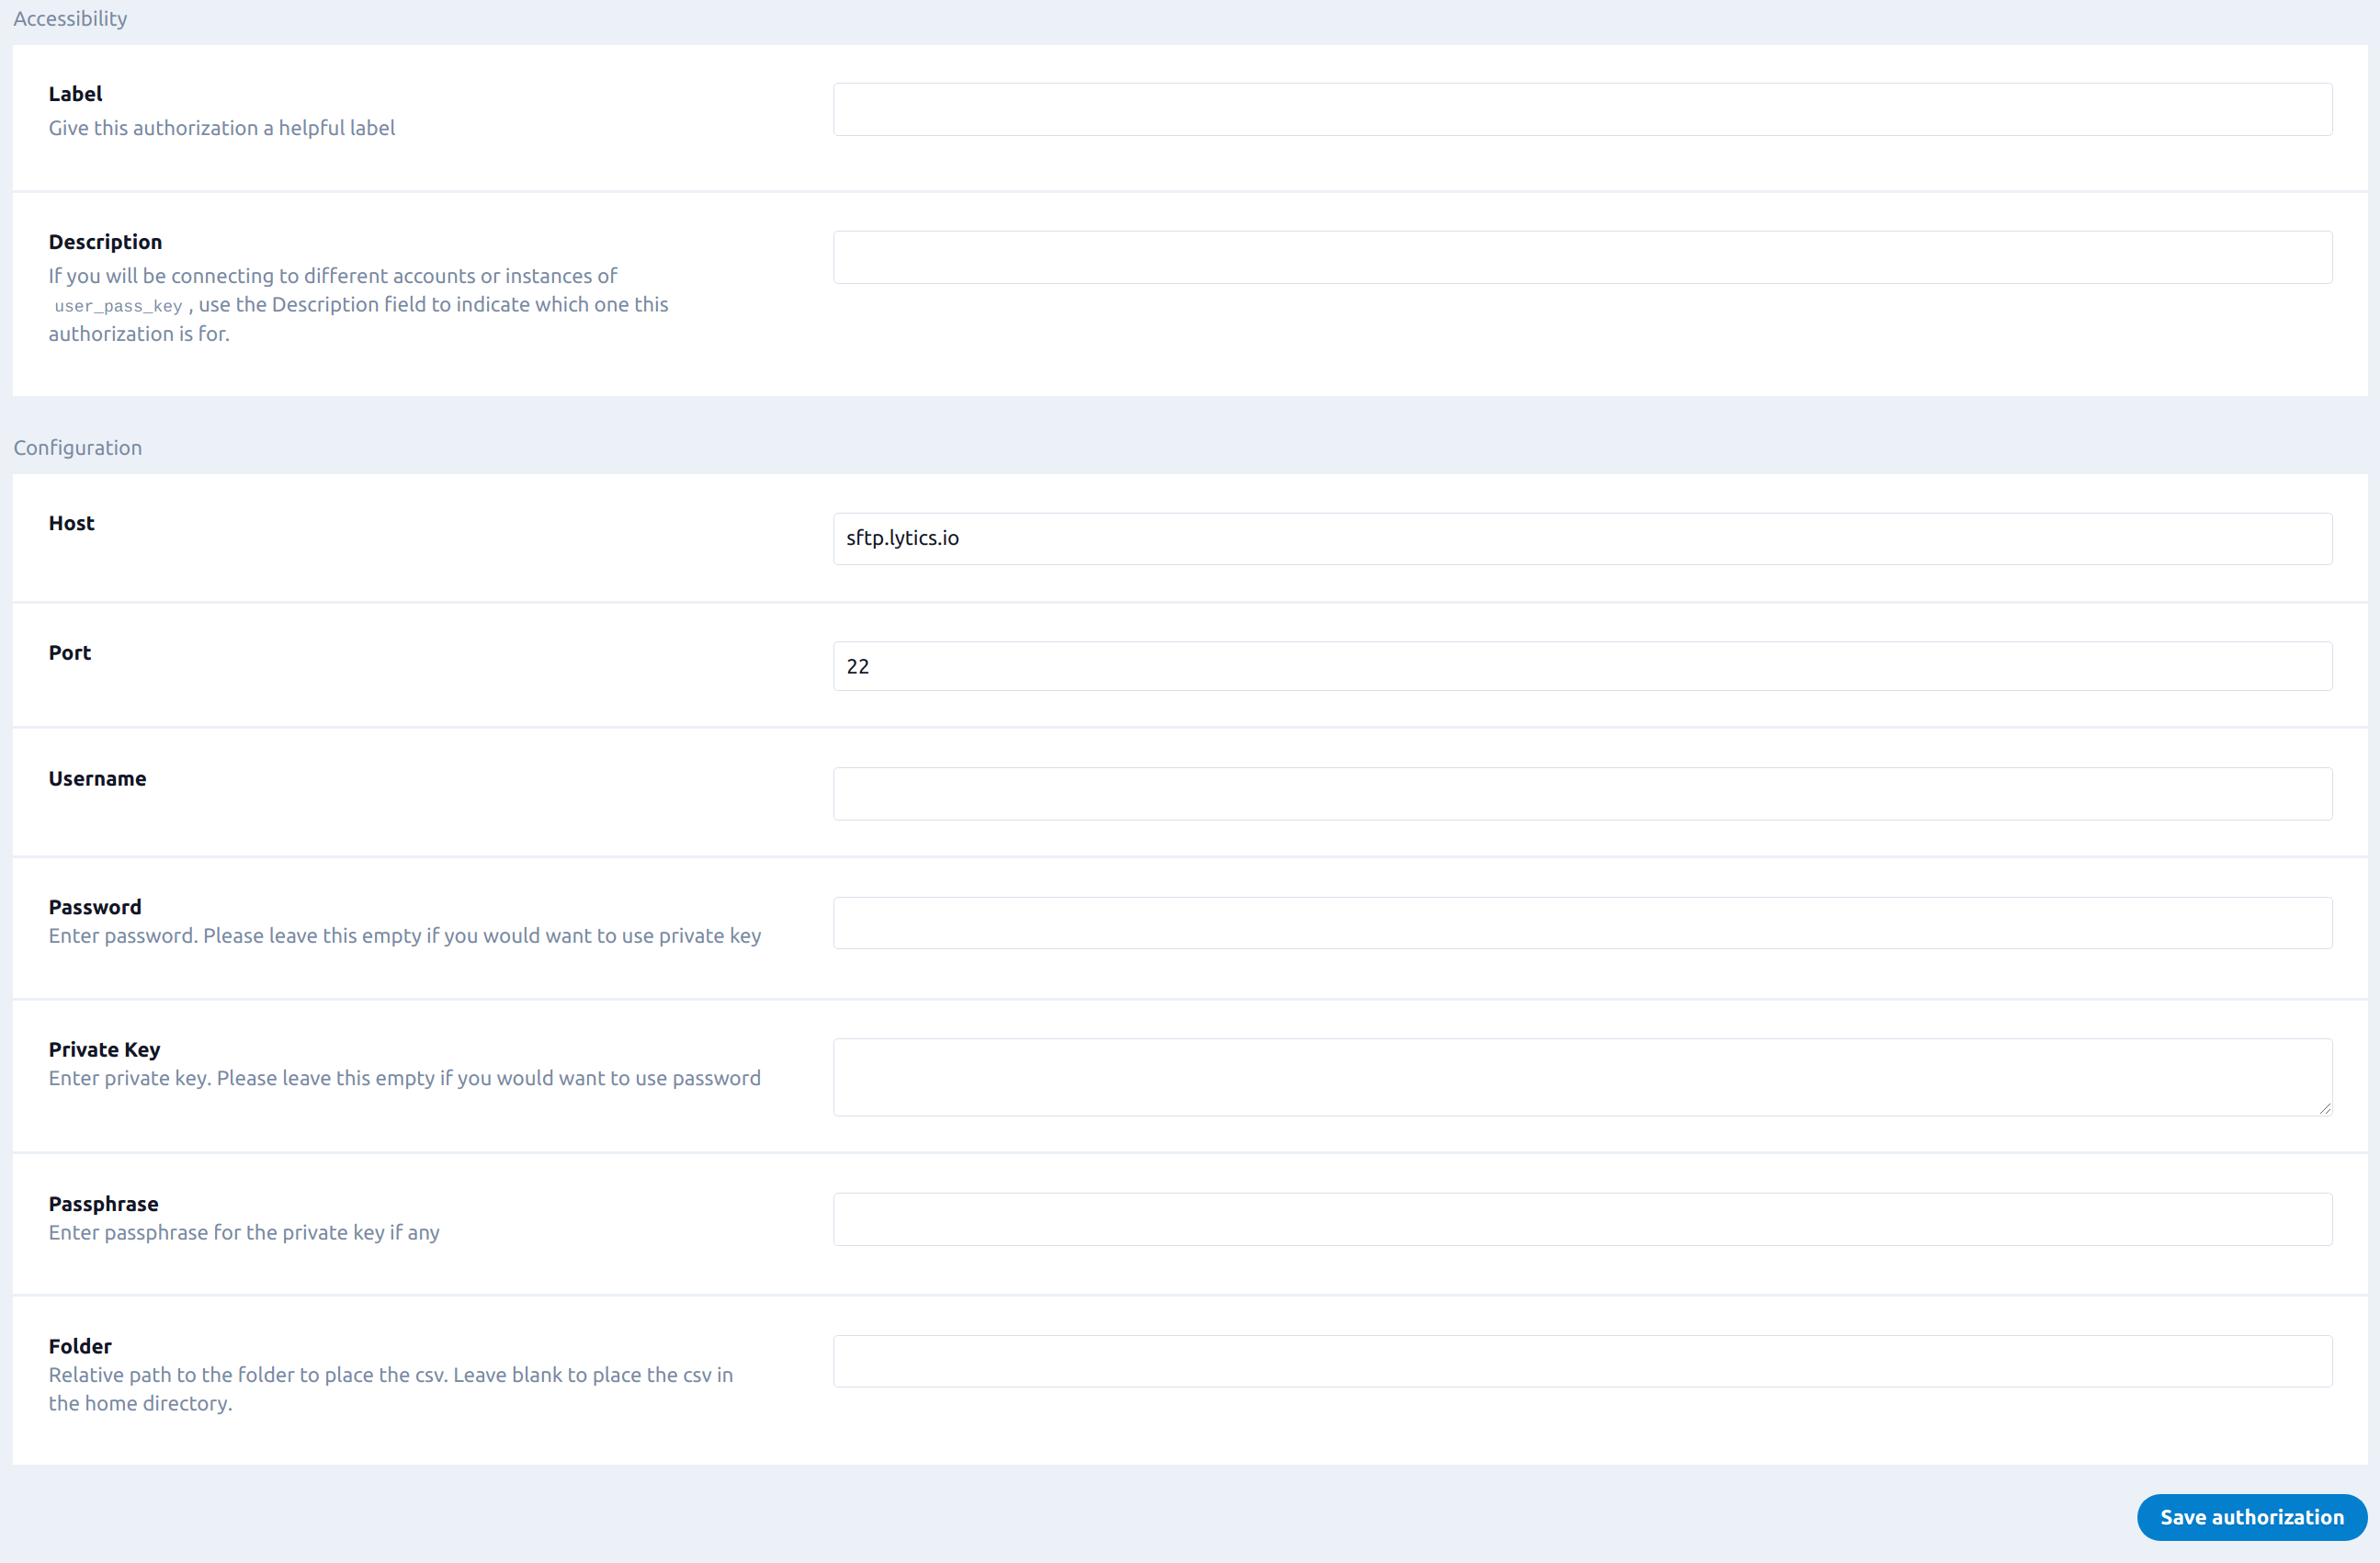
Client SFTP Server Authorization
- In the Host text field, enter the host name or IP address of the SFTP server you want to connect to.
- In the Port text field, enter the port number for the SFTP server.
- In the Username text field, enter the username for the SFTP server.
- In the Password text field, enter the password for the SFTP server. If you wish to use a Private Key, leave this field empty.
- In the Private Key text field, enter the ssh private key for the user for the SFTP server. This key is usually generated by you as a part of a SSH private/public key combination. Lytics is compatible with keys in the OpenSSH format. If you used a tool like PuTTY to generate your key make sure to export it in the OpenSSH format before adding it to Lytics.
NOTE: If you choose to provide both, then Lytics will try to connect to the SFTP server with the private key first and if that fails then we will try with the password. - In the Passphrase text field, enter the passphrase for the private key you entered if any.
- In the Folder text field, enter the relative path to the folder to import or export file. If the path is not given, then we will export the file to the user's home directory.

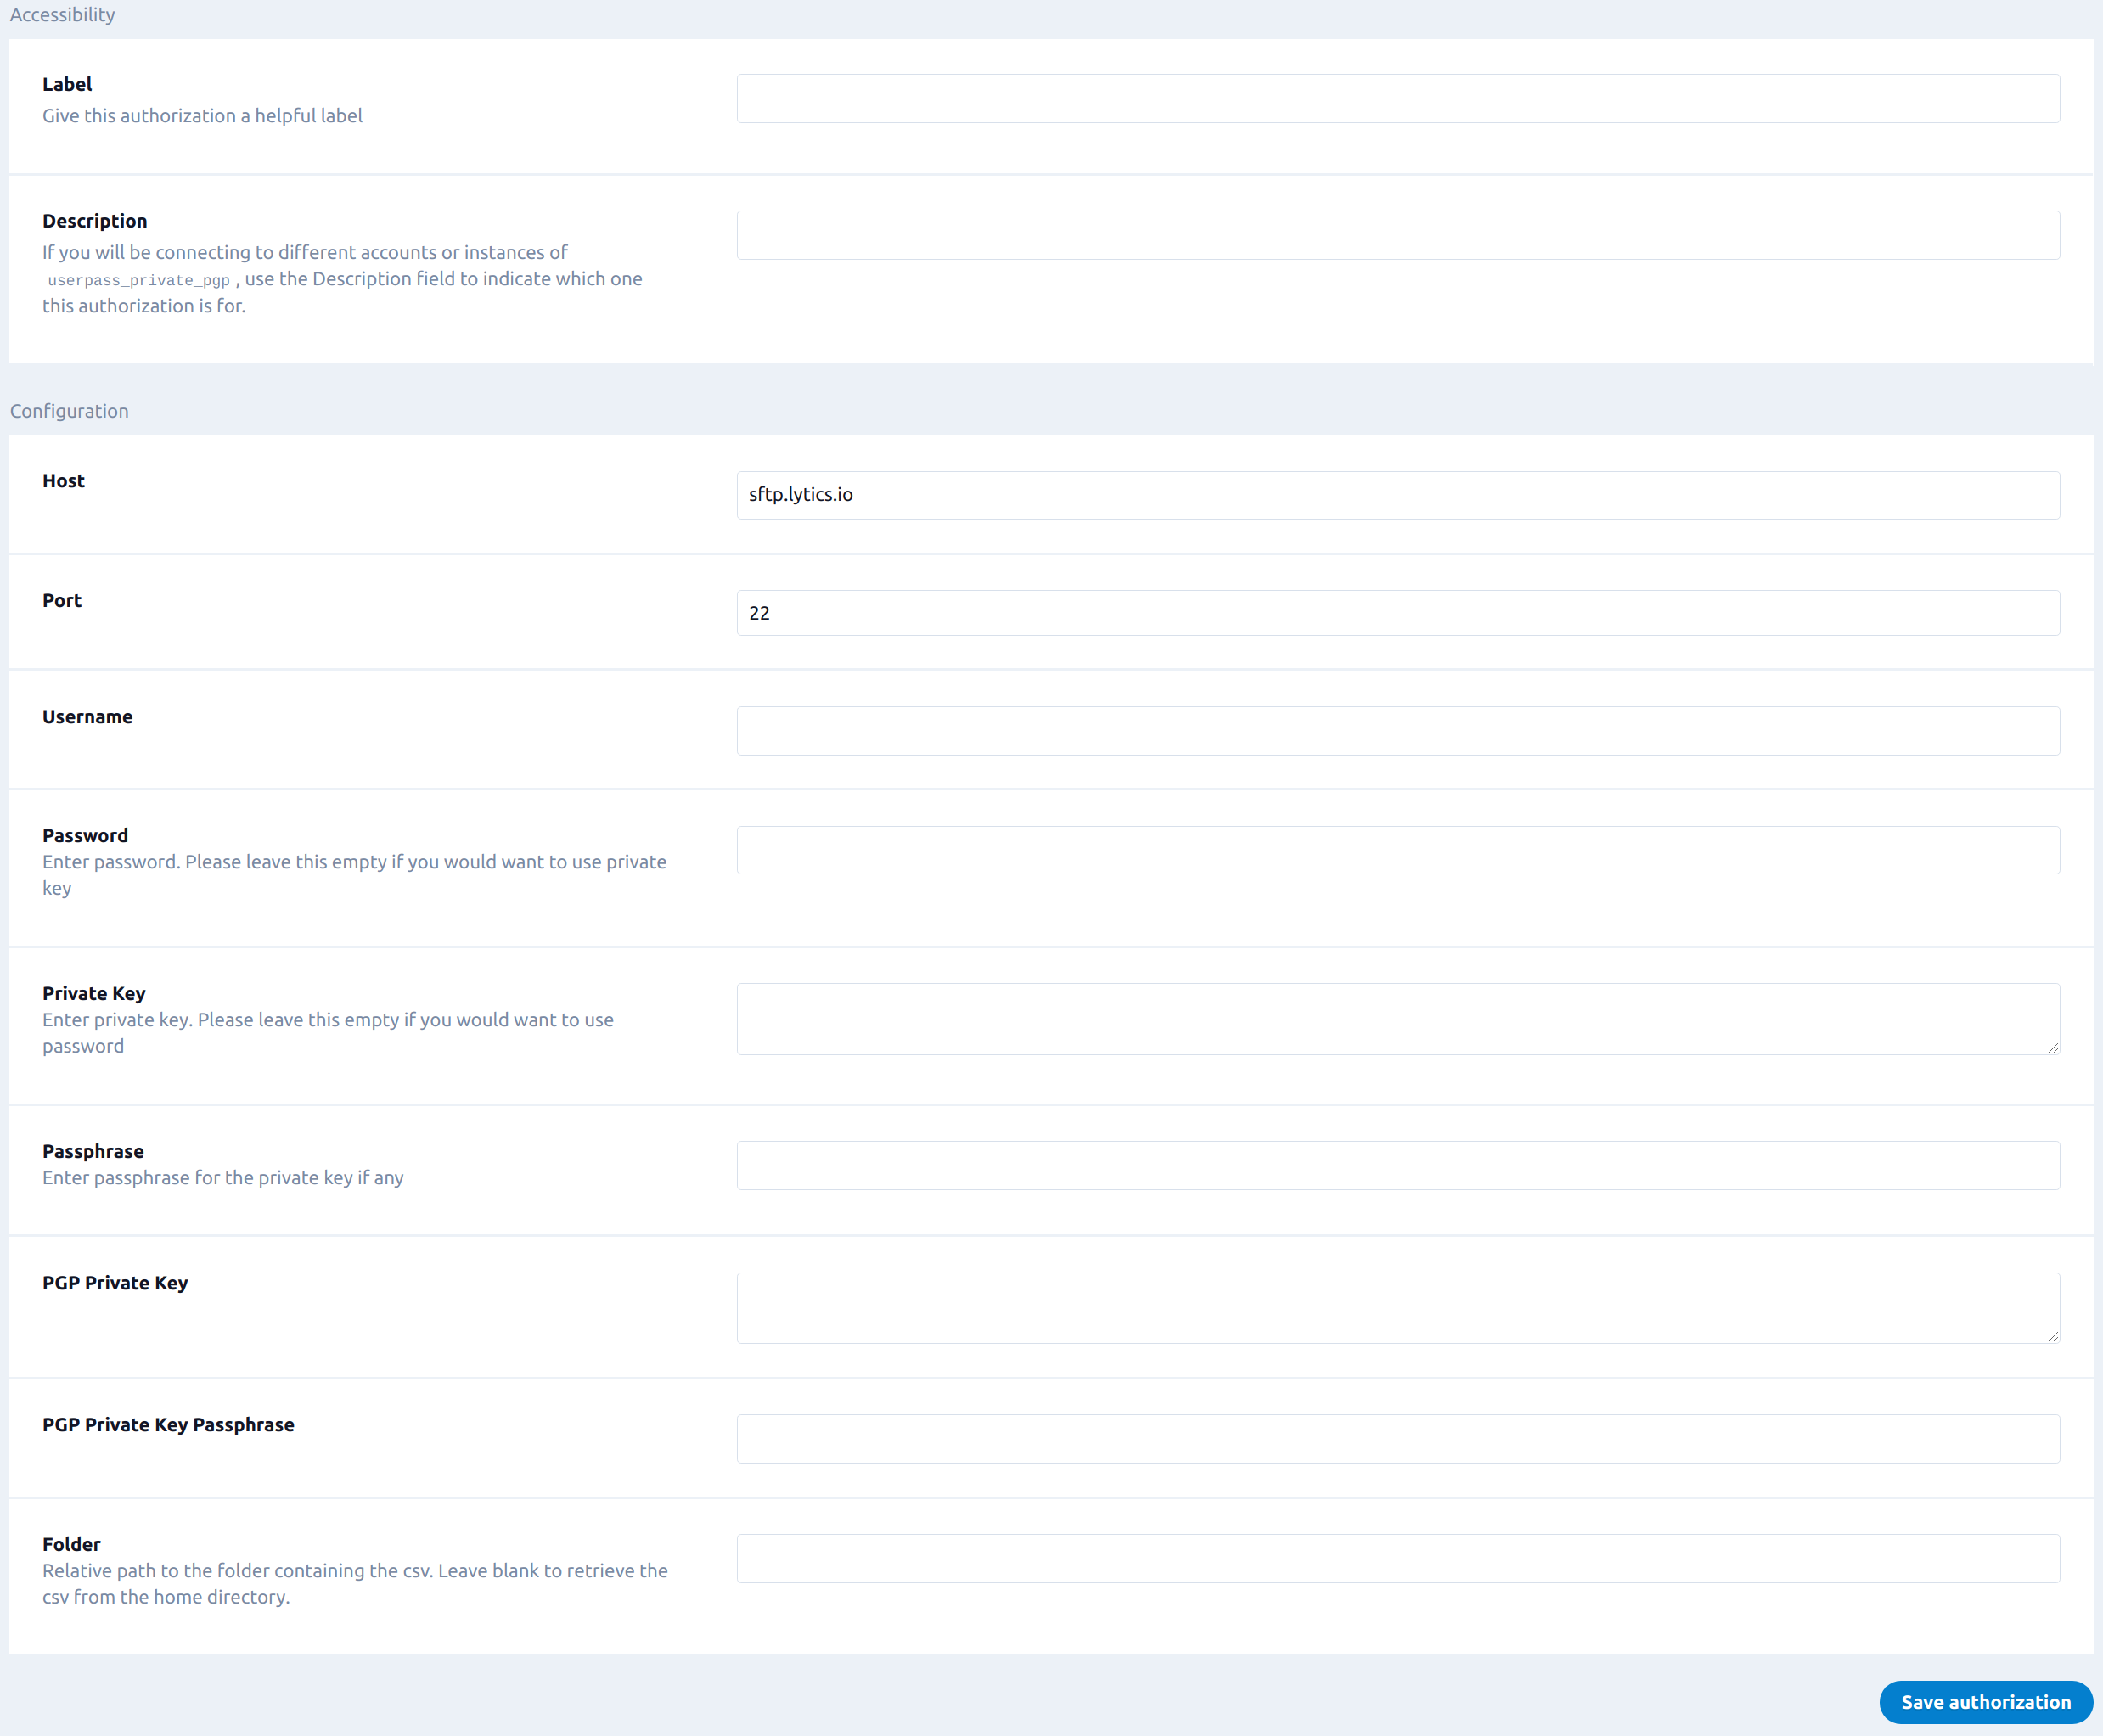
Client SFTP Server Authorization with PGP Private Key
This authorization lets you import JSON or CSV files to Lytics that have been encrypted using your PGP private key. In order to add this authorization, please make sure you have your PGP keys set up first. See PGP encryption for more information.
- In the Host text field, enter the host name or IP address of the SFTP server you want to connect to.
- In the Port text field, enter the port number for the SFTP server.
- In the Username text field, enter the username for the SFTP server.
- In the Password text field, enter the password for the SFTP server. If you wish to use a Private Key, leave this field empty.
- In the Private Key text field, enter the ssh private key for the user for the SFTP server. This key is usually generated by you as a part of a SSH private/public key combination. Lytics is compatible with keys in the OpenSSH format. If you used a tool like PuTTY to generate your key make sure to export it in the OpenSSH format before adding it to Lytics.
NOTE: If you choose to provide both, then Lytics will try to connect to the SFTP server with the private key first and if that fails then we will try with the password. - In the Passphrase text field, enter the passphrase for the private key you entered if any.
- In the PGP Private Key text field, enter your PGP private key. See PGP private keys for more information.
- In the PGP Private Key Passphrase text field, enter the passphrase for your PGP private key.
- In the Folder text field, enter the relative path to the folder to import the file from. If the path is not given, then we will connect to the user's directory.

Client SFTP Server Authorization with PGP Public Key
This authorization lets you export Lytics audiences to a CSV file while also encrypting the content using the provided PGP public key. In order to add this authorization, please make sure you have your PGP keys set up first. See PGP encryption for more information.
- In the Host text field, enter the host name or IP address of the SFTP server you want to connect to.
- In the Port text field, enter the port number for the SFTP server.
- In the Username text field, enter the username for the SFTP server.
- In the Password text field, enter the password for the SFTP server. If you wish to use a Private Key, leave this field empty.
- In the Private Key text field, enter the ssh private key for the user for the SFTP server. This key is usually generated by you as a part of a SSH private/public key combination. Lytics is compatible with keys in the OpenSSH format. If you used a tool like PuTTY to generate your key make sure to export it in the OpenSSH format before adding it to Lytics.
NOTE: If you choose to provide both, then Lytics will try to connect to the SFTP server with the private key first and if that fails then we will try with the password. - In the Passphrase text field, enter the passphrase for the private key you entered if any.
- In the PGP Public Key text field, enter PGP public key. See PGP public keys for more information.
- In the Folder text field, enter the relative path to the folder to export file to. If the path is not given, then we will connect to the user's directory.
Lytics Managed SFTP Server
Lytics provides a managed SFTP server where you can provision an account to move data into and out of Lytics.
The Lytics managed SFTP server URL and port are:
SFTP Host Name: sftp.lytics.io
SFTP Port Number: 22
For credentials to connect to Lytics Managed SFTP, you will create it according to your requirements using one of the following authorizations:
- Lytics Managed SFTP Server Authorization
- Lytics Managed SFTP Server Authorization with PGP Private Key
- Lytics Managed SFTP Server Authorization with PGP Public Key
When you add an authorization, Lytics creates a new user using the information provided in the Lytics managed SFTP server. You can use those user credentials to upload or download a file.
SFTP File ExpirationBy default, the files are stored for 90 days in Lytics Managed SFTP server. After 90 days, the files are deleted. If you wish to store file for less than that then edit the "Number of days to keep files on Lytics SFTP server" account setting.
You can find this setting in "Account Settings > Lytics API > Data Collection" section.
Updating the file modified time is not supported by the Lytics Managed SFTP server. The modified time is set when the file is uploaded to the server and cannot be changed.
Deleting the a Lytics Managed SFTP server authorization in the Lytics platform, will remove the username from accessing the SFTP server.
Lytics Managed SFTP Server Authorization
- In the Username text box, enter a username. This username must be between 3 to 32 characters. Username can have characters a-z, A-Z, 0-9, hyphen(-), and underscore(_). It cannot start with hyphen(-).
- In the Password password box, enter a password. The password must be between 8 to 32 characters and include at least one uppercase letter, lowercase letter, number and special character.
- In the Public Key text box, enter your SSH public key. This key is usually generated by you as a part of a SSH private/public key combination. Lytics is compatible with keys in the OpenSSH format. If you used a tool like PuTTY to generate your key make sure to export it in the OpenSSH format before adding it to Lytics.
NOTE: Either password or public key must be provided.
Lytics Managed SFTP Server Authorization with PGP Private Key
This authorization lets you import JSON or CSV files that have been encrypted with your PGP private key. In order to add this authorization, please make sure you have your PGP keys set up. See PGP encryption for more information.
- Create a user for Lytics managed SFTP server if you have not already.
- Use the credentials of that user and Lytics managed SFTP server host details (Host name:
sftp.lytics.ioPort:22) to create SFTP Server authorization with PGP Private Key using Client SFTP Server Authorization with PGP Private Key.
Lytics Managed SFTP Server Authorization with PGP Public Key
This authorization lets you export Lytics audiences to a CSV file while encrypting the content using the provided PGP public key. In order to add this authorization, please make sure you have your PGP keys set up. See PGP encryption for more information.
- Create a user for Lytics managed SFTP server if you have not already.
- Use the credentials of that user and Lytics managed SFTP server host details (Host name:
sftp.lytics.ioPort:22) to create SFTP Server authorization with PGP Public Key using Client SFTP Server Authorization with PGP Public Key.
JSON Import
Lytics allows you to import data via a JSON file for data sources we do not natively integrate with.
Integration Details
- Implementation Type: Server-side Integration.
- Implementation Technique: File Based Transfer Integration.
- Frequency: Batch Integration. once a day at a scheduled time.
- Resulting data: User Profiles once the imported data is mapped via LQL.
This integration parses JSON files and imports fields and associated data. The JSON file must be a JSON New Line Delimited file where each line contains a single record. Once the integration is started it will:
- Connect to the SFTP server.
- Navigate to the configured folder.
- Read the selected JSON file.
- Import all the fields in the JSON file.
Fields
Once you choose the file to import during configuration, Lytics will read the file and list all the fields that can be imported. You may select fields that you wish to import.
Configuration
Follow these steps to set up and configure an import job for Lytics File Service in the Lytics platform. If you are new to creating jobs in Lytics, see the Data Sourcesdocumentation for more information.
- Select Lytics File Service from the list of providers.
- Select the Import JSON job type from the list.
- Select the Authorization you would like to use or create a new one.
- Enter a Label to identify this job you are creating in Lytics.
- (Optional) Enter a Description for further context on your job.
- Complete the configuration steps for your job.
- From the Stream input, select the data stream where the data will be posted or enter a name to create a new stream.
- (Optional) From the Folder input, select the folder where the JSON file is located.
- (Optional) From the File input, select the file to import. Listing files may take up to a couple minutes after the bucket is chosen.
- (Optional) From the Timestamp Field input, select the field name that contains the timestamp of an event. If no field is specified, the event will be time stamped with the time of the import.
- (Optional) Select the Keep Updated checkbox, to continuously run this import.
- (Optional) Toggle Show Advanced Options tab to expand the advanced configuration.
- (Optional) In the Prefix text box, enter the file name prefix. You may use regular expressions for pattern matching. The prefix must match the file name up to the timestamp. A precalculated prefix derived from the selected file will be available as a dropdown.
- (Optional) From the Time of Day input, select time of day to start importing each day.
- (Optional) From the Timezone input, select the timezone for the time of day you selected above.
- Click Complete to create the job.
CSV Import
Lytics allows you to import data via a CSV file from data sources we do not natively integrate with.
Integration Details
- Implementation Type: Server-side Integration.
- Implementation Technique: User Field.
- Frequency: Batch Integration, frequency can be configured.
- Resulting data: User Profiles once the imported data is mapped via LQL.
This integration parses CSV files and imports fields and associated data. Once the integration is started it will:
- Connect to the SFTP server.
- Navigate to the configured folder.
- Read the selected CSV file.
- Import the fields that are chosen during configuration.
Fields
Once you choose the file to import during configuration, Lytics will read the file and list all the fields that can be imported. You may select fields that you wish to import.
Configuration
Follow these steps to set up and configure an import job for Lytics File Service integrations in the Lytics platform. If you are new to creating jobs in Lytics, see the Data Sourcesdocumentation for more information.
- Select Lytics File Service from the list of providers.
- Select the Import CSV job type from the list.
- Select the Authorization you would like to use or create a new one.
- Enter a Label to identify this job you are creating in Lytics.
- (Optional) Enter a Description for further context on your job.
- Complete the configuration steps for your job.
- In the Stream text box, select the data stream where the data will be posted or enter a name to create a new stream.
- (Optional) From the Folder input, select the folder where the CSV file is located.
- From the File input, select the file to import, or if this is a continuous import of dated files e.g.,
file_20160218.csv, choose the earliest dated file to import, and all files will be imported from that date forward. - (Optional) In the Custom Delimiter text box, enter the delimiter of the file. Default delimiter is a comma,
,. Other common delimiters may be "|" (pipe) or ";". For tab delimited files enter "t". - (Optional) From the Timestamps input, select one or more columns in the CSV that contain the timestamp of an event. Sort in order of importance (e.g., "Updated" should be above "Created"). If no fields are specified, the event will be time stamped with the time of the import. Timestamp selection is unavailable for zip files larger than 100MB.
- (Optional) From the Fields input, select fields to import. If left empty all fields will be imported. If no field names appear, check to ensure the CSV file has an appropriate header row or the delimiter may need to be changed. Field selection is unavailable for zip files larger than 100MB.
- (Optional) In the Prefix text box, enter the file name prefix. You may use regular expressions for pattern matching. The prefix must match the file name up to the timestamp. A precalculated prefix derived from the selected file will be available as a dropdown.
- (Optional) Select the Keep Updated checkbox to run this import continuously checking for new files periodically.
- (Optional) From the File Upload Frequency input, select how often to check for a new file.
- (Optional) From the Time of Day input, select the time of day to start import.
- (Optional) From the Timezone input, select the timezone for the time of day you selected above.
- (Optional) Select the Diff checkbox to compare file contents to the previous file contents during continuous import and import only rows that have changed. This is useful when large amounts of data remain unchanged in each file.
- Click Complete to create the job.
CSV Export
Lytics allows you to export your audiences to a CSV file for importing into other tools that Lytics does not natively integration with.
Integration Details
- Implementation Type: Server-side Integration.
- Implementation Technique: File Based Transfer Integration.
- Frequency: Batch Integration, frequency can be configured.
- Resulting data: User Fields in a file.
Fields
You can select and export any Lytics user fields to a CSV file.
Export CSV for Download
Export Lytics users to a CSV file that can be downloaded. You will receive an email with a link to download the file.
Follow these steps to set up and configure an export job for Lytics File Service in the Lytics platform.
- Select Lytics File Service from the list of providers.
- Select the Email CSV job type from the list.
- Select the Authorization you would like to use or create a new one.
- Enter a Label to identify this job you are creating in Lytics.
- (Optional) Enter a Description for further context on your job.
- (Optional) From the Compress input, select the compression type.
- (Optional) Select the Include Headers checkbox to include the field names in the first row of the exported file.
- (Optional) Select the Audience Name checkbox to add a column with the name of the exported Lytics audience.
- (Optional) Select the Additional Audiences checkbox to add a column containing all the Lytics audiences a user is a member of.
- (Optional) From the Fields to Export input, select a list of user fields to export.
- (Optional) In the User Limit numeric field, enter the maximum number of users to export. Leave blank to export all users.
- (Optional) In the Custom Delimiter text box, enter a custom delimiter for your file. Default delimiter is ",". A recommended custom delimiter is "|" (pipe).
- (Optional) From the Custom Join input, select a custom join character for fields that have multiple values. Default is to join multi-value fields with "&", e.g., emails=[email protected]&[email protected].
- (Optional) Select the Continuous Export checkbox, to email CSV file every day.
- (Optional) From the Time of Day input, select the time of day to start export each day.
- (Optional) From the Timezone input, select the timezone for time of day.
- Click Complete to create the job.
Export CSV to SFTP
You can opt to export your CSV to an SFTP server. This server can be your own or a Lytics managed SFTP server. The audience CSV file will be named lytics_{segment_slug}_{date_time}.csv, and can optionally be compressed into a zip or gz archive.
Follow these steps to set up and configure an export job for Lytics File Service in the Lytics platform.
- Select Lytics File Service from the list of providers.
- Select the Export CSV via SFTP job type from the list.
- Select the Authorization you would like to use or create a new one.
- Enter a Label to identify this job you are creating in Lytics.
- (Optional) Enter a Description for further context on your job.
- From the Audience Name drop-down, select the Lytics audience that contains the users to export.
- (Optional) From the Compress input, select the compression type for the file to be exported.
- (Optional) Select the Include Headers checkbox, to include the field names as the first row of the exported file.
- (Optional) Select the Audience Name checkbox, to select to add a column with the name of the exported Lytics audience.
- (optional) Select the Audience Slug checkbox, to add a column with the slug of the exported Lytics audience.
- (Optional) Select the Additional Audiences checkbox, to add a column containing all the Lytics audiences a user is a member of.
- (Optional) From the Fields to Export input, select the list of user fields to export. If none are selected then every user field will be included.
- (Optional) In the User Limit numeric field, enter the maximum number of users to export. Leave blank to export all users.
- (Optional) In the Max File Size (bytes) numeric field, enter the maximum size per file, in bytes. If set, a large export is split into multiple files, each under this size and named with a
.part-001,.part-002, … suffix (for example,lytics_all-users_20260101.part-001.csv). All users are still exported. The limit applies to the uncompressed data, so compressed (gzip/zip) or PGP-encrypted files will be smaller than the limit. Leave blank to export a single file. The minimum is 1 MiB (1048576 bytes). - (Optional) In the Custom Delimiter text box, enter a custom delimiter for your file. Default delimiter is ",". A recommended custom delimiter is "|" (pipe).
- (Optional) From the Custom Join input, select a custom join character for fields that have multiple values. Default is to join multi-value fields with "&", e.g., emails=[email protected]&[email protected].
- (Optional) Select the Continuous Export checkbox, to export at the specified frequency selected in File Export Frequency option.
- (Optional) From the File Export Frequency input, select how often to export the new file.
- (Optional) From the Time of Day input, select time of day to start export each day.
- (Optional) From the Timezone input, select timezone for time of day.
- (Optional) From the Timestamp Format input, select the format for the timestamp that will be added at the end of the filename. MM = month, mm = minute. If None (omit timestamp) is selected, the file name will not contain a timestamp. For continuous exports, this will result in the file being overwritten on each run.
- Click Complete to create the job.
Export JSON via SFTP
Lytics allows you to export your audiences to a JSON lines file for importing into other tools that Lytics does not natively integration with.
Integration Details
- Implementation Type: Server-side Integration.
- Implementation Technique: File Based Transfer Integration.
- Frequency: Batch Integration, frequency can be configured.
- Resulting data: User Fields in a file.
Fields
You can select and export any Lytics user fields to a JSON file.
Configuration
You can opt to export your JSON to an SFTP server. This server can be your own or a Lytics managed SFTP server. The audience JSON file will be named lytics_{segment_slug}_{date_time}.json, and can optionally be compressed into a zip or gz archive.
Follow these steps to set up and configure an export job for Lytics File Service in the Lytics platform.
- Select Lytics File Service from the list of providers.
- Select the Export JSON via SFTP job type from the list.
- Select the Authorization you would like to use or create a new one.
- Enter a Label to identify this job you are creating in Lytics.
- (Optional) Enter a Description for further context on your job.
- From the Audience Name drop-down, select the Lytics audience that contains the users to export.
- (Optional) From the Compress input, select the compression type for the file to be exported.
- (Optional) Select the Audience Name checkbox, to select to add a column with the name of the exported Lytics audience.
- (optional) Select the Audience Slug checkbox, to add a column with the slug of the exported Lytics audience.
- (Optional) From the Fields to Export input, select the list of user fields to export. If none are selected then every user field will be included.
- (Optional) In the User Limit numeric field, enter the maximum number of users to export. Leave blank to export all users.
- (Optional) In the Max File Size (bytes) numeric field, enter the maximum size per file, in bytes. If set, a large export is split into multiple files, each under this size and named with a
.part-001,.part-002, … suffix (for example,lytics_all-users_20260101.part-001.json). All users are still exported. The limit applies to the uncompressed data, so compressed (gzip/zip) or PGP-encrypted files will be smaller than the limit. Leave blank to export a single file. The minimum is 1 MiB (1048576 bytes). - (Optional) Select the Continuous Export checkbox, to export at the specified frequency selected in File Export Frequency option.
- (Optional) From the File Export Frequency input, select how often to export the new file.
- (Optional) From the Time of Day input, select time of day to start export each day.
- (Optional) From the Timezone input, select timezone for time of day.
- (Optional) From the Timestamp Format input, select the format for the timestamp that will be added at the end of the filename. MM = month, mm = minute. If None (omit timestamp) is selected, the file name will not contain a timestamp. For continuous exports, this will result in the file being overwritten on each run.
- Click Complete to create the job.
Export Events as CSV to SFTP
Export events into SFTP so you can access, archive, or run analysis on Lytics events.
Integration Details
- Implementation Type: Server-side Integration
- Implementation Technique: REST API Integration
- Frequency: One-time or scheduled Batch Integration which may be hourly, daily, weekly, or monthly depending on configuration.
- Resulting data: Raw Event Data exported to a CSV file format.
Each run of the job will proceed as follows:
- Create a CSV file with the configured file name.
- Read events from the configured Lytics data streams. If the export is configured to run periodically, only the events since the last run of the export will be included.
- PGP encrypt the CSV if a PGP key is provided in the SFTP authorization.
- Compress the CSV, if selected in the export's configuration.
- Write the file to the SFTP server.
Fields
The fields included depend on the raw event in Lytics data. All fields in the selected stream will be included in the exported CSV.
Configuration
Follow these steps to set up and configure an export job to an SFTP server in the Lytics platform. If you are new to creating jobs in Lytics, see the Destinations documentation for more information.
- Select Lytics File Service from the list of providers.
- Select the Export Events as CSV to SFTP from the list.
- Select the Authorization you would like to use or create a new one.
- Enter a Label to identify the job you are creating in Lytics.
- (Optional) Enter a Description for further context on your job.
- From the Data Streams to Export input, select the event data streams to export, a stream is a single source/type of data (you may choose more than one). If none are selected, all streams are exported.
- (optional) In the Start Date text box, enter events from this date onwards will be exported. Use
yyyy-mm-ddformat (2015-08-13). - (optional) In the End Date text box, enter events before, but NOT including this date will be exported. Use
yyyy-mm-ddformat (2015-08-13). - (optional) From the Compress input, select the compression type (gzip, zip, or none) of the file.
- In the Filename input, enter the naming convention for the files.
{TIMESTAMP}will be replaced with the current time of the export. The filename may include folder e.g.:/myfolder/myfile-{TIMESTAMP}. File extension e.g., .csv, .csv.gz will automatically be added. - (optional) From the Timestamp Format input, select the format for the {TIMESTAMP} in the filename. MM = month, mm = minute.
- (optional) Select the Include Headers checkbox to include the field names as the first row of the exported file.
- (optional) Select the Keep Updated checkbox to run this export continuously.
- (optional) From the File Export Frequency input, select how often a continuous export should export a new file. Default is daily.
- (optional) From the Time of Day input, select the time of day to run a Daily or Weekly export.
- (optional) From the Timezone input, select the timezone for the time of day specified above.
- Click Complete to create the job.
Updated 7 days ago