

Mailchimp
Overview
Mailchimp is a marketing platform for email campaigns including audience segmentation, content templates, reporting and more.
Integrating Lytics with Mailchimp allows you to import email and other user activity data (such as opens and clicks) or export Lytics' cross-channel, behavioral-driven audiences to build and send personalized marketing campaigns from Mailchimp.
The Lytics Canvas supports Mailchimp Experiences. Use Lytics to enrich your Mailchimp user lists with cross-channel data, behavioral scores, and content affinities to improve campaign engagement and performance.
Authorization
If you haven't already done so, you will need to set up a Mailchimp account before you begin the process described below.
If you are new to creating authorizations in Lytics, see the Authorizations documentation for more information.
- Select Mailchimp from the list of providers.
- Select the Mailchimp Sign In method for authorization.
- Enter your Mailchimp login credentials in the login popup.
- In the Label text box, enter a name for the authorization
- (optional) In the Description text box, enter a description for this authorization
- Click Save Authorization.
Import Audiences and Activity Data
Importing user and activity data from Mailchimp results in new users or existing user profiles supplemented with Mailchimp campaign data. You can use this data to build and refine your existing Lytics audiences to power better, cross-channel campaigns.
Integration Details
- Implementation Type: Server-side Integration.
- Implementation Technique: REST API Integration - Webhook Integration.
- Frequency: Batch Integration every 12 hours.
- Resulting data: User Profiles and Raw Event Data.
This integration utilizes Mailchimp APIs to receive user and activity data. On each run of the job, it will:
- Check if webhooks are set up in the Mailchimp account.
- If any webhooks are found, user events such as subscription changes and profile updates will be received in Lytics via webhooks, reformatted on ingestion, and available in the
mailchimp_subscribersstream. - Query for campaigns tied to the lists that you've configured.
- For each campaign found, the job will:
- Reflect all subscription changes on the
mailchimp_subscribersstream. - Add new activity data to the
mailchimp_activitystream.
- Reflect all subscription changes on the
Fields
The following fields are included in the default mapping of the mailchimp_subscribers stream:
| Source Field | Lytics User Field | Description | Type |
|---|---|---|---|
| cc | country_code | Country Code | string |
| email(email_address) | email unique id | Email Address | string |
| emaildomain(email_address) | email_domain | Email Domain | string |
| euid | mc_euid unique id | MailChimp User ID | string |
| first_name | mc_first_name | Mailchimp First Name | string |
| last_name | mc_last_name | Mailchimp Last Name | string |
| latitude | mc_latitude | Mailchimp Latitude | string |
| longitude | mc_longitude | Mailchimp Longitude | string |
| map(listid, liststatus) | mc_subscriber_statuses | Mailchimp Subscriber Statuses | map[string]value |
| map(listid, tags) | mc_tags | Mailchimp Tags | map[string]value |
| match("marketing_permissions.") | mc_marketing_permissions | Mailchimp Marketing Permissions | map[string]bool |
| match("mc_group.") | mc_groups | Mailchimp Groups | map[string]bool |
| member_rating | mc_rating | Mailchimp Rating | string |
| region | mc_region | Mailchimp Last Region | string |
| set(cc) | country_codes | Country Codes | []string |
| set(leid) | mc_leids | Mailchimp Email ID (LEID) | []string |
| set(listid) | mc_listids | Mailchimp Lists | []string |
| set(region) | mc_regions | Mailchimp Regions | []string |
| timezone | timezone | Time Zone | string |
The following fields are included in the default mapping of the mailchimp_activity stream:
| Source Field | Conditional (IF) | Lytics User Field | Description | Type |
|---|---|---|---|---|
| action | mc_action | Mailchimp Action | string | |
| count(action) | eq(action, "click") | mc_clickct | Mailchimp Click Count | int |
| count(action) | eq(action, "cleaned") | mc_hardbouncect | Mailchimp Hard Bounce Count | int |
| count(action) | eq(action, "open") | mc_openct | Mailchimp Open Count | int |
| count(action) | eq(action, "sent") | mc_sendct | Mailchimp Send Count | int |
| count(action) | eq(action, "subscribe") | mc_subct | Mailchimp Subscribe Count | int |
| count(action) | eq(action, "unsubscribe") | mc_unsubct | Mailchimp Unsubscribe Count | int |
| email(email) | email unique id | Email Address | string | |
| email_type | eq(action, "subscribe") | mc_emailtype | Mailchimp Email Type | string |
| emaildomain(email) | email_domain | Email Domain | string | |
| epochms() | eq(action, "cleaned") | mc_hardbounce_ts | Mailchimp Hard Bounce Time | date |
| epochms() | eq(action, "subscribe") | mc_sub_ts | Mailchimp Subscribe Time | date |
| epochms() | eq(action, "unsubscribe") | mc_unsub_ts | Mailchimp Unsubscribe Time | date |
| last_status | mc_laststatus | Mailchimp Last Status | string | |
| map("email", epochms()) | action IN ("open","click","unsubscribe","subscribe") | last_channel_activities | Last Activity By Channel | map[string]time |
| map(experience_id, 1) | eq(action, "click") | mc_conversions | Converted on Mailchimp Experience | map[string]int |
| map(experience_id, 1) | eq(action, "open") | mc_impressions | Reached with Mailchimp Experience | map[string]int |
| max(epochms()) | action IN ("open","click","unsubscribe","subscribe") | last_active_ts | Last Active | date |
| max(epochms()) | eq(action, "click") | mc_lastclick_ts | Mailchimp Last click | date |
| max(epochms()) | eq(action, "open") | mc_lastopen_ts | Mailchimp Last Open | date |
| min(epochms()) | eq(action, "click") | mc_firstclick_ts | Mailchimp First click | date |
| min(epochms()) | eq(action, "open") | mc_firstopen_ts | Mailchimp First Open | date |
| set("email") | action IN ("open","click","unsubscribe","subscribe") | channels | All Channels Used | []string |
| set(bounce_reason) | eq(action, "cleaned") | mc_bouncereason | Mailchimp Hard Bounce Reason | []string |
| set(campaign_title) | mc_campaigntitles | Mailchimp Campaign Names | []string | |
| set(campaignid) | mc_campaignids | Mailchimp Campaign Ids | []string | |
| set(listid) | mc_listids | Mailchimp Lists | []string | |
| set(unsub_action) | eq(action, "unsubscribe") | mc_unsubaction | Mailchimp Unsubscribe Action | []string |
| set(unsub_reason) | eq(action, "unsubscribe") | mc_unsubreason | Mailchimp Unsubscribe Reason | []string |
| set(utm_campaign) | utm_campaigns | List Of Campaigns Referred From | []string | |
| set(utm_content) | utm_contents | List Of Contents Referred From | []string | |
| set(utm_medium) | utm_mediums | List Of Mediums Referred From | []string | |
| set(utm_source) | utm_sources | List Of Sources Referred From | []string | |
| set(utm_term) | utm_terms | List Of Terms Referred From | []string | |
| set(variant_title) | mc_variant_titles | Mailchimp Variant Titles | []string | |
| set(variantid) | mc_variantids | Mailchimp Variant Ids | []string | |
| todate(timestamp) | eq(action, "sent") | mc_send_ts | Mailchimp Send Time | date |
| url | mc_email_url | Mailchimp Url | string | |
| valuect(action) | mc_actionct | Mailchimp Action Count | map[string]intsum | |
| valuect(campaignid) | eq(action, "click") | total_clicks_by_campaign | The number of clicks for a campaign | map[string]intsum |
| valuect(campaignid) | eq(action, "open") | total_opens_by_campaign | The number of opens for a campaign | map[string]intsum |
| valuect(hash(urlmain(url))) | eq(action, "open") OR eq(action, "click") | hashedurls | Hashed Urls Visited | map[string]intsum |
| valuect(hourofday()) | eq(action, "click") | mc_hourlyclick | Mailchimp Clicks By Hour | map[string]intsum |
| valuect(hourofday()) | eq(action, "open") | mc_hourlyopen | Mailchimp Opens By Hour | map[string]intsum |
Lytics can import any and all custom fields from Mailchimp, but this stream does not automatically map these fields, so all custom fields must first be mapped.
Configuration
Follow these steps to set up and configure an import job for Mailchimp in the Lytics platform. If you are new to creating jobs in Lytics, see the Data Sources documentation for more information.
- Select Mailchimp from the list of providers.
- Select the Import Audiences from the list.
- Select the Authorization you would like to use or create a new one.
- Enter a Label to identify this job you are creating in Lytics.
- (Optional) Enter a Description for further context on your job.
- Complete the configuration steps for your job.
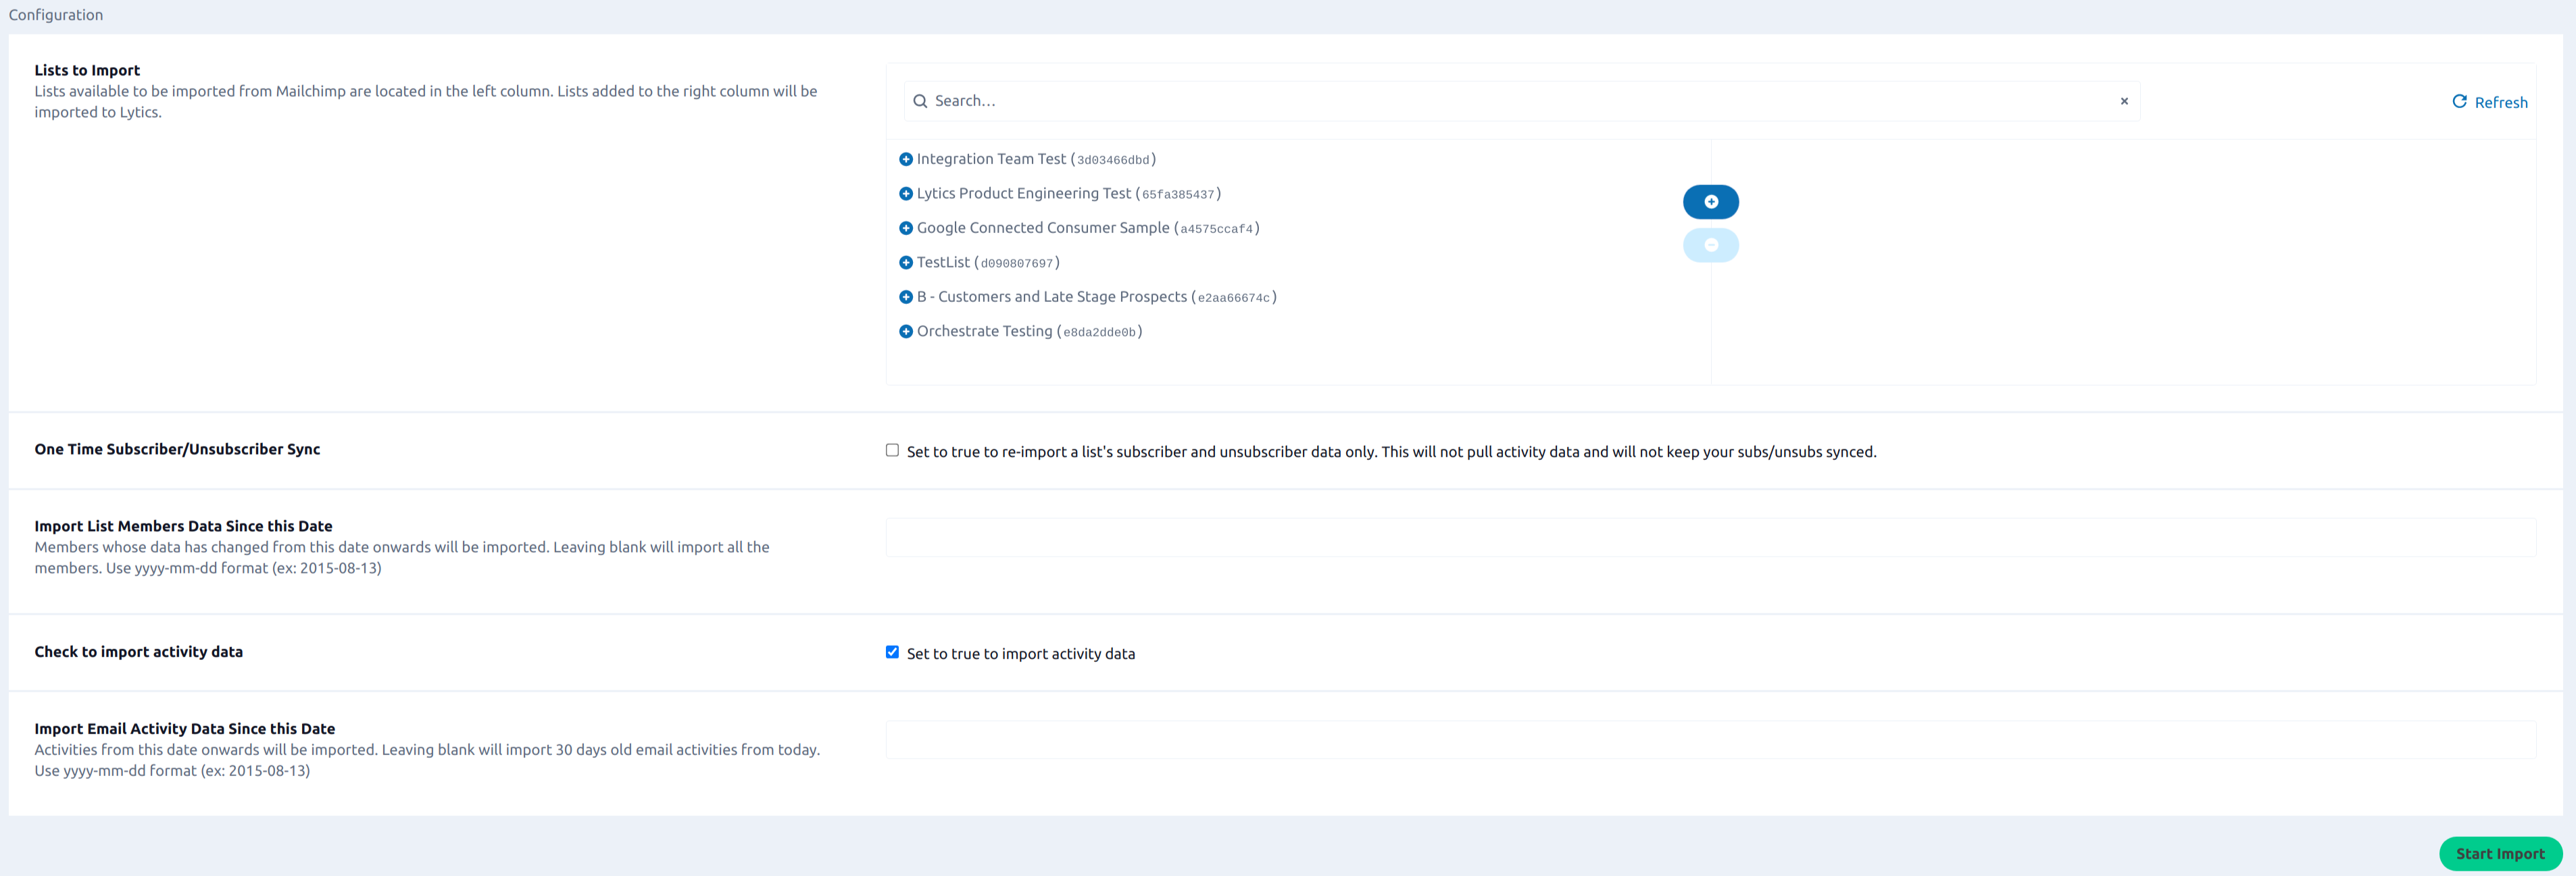
- From the Lists to Import input, select lists available to be imported from Mailchimp are located in the left column. Lists added to the right column will be imported to Lytics.
- (Optional) Toggle Show Advanced Options.
- (Optional) Select the One Time Subscriber/Unsubscriber Sync checkbox, to set to true to re-import a list's subscriber and unsubscriber data only. This will not pull activity data and will not keep your subs/unsubs synced.
- (Optional) In the Import List Members Data Since this Date text box, enter members whose data has changed from this date onwards will be imported. Leaving blank will import all the members. Use
yyyy-mm-ddformat (ex: 2015-08-13). - (Optional) Select the Check to import activity data checkbox, to set to true to import activity data.
- (Optional) In the Import Email Activity Data Since this Date text box, enter activities from this date onwards will be imported. Leaving blank will import 30 days old email activities from today. Use
yyyy-mm-ddformat (ex: 2015-08-13). - Click Start Import.

Export Audiences
Exporting a Lytics audience to Mailchimp allows you to send a marketing campaign email to users based on your own, relevant targeting criteria, such as cross-channel behavior, content affinities, and more.
Integration Details
- Implementation Type: Server-side Integration.
- Implementation Technique: REST API Integration.
- Frequency: Batch Integration every 10 minutes, or when the number of audience members to export exceeds 10,000.
- Resulting data: Lytics audience(s) in Mailchimp.
This integration utilizes Mailchimp APIs to export Lytics Audiences into Mailchimp. On each run of the job, it will sync your selected Lytics Audiences with your selected Mailchimp List.
Fields
The following fields are included in the default mapping. Custom fields are not exported to Mailchimp.
| Lytics User Field | Description | Mailchimp Field | Type |
|---|---|---|---|
| Email Address | string | ||
| interests | Mailchimp Interest Groups | Interests | []string |
| status | Subscription Status | Status | string |
| merger_fields | Fields for Email Personalization | Merger Fields | map[string]string |
Configuration
Follow these steps to set up and configure an export job for Mailchimp in the Lytics platform. If you are new to creating jobs in Lytics, see the Destinations documentation for more information.
- Select Mailchimp from the list of providers.
- Select the Export Audiences from the list.
- Select the Authorization you would like to use or create a new one.
- Enter a Label to identify this job you are creating in Lytics.
- (Optional) Enter a Description for further context on your job.
- Select the audiences to export. These will appear as intrests in your Mailchimp list named "Lytics" + the audience name.
- Complete the configuration steps for your job.
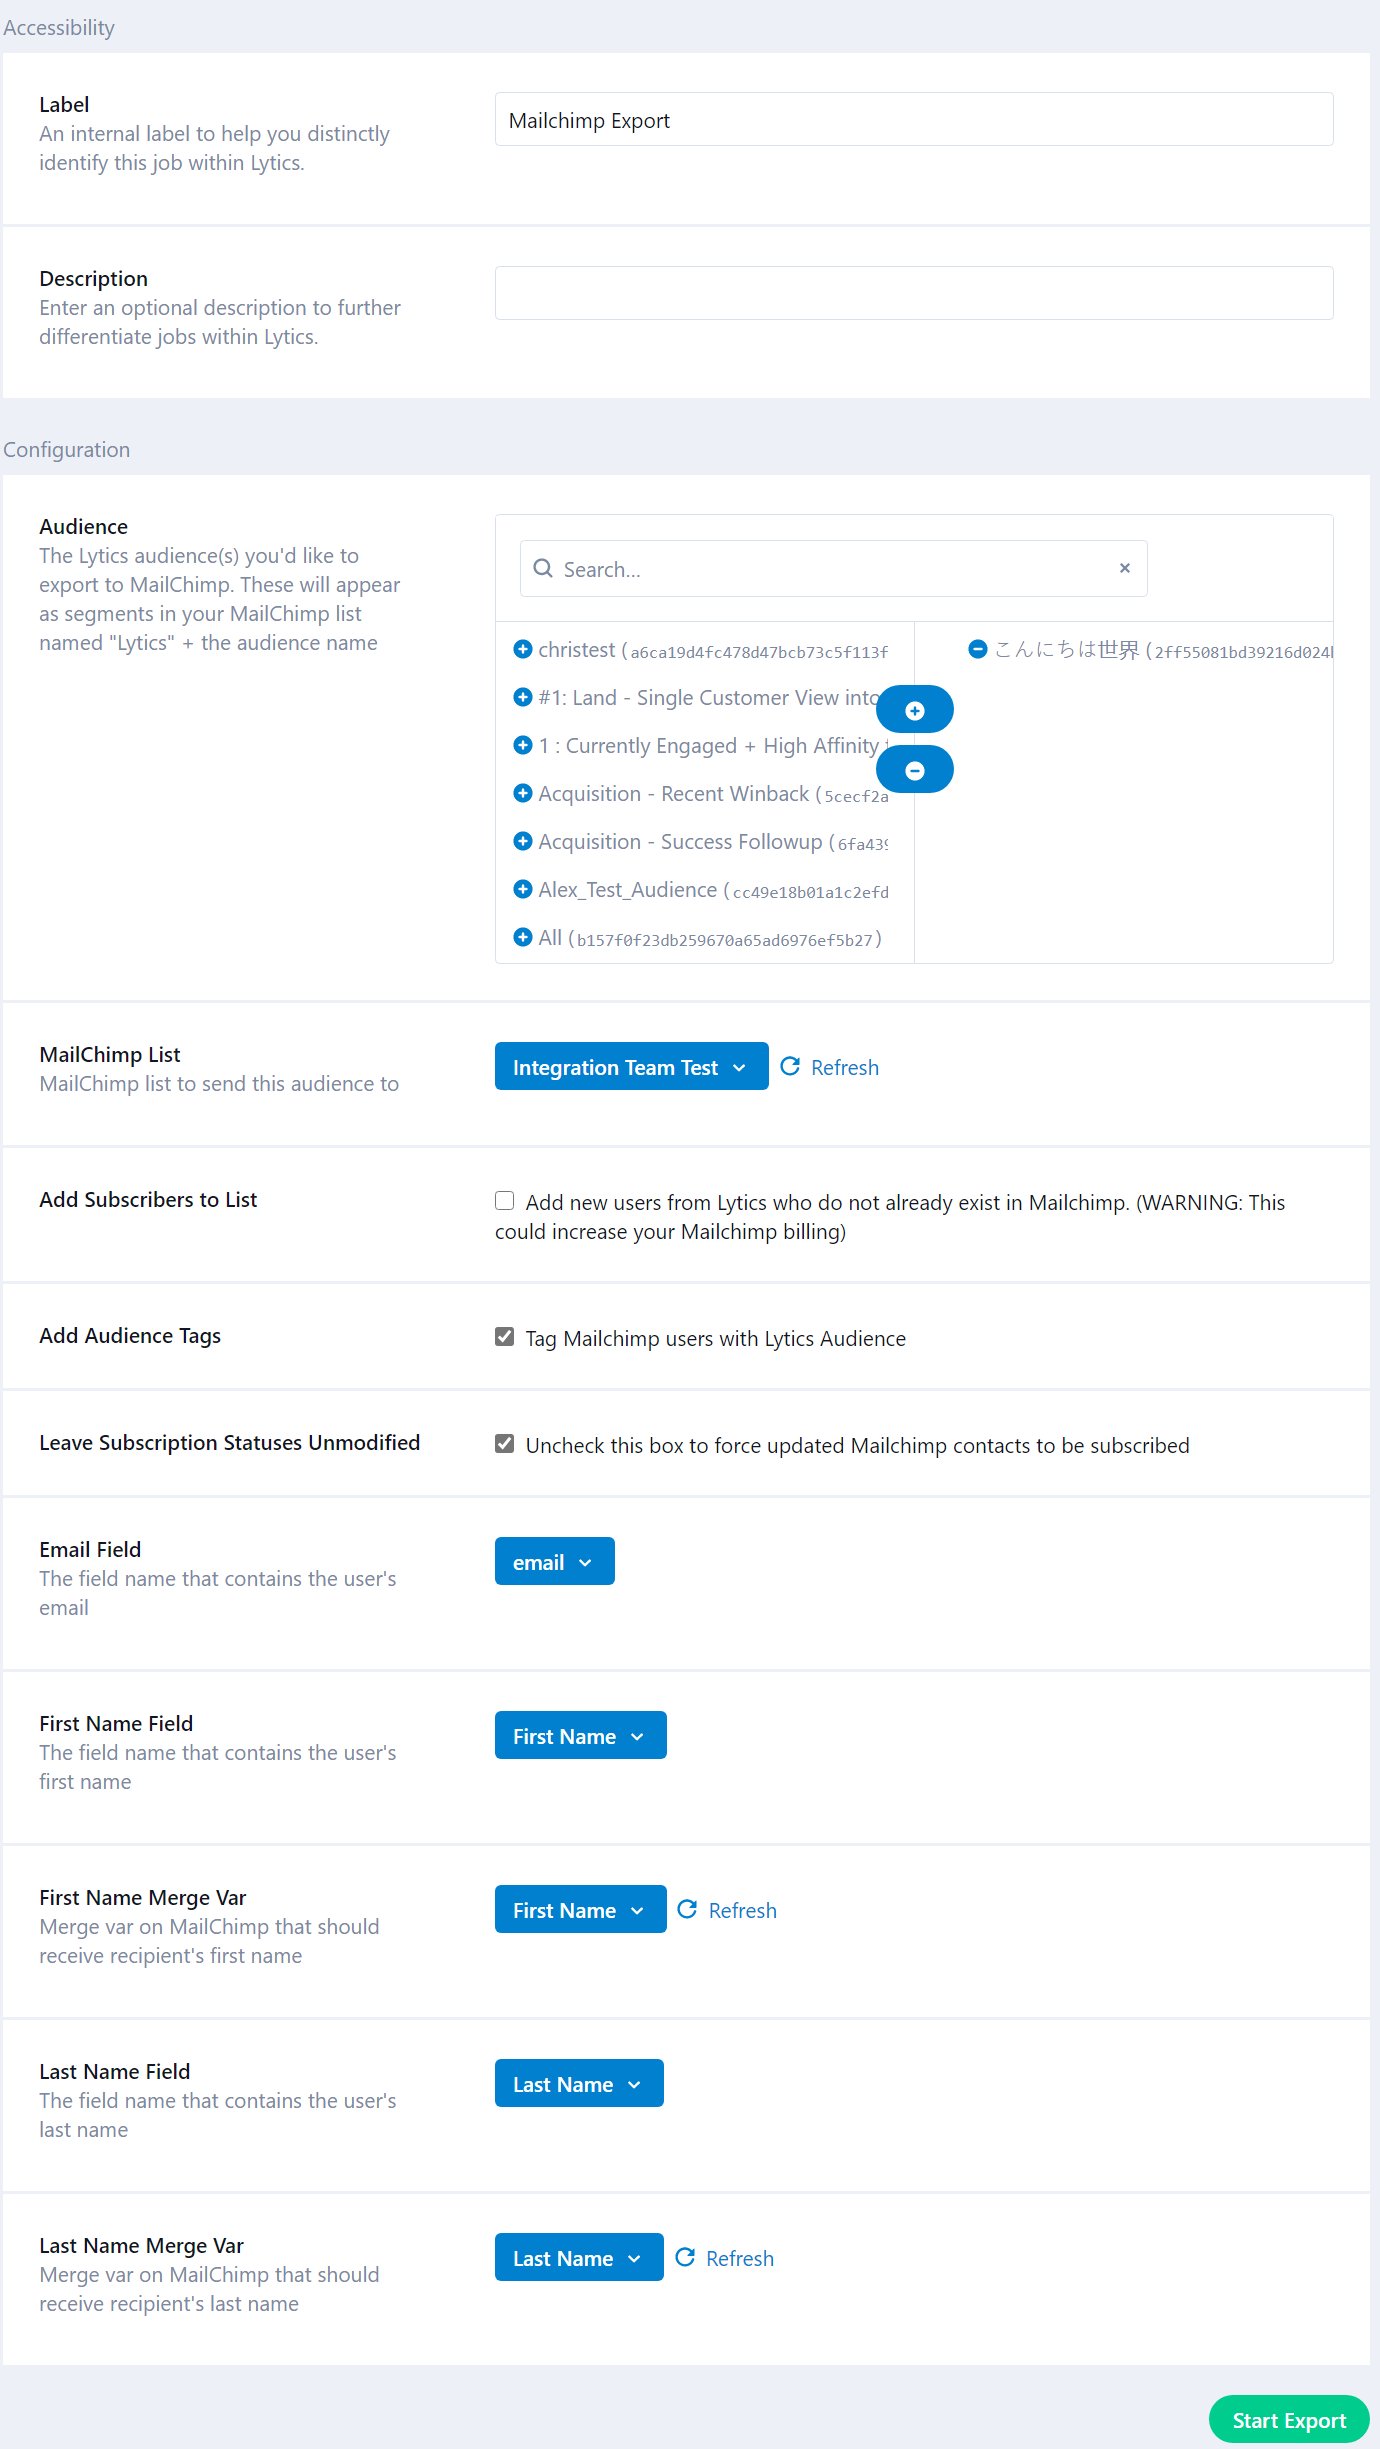
- From the MailChimp List input, select MailChimp list to send this audience to. Note that we will clear any pre-existing audience and replace it with an up-to-date snapshot of its members.
- (optional) Select the Add Subscribers to List checkbox, to add new users from Lytics who do not already exist in Mailchimp. (WARNING: This could increase your Mailchimp billing).
- (optional) Select the Add Audience Tags checkbox, to tag Mailchimp users with Lytics Audience.
- (optional) Select the Leave Subscription Statuses Unmodified checkbox, to uncheck this box to force updated Mailchimp contacts to be subscribed.
- From the Email Field input, select the field name that contains the user's email.
- (optional) From the First Name Field input, select the field name that contains the user's first name.
- (optional) From the First Name Merge Var input, select merge var on MailChimp that should receive recipient's first name.
- (optional) From the Last Name Field input, select the field name that contains the user's last name.
- (optional) From the Last Name Merge Var input, select merge var on MailChimp that should receive recipient's last name.
- Click Start Export.

Experiences
Lytics Experiences support Mailchimp campaigns and automations. These Experiences can be run as stand-alone campaigns or, using the Lytics Canvas, you can manage the cross-channel customer lifecycle utilizing Mailchimp campaigns as the email touchpoint.
Experience Import
Like all Experience enabled providers, you can import Experiences from Mailchimp. During the import process, you will be asked to select an authorization. Read the Mailchimp authorization documentation for more information.

If you're not seeing the emails you would like to import on this list make sure that it is a Campaign or Automation created of one of the eligible types. If you would like to activate your Experience with Lytics, you may want to create a new Campaign or Automation and save it in a draft state before selecting targeting details.
Tactics
Tactics are determined by whether or not the email in Mailchimp is a Campaign or Automation and further by the type of automation. Mailchimp Experiences in Lytics support the following tactics:
- Campaign - Send an email to a list of users at one time (e.g., a weekly newsletter).
- Email on List Add - Send an email when a new subscriber is added to your list.
- Email on Tag Add - Send an email when a user is tagged with a particular tag.
Note: The Email on List Add tactic applies to Mailchimp automations of the Welcome new subscribers type, and the Email on Tag Add tactic applies to automations of the Email subscribers when they're tagged type.
Configuration
After importing a Mailchimp Experience you can configure it for activation. All Mailchimp Experiences have the same three configuration steps within the Experience Editor:
- Target - select the target audience for your Experience.
- Configure Mailchimp - set up how the audience for your Experience will be exported. This step will match the configuration instructions of the export workflow and will generally function the same, but without the Audience selection, as that is configured by the Target step in the Experience editor.
- Configure Delivery - choose to turn the Delivery Optimization feature on or off. For Mailchimp Experiences, Delivery Optimization is most useful for the Email on List Add or the Email on Tag Add so your email is delivered at an optimal time for each user.
Once you've finished configuring the Experience you can save and activate it.
Activation
Activating a Mailchimp Experience exports Lytics users to the associated Mailchimp list. Once the export from Lytics has populated in Mailchimp, it can be used for targeting in your Campaign. The export should complete within a few minutes of activation. If you have Delivery Optimization enabled, users will export at the optimal delivery time at which point the list will be created in Mailchimp.
Campaign Tactic
Once an Experience with the Campaign tactic has been activated in Lytics, follow these steps to finalize your email in Mailchimp:
- In Mailchimp, find your campaign and edit it.
- Under the To step, select Add Recipients.
- From the Audience dropdown select the Mailchimp audience you selected during the configuration of the Experience in Lytics.
- Under Segment or Tag select the tag that matches the name of your Experience.
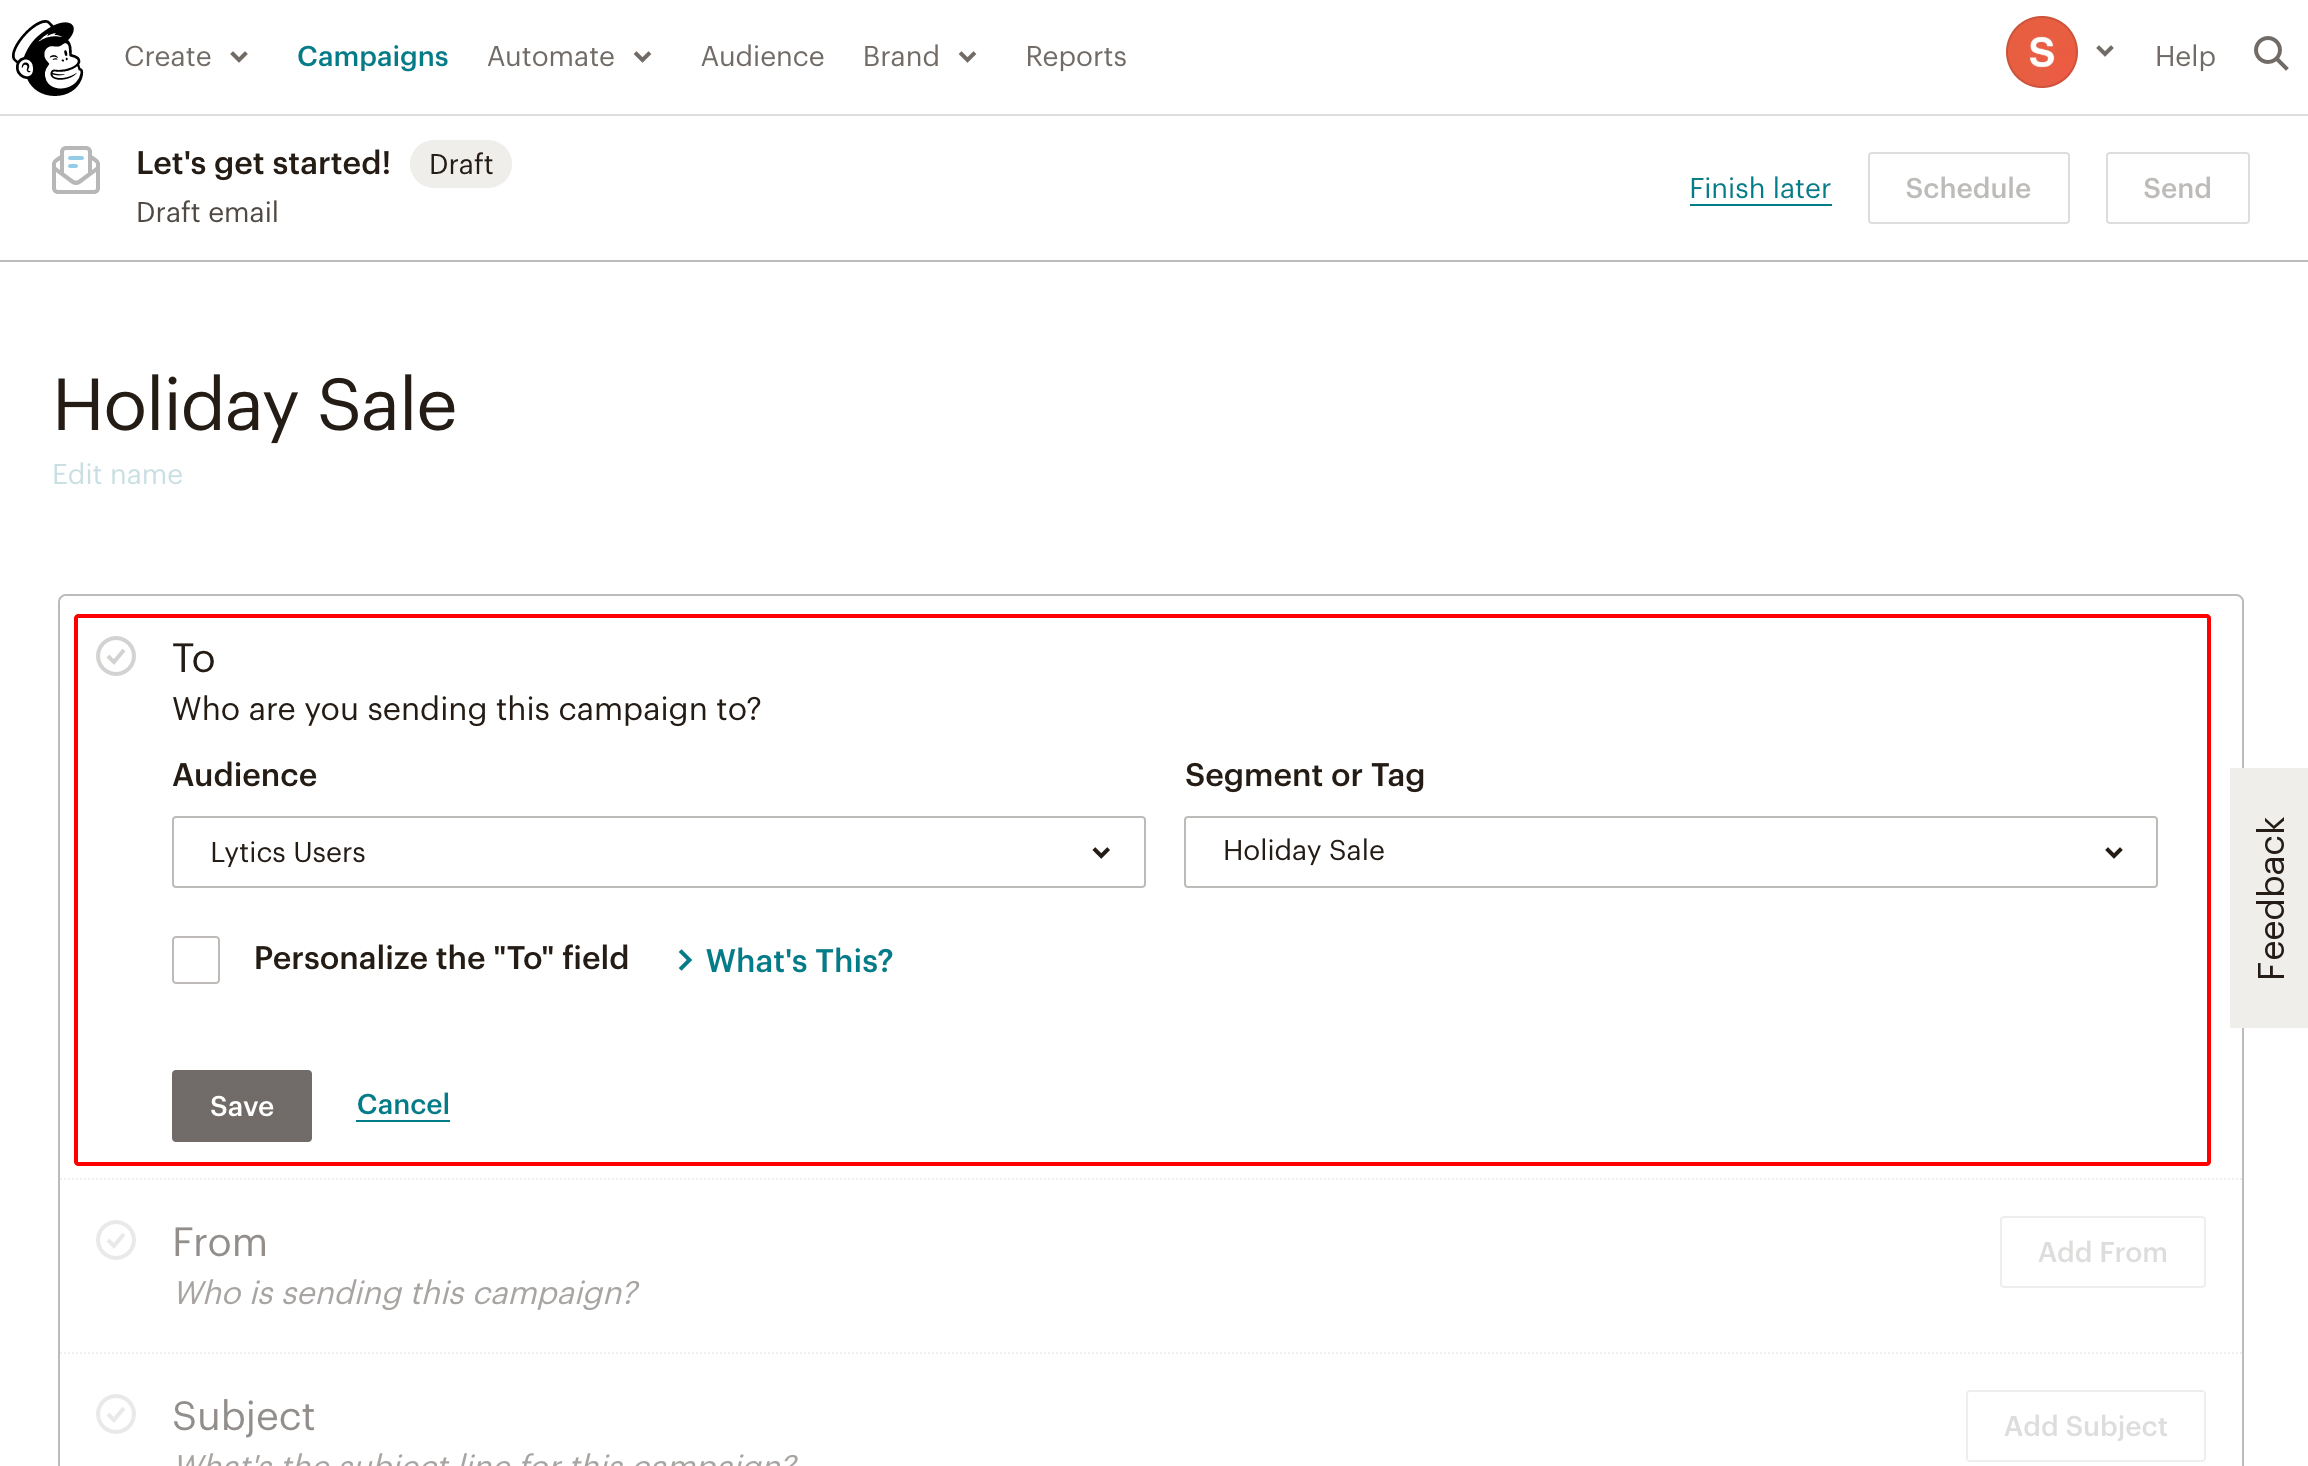
- Click Save to save these changes, and proceed with the setup process of your campaign, see Mailchimp's documentation for detailed instructions on these steps.
- Once you're ready to deploy, click Send to send immediately or Schedule to send the campaign later.

Email on Tag or List Add Tactics
For Email on Tag Add and Email on List Add Experiences, you must have created an automation before importing your Experience. You need to select a list for the automation before you can save it as a draft. Ensure that when you configure you select the same list you choose when creating the automation in Mailchimp. The dropdown should be pre-populated with the list you chose to make this easy.
Once you activate the Experience, use the following steps to finalize your email in Mailchimp:
- Locate the automation in Mailchimp under the Campaigns list.
- Click the Edit button to edit the automation.
- If the Experience has the Email on Tag Add tactic you will need to select the tag to trigger the email.
- Under the Design Email section there should be a statement about the trigger of your automation. Select to Edit the trigger.
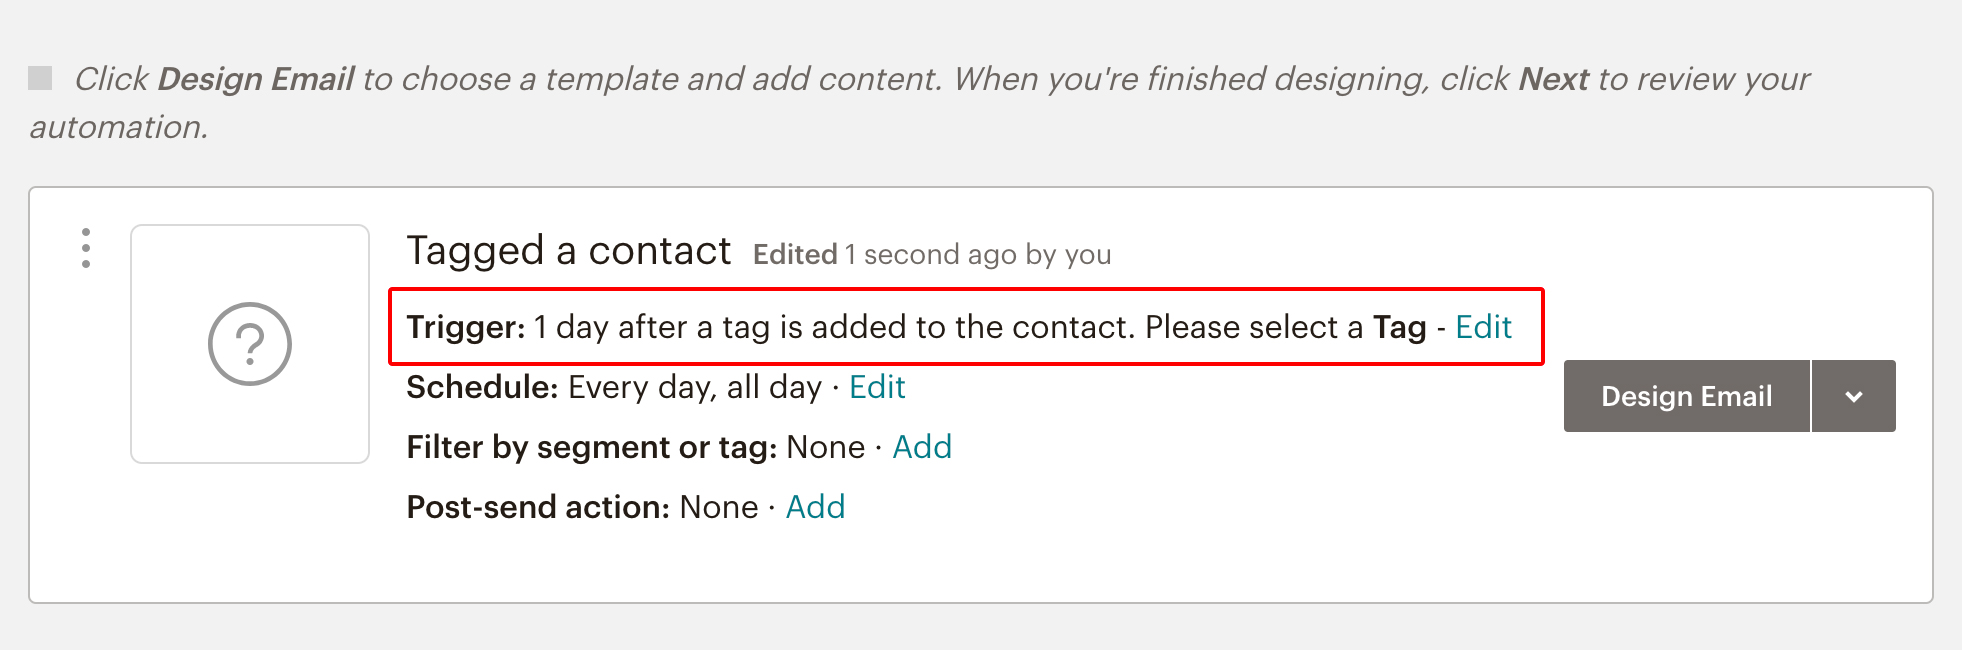
- Select a delay for triggering the email if you would like one, and under Settings select the tag with the same name as your Experience.
- Click on Update Trigger to save the changes.
- Under the Design Email section there should be a statement about the trigger of your automation. Select to Edit the trigger.
- Finish configuring your email refer to Mailchimp's documentation for assistance.
- Click Next to continue to the review step. Confirm your configuration looks correct and click Start Sending to finish the activation of your Mailchimp automation.

Metrics
Mailchimp metrics are collected through Mailchimp's Email Activity API.
-
Reach -
Openevents from Mailchimp count as impressions for Mailchimp campaigns and automations. -
Converted -
Clickevents from Mailchimp count as conversions for Mailchimp campaigns and automations.
These events are also mapped to the Lytics user fields Reached with Mailchimp Experience and Converted on Mailchimp Experience, which are available in the audience builder so that you can create new audiences using these metrics.
Updated 3 months ago