

Databricks
Overview
Databricks is a software platform that provides you a way to organize your data for the purpose of analytics and data science.
Integrating Lytics with Databricks allows you to import data from your Databricks database into Lytics and then activate to various advertising and marketing platforms.
Authorization
If you haven't already done so, you will need to set up a Databricks account before you begin the process described below.
Please see connection with databricks using go sql driver for details on how Lytics integrates with Databricks. You would need Host, HTTP Path and Personal Access Token in order to connect to Databricks. Please refer to Databrick's connection details for cluster or connection details for sql warehouse documentation to get host and HTTP path information. For personal access token, please refer to Databrick's generating personal access token documentation.
Please make sure your Databricks cluster is running before you begin the authorization process. It can take up to 5 minutes for the cluster to initiate.
Your Databricks cluster must be running to configure an authorization & connection and create Cloud Connect audiences in Lytics.
We recommend using SQL Warehouses (ideally Serverless SQL Warehouses).
If you are new to creating authorizations in Lytics, see the Authorizations documentation for more information.
- Select Databricks from the list of providers.
- Select the Databricks Database Authorization method for authorization.
- Enter a Label to identify your authorization.
- (Optional) Enter a Description for further context on your authorization.
- In the Host text box, enter Databricks server hostname.
- In the Port numeric text box, enter Databricks server port. Default port for Databricks cluster is 443.
- In the HTTP Path text box, enter Databricks compute resources URL.
- In the Token text box, enter your Databricks personal access token.
- Click Complete to save the authorization.

Import Table
Import user data directly from your Databricks database table into Lytics, resulting in new user profiles or updates to fields on existing profiles.
Integration Details
- Implementation Type: Server-side Integration.
- Implementation Technique: Databricks database connection.
- Frequency: One-time or scheduled Batch Integration can be hourly, daily, weekly, or monthly depending on configuration).
- Resulting data: Raw Events, User Profiles and User Fields.
This integration uses Databricks gosql driver to establish connection with Databricks database and imports data by querying the table selected during configuration. Once started, the job will:
- Creates a temporary view containing a snapshot of the database table to query against.
- Adds a column for consistent ordering of data.
- Only rows that have a timestamp after the last import, or Since Date will be included.
- Query a batch of rows from the temporary table.
- Emits rows to the data stream.
- Repeat steps 2 and 3 until the entire temporary view is read.
- Once all the rows are imported, if the job is configured to run continuously, it will sleep until the next run. The time between runs can be selected during configuration.
Fields
Fields imported through Databricks will require custom data mapping.
Configuration
Follow these steps to set up and configure a Databricks import table job in the Lytics platform. If you are new to creating jobs in Lytics, see the Jobs Dashboard documentation for more information.
-
Select Databricks from the list of providers.
-
Select the Import Table job type from the list.
-
Select the Authorization you would like to use or create a new one.
-
Enter a Label to identify this job you are creating in Lytics.
-
(Optional) Enter a Description for further context on your job.
-
Complete the configuration steps for your job.
Your Databricks cluster must be running to configure an authorization and a job in Lytics. It can take up to 5 minutes for the cluster to initiate.
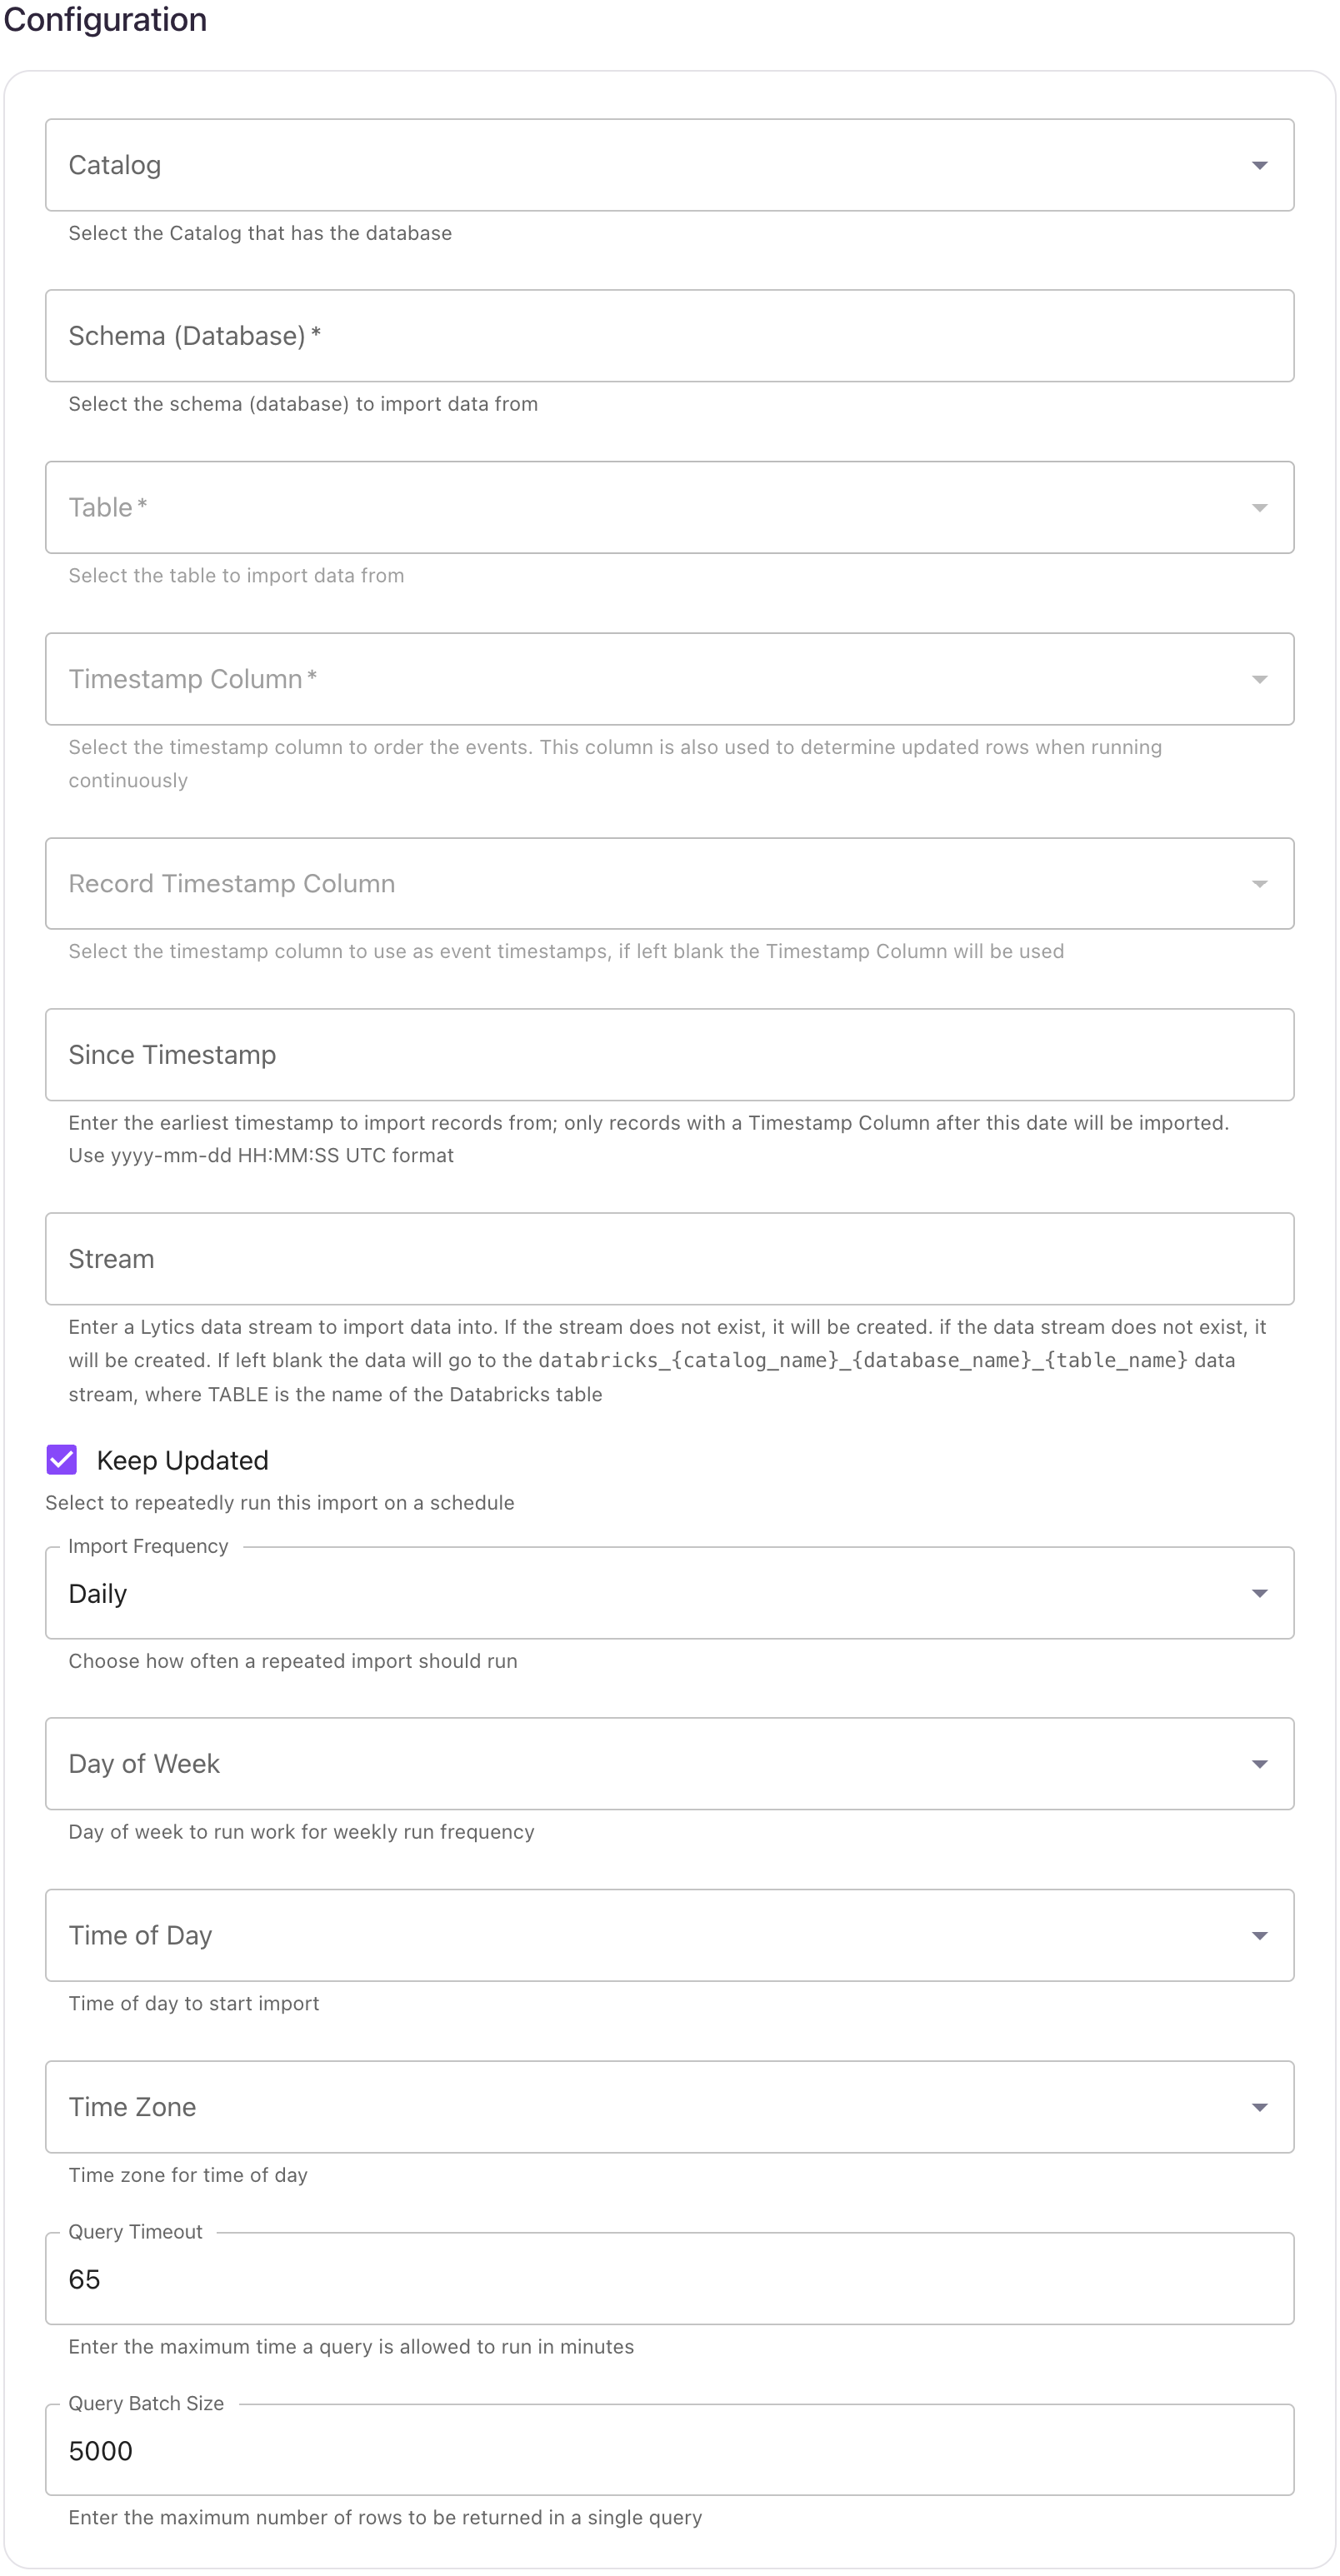
- Using the Catalog dropdown menu, select the Databricks catalog that has the database.
- Using the Database dropdown menu, select the database you would like to import data from.
- Using the Table dropdown menu, select the table you want to import data from.
- From the Timestamp Column input, select the timestamp column to order the events. This column is also used to determine updated rows when running continuously.
- (Optional) From the Record Timestamp Column input, select the timestamp column to use as event timestamps, if left blank the Timestamp Column will be used.
- (Optional) In the Since Timestamp text box, enter the earliest timestamp to import records from; only records with a Timestamp Column after this date will be imported. Use
yyyy-mm-ddHH:MM:SSUTC format. - (Optional) From the Stream input, select or type the data stream name you want to add data to. If the data stream does not exist, it will be created. If left blank the data will go to the
databricks_{catalog_name}_{database_name}_{table_name}stream. - (Optional) Select the Keep Updated checkbox to repeatedly run this import on a schedule.
- (Optional) From the Import Frequency input, choose how often a repeated import should run.
- (Optional) From the Time of Day input, select time of day to start import.
- (Optional) From the Timezone input, select timezone for time of day.
- (Optional) In the Query Timeout numeric field, enter the maximum time a query is allowed to run in minutes.
- (Optional) In the Query Batch Size numeric field, enter the maximum number of rows to be returned in a single query.
- Click Start Import.
Export Audience
Export user profile data from Lytics to a Databricks table and leverage Databricks tools to organize, transform and analyze the data as well as to generate reports to assist in improving campaign performance.
Integration Details
- Implementation Type: Server-side Integration.
- Implementation Technique: File Based Transfer Integration and Databricks database connection.
- Frequency: Batch Integration every 24 hours. Each batch contains the entire audience, and replaces the previous table.
- Resulting data: User Fields will be exported to Databricks as rows in a table.
This integration connects to your Databricks using gosql driver. It uses databricks Copy INTO command to load data from Lytics. Once started, the job will:
- Create a placeholder table in Databricks with no schema. The name of the table follows
lytics_user_{audience_slug}format. - Scan the audience for export, and writes the user data in CSV format to the Lytics-managed AWS S3 bucket.
- Load the data from Lytics AWS bucket to the Databricks table created above via COPY INTO command.
- If the export is configured to run continuously, the workflow will go to sleep for configured period of time before repeating steps 1 through 3.
Everytime the job runs, it will drop and create the placeholder table. The schema of the table is later inferred by Databricks during COPY INTO command.
Fields
If fields are selected during job configuration, only those fields will be included in the resulting Databricks table. If none is selected then all the user fields will be exported. Non-scalar fields will be exported as JSON string.
Configuration
Follow these steps to set up and configure a Databricks export job in the Lytics platform. If you are new to creating jobs in Lytics, see the Jobs Dashboard documentation for more information.
-
Select Databricks from the list of providers.
-
Select the Export Audience job type from the list.
-
Select the Authorization you would like to use or create a new one.
-
Enter a Label to identify this job you are creating in Lytics.
-
(Optional) Enter a Description for further context on your job.
-
Complete the configuration steps for your job.
-
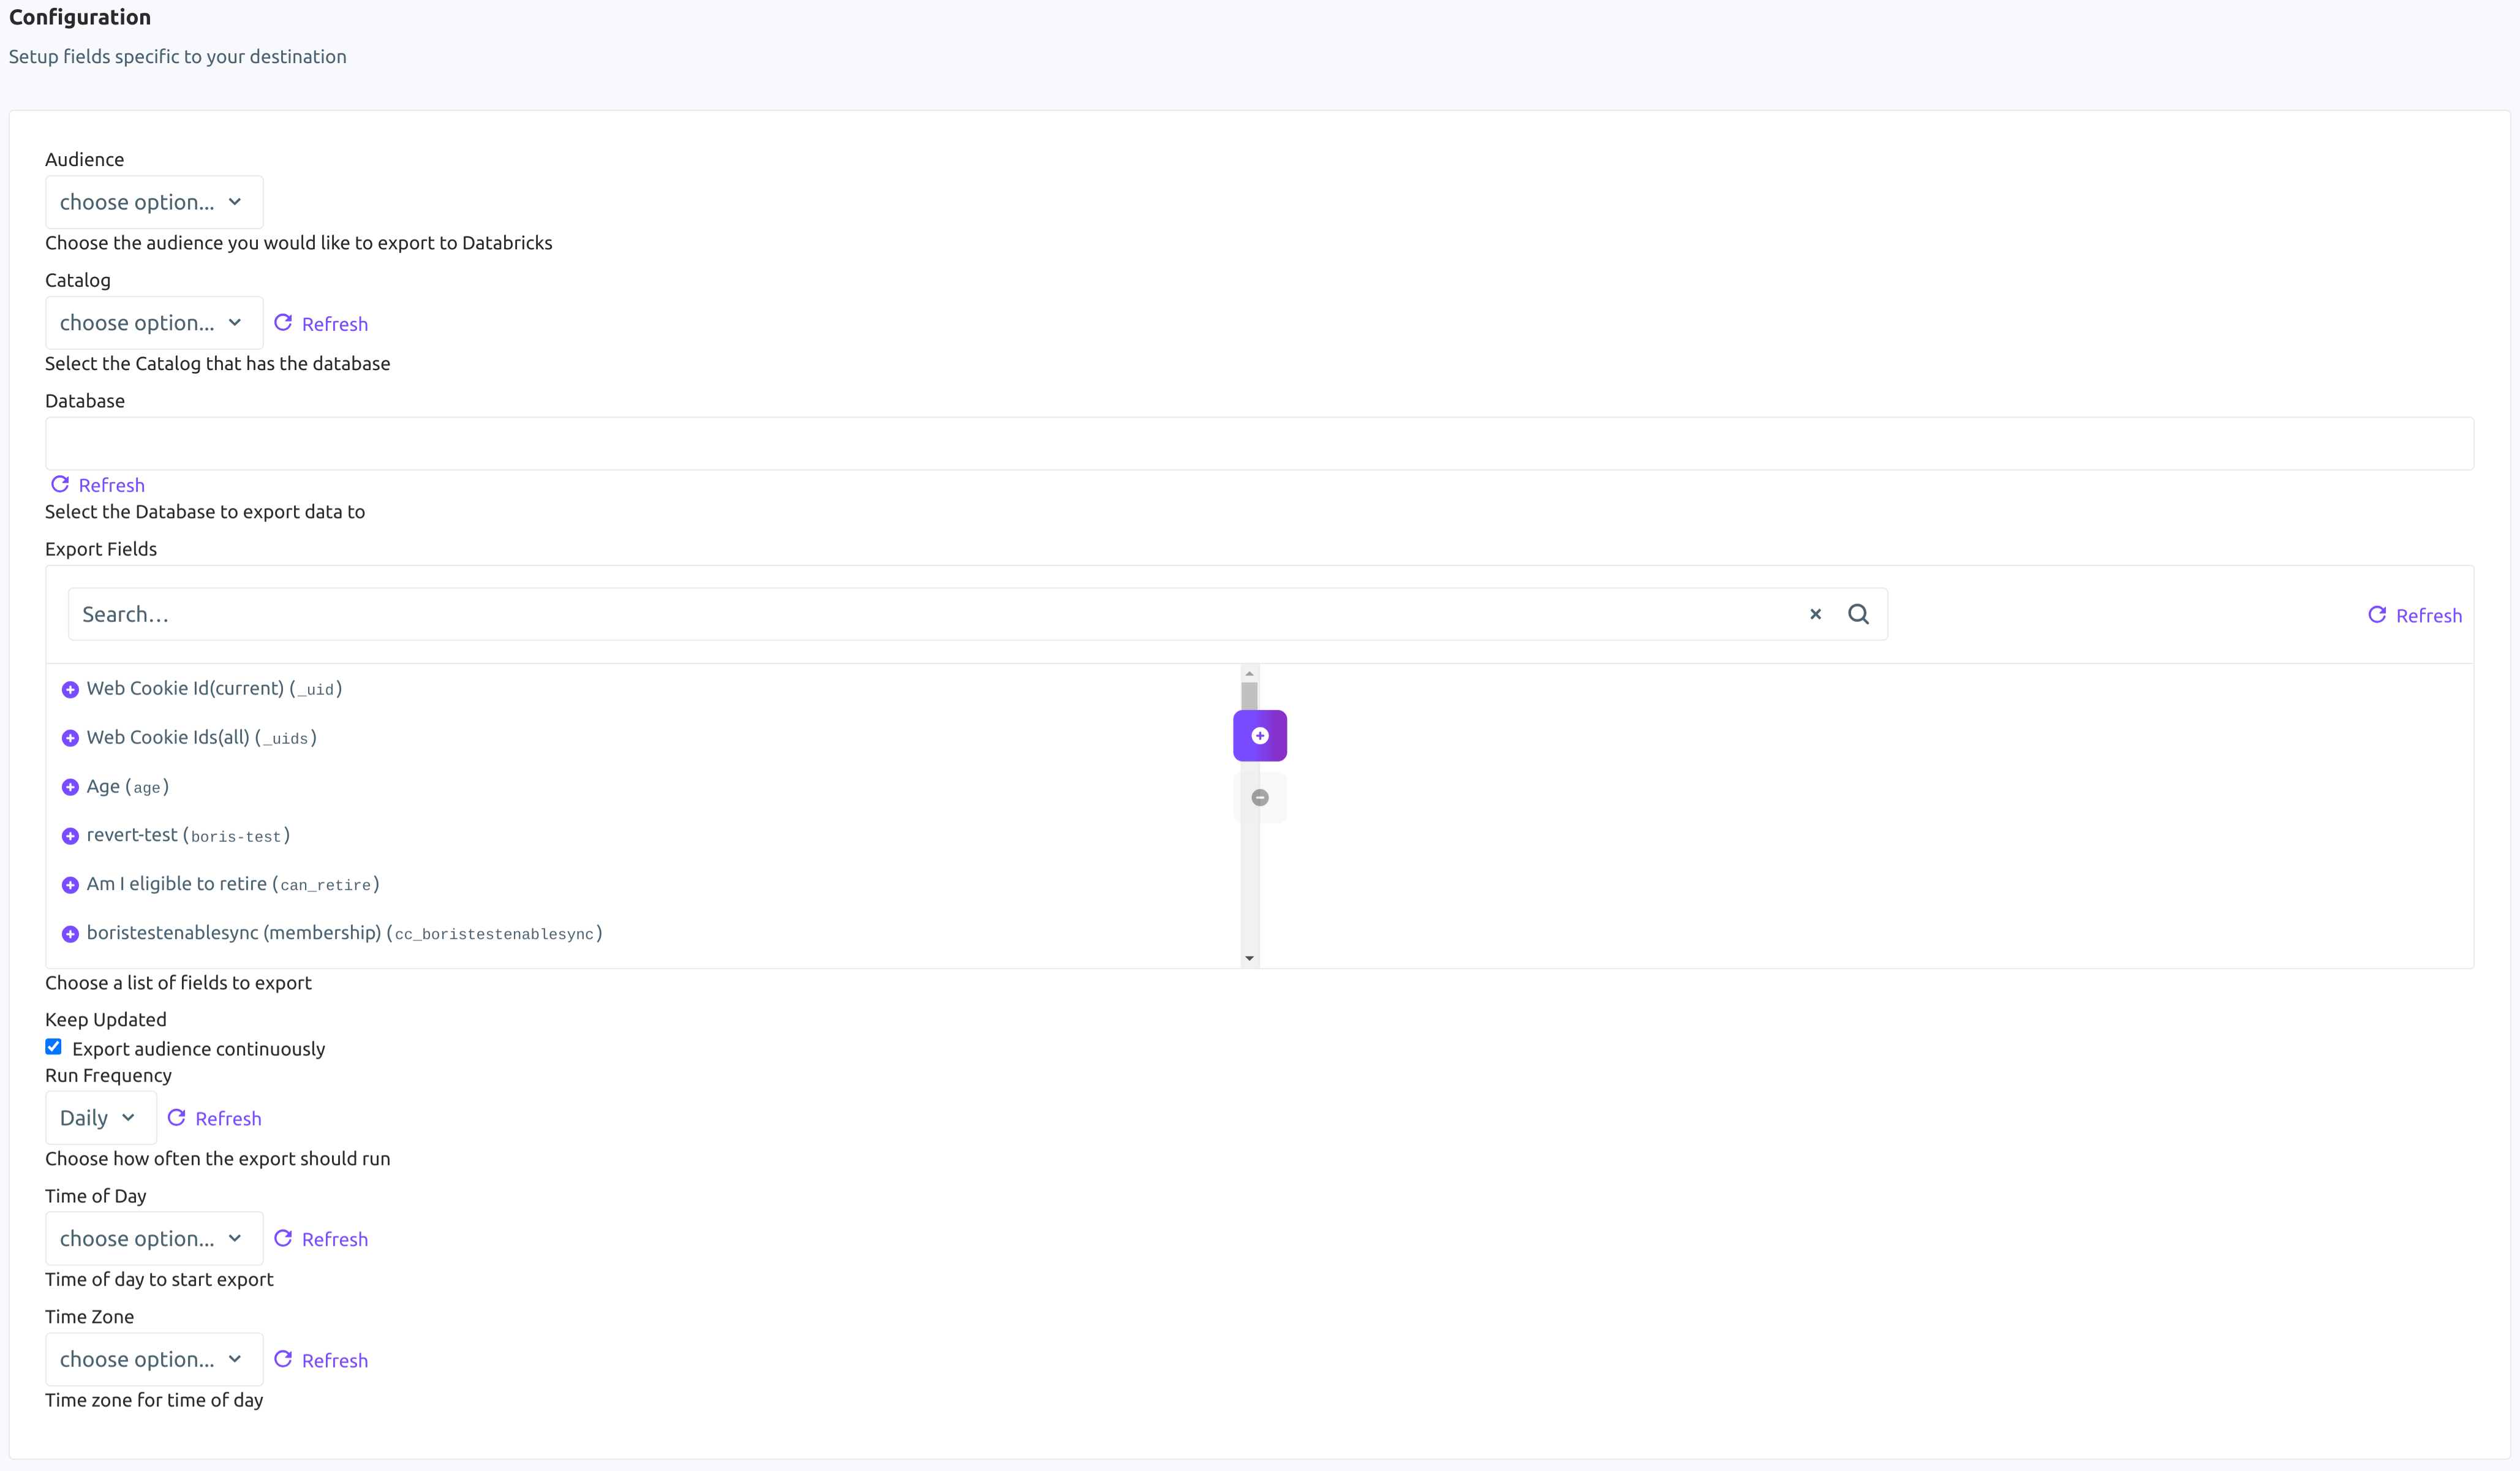
Using the Audience dropdown menu, select the Lytics audience you would like to export.
-
Using the Catalog dropdown menu, select the Databricks catalog that has the database.
-
Using the Database dropdown menu, select the Databricks database you would like to export data to.
-
From the Export Fields input, choose a list of Lytics user profile fields to export. Each field will be exported to the table as an individual column. If none are selected, then all the fields will be exported.
-
(Optional) Select the Keep Updated checkbox to export the audience continuously.
-
(Optional) From the Run Frequency imput, select how often to export the users.
-
(Optional) From the Time of Day input, select the time of day to start continuous exports.
-
(Optional) From the Timezone input, select a timezone for time of day.
-
Click Start Export.
Export Event Data
Export event data from any Lytics data stream to Databricks. NOTE: Unlike user fields, events are not represented within the Lytics dashboard. Events are the raw data received from integrations as seen in your Data Streams.
Integration Details
- Implementation Type: Server-side Integration.
- Implementation Technique: File Based Transfer Integration and Databricks database connection.
- Frequency: Batch Integration.
- Resulting data: Raw Event data is stored in the resulting Databricks Delta table.
This integration connects to your Databricks workspace using the gosql driver and uses COPY INTO to load data from a Lytics-managed AWS S3 bucket. Once the export is started the job will:
- Scan through events on the selected data stream(s).
- Generate CSV row(s) for each scanned event and write them to the Lytics-managed AWS S3 bucket.
- If the target table does not yet exist, create it with the schema below.
- Load the data from S3 into your Databricks Delta table via COPY INTO. The table is never dropped; Databricks
COPY INTOload-history dedup ensures the same staged file is not re-ingested if a run is retried.
There are a few things to know when running an event export:
- The event export scans the complete data stream from the first collected event to the current event, unless otherwise specified by the export configuration.
- The export will run according to the schedule you configure (for example, daily, weekly, or monthly). If no frequency is selected, the export will run approximately every 15 minutes.
- By default, each selected stream is written to its own table named
lytics_events_{stream}. Select Single Table Destination to write every selected stream to a singlelytics_events_alltable instead.
Fields
The export writes a fixed five-column schema. The full per-event payload is stored as a JSON string in the data column.
| Field | Description | Databricks Type |
|---|---|---|
| id | Event ID | BIGINT |
| ly_event_ts | The timestamp of the event | TIMESTAMP |
| ly_receive_ts | The timestamp when Lytics received the event | TIMESTAMP |
| stream | The Lytics data stream the event came from | STRING |
| data | The full event payload as a JSON-encoded string | STRING |
Configuration
Follow these steps to set up and configure an export of events from Lytics to Databricks. If you are new to creating jobs in Lytics, see the Destinations documentation for more information.
- Select Databricks from the list of providers.
- Select the Databricks: Export Event Data job type from the list.
- Select the Authorization you would like to use or create a new one.
- Enter a Label to identify this job you are creating in Lytics.
- (Optional) Enter a Description for further context on your job.
- (Optional) From the Data Streams to Export input, select data streams to export. A stream is a single source/type of data. You may choose more than one. If none are selected, all streams will be exported.
- (Optional) From the Data Streams Fields to Export input, select data stream fields to export. If none are selected, all fields for the selected stream(s) will be exported.
- (Optional) Using the Catalog dropdown menu, select the Databricks catalog that contains the destination schema.
- In the Schema (Database) input, select the Databricks schema (database) to export event data to.
- (Optional) In the Maximum numeric field, enter the number of events to be exported. If left blank, all events will be exported.
- (Optional) In the Start Date field, enter the date of the oldest event you want to export. Events from this date onwards will be exported. Use
yyyy-mm-ddformat (e.g.2015-08-13). - (Optional) In the End Date field, enter the most recent date you want to export. Events before, but NOT including this date will be exported. Use
yyyy-mm-ddformat (e.g.2015-08-13). - (Optional) Select the Keep Updated checkbox to continuously run this export.
- (Optional) Select the Start Export From Now Onwards checkbox to only export events collected from now onwards. This will override any start or end date configuration.
- (Optional) Select the Single Table Destination checkbox to write every selected stream to one
lytics_events_alltable instead of one table per stream. - (Optional) From the Export Frequency input, select how often to run the export: Daily, Weekly, or Monthly. Applies when Keep Updated is enabled. If not set, the export will run approximately every 15 minutes.
- (Optional) From the Day of Week input, select the day of the week to run the export. Applies when Export Frequency is set to Weekly.
- (Optional) From the Time of Day input, select the time of day to start the export.
- (Optional) From the Time Zone input, select the time zone for the time of day.
- Click Complete to start the export.
Export System Events
Export Lytics system events to a Databricks Delta table and monitor jobs, authorizations, audiences, and other activity in your Lytics instance. For background on system events, see Lytics System Events: Audit Logs and Alerts.
Integration Details
- Implementation Type: Server-side Integration.
- Implementation Technique: File Based Transfer Integration and Databricks database connection.
- Frequency: Batch Integration.
- Resulting data: Lytics system events stored as rows in a Databricks Delta table.
This integration connects to your Databricks workspace using the gosql driver and uses COPY INTO to load data from a Lytics-managed AWS S3 bucket. Once the export is started the job will:
- Query Lytics system events for the configured Subject Type / Subject ID and time range.
- Write the events as CSV rows to the Lytics-managed AWS S3 bucket. Files are flushed every 100,000 events or when the file reaches 1 GB.
- If the target table does not yet exist, create it with the schema below. If a table name is not provided, the default
lytics_system_event_export_{AID}is used. - Load the data from S3 into your Databricks Delta table via COPY INTO. The table is never dropped; Databricks
COPY INTOload-history dedup ensures the same staged file is not re-ingested if a run is retried. - On subsequent runs (if Keep Updated is enabled), only new system events since the last successful export are appended — existing rows are never modified or deleted.
Fields
By default, Lytics exports the following fields to Databricks:
| Field | Description | Databricks Type |
|---|---|---|
| id | ID of the event | STRING |
| date | Date when the event occurred | TIMESTAMP |
| aid | Account AID | STRING |
| user_id | User associated with the event | STRING |
| subject_type | What the event is about (work, segment, account) | STRING |
| subject_id | ID associated with the subject | STRING |
| verb | Action described by the event | STRING |
| notes | Extra information about the event | STRING |
| related | Any related information associated with the event | STRING |
Configuration
Follow these steps to set up and configure an export of Lytics system events to Databricks. If you are new to creating jobs in Lytics, see the Destinations documentation for more information.
- Select Databricks from the list of providers.
- Select the Databricks: Export System Events job type from the list.
- Select the Authorization you would like to use or create a new one.
- Enter a Label to identify this job you are creating in Lytics.
- (Optional) Enter a Description for further context on your job.
- (Optional) Using the Catalog dropdown menu, select the Databricks catalog that contains the destination schema.
- In the Schema (Database) input, select the Databricks schema (database) to export system events to.
- (Optional) In the Databricks Table text box, enter the name of an existing table or a new table name. If left blank,
lytics_system_event_export_{AID}will be used. - (Optional) In the Start Date text box, enter the date to export system events on or after (ex:
2020-01-01). If no start date is given, system events for the last 30 days will be exported. - (Optional) In the End Date text box, enter the date to export system events strictly before (ex:
2020-01-01). If no end date is given, system events up to the current date will be exported. - (Optional) In the Subject Type text box, enter the Subject Type of system events you would like to export (work, segment, account). Only events with this Subject Type will be exported.
- (Optional) In the Subject ID text box, enter the Subject ID for the above Subject Type (work_id, segment_id, account_id). Only events with this Subject ID will be exported.
- (Optional) Select the Keep Updated checkbox to continuously run this export. The export will run daily once it sends all the data.
- (Optional) From the Time of Day input, select the time of day to start the export each day.
- (Optional) From the Time Zone input, select the time zone for the time of day.
- Click Complete to start the export.
Export Audience Changes
Export audience membership change events from Lytics to Databricks, tracking when users entered or exited the selected audience segments.
Integration Details
- Implementation Type: Server-side Integration.
- Implementation Technique: Audience Trigger Integration File Based Transfer Integration.
- Frequency: Near Real-time Integration with an optional one-time Backfill of the audience after setup.
- Resulting data: Audience membership change events exported to Databricks as rows in a Delta table.
The job monitors selected Lytics audiences for membership changes. Whenever users enter or exit one of the selected audiences, the change is staged to the Lytics-managed AWS S3 bucket and loaded into your Databricks table.
When the job is started, it will:
- If the target table does not yet exist, create it with the schema below. If a table name is not provided, the default
lytics_seg_changesis used. The column name for the user identifier matches the ID Field selected during configuration. - Run a one-time backfill (if Existing Users is enabled), emitting an enter event for every current member of each selected audience.
- Receive real-time enter/exit events for the selected audiences and write them as CSV rows to the Lytics-managed AWS S3 bucket. Files are flushed in batches of 100,000 events or every 5 minutes, whichever occurs first.
- Load each staged file into your Databricks Delta table via COPY INTO. The table is append-only; Databricks
COPY INTOload-history dedup ensures the same staged file is not re-ingested if a load is retried.
Fields
The exported events will include the following fields in your Databricks table. The first column's name is the ID Field you select during configuration.
| Field | Description | Databricks Type |
|---|---|---|
| {ID Field} | The selected ID field value for the user | STRING |
| segment_slug | Lytics audience slug | STRING |
| timestamp | When the membership change occurred | TIMESTAMP |
| exit | Whether this event is exit or enter | BOOLEAN |
Configuration
Follow these steps to set up and configure an export of audience change events to Databricks. If you are new to creating jobs in Lytics, see the Destinations documentation for more information.
- Select Databricks from the list of providers.
- Select the Databricks: Export Audience Changes job type from the list.
- Select the Authorization you would like to use or create a new one.
- Enter a Label to identify this job you are creating in Lytics.
- (Optional) Enter a Description for further context on your job.
- (Optional) Using the Catalog dropdown menu, select the Databricks catalog that contains the destination schema.
- In the Schema (Database) input, select the Databricks schema (database) to export audience change data to.
- From the Audiences input, select up to 10 audiences you would like to track for membership changes.
- From the ID Field dropdown menu, select the Lytics user field to use as the ID column in Databricks.
- (Optional) In the Table Name text box, enter the name of an existing table or a new table name. If left blank,
lytics_seg_changeswill be used. - (Optional) Select the Existing Users checkbox to export existing audience members as enter events during a one-time backfill.
- Click Complete to start the export.
Export Metrics
Export Lytics platform metrics to Databricks. This workflow allows you to export raw time-series metric data — such as segment sizes, stream volumes, job activity, and more — into a Databricks Delta table for analysis and reporting.
Integration Details
- Implementation Type: Server-side Integration.
- Implementation Technique: File Based Transfer Integration and Databricks database connection.
- Frequency: Batch Integration.
- Resulting data: Time-series metric data stored in a Databricks Delta table. The workflow is append-only — each run loads only new rows since the last successful export, using Databricks
COPY INTOload-history deduplication.
This integration connects to your Databricks workspace using the gosql driver and uses COPY INTO to load data from a Lytics-managed AWS S3 bucket.
Once the export is started the job will:
- Query raw time-series metric data from the Lytics platform for the configured dimension, type, and time range.
- Write the metric data as gzipped CSV to the Lytics-managed AWS S3 bucket.
- If the target table does not yet exist, create it with the schema below.
- Load the data from S3 into your Databricks Delta table via COPY INTO. The table is never dropped; Databricks
COPY INTOload-history dedup ensures the same staged file is not re-ingested if a run is retried. - On subsequent runs (if Keep Updated is enabled), only new rows since the last successful export are appended — existing rows are never modified or deleted.
Fields
By default, Lytics exports the following fields to Databricks:
| Field | Description | Databricks Type |
|---|---|---|
| dimension | The metric dimension (e.g. segment, stream, works) | STRING |
| dimension_id | The specific ID within the dimension (e.g. a segment ID) | STRING |
| dimension_type | The metric type (e.g. size, added, removed) | STRING |
| ts | The timestamp of the metric data point | TIMESTAMP |
| value | The metric value | DOUBLE |
| ly_exported_ts | The timestamp when the data was exported | TIMESTAMP |
Available Dimensions and Metric Types
The available metric types depend on the dimension you select. See the Available Dimensions and Metric Types table in the Google BigQuery documentation for the full list — the same dimensions and types are supported across all warehouse destinations.
Configuration
Follow these steps to set up and configure an export of metrics from Lytics to Databricks. If you are new to creating jobs in Lytics, see the Destinations documentation for more information.
- Select Databricks from the list of providers.
- Select the Databricks: Export Metrics job type from the list.
- Select the Authorization you would like to use or create a new one.
- Enter a Label to identify this job you are creating in Lytics.
- (Optional) Enter a Description for further context on your job.
- (Optional) Using the Catalog dropdown menu, select the Databricks catalog that contains the destination schema.
- In the Schema (Database) input, select the Databricks schema (database) to export metric data to.
- (Optional) In the Databricks Table text box, enter the table name. If left blank,
lytics_{AID}_metricswill be used. - From the Metric Dimension input, select the dimension of the metric you want to export (e.g. segment, stream, works). See the Available Dimensions and Metric Types section above for the full list.
- (Optional) In the Dimension ID text box, enter the specific ID for the dimension (e.g. a segment ID or stream name). If left blank, metrics for all IDs within the selected dimension will be exported.
- From the Metric Type input, select the metric type to export. The available options will depend on the dimension selected in step 9.
- (Optional) From the Lookback Range input, select the time range of historical data to include in the initial export. Options are: 0d (no lookback), 7d, 14d, 30d (default), 60d, and 90d.
- (Optional) Select the Keep Updated checkbox to continuously run this export on a daily basis. When enabled, subsequent runs will incrementally append only new rows since the last successful export.
- (Optional) From the Time of Day input, select the time of day to start the export.
- (Optional) From the Time Zone input, select the time zone for the time of day.
- Click Complete to start the export.