

JavaScript
Introduction
The Lytics JavaScript Tag (JS Tag) is the primary SDK for collecting behavioral data from your website visitors and delivering real-time personalization. It handles:
- Behavioral tracking — page views, clicks, form submissions, and custom events that build user profiles with content affinities and behavioral scores
- Identity resolution — associating anonymous visitors with known user profiles across sessions and devices
- Profile delivery — surfacing audience membership and user attributes to the browser for personalization
- Integration handoff — forwarding profile data to web-based integrations like Google Analytics, Facebook Ads, and others
This guide walks you through installation, tagging strategy, common implementation patterns, and troubleshooting — everything you need to get the most out of the Lytics platform on your web properties.
Quick Start
1. Install the Tag
Copy the JS Tag snippet from the Lytics app installation page and paste it into your site's <head> tag. It looks like this:
<script type="text/javascript">
  !function(){"use strict";var o=window.jstag||(window.jstag={}),r=[];function n(e){o[e]=function(){for(var n=arguments.length,t=new Array(n),i=0;i<n;i++)t[i]=arguments[i];r.push([e,t])}}n("send"),n("mock"),n("identify"),n("pageView"),n("unblock"),n("getid"),n("setid"),n("loadEntity"),n("getEntity"),n("on"),n("once"),n("call");o.loadScript=function(n,t,i){var e=document.createElement("script");e.async=!0,e.src=n,e.onload=t,e.onerror=i;var o=document.getElementsByTagName("script")[0];o.parentNode.insertBefore(e,o)},o.init=function n(t){o.config=t,t.callback?o.loadScript(t.src,function(){var n=window.jstag;for(var e in o.config=t,o)n[e]||(n[e]=o[e]);r.forEach(function(n){n[0]in window.jstag&&window.jstag[n[0]].apply(window.jstag,n[1])}),r=[],"init"in n&&n.init(t),t.callback(n)}):o.loadScript(t.src)},o.init({
    src: '//c.lytics.io/api/tag/YOUR_ACCOUNT_ID/latest.min.js'
  })}();
</script>
Replace YOUR_ACCOUNT_ID with your Lytics account ID (found in Account Settings).
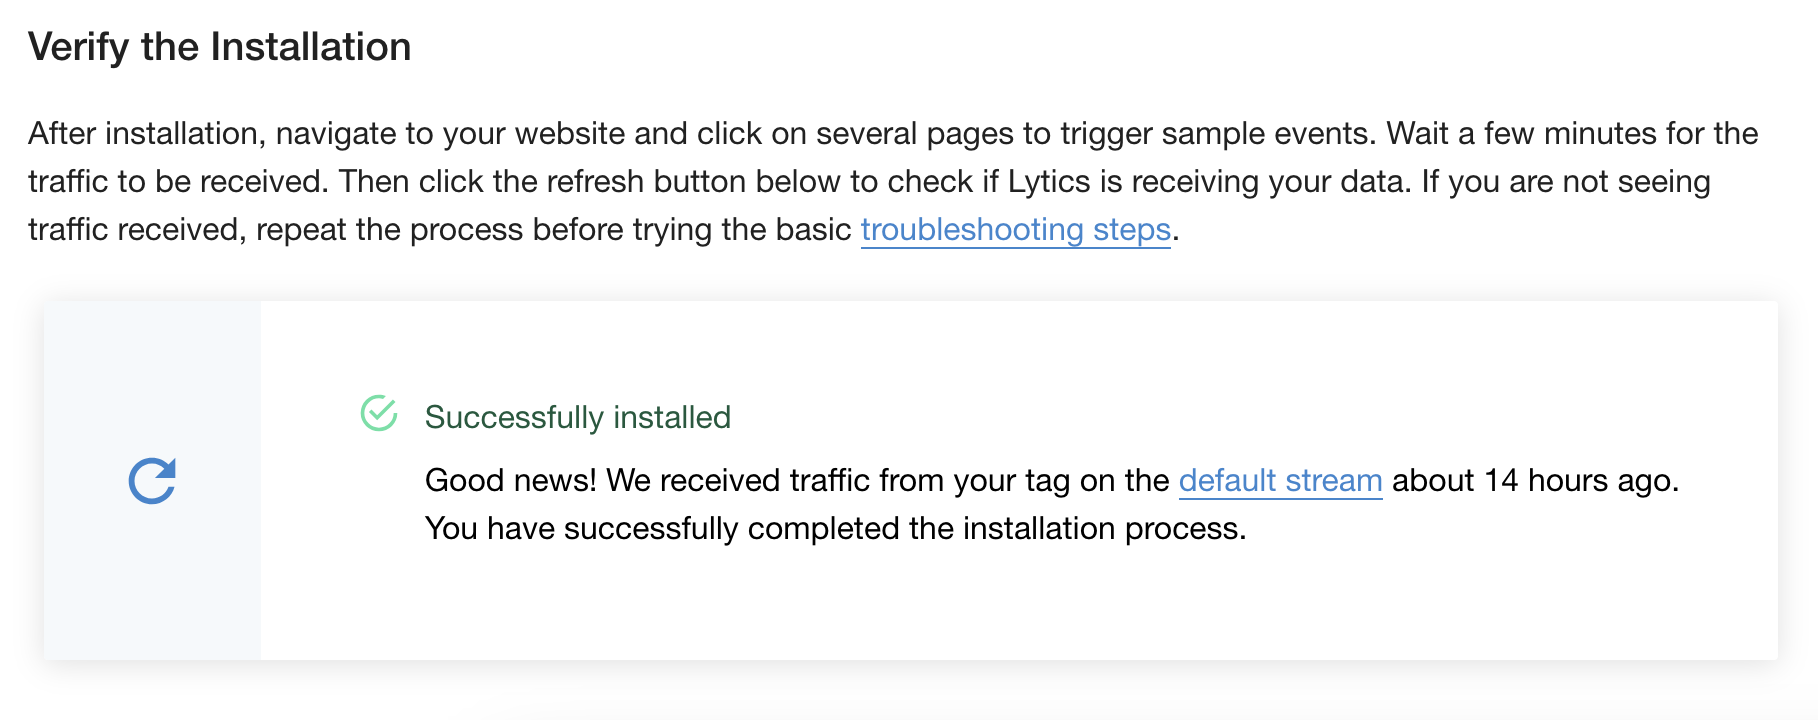
2. Verify Installation
Open your browser's developer console and run:
jstag.config.version;If a version number is returned (e.g., 3.x.x), the tag is installed and collecting data. You can also use the automated verification checker in the Lytics app installation page.
3. Send Your First Event
In the browser console (or in your site code), send a test event:
jstag.send({ event: "test_event" });4. Verify Data in Lytics
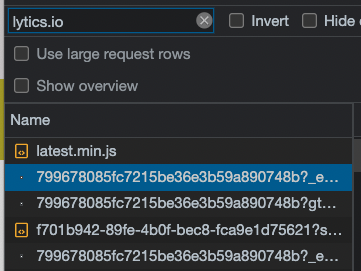
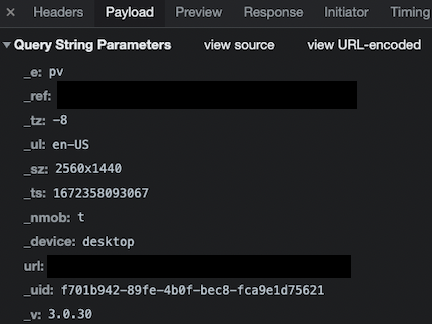
Open the Network tab in developer tools and filter for lytics.io. You should see requests to the /c collection endpoint. Check the Payload section to confirm your data was sent.
Then visit the stream/pipeline section in the Lytics app to verify the event arrived.
Installation
Standard Script Tag
The recommended approach is to paste the JS Tag snippet directly in your site's <head> section. This ensures the tag loads early and captures all page views. Get your snippet from the installation page in the Lytics app.
Google Tag Manager
- Log into GTM.
- Click New Tag > Tag Configuration.
- Under Custom, select Custom HTML.
- Paste the Lytics JS Tag snippet.
- Name it
Lytics JavaScript Tag. - In Triggering, select All Pages.
- Click Save, then Submit to publish.
- Visit your site and click through a few pages to generate traffic.
- Check the Tag Installation Status on the installation page.
Other Tag Managers
Lytics can be installed through virtually any tag manager. The process is generally the same: create a custom HTML tag, paste the Lytics snippet, trigger on all pages, and publish.
Subresource Integrity (SRI)
For environments that require SRI, see the SRI documentation.
Self-Hosting the Tag
While not recommended (it means you miss automatic updates and may void SLA agreements), it is possible to host the JS Tag from your own infrastructure. The trade-offs:
Benefits:
- Compliance with strict security requirements
Drawbacks:
- No automatic feature updates or bug fixes
- Client-side integrations require manual configuration
- Account settings no longer update dynamically
- You are responsible for caching and scalability
If required, follow these steps:
- Navigate to the
srcURL from your tag snippet (e.g.,//c.lytics.io/api/tag/YOUR_ID/latest.min.js) in a browser and save the file. - Host the file on your infrastructure.
- Update the
srcin yourjstag.initconfig:
jstag.init({
  src: '//yourcompany.com/assets/lytics.latest.min.js'
});
Configuration
Version 3 is configured out-of-the-box for most use cases. Additional options are available for custom or advanced scenarios.
Configuration Options
| Key | Type | Required | Default | Description |
|---|---|---|---|---|
src | string | Yes | — | URL to load the tag from (provided by Lytics) |
url | string | Yes | //c.lytics.io | Collection endpoint URL. Do not change this. |
cid | string | Yes | — | Account ID (auto-set from src when using the generated snippet) |
loadid | boolean | No | false | Enable third-party cookies for cross-domain identity resolution |
stream | string | No | "default" | Data stream name for collected events |
sessecs | integer | No | 1800 | Session timeout in seconds (30 minutes) |
qsargs | string[] | No | [] | Query parameters to always collect from the URL |
serializer | string | No | "default" | "default" or "legacy" (for v2 migration only) |
cookies | object | No | — | Cookie domain config, e.g., { domain: ".site.com" } |
entity | object | No | — | Custom identifier config (byFieldKey, byFieldValue) |
pageAnalysis | object | No | — | Control automatic page data collection |
pathfora | object | No | — | Personalization widget configuration |
Configuration Details
url— The generated URL should never be changed as it will prevent your data from being sent to Lytics.cid— Automatically included when using the generated tag snippet. Do not alter.loadid— Enables Lytics to use a third-party cookie if available, pulling cross-domain behavior into a single unified user profile. Useful when you own multiple domains.stream— When collecting data across multiple domains, it is common to use a custom stream per domain. Custom streams require corresponding LQL to surface the collected data as user fields. See Tagging Strategy below.serializer— Only use"legacy"if migrating from v2 with deeply nested data. Otherwise, leave as"default".cookies— Sets the cookie domain for the Lytics cookie. Useful for sites with many subdomains to ensure consistent tracking:{ cookies: { domain: ".yoursite.com" } }entity— Use a custom identifier instead of the Lytics cookie. See Identity & User Identification.pageAnalysis— Controls automatic page data extraction:{ pageAnalysis: { collectQueryParams: true, dataLayerPull: { disabled: false } } }
Example Configuration
jstag.init({
  src: '//c.lytics.io/api/tag/YOUR_ACCOUNT_ID/latest.min.js',
  loadid: true,
  stream: 'web_main',
  sessecs: 1800,
  qsargs: ['utm_source', 'utm_medium', 'utm_campaign'],
  cookies: { domain: '.yoursite.com' }
});
Tagging Strategy & Best Practices
What to Tag
A good tagging implementation captures four categories of data:
| Category | Purpose | Examples |
|---|---|---|
| Page views | Content consumption, browsing behavior | Automatic (or manual for SPAs) |
| Identity events | Link anonymous visitors to known users | Login, registration, form submission with email |
| Behavioral events | Actions that indicate intent or engagement | Search, video play, download, add-to-cart |
| Conversion events | Business outcomes | Purchase, subscription, form completion |
You do not need to tag everything. Focus on events that will drive your use cases — audience building, personalization, and attribution.
Event Naming Conventions
Use consistent, lowercase, snake_case names for events and fields:
// Good
jstag.send({ event: "product_viewed", product_id: "SKU-123" });
jstag.send({ event: "form_submitted", form_name: "newsletter_signup" });
jstag.send({ event: "purchase_completed", order_value: 49.99 });

// Avoid
jstag.send({ event: "Product Viewed" });   // spaces, mixed case
jstag.send({ event: "formSubmitted" });     // camelCase
jstag.send({ event: "click" });             // too generic
Payload Structure
Keep payloads flat. Lytics works best with flat key-value pairs:
// Good — flat structure
jstag.send({
  event: "purchase_completed",
  order_id: "ORD-456",
  order_value: 129.99,
  currency: "USD",
  product_category: "electronics"
});

// Avoid — deeply nested objects
jstag.send({
  event: "purchase_completed",
  order: {
    id: "ORD-456",
    total: { value: 129.99, currency: "USD" }
  }
});
When to Use Custom Streams
The default stream ("default") works for most single-site implementations. Use custom streams when:
- Multiple domains — one stream per domain (e.g.,
web_main,web_blog,web_support) - Different data schemas — events with very different field structures
- Separate LQL processing — you need different field mappings per data source
Custom streams require corresponding LQL statements to map raw fields into user profile fields. Consult your Lytics account team when setting up custom streams.
How Data Flows
Understanding the data pipeline helps you tag effectively:
Browser (jstag.send)
    → /c endpoint (collection)
        → Data Stream (e.g., "default")
            → LQL Processing (field mapping, identity resolution)
                → User Profile (audiences, scores, affinities)
                    → /personalize endpoint
                        → Browser (entityReady callback)
Every jstag.send() call sends data to the /c collection endpoint, which routes it to the configured stream. LQL statements on that stream define how raw fields map to user profile fields, which identity fields to use for profile merging, and how to aggregate values over time. The enriched profile is then available back in the browser through the /personalize endpoint.
Data Collection
Automatically Collected Data
The JS Tag automatically collects the following fields with every event:
| Field | Example | Description |
|---|---|---|
_e | pv | Event type (pv = page view) |
_ref | www.google.com | Referral domain |
_tz | -7 | Time zone offset from UTC |
_ul | en-US | Browser language |
_sz | 2560x1440 | Display size |
_ts | 1504306728695 | Timestamp (milliseconds since epoch) |
_nmob | t | Not mobile (t = desktop) |
_device | desktop | Device type |
url | www.yoursite.com/page | Page URL |
_uid | 74481.3222228897 | Lytics cookie ID |
_v | 3.0.2 | JS Tag version |
You do not need to send these manually — they are included automatically.
Page Views
A page view is captured automatically each time the browser fully loads a new URL. For SPAs or when you need to manually trigger a page view:
jstag.pageView();Custom Events
Use jstag.send() to collect any custom data. The method accepts a JavaScript object with any key-value pairs:
jstag.send({
  event: "button_clicked",
  button_name: "hero_cta",
  page_section: "homepage"
});
Advanced: Stream, Payload, and Callback
All collection methods accept three optional parameters:
jstag.send(STREAM, PAYLOAD, CALLBACK);
jstag.pageView(STREAM, PAYLOAD, CALLBACK);| Parameter | Type | Description |
|---|---|---|
STREAM | string | Target stream name (overrides config default) |
PAYLOAD | object | The data to send |
CALLBACK | function | Called when the collect request completes |
// Send to a specific stream with a callback
jstag.send('checkout_events', { event: "cart_updated", item_count: 3 }, function(response) {
  console.log("Event sent:", response);
});
Identity & User Identification
How Anonymous Tracking Works
On first visit, the JS Tag generates a unique _uid and stores it as a first-party cookie (seerid). This ID is included in every event, allowing Lytics to link all of a visitor's activity into a single anonymous profile — even across sessions.
Identifying Known Users
When a visitor provides identifying information (email, user ID, etc.), send it via jstag.send() to link the anonymous profile to a known identity:
// On login or form submission
jstag.send({
  email: "[email protected]",
  userid: "USR-12345",
  first_name: "Jane",
  last_name: "Doe"
});
This merges the anonymous cookie-based profile with any existing profile for that email or user ID. Send identity data at every opportunity — login, registration, form submission, email click-through — to maximize profile resolution.
Custom Entity Identifiers
By default, the JS Tag uses the _uid cookie to look up the visitor's profile. If you have authenticated users and want to use a stronger identifier:
// Get authenticated user from your auth system
var user = getAuthenticatedUser();

var config = {
  src: '//c.lytics.io/api/tag/YOUR_ACCOUNT_ID/latest.min.js'
};

// Use a custom identifier for logged-in users
if (user) {
  config.entity = {
    byFieldKey: 'user_id',        // The Lytics profile field name
    byFieldValue: user.id          // The value from your auth system
  };
}

jstag.init(config);
When entity is configured, the /personalize endpoint will look up the visitor by the specified field instead of the cookie, returning a richer profile for known users.
Example: Email as Identifier
For sites where email is the primary known identifier (e.g., after a form submission or login):
var user = getAuthenticatedUser();

var config = {
  src: '//c.lytics.io/api/tag/YOUR_ACCOUNT_ID/latest.min.js'
};

if (user && user.email) {
  config.entity = {
    byFieldKey: 'email',
    byFieldValue: user.email
  };
}

jstag.init(config);
Example: CRM Contact ID
If your users are managed in a CRM like Salesforce or HubSpot, use the CRM's contact ID to ensure profile consistency across systems:
var crmUser = getCRMContact();

var config = {
  src: '//c.lytics.io/api/tag/YOUR_ACCOUNT_ID/latest.min.js'
};

if (crmUser && crmUser.contactId) {
  config.entity = {
    byFieldKey: 'salesforce_contact_id',
    byFieldValue: crmUser.contactId
  };
}

jstag.init(config);
Example: Internal Customer UUID
For platforms with their own customer database, use your internal UUID:
var customer = getCustomer();

var config = {
  src: '//c.lytics.io/api/tag/YOUR_ACCOUNT_ID/latest.min.js'
};

if (customer && customer.uuid) {
  config.entity = {
    byFieldKey: 'customer_uuid',
    byFieldValue: customer.uuid
  };
}

jstag.init(config);
Example: Strongest Available Identifier with Fallback
In practice, you may have multiple identifiers available depending on the user's authentication state. Use the strongest one available:
var user = getAuthenticatedUser();

var config = {
  src: '//c.lytics.io/api/tag/YOUR_ACCOUNT_ID/latest.min.js'
};

if (user && user.id) {
  // Strongest: authenticated user ID
  config.entity = {
    byFieldKey: 'user_id',
    byFieldValue: user.id
  };
} else if (user && user.email) {
  // Fallback: email from a previous form submission or cookie
  config.entity = {
    byFieldKey: 'email',
    byFieldValue: user.email
  };
}
// If neither is available, the default _uid cookie is used automatically

jstag.init(config);
Example: Server-Rendered Identifier
When your backend (CMS, application server, etc.) knows the current user, inject the identifier directly into the page template. This avoids a client-side auth lookup and ensures the identifier is available immediately when the tag loads.
PHP / WordPress:
<script type="text/javascript">
  // ... jstag snippet ...
  var config = {
    src: '//c.lytics.io/api/tag/YOUR_ACCOUNT_ID/latest.min.js'
  };

  <?php if (is_user_logged_in()): ?>
  var currentUser = <?php echo json_encode([
    'id' => get_current_user_id(),
    'email' => wp_get_current_user()->user_email
  ]); ?>;

  config.entity = {
    byFieldKey: 'user_id',
    byFieldValue: String(currentUser.id)
  };
  <?php endif; ?>

  jstag.init(config);
</script>
Django / Jinja2:
<script type="text/javascript">
  // ... jstag snippet ...
  var config = {
    src: '//c.lytics.io/api/tag/YOUR_ACCOUNT_ID/latest.min.js'
  };

  {% if user.is_authenticated %}
  config.entity = {
    byFieldKey: 'user_id',
    byFieldValue: '{{ user.pk }}'
  };
  {% endif %}

  jstag.init(config);
</script>
Ruby on Rails (ERB):
<script type="text/javascript">
  // ... jstag snippet ...
  var config = {
    src: '//c.lytics.io/api/tag/YOUR_ACCOUNT_ID/latest.min.js'
  };

  <% if current_user %>
  config.entity = {
    byFieldKey: 'user_id',
    byFieldValue: '<%= current_user.id %>'
  };
  <% end %>

  jstag.init(config);
</script>
Cross-Domain Tracking
If you own multiple domains and want to unify visitor profiles across them, enable loadid:
jstag.init({
  src: '//c.lytics.io/api/tag/YOUR_ACCOUNT_ID/latest.min.js',
  loadid: true
});
This uses a third-party cookie (when available) to resolve the same visitor across your domains.
Accessing the Anonymous ID
// Get the current visitor's _uid (async)
jstag.getid(function(id) {
  console.log("Visitor ID:", id);
});

// Override the _uid (advanced — use with caution)
jstag.setid('custom_id_value');
Common Tagging Patterns
User Login / Registration
Send identity data whenever a user authenticates. This is the most important tagging event for linking anonymous and known profiles.
// On successful login
jstag.send({
  event: "login",
  email: user.email,
  userid: user.id,
  first_name: user.firstName,
  last_name: user.lastName
});

// On registration
jstag.send({
  event: "registration",
  email: user.email,
  userid: user.id,
  signup_source: "website",
  plan: "free"
});
Form Submissions
Capture lead data when users submit forms:
// Newsletter signup
document.getElementById('newsletter-form').addEventListener('submit', function(e) {
  var email = document.getElementById('email-input').value;
  jstag.send({
    event: "newsletter_signup",
    email: email,
    form_name: "footer_newsletter",
    page_url: window.location.pathname
  });
});

// Contact form
jstag.send({
  event: "contact_form_submitted",
  email: formData.email,
  name: formData.name,
  company: formData.company,
  inquiry_type: formData.subject
});
E-Commerce
Product Views
jstag.send({
  event: "product_viewed",
  product_id: "SKU-789",
  product_name: "Running Shoes",
  product_category: "footwear",
  product_price: 89.99
});
Add to Cart
jstag.send({
  event: "add_to_cart",
  product_id: "SKU-789",
  product_name: "Running Shoes",
  quantity: 1,
  cart_value: 89.99
});
Purchase / Conversion
jstag.send({
  event: "purchase_completed",
  order_id: "ORD-456",
  order_value: 129.99,
  currency: "USD",
  item_count: 2,
  payment_method: "credit_card"
});
Content Engagement
Search
jstag.send({
  event: "search",
  search_query: document.getElementById('search-input').value,
  results_count: resultCount
});
Video Play
jstag.send({
  event: "video_played",
  video_id: "VID-001",
  video_title: "Product Demo",
  video_duration: 180
});
File Download
jstag.send({
  event: "file_downloaded",
  file_name: "whitepaper-2024.pdf",
  file_type: "pdf",
  content_category: "resources"
});
Campaign & Attribution Data
Capture UTM parameters and campaign data using qsargs in your configuration:
jstag.init({
  src: '//c.lytics.io/api/tag/YOUR_ACCOUNT_ID/latest.min.js',
  qsargs: ['utm_source', 'utm_medium', 'utm_campaign', 'utm_term', 'utm_content']
});
This automatically captures UTM parameters from the URL on every page view without any additional jstag.send() calls.
Declarative Tracking with lx-* Attributes
lx-* AttributesThe JS Tag includes a plugin that lets you track user interactions directly in your HTML markup — no JavaScript required. Add lx-* attributes to any element and the tag will automatically listen for DOM events and send the data to Lytics.
Enabling the Plugin
The lx plugin is disabled by default. Enable it in your jstag.init configuration:
jstag.init({
  src: '//c.lytics.io/api/tag/YOUR_ACCOUNT_ID/latest.min.js',
  lx: {
    disabled: false
  }
});
Core Attributes
| Attribute | Description |
|---|---|
lx-trigger | The DOM event that triggers data collection (e.g., click, change, submit) |
lx-send | Query-string style payload (e.g., event=signup&plan=free) |
lx-send-* | Individual payload fields as separate attributes (e.g., lx-send-event="signup") |
lx-stream | Route the event to a specific stream (defaults to "default") |
All attributes also work with the data- prefix (e.g., data-lx-trigger, data-lx-send) for HTML5 validity.
Supported Triggers
The following DOM events can be used as lx-trigger values:
click, dblclick, change, input, focusin, focusout, keydown, keypress, mousedown, mouseout, mouseover, mouseup, touchstart, touchend, touchcancel, submit
Examples
Button Click
<button
  lx-trigger="click"
  lx-send="event=cta_clicked&button_name=hero_signup"
>
  Sign Up Now
</button>
This sends { "event": "cta_clicked", "button_name": "hero_signup" } when the button is clicked.
Using Individual Send Attributes
Instead of a query string, you can use lx-send-* attributes for each field:
<button
  lx-trigger="click"
  lx-send-event="cta_clicked"
  lx-send-button_name="hero_signup"
>
  Sign Up Now
</button>
This sends the same payload as the query-string example above.
Routing to a Custom Stream
<button
  lx-trigger="click"
  lx-send="event=download&file=whitepaper.pdf"
  lx-stream="content_engagement"
>
  Download Whitepaper
</button>
Form Submission
When lx-trigger="submit" is set on a <form>, the plugin automatically collects all form field values as the payload:
<form lx-trigger="submit">
  <input name="email" type="email" placeholder="[email protected]" />
  <input name="signup_source" type="hidden" value="footer_newsletter" />
  <button type="submit">Subscribe</button>
</form>
When submitted, this sends { "email": "[email protected]", "signup_source": "footer_newsletter" }. The plugin calls preventDefault() on the submit event, so handle any additional form submission logic (like redirecting or showing a confirmation) separately.
Tracking Input Changes
<select lx-trigger="change" lx-send-event="filter_changed" lx-send-filter_name="category">
  <option value="all">All</option>
  <option value="electronics">Electronics</option>
  <option value="clothing">Clothing</option>
</select>
Configuration Options
| Key | Type | Default | Description |
|---|---|---|---|
lx.disabled | boolean | true | Enable/disable the plugin |
lx.prefix | string | "lx" | Attribute prefix (change to use a different prefix) |
lx.target | Element | document.body | Container element for event delegation |
lx.stream | string | "default" | Default stream when lx-stream is not specified |
lx.triggers | string[] | (see above) | List of DOM events to listen for |
Notes
- Keys in
lx-sendare case-sensitive:lx-send="Foo=bar&foo=baz"sends bothFooandfooas separate fields. - Hyphens in
lx-send-*attribute names are converted to dots in the payload (e.g.,lx-send-user-name="Jane"sends{ "user.name": "Jane" }). - The plugin uses event delegation on the target container, so elements added dynamically to the DOM are tracked automatically.
- Event listeners are cleaned up automatically when the JS Tag is torn down.
Single Page Apps (SPA)
SPAs require special handling because the browser does not fully reload between route changes. Version 3 of the JS Tag is built with SPAs in mind.
Route Change Handling
On each route change, you need to:
- Track a page view for the new route.
- Optionally reload the visitor profile and re-evaluate campaigns.
// Call this on every route change in your SPA
function onRouteChange() {
  // Track the new page view
  jstag.pageView();

  // Re-fetch the profile and trigger configured campaigns
  jstag.loadEntity(function(profile) {
    console.log("Profile refreshed:", profile.data);
  });
}
React Example
import { useEffect } from 'react';
import { useLocation } from 'react-router-dom';

function LyticsPageTracker() {
  const location = useLocation();

  useEffect(() => {
    window.jstag.pageView();
    window.jstag.loadEntity();
  }, [location.pathname]);

  return null;
}
Vue Example
// In your router setup
router.afterEach((to) => {
  window.jstag.pageView();
  window.jstag.loadEntity();
});
Controlling Widget Refresh
By default, Pathfora widgets are re-evaluated every time loadEntity loads an updated profile. For SPAs with frequent route changes, this can cause unnecessary flickering. Use listenForProfileChange to only reload widgets when their dependencies change:
jstag.init({
  src: '//c.lytics.io/api/tag/YOUR_ACCOUNT_ID/latest.min.js',
  pathfora: {
    publish: {
      listenForProfileChange: true
    }
  }
});false(default): All Lytics-managed widgets are removed and re-evaluated every time the profile loads.true: Only widgets with dependencies (audience membership, attribute targeting, entity field templates) are reloaded when those dependencies change.
Accessing Visitor Profiles
The JS Tag fetches the visitor's profile in real-time from the /personalize endpoint. Because this is asynchronous, always use the callback pattern.
Entity Ready Callback
jstag.call('entityReady', function(profile) {
  var user = profile.data.user;

  console.log("Audiences:", user.segments);
  console.log("Email:", user.email);
});
Profile Data Structure
{
  "data": {
    "user": {
      "email": "[email protected]",
      "segments": ["all", "known_users", "high_value"],
      "first_name": "Jane"
    },
    "experiences": [
      {
        "experience_id": "f53e136b35c498ac944b56a0658ab672",
        "experience_slug": "welcome_offer",
        "provider_slug": "custom"
      }
    ],
    "errors": null
  }
}
The segments array contains audience slugs that have been enabled for API access. The user object contains any fields that have been explicitly surfaced in your account settings.
Audience Membership
Via Callback (Recommended)
jstag.call('entityReady', function(profile) {
  var audiences = profile.data.user.segments;

  if (audiences.indexOf('high_value') !== -1) {
    showVIPExperience();
  }
});
Via Direct Method
// Returns audience list (only after profile has loaded)
jstag.getSegments();
Via localStorage (Zero Latency)
Version 3 caches audience membership in localStorage. For use cases that cannot wait for the async profile load:
try {
  var audiences = JSON.parse(localStorage.lytics_segments);
  console.log("Cached audiences:", audiences);
} catch (e) {
  // Audiences not yet cached
}
Reloading the Profile
Force a profile refresh and re-evaluate experiences:
jstag.loadEntity(function(profile) {
  console.log("Profile refreshed:", profile.data);
});
Content Recommendations
The content recommendation plugin fetches personalized content suggestions for the current visitor in real-time.
Basic Usage
jstag.recommend(
  { limit: 5 },
  function(recommendations) {
    recommendations.forEach(function(item) {
      console.log("Recommended:", item.title, item.url);
    });
  }
);
Options
| Property | Type | Description |
|---|---|---|
limit | number | Maximum recommendations to return |
collection | string | Target a specific content collection |
visited | boolean | Include/exclude previously visited content |
shuffle | boolean | Randomize the order of results |
display | string | Display context or format |
engine | string | Recommendation engine to use |
rank | number | Ranking criteria |
wait | string | Wait condition for processing |
Caching Behavior
- Results are cached in browser storage using a key based on user ID and parameters.
- Cached results are returned immediately for faster performance.
- When
visited: falseis set, the cache is bypassed. - When
shuffle: trueis set, the first item is removed from cached results each time.
Error Handling
function loadRecommendations() {
  var hasLoaded = false;

  var fallbackTimer = setTimeout(function() {
    if (!hasLoaded) displayFallbackContent();
  }, 3000);

  jstag.recommend(
    { limit: 5, collection: "blog-posts" },
    function(recommendations) {
      hasLoaded = true;
      clearTimeout(fallbackTimer);
      if (recommendations.length > 0) {
        displayRecommendations(recommendations);
      } else {
        displayFallbackContent();
      }
    }
  );

  jstag.on("recommend.failure", function() {
    hasLoaded = true;
    clearTimeout(fallbackTimer);
    displayFallbackContent();
  });
}
Debug Events
| Event | Fires When |
|---|---|
recommend.requested | Recommendation request is initiated |
recommend.success | Recommendations are returned successfully |
recommend.failure | Recommendation request fails |
jstag.on("recommend.success", function(recs) {
  console.log("Received", recs.length, "recommendations");
});

jstag.on("recommend.failure", function(error) {
  console.error("Recommendation error:", error);
});
Integration Examples
A common pattern is to forward Lytics profile data to other tools running on the page.
Google Analytics 4
jstag.call('entityReady', function(profile) {
  if (profile && profile.data && profile.data.user) {
    gtag('set', { 'audience_name': profile.data.user.segments });
  }
});
Sitecore
jstag.call('entityReady', function(profile) {
  if (profile && profile.data && profile.data.user) {
    var segs = profile.data.user.segments || [];
    jstag.setCookie("ly_segs", JSON.stringify(segs), 604800);
  }
});
LiveRamp
jstag.call('entityReady', function(profile) {
  var id = profile.data.user._uid;
  var previouslySent = jstag.getCookie("lyticsLrIdl");
  if (!previouslySent) {
    // Send to LiveRamp
    jstag.setCookie("lyticsLrIdl", id, 604800);
  }
});
Generic Pattern
jstag.call('entityReady', function(profile) {
  var user = profile.data.user;
  if (!user) return;

  // Forward audiences to any tool
  var audiences = user.segments || [];
  yourTool.setUserData({
    lytics_audiences: audiences,
    lytics_email: user.email
  });
});
Quick Reference
Methods
| Method | Use Case | Example |
|---|---|---|
jstag.send(data) | Send custom event data | jstag.send({ event: "signup" }) |
jstag.send(stream, data, cb) | Send to specific stream | jstag.send('mystream', { event: "signup" }, fn) |
jstag.pageView() | Track a page view | jstag.pageView() |
jstag.call('entityReady', cb) | Access visitor profile | jstag.call('entityReady', fn) |
jstag.loadEntity(cb) | Refresh profile & campaigns | jstag.loadEntity(fn) |
jstag.getEntity() | Get current entity data | jstag.getEntity() |
jstag.getid(cb) | Get visitor's anonymous ID | jstag.getid(fn) |
jstag.setid(val) | Set custom anonymous ID | jstag.setid('abc123') |
jstag.getSegments() | Get audience membership | jstag.getSegments() |
jstag.recommend(opts, cb) | Get content recommendations | jstag.recommend({ limit: 5 }, fn) |
jstag.on(event, cb) | Listen for events | jstag.on('entityReady', fn) |
jstag.once(event, cb) | Listen for event (once) | jstag.once('entityReady', fn) |
jstag.setCookie(name, val, ttl) | Set a browser cookie | jstag.setCookie('key', 'val', 86400) |
jstag.getCookie(name) | Read a browser cookie | jstag.getCookie('key') |
jstag.mock() | Test mode (no real sends) | jstag.mock() |
Common Event Payloads
// Login
jstag.send({ event: "login", email: "[email protected]", userid: "U123" });

// Registration
jstag.send({ event: "registration", email: "[email protected]", signup_source: "website" });

// Newsletter signup
jstag.send({ event: "newsletter_signup", email: "[email protected]" });

// Product view
jstag.send({ event: "product_viewed", product_id: "SKU-789", product_category: "shoes" });

// Add to cart
jstag.send({ event: "add_to_cart", product_id: "SKU-789", quantity: 1, cart_value: 89.99 });

// Purchase
jstag.send({ event: "purchase_completed", order_id: "ORD-456", order_value: 129.99, currency: "USD" });

// Search
jstag.send({ event: "search", search_query: "running shoes", results_count: 24 });

// Content engagement
jstag.send({ event: "video_played", video_id: "VID-001", video_title: "Demo" });

// File download
jstag.send({ event: "file_downloaded", file_name: "whitepaper.pdf", file_type: "pdf" });
Debugging Commands
Run these in the browser console to inspect the current state:
jstag.config.version          // Tag version
jstag.isLoaded                // True if all resources loaded
jstag.getSegments()           // Current audience membership
jstag.getEntity()             // Full profile data
jstag.getid(id => console.log(id))  // Anonymous visitor ID
Events
| Event | Description |
|---|---|
entityReady | User profile has loaded |
recommend.requested | Recommendation request initiated |
recommend.success | Recommendations returned |
recommend.failure | Recommendation request failed |
pathfora.publish.done | Pathfora widget published |
Cookies & Storage
| Name | Type | Purpose |
|---|---|---|
seerid | Cookie | Lytics anonymous visitor ID (_uid) |
lytics_segments | localStorage | Cached audience membership |
Troubleshooting
Is the tag loaded?
jstag.isLoaded // should return trueIf jstag is undefined, the tag snippet is not installed or hasn't loaded yet.
Is data being sent?
Open the Network tab in developer tools and filter for lytics.io. Look for requests to the /c endpoint:
Check the Payload section to see exactly what data was sent:
You can also test from the console:
jstag.send({ event: "test" });Then verify the event appears in the Network tab and in the Lytics stream/pipeline UI.
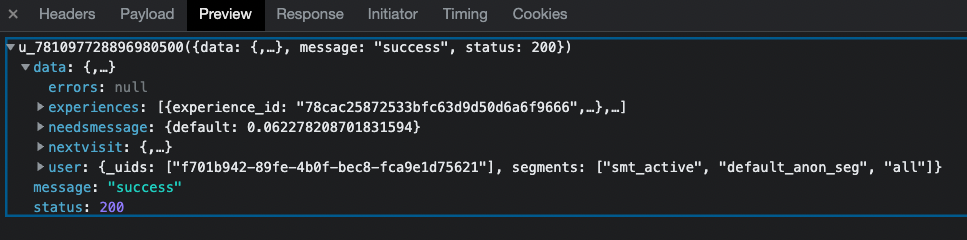
Is the profile loading correctly?
Filter the Network tab for requests to the /personalize endpoint:
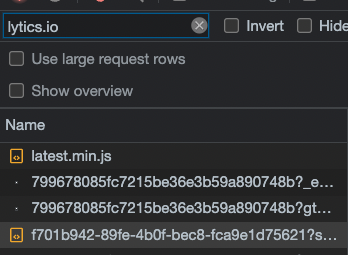
Use the Preview tab to inspect the returned profile data:
What data is stored client-side?
Two types of data are stored in the browser:
- Consumer attributes — profile fields like
first_name,email, etc. Controlled by your account's surfaced fields settings. - Consumer behaviors — audience membership and active experiences/campaigns.
Both are available via:
jstag.getEntity()Account settings control which attributes are surfaced client-side:

Verifying audience membership
jstag.getSegments();This returns the list of audiences the current visitor belongs to (only after the profile has loaded).
Testing Best Practices
- Always use incognito mode. This removes all cookies and caches, ensuring a clean test session. Close all incognito windows between test sessions.
- Document your testing path. Record the date, time, audience being tested, and results with screenshots.
Testing Known User Audiences
When testing audiences that link email and cookie data:
- Use each test email only once. Gmail supports punctuation tricks:
[email protected]and[email protected]deliver to the same inbox but create separate Lytics profiles. - Trigger a merge event to link the cookie with the email:
- Submit a form that sends email via
jstag.send() - Open an email link (with tracking pixel) in the incognito window
- Use the API to force-append an email to the cookie
- Submit a form that sends email via
Testing Anonymous User Audiences
Find your anonymous cookie ID:
jstag.getid(id => console.log(id));Use this ID to search for your profile in the Lytics dashboard's Find a User feature.
Numbers Not Matching?
When comparing Lytics user counts against other sources:
- Ensure you're comparing the same time period, web property, and filters.
- Account for employee traffic and bots.
- Lytics merges profiles across browsers and devices, so counts may be lower than tools that count unique cookies.
Contact Lytics support for assistance with count validation.
API Reference
The JS Tag interacts with two primary APIs:
- Data Upload — handles collection for all
jstag.send()calls via the/cendpoint - Personalization — retrieves user profiles and powers onsite personalization via the
/personalizeendpoint
Updated 4 months ago