

Jebbit
Overview
The following document outlines the recommended pattern for ensuring all information collected via Jebbit can be associated with the fully resolved C360 profiles built and managed by Lytics. This document will cover the core mechanics of what is happening and instructions on achieving an initial implementation.
It is always recommended that you consult with the technical resources responsible for managing your web properties to ensure no existing implementations or usecases are negatively impacted by added additional code via tag manager or directly to your code base.
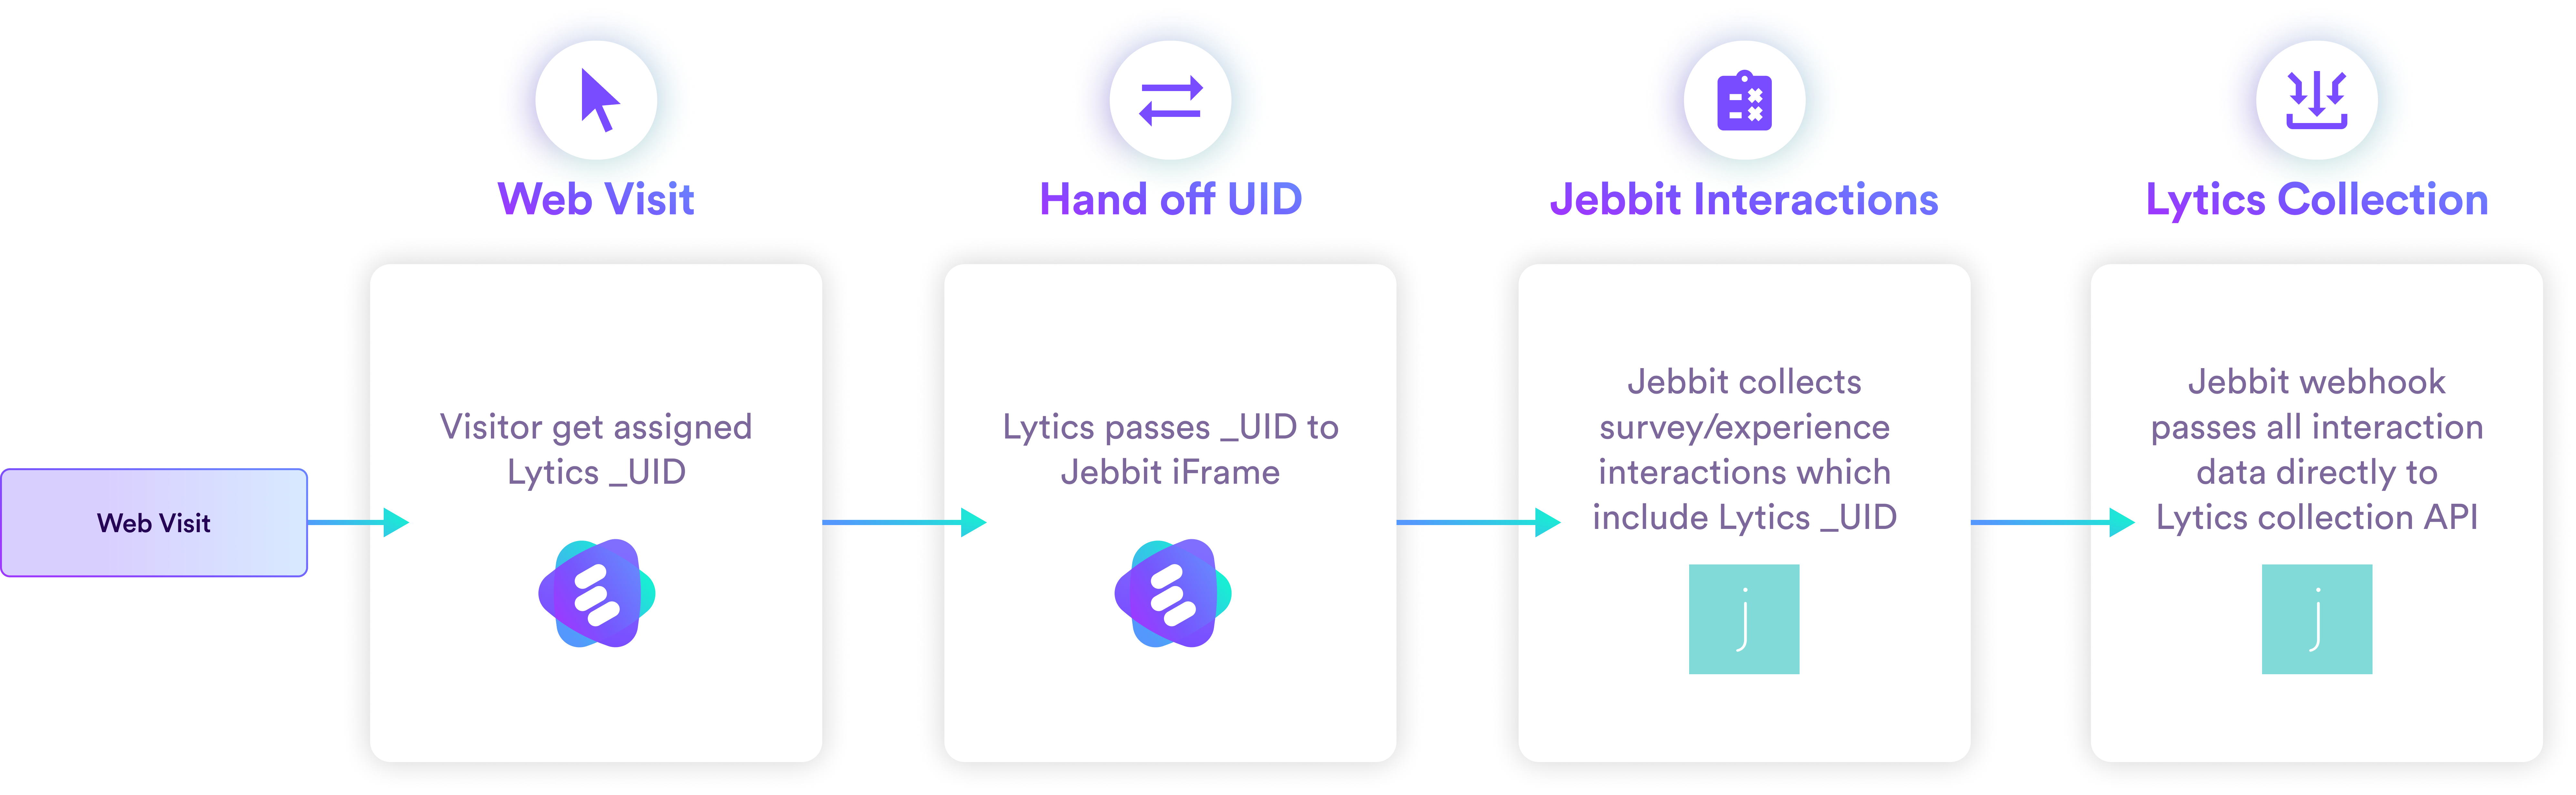
Pulling this use case together requires the following three milestones:
-
Identify the end user during a website visit.
-
Hand off the identity information, Lytics _uid, to Jebbit to leverage inside of their managed properties.
-
Complete the survey or other Jebbit-managed interaction.
-
Deliver all interaction data back to Lytics to be associated with the origin user's profile.
Configuration
Identify the Visitor
Identifying the visitor is simple and comes out of the box as part of the installation of our Javascript SDK. By installing this tag, we'll automatically place a first-party cookie on the visitor's device specific to Lytics. This cookie contains the Lytics _uid, which enables associating interactions across your site with a single C360 profile.
In our handoff to Jebbit below, we'll leverage one of the many available utilities to access and deliver this value per Jebbits preferred method.
Hand off UID to Jebbit
There are several ways that Jebbit can be leveraged. This document outlines the recommended path for using an iFrame embed for your Jebbit Experiences. If you are using an alternate method, consult the Jebbit documentation. However, a similar approach can be used across all Jebbit launch methods.
From the Jebbit UI, navigate to your desired experience. Along the top, you'll see a navigation option for "launch." This is where you'll access the source code and configuration options for the iFrame launch method.
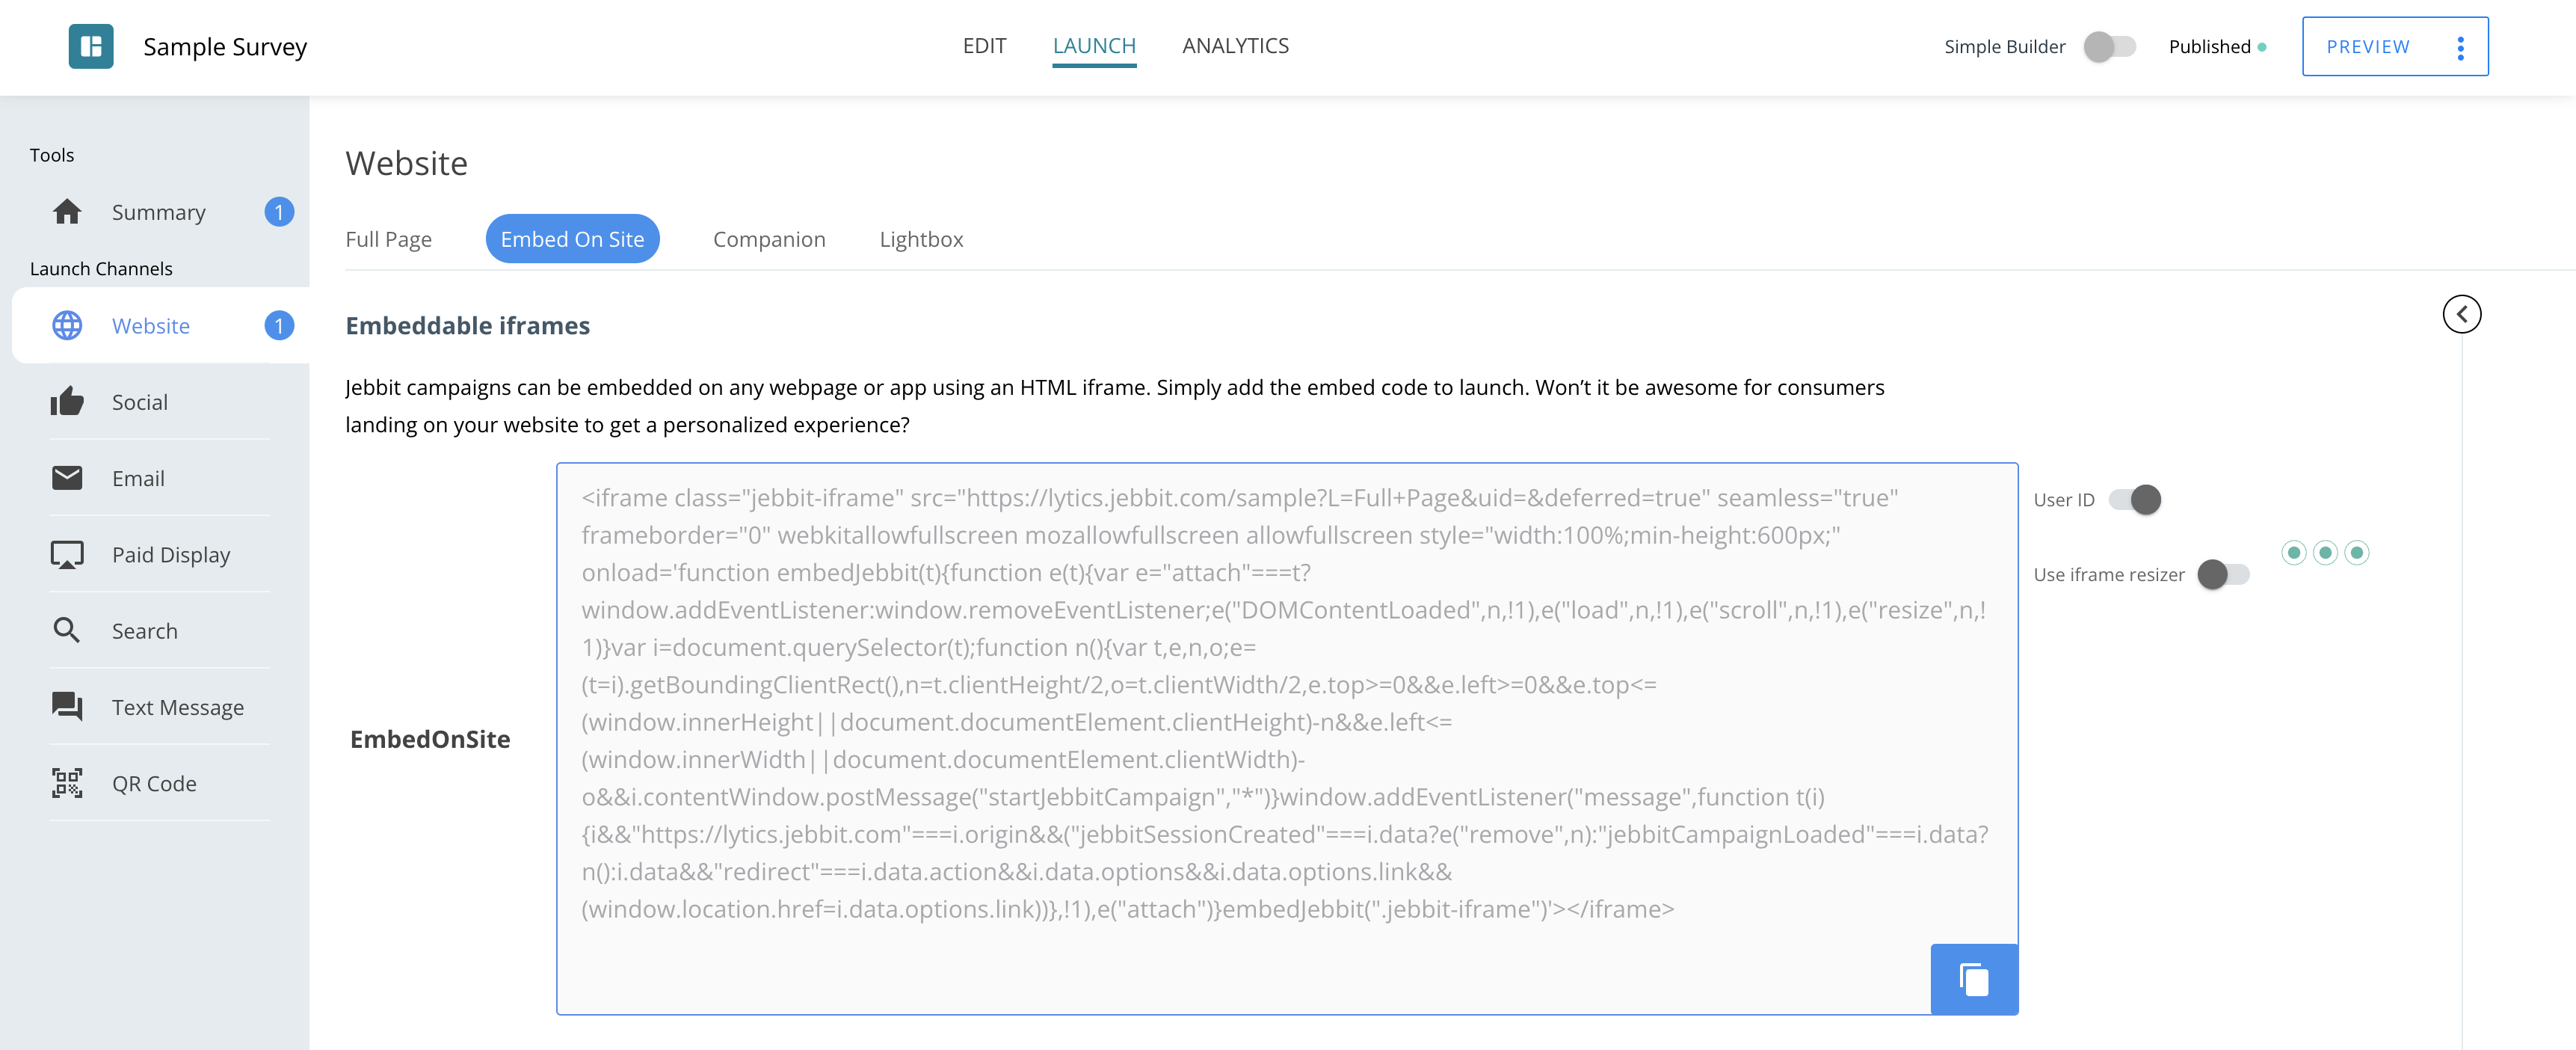
To the right of the code snippet, you'll find a toggle for "User ID," as shown below. Ensure that this is enabled, as it allows the Lytics _uid to be passed to Jebbit and associated with all tracked interactions.

Finally, place the Jebbit snippet on your website as you usually would. No additional actions are necessary specific to Lytics. Further details on Jebbit's iFrame Experience launch configuration can be found here.
Configure Jebbit to Lytics Connection
Feeding interaction data back to Lytics in near real-time is always recommended. This is made possible via the Jebbit to Lytics integration. This integration leverages a webhook that passes data to a unique data stream for mapping into the profile.
Both webhooks and the Lytics integration require assistance from the Jebbit team to configure and will require a valid access token along with the name of your desired stream. Stream definition is entirely up to you, but we recommend jebbit_activityto take advantage of a set of pre-defined mappings.
Access Token Creation
Though any role with the ability to create and manage data sources will work without an issue, we recommend creating a token with the Data Managerprivilege exclusively for this integration. This reduces any risk of granting unnecessary access.
As a result of a properly configured connection, you'll have access to all interaction data collected via Jebbit, which in most cases looks similar to the following:
{
  "source": "EmbedOnSite",
  "link": "EmbedOnSite",
  "experience_date": "2023-08-17 20:56:36 UTC",
  "created_at": "2023-08-17 20:56:36 UTC",
  "elapsed_time": 8,
  "client_user_id": "sample-user-id",
  "country_code": "US",
  "jebbit_id": "aaaaa-aaaaa-aaaaa-aaaaa-aaaaa",
  "page_url": "https://yourdomain.com/",
  "url_params": "L=Full+Page&uid=sample-user-id&deferred=true",
  "aws_region": "us",
  "user_agent": "Mozilla/5.0 (Macintosh; Intel Mac OS X 10_15_7) AppleWebKit/537.36 (KHTML, like Gecko) Chrome/115.0.0.0 Safari/537.36",
  "is_valid": true,
  "is_completed": true,
  "ip_address": "11.111.11.111",
  "is_mobile": false,
  "user_session_id": "bbbbbb-bbbbbb-bbbbbb-bbbbbb-bbbbbb",
  "business_name": "Your Business Name",
  "business_id": "your_business_id",
  "campaign_name": "Sample Survey",
  "campaign_id": "abc123",
  "channel_name": "full_page",
  "sub_channel_name": "full_page",
  "sub_channel_label": "Full Page",
  "sub_channel_type": "time",
  "L": "Full Page",
  "uid": "sample-user-id",
  "deferred": "true",
  "email": "[email protected]",
  "form_field_dropdown_values": {
  },
  "$metadata": {
    "attribute_types": {
      "email": "input"
    }
  }
}
Connect Lytics Identity with Jebbit
The last step in the process is to dynamically update the iFrame url to include the visitors Lytics _uid. There are several ways to do this, depending on the tools and resources at your disposal. Below you'll find one example and a description of what is happening. Please review this code in its entirety with your development partners to ensure there is no chance of an unintended conflict with your source code.
The following snippet requires the Lytics JavaScript tag to be present on your site before it can be called. Failing to ensure that load order will result in a JS error due to
jstagbeing undefined.
Out of the box, the Lytics JavaScript SDK provides an asynchronous "getid" function. This is used to retrieve the visitor's current _uid. To leverage this function, the core Lytics SDK must already be present. Otherwise, a JavaScript error will occur.
In the example below, we leverage this function to find the current "src" definition for the Jebbit iFrame. An assumption is made that only 1 Jebbit iFrame is present on the page and that it leverages a class of "jebbit-iFrame." If this is false, the querySelector on line 4 must be altered to match your implementation.
We then leverage a simple query add or update function to determine if the src already contains a uid. If it does, we'll update and if not we'll append a new query param to the src, which includes the uid, as per Jebbit's preferred method and documentation.
Example
jstag.getid(function(id){
  // helper function to either add or update a the uid query param
  function addOrUpdateQueryParam(n,r,s){var t=n,i="",e="",u=t.indexOf("#");-1!==u&&(e=t.substring(u),t=t.substring(0,u));var a=t.indexOf("?");-1!==a&&(i=t.substring(a+1),t=t.substring(0,a));for(var d=[],o=i.split("&"),p=0;p<o.length;p++){var g=o[p].split("=");g[0]!==r&&d.push(g[0]+"="+g[1])}return d.push(r+"="+encodeURIComponent(s)),""!==(i=d.join("&"))&&(i="?"+i),t+=i+e}
  var jebbitIframe = document.querySelector('.jebbit-iframe');
  if (jebbitIframe) {
    var existingSrc = jebbitIframe.getAttribute('src');
    var updatedSrc = addOrUpdateQueryParam(existingSrc, "uid", id);
    if (updatedSrc) {
        jebbitIframe.src = updatedSrc;
    } else {
        // take an action the source of the jebbit iframe was invalid for any reason
        // console.log('Invalid iFrame Source');
    }
  } else {
      // take an action if no jebbit iframe was found
      // console.log('No Jebbit iFrame Found');
  }
})
In most cases, the above example can be dropped into your preferred tag manager alongside the core Lytics JavaScript SDK.
Testing
Upon completing the above configuration a test can be performed for a published Jebbit Experience. Simply visit the test site where the Lytics tag and Jebbit iFrame are present. Complete the survey and verify data is being updated in the defined Lytics stream. In our testing, it can take several minutes for the form data to populate in Jebbit and be subsequently passed to the Lytics platform.
Updated 10 months ago