

Contentful
Overview
Contentful is a powerful and flexible headless content management system (CMS) that acts as a unified content layer to create amazing digital experiences at scale.
Integrating Contentful and Lytics allows you to import content from your website, campaign, or custom structured content from Contentful to Lytics to personalize email, web, mobile, or ads content for your customers. This integration utilizes the Lytics Content Affinity Engine to classify Contentful documents and works with Lytics Content Recommendations to act as the decisioning layer for true one-to-one content personalization.
Authorization
If you haven't already done so, you will need to setup a Contentful account before you begin the process described below. If you are new to creating authorizations in Lytics, see the Authorizations documentation for more information.
-
Select Contentful from the list of providers.
-
Select the Contentful Sign In method for authorization.
-
When prompted, log in to the Contentful account you wish to authorize and follow the steps per Contentful's instructions.
-
Enter a Label to identify your authorization.
-
(Optional) Enter a Description for further context on your authorization.
-
Click Save Authorization.

You can now use your authorization when setting up webhooks to import content. You will need the ID of the authorization created, which you can copy from the authorization list:

Configure Webhooks
Configuring webhooks in Contentful will allow you to send content to Lytics when it's published. You can send custom topics through this integration in addition to the standard Lytics topic extraction process using natural language processing. Imported Contentful entries can be included as part of Content Collections and Recommendations to power marketing campaigns personalized with one-to-one content.
Before You Begin
Before you set up webhooks to go to Lytics make sure you've completed the following prerequisites:
- Have a Lytics API token with the Data Manager role ready. You can read how to generate a new API token if you do not already have one.
- Go through the authorization process and have your authorization ID ready.
If you are not currently using webhooks in Contentful, it may help to read through the Contentful documentation on webhooks and webhook transformation to familiarize yourself with these concepts.
Configuring the Webhook
Follow these instructions to set up the webhook integration.
-
Log into your Contentful account.
-
In the space you wish to configure, click Settings and then Webhooks.
-
Click Add Webhook.
-
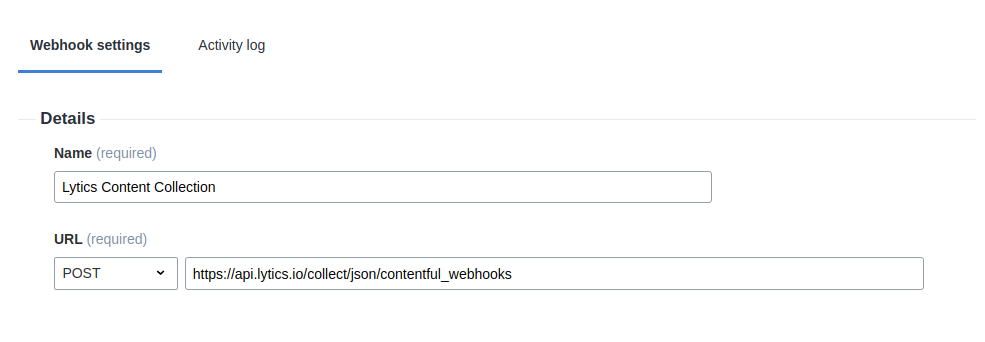
Add a name for your webhook such as "Lytics Content Collection" or something similar.
-
Under URL, select the POST method and enter the following URL:
https://api.lytics.io/collect/json/contentful_webhooks
-
Under Triggers you can configure what events the webhook should fire on by selecting Select specific triggering events. For this integration it is recommended to select Entry events on Publish.
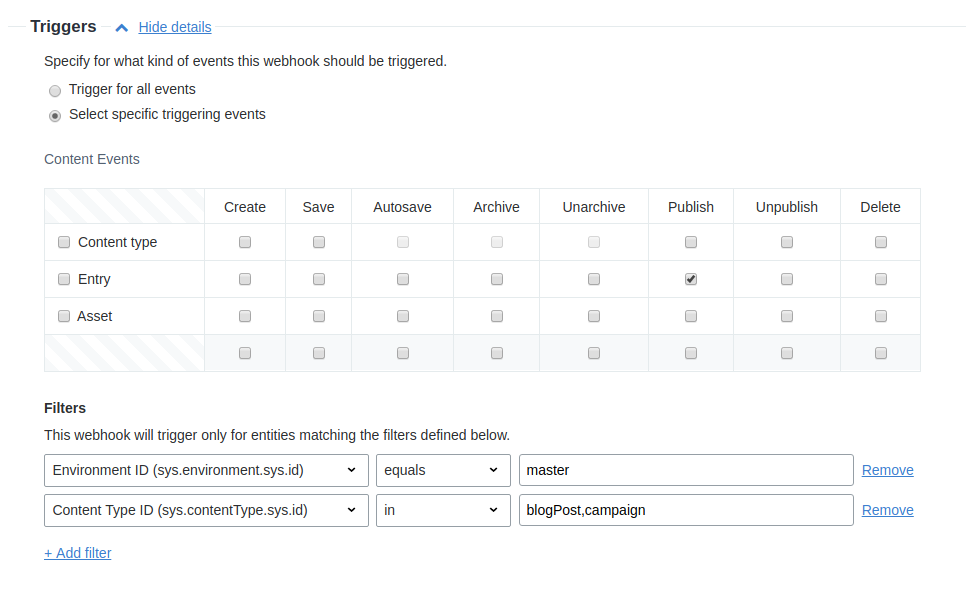
Note: Currently this integration only supports content entry ingestion and updates. There is no way to remove, mark as unpublished, or archive entries from Contentful in Lytics, thus these event types are not recommended for use in the webhook.
-
You can add additional filters such as Environment or Content Types.
Note: If your content types differ vastly in the naming of common fields, you may need to create one webhook per content type as you will need to map individual Contentful fields to Lytics fields.
-
Under Headers you will need to add two custom headers:
Authorization- your generated Lytics API token.Lytics-Auth-ID- the ID you created during the authorization step.


- Select application/json under the Content Type drop down.
- Under Payload select Customize the webhook payload. You will need to construct a custom payload to map fields to names that Lytics will recognize and can ingest. Use the webhook transformation documentation and the section on payload fields below to construct your payload.
- Once you're ready to begin sending webhooks to Lytics, click Save to activate the webhook.
The next time a qualifying event (such as publishing an entry) takes place in Contentful, you should be able to see that document in Lytics.
Payload Fields
When constructing the custom payload of your webhook, you will want to include the following fields:
| Payload Field Name | Supported Contentful Field Types | Description |
|---|---|---|
| space_id | space.sys.id metadata field | Contentful space ID. |
| environment_id | environment.sys.id metadata field | Contentful environment ID. |
| id | sys.id metadata field | Entry ID. |
| type | contentType.sys.id metadata field | Content Type ID of the entry. |
| created | createdAt metadata field | Date the entry was created. |
| updated | updatedAt metadata field | Date the entry was last updated. |
| version | revision metadata field | Number of the current entry version. |
| title | Short Text | Title of the entry. |
| description | Short Text Long Text (Plain) | A short summary of the content usually no more than a couple sentences. |
| body | Short Text Long Text (Plain, Markdown) Rich Text | Main body of content. |
| published | Date & TimepublishedAt metadata field | Date the entry was last published. |
| author | Short Text | Name of the author of the entry. |
| image | Media (One file, Image) | Primary image to represent the content. |
| topics | Short Text (List) | Custom topics to assign this entry in the Lytics topic taxonomy. |
Sample Payload
Use the following sample payload as a reference when constructing your own. Be sure to rename your Contentful fields and locales as necessary and omit any fields that don't apply to your content types.
{
    "space_id": "{ /payload/sys/space/sys/id }",
    "environment_id": "{ /payload/sys/environment/sys/id }",
    "id": "{ /payload/sys/id }",
    "type": "{ /payload/sys/contentType/sys/id }",
    "created": "{ /payload/sys/createdAt }",
    "updated": "{ /payload/sys/updatedAt }",
    "version": "{ /payload/sys/revision }",
    "title": "{ /payload/fields/title/en-US }",
    "description": "{ /payload/fields/description/en-US }",
    "body": "{ /payload/fields/body/en-US }",
    "published": "{ /payload/fields/publishDate/en-US }",
    "author": "{ /payload/fields/author/en-US }",
    "image": "{ /payload/fields/image/en-US }",
    "topics": "{ /payload/fields/lyticsTopicTags/en-US }"
}For content fields that have locales you want to send to Lytics, you should include the locale in the field mapping (the above example uses the
en-USlocale). The current integration cannot accept multiple locales per field unless you map them separately.
Be sure to test your webhook. If you've mapped anything incorrectly, individual fields may not appear in Lytics as expected.
Testing and Validation
After you've configured the webhook you should test it to ensure data is being received in Lytics properly. There are some steps you can take in both tools to troubleshoot the webhook.
Contentful
First you will need to trigger the webhook by taking an action in Contentful.
- Navigate to an entry in Contentful which is qualified to trigger the webhook.
- Perform an action on this entry which will trigger the webhook (such as making a change to the content and publishing the entry).
- Navigate to Settings > Webhooks and click View details next to your Lytics webhook.
- In the Activity Log tab you should see a log of webhook requests. If the webhook was received successfully HTTP 200 should be present in the Call result column.
- Click View details to view the full request and response payload. Ensure that all the expected fields are included and formatted properly.

Lytics
If your webhook request looks as expected, you can validate the content has synced and is mapped correctly in Lytics:
-
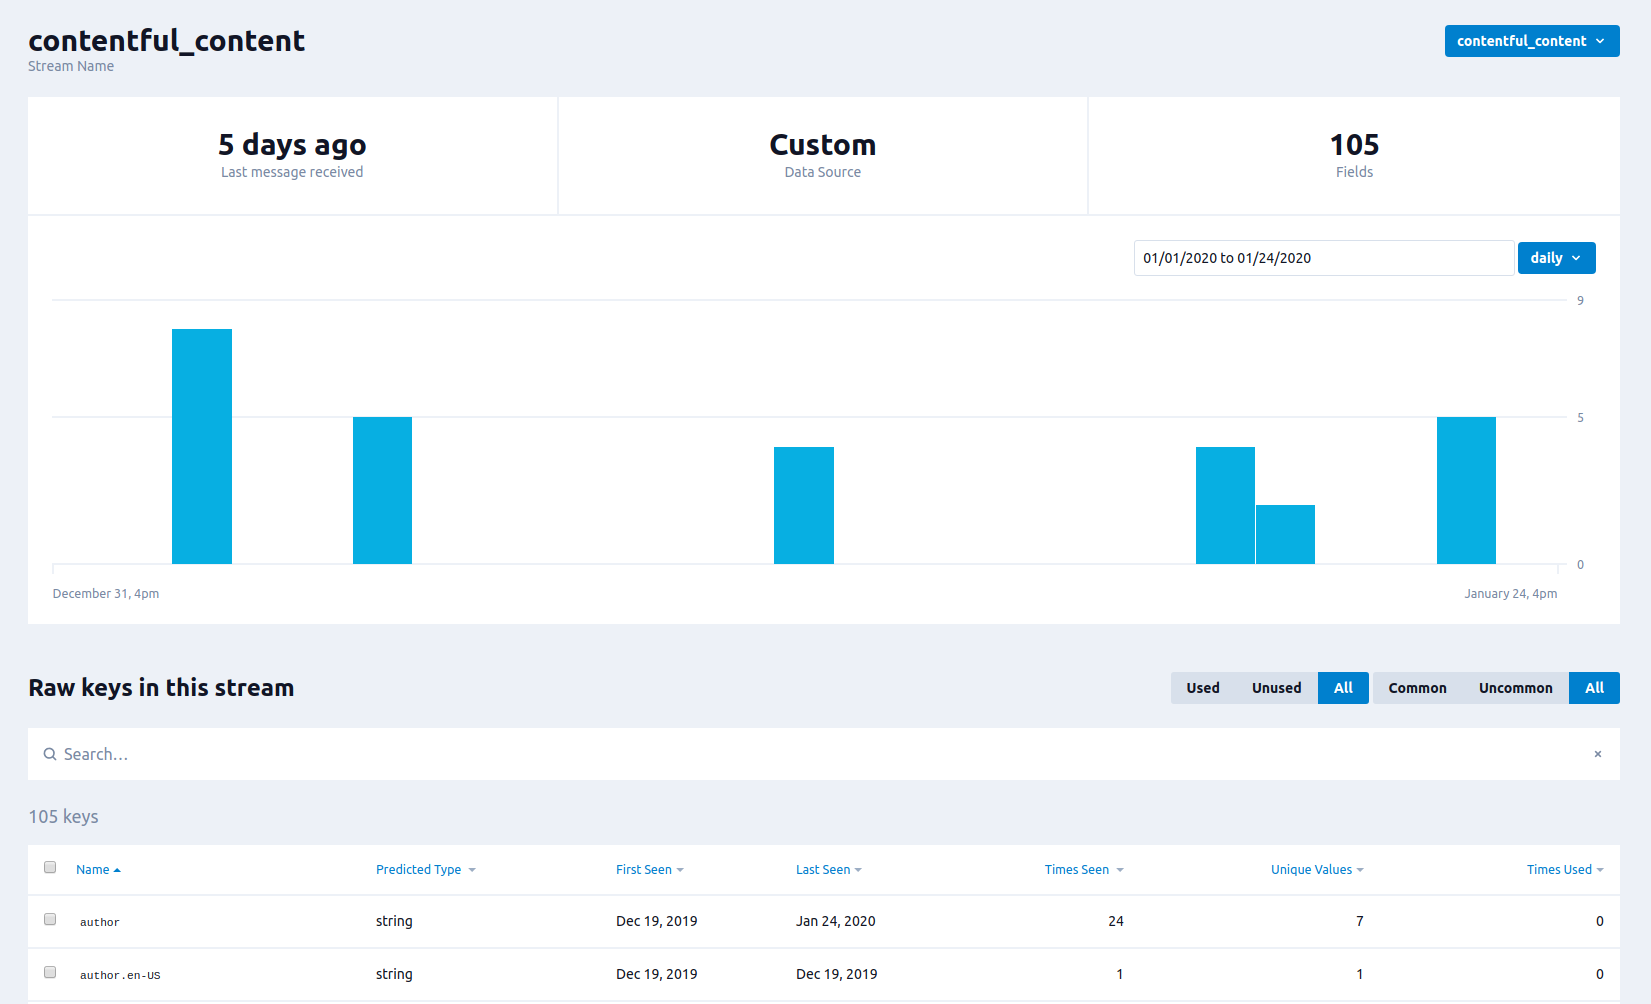
To ensure data has been received by Lytics, navigate to Data > Data Streams and select the
contentful_contentstream from the drop down. If this stream is not present, Lytics has not received content from Contentful yet.
-
If raw data is present, you can check that it is being processed by building a Content Collections of all your Contentful entries. Navigate to Content > Collections.
-
Select New Collection.
-
You will use the
soucrefield to build this collection - which contains the ID of the content from Contentful, since it is a non-standard field. You can select the Advanced Editor from the ... menu in the Collection editor.

-
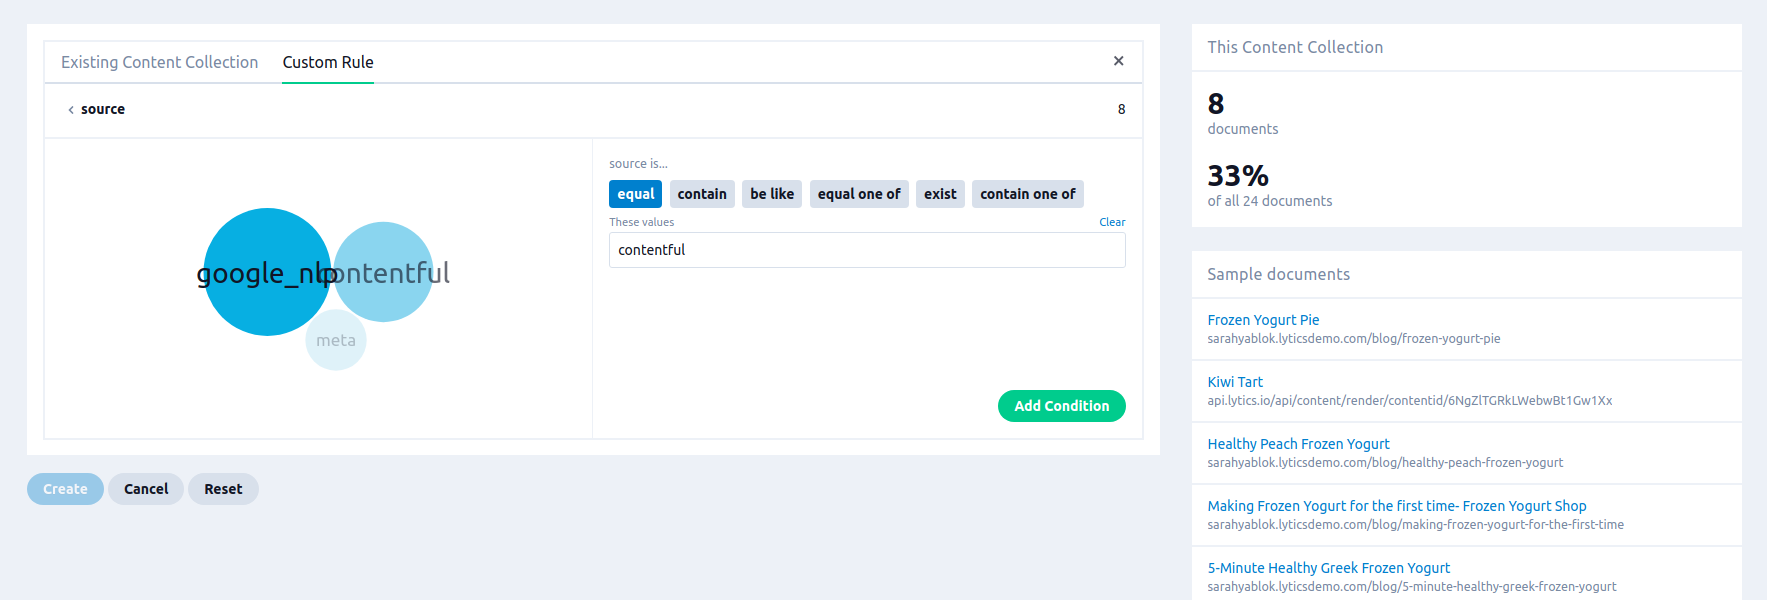
Under Custom Rule find and select the source field.
-
Select the equals rule and then type
contentfulinto the text box to include all documents received from contentful in the collection. Then click Add Condition.
-
Under Sample Documents on the right side of the editor, you should see a list of Contentful documents that have been imported via the webhook. You can click on one to see the detailed view of the document.
If no sample documents appear this may be because your data is processing. It may take longer to process the first time you receive content from Contentful. If the document does not appear, but you are able to see data in the data stream, contact Lytics support to ensure the content queries for your account are up to date.
-
Validate that all the fields you expect to see are present and formatted correctly in the document summary.
Documents with a rich text body field will have an additional field, "HTML Body from Contentful Rich Text" which contains the rich text body parsed ad HTML, while the "body" field itself includes plain text.
-
Back in the advanced collection editor, you may opt to name and save your collection, or use any of the imported fields to further refine your collection for use in Content Recommendations


If you run into issues during any of these steps, feel free to reach out to the Lytics support team for assistance.
Updated 20 days ago