

SendGrid
Overview
SendGrid is a cloud-based transactional email service and email marketing platform.
Integrating Lytics with SendGrid allows you to import email and other user activity data (such as opens and clicks) or export Lytics' cross-channel, behavior-driven audiences to build and send personalized marketing campaigns from SendGrid.
The Lytics Goals supports SendGrid email Experiences. You can manage the cross-channel customer lifecycle with the Lytics Goals and use SendGrid marketing campaigns as your email touchpoints.
Authorization
If you haven't already done so, you will need to setup a SendGrid account before you begin the process described below.
To authorize a SendGrid workflow, you must provide a SendGrid API key so Lytics can communicate with SendGrid's APIs to send and receive data from your account. For instructions on how to create an API key, refer to SendGrid's API key documentation.
- Select SendGrid from the list of providers.
- Select the SendGrid method for authorization.
- Enter a Label to identify your authorization.
- (Optional) Enter a Description for further context on your authorization.
- Enter the SendGrid API Key that you generated.
- Click Save Authorization.
Import Audiences
Importing user and activity data from SendGrid results in new users and/or existing user profiles supplemented with SendGrid campaign activity data. You can use this data to build and refine your existing Lytics audiences to power better, cross-channel campaigns.
Integration Details
- Implementation Type: Server-side Integration
- Implementation Technique: User import REST API Integration , Activity Webhook Integrations
- Frequency: User data is done by a Batch Integration imported daily. Activity data, if configured, is received by a Real-time Integration
- Resulting data: Full User Profiles for all SendGrid contacts or users in the selected lists. If configured, activity data related to marketing campaigns and transactional emails at the event level will be collected as additional User Fields
This integration utilizes the SendGrid APIs to receive user data. On each run of the job, it will:
- Export all contacts in your SendGrid account, or if you've configured import lists or segments, it will filter to only contacts in the selected lists and segments.
- For each contact imported it will:
- Get that contact's list membership.
- Ingest the collected user data into the
sendgrid_usersstream.
If the Import email events option is selected during the configuration process, on the first run of the job it will also:
- Check if webhooks are set up in the SendGrid account.
- Automatically apply the proper settings to your SendGrid account to enable activity data to be sent to Lytics.
- After this, user activity is received in Lytics via webhook, reformatted on ingestion, and available in the
sendgrid_activitystream.
Fields
The following fields are included in the default mapping of the sendgrid_users stream:
| Source Field | Lytics User Field | Description | Type |
|---|---|---|---|
email unique id | string | ||
| id | sendgrid_id unique id | SendGrid User ID | string |
| emaildomain | Email Domain | string | |
| first_name | first_name | First Name | string |
| last_name | last_name | Last Name | string |
| last_clicked | sg_last_clicked | Last Clicked (SendGrid) | date |
| last_emailed | sg_last_emailed | Last Emailed (SendGrid) | date |
| last_opened | sg_last_opened | Last Opened (SendGrid) | date |
| list_ids | sg_list_ids | SendGrid List IDs | []string |
| list_names | sg_list_names | SendGrid Lists | []string |
| segment_ids | sg_seg_ids | SendGrid Segment IDs | []string |
Lytics will import all custom fields from SendGrid, however this stream does not automatically map these fields. If you would like to map the imported custom fields to Lytics user fields, contact customer support for assistance.
The following fields are included in the default mapping of the sendgrid_activity stream:
| Source Field | Lytics User Field | Description | Type |
|---|---|---|---|
email unique id | string | ||
| n/a | channels | the channel this event was received from, set to email | []string |
| event | email_bounce_ct | Email Bounced | int |
| category | email_category | Email Categories | map[string]intsum |
| event | email_click_ct | Email Clicked | int |
| event | email_complaint_ct | Email Complaint | int |
| timestamp | email_first_bounce_ts | First Email Bounced | date |
| timestamp | email_first_complaint_ts | First Email Complaint | date |
| timestamp | email_first_sent_ts | First Email Sent | date |
| timestamp | email_firstclick_ts | First Email Clicked | date |
| timestamp | email_firstopen_ts | First Email Opened | date |
| timestamp | email_last_bounce_ts | Last Email Bounced | date |
| timestamp | email_last_complaint_ts | Last Email Complaint | date |
| timestamp | email_last_sent_ts | Last Email Sent | date |
| timestamp | email_lastclick_ts | Last Email Clicked | date |
| timestamp | email_lastopen_ts | Last Email Opened | date |
| event | email_open_ct | Email Opened | int |
| event | email_sent_ct | Email Sent | int |
| url | email_urls | Email Urls Clicked on | []string |
| emaildomain | Email Domain | string | |
| url | hashedurls | Hashed Urls Visited | map[string]intsum |
| timestamp | last_active_ts | Last Active | date |
| last_channel_activities | Last Activity By Channel | map[string]time | |
| bounce_type | sg_bounce_type | SendGrid Bounce Type | []string |
| marketing_campaign_name | sg_campaigns | SendGrid Campaigns | []string |
| experience_id | sg_conversions | Converted on SendGrid Experience | map[string]int |
| event | sg_email_action | SendGrid Email Actions | map[string]intsum |
| event | sg_email_opens | SendGrid Email Opens | int |
| reason | sg_error_reason | string | |
| experience_id | sg_impressions | Reached with SendGrid Experience | map[string]int |
Configuration
Follow these steps to set up and configure an import of SendGrid in the Lytics platform.If you are new to creating jobs in Lytics, see the Data Sources documentation for more information.
- Select SendGrid from the list of providers.
- Select the Import Audiences job type from the list.
- Select the Authorization you would like to use or create a new one.
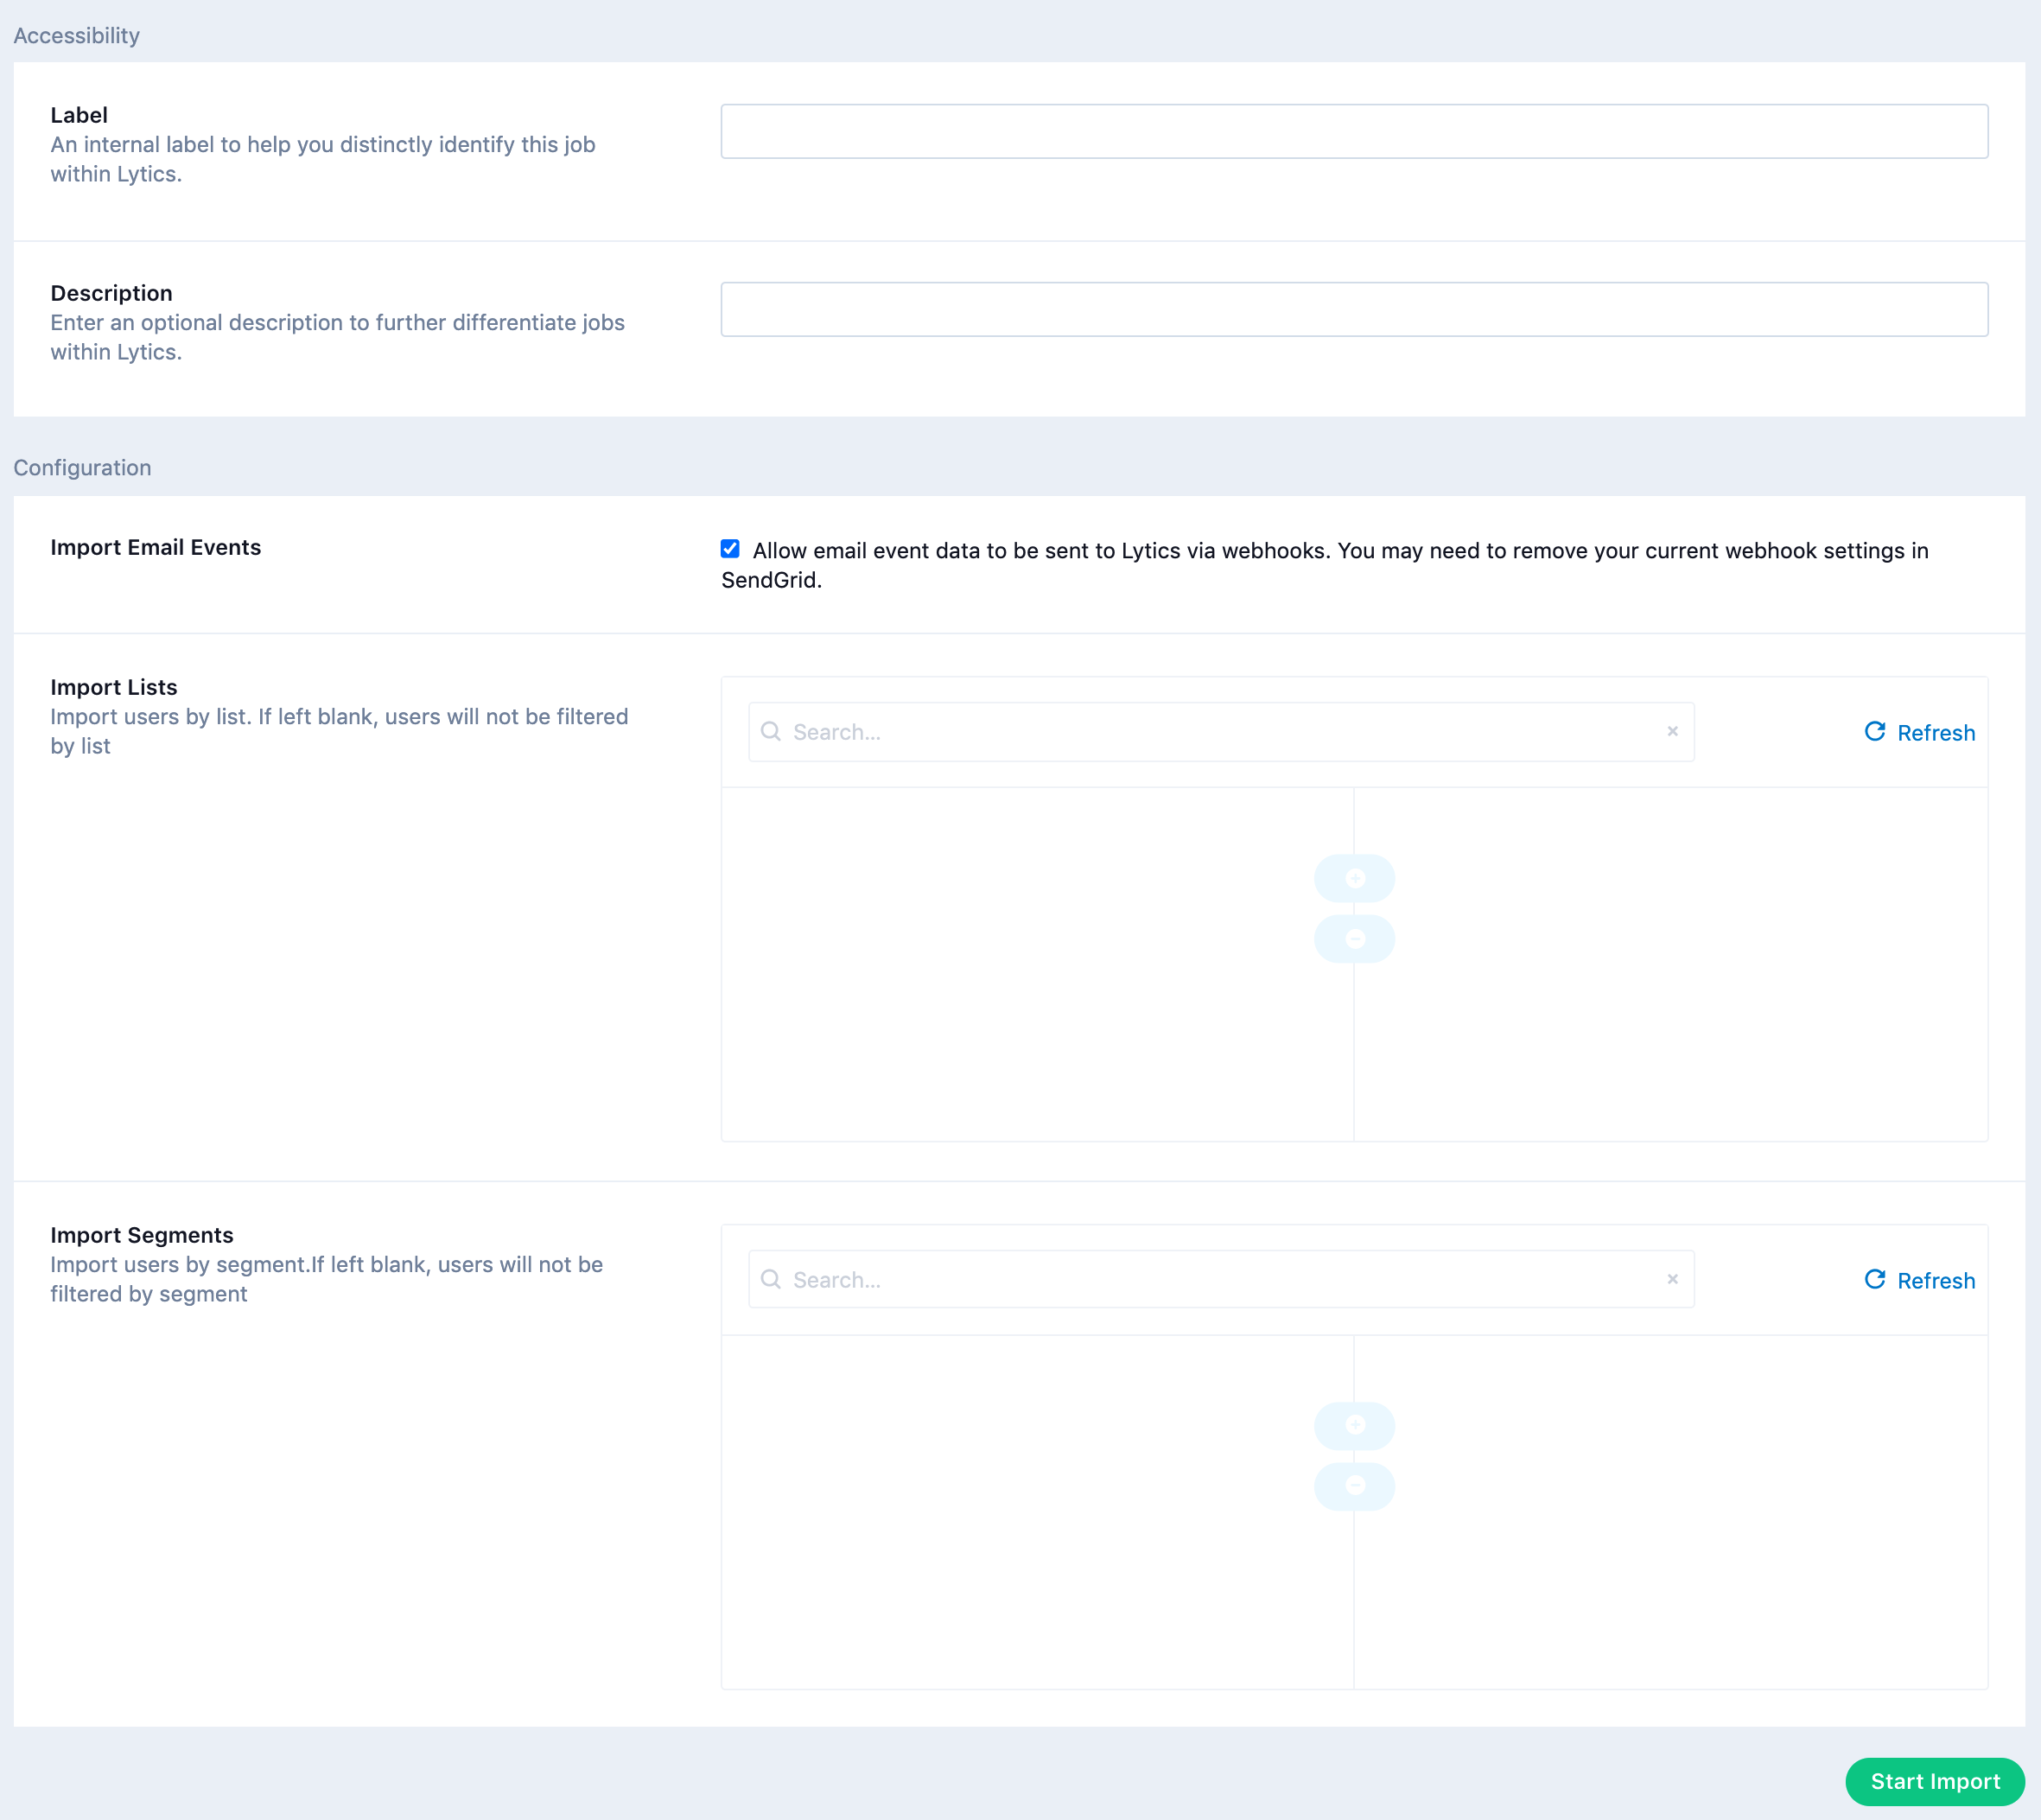
- Enter a Label to identify this job you are creating in Lytics.
- (Optional) Enter a Description for further context on your job.
- Select the Import Email Events checkbox, to allow email event data to be sent to Lytics via webhooks. This will only turn on webhooks if they are not already configured to another destination within your SendGrid account. You can also manually set up SendGrid webhooks to go to Lytics by following these instructions.
- From the Import Lists input, select the list(s) to import users from. If left blank, users will not be filtered by list.
- From the Import Segments input, select the segment(s) to import users from. If left blank, users will not be filtered by segment.
- Click Start Import.

Export Audiences
Exporting a Lytics audience to SendGrid allows you to send a Single Send email to your users based on your own, relevant targeting criteria, such as: cross-channel behavior, content affinities, and more.
Integration Details
- Implementation Type: Server-side Integration
- Implementation Technique: REST API Integration and Audience Trigger Integration
- Frequency: Real-time Integration, with a one-time Backfill of the audience after setup.
- Resulting data: Lytics users that are a member of the selected audience(s) are exported as SendGrid contacts. A new SendGrid segment is created for each corresponding Lytics audience on the "All Contacts" list, or the list selected during configuration.
This integration utilizes the SendGrid APIs to send user data. Once the export is started the job will:
- Create a new custom field in SendGrid called
lytics_segmentsto record Lytics audience membership. - Create new SendGrid segment(s) on the list selected or on the "All Contacts" list if no list was selected in configuration.
The SendGrid segment(s) created by the job will ultimately contain the users from the exported Lytics audience(s). For example, if a Lytics audience named "High Value Users" with the id 5cecf2aa79b0a5641920e0607b95c793 is exported to SendGrid, you will see a new segment in SendGrid named "High Value Users". The definition of this segment will be lytics_segments contains 5cecf2aa79b0a5641920e0607b95c793.

After a backfill, the job will receive real-time updates when a user enters or exits the audience. For each user to export, regardless if the user is being added as part of the backfill, or they're entering/exiting the audience in realtime, it will:
- Create the users as contacts in SendGrid.
- If a list was selected in configuration the users will be added to the list as part of the update.
The lytics_segments field is automatically populated with the a comma separated list of Lytics audience IDs the user is currently a member of. That is, once a user leaves the audience in Lytics, this field will be updated in SendGrid, and they will be removed from the SendGrid segment. Users will not automatically be removed from your SendGrid account, or the list your segment is on.
Fields
By default, Lytics exports the following fields to SendGrid. You can export any Lytics user field to a custom SendGrid field, so long as the field type is a string, int or date. You can customize the Lytics source fields as part of the job configuration.
| Lytics User Field | Description | SendGrid Field | Type |
|---|---|---|---|
| last_name | Last Name | last_name | string |
| first_name | First Name | first_name | string |
| string | |||
| lytics_segments | string |
Note: additional lytics_segments fields (with an integer suffix e.g. lytics_segments_1) may be created if the total number of segments exported exceeds the max field size.
Configuration
Follow these steps to set up and configure an export of users to SendGrid in the Lytics platform.If you are new to creating jobs in Lytics, see the Destinations documentation for more information.
- Select SendGrid from the list of providers.
- Select the Export Audiences job type from the list.
- Select the Authorization you would like to use or create a new one.
- Enter a Label to identify this job you are creating in Lytics.
- (Optional) Enter a Description for further context on your job.
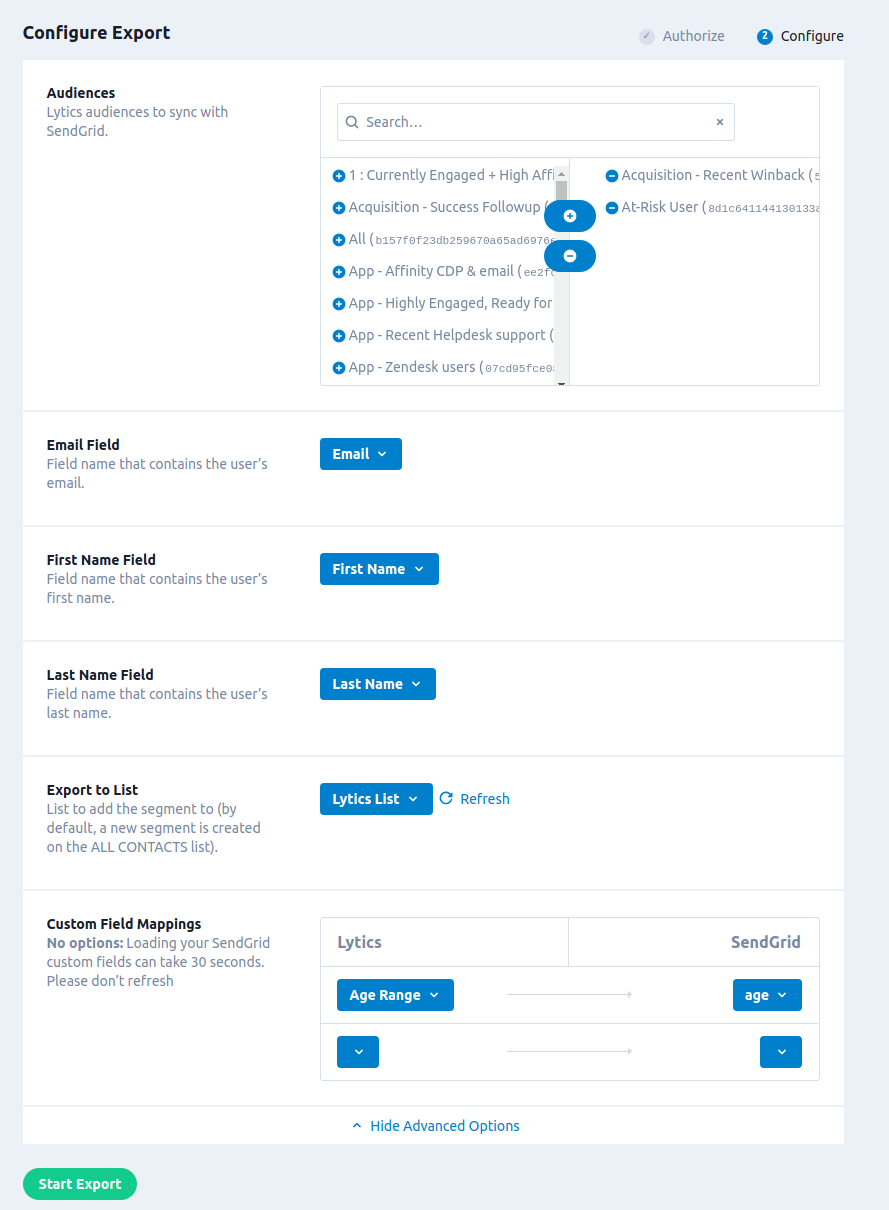
- Using the Audiences input, you may select Lytics audiences to export to SendGrid. Audiences in the right column will be exported.
- To use a non-default user field for email, select a field from the Email Field dropdown.
- (Optional) Toggle Show Advanced Options to reveal the following options.
- (Optional) Select a field from the First Name Field dropdown to use a non-default user field for first name.
- (Optional) Select a field from the Last Name Field dropdown to use a non-default user field for last name.
- (Optional) Select a list from the Export to List dropdown if you would like to export your users to segment(s) on a list within SendGrid.
- (Optional) Using the Custom Field Mappings you can map additional Lytics User fields to custom fields in SendGrid
- Click Start Export.
Export Audiences (Triggered Emails)
You can use Lytics to trigger a SendGrid transactional email to your customers when they enter a Lytics audience. For example, send a welcome email when a customer moves from unknown to known, or a retention email when a customer becomes disengaged.
Integration Details
- Implementation Type: Server-side Integration
- Implementation Technique: REST API Integration with Audience Trigger Integration
- Frequency: Real-time Integration
- Resulting data: An email sent to users entering the Lytics audience selected with the SendGrid templated selected. The payload of this send request may be populated with Lytics profile data and content recommendations for the user depending on configuration.
The job uses SendGrid's v3 Mail Send API to deliver emails with the template you select during configuration. Thus before you can set up this job, you must first have created the dynamic transactional template you will use in your SendGrid account. Each time a user enters the audience selected during configuration, the job will:
- Populate a payload with Lytics user profile fields and content recommendations as described in the fields section below.
- Use the Mail Send API to trigger the email.
The job will then wait for more users to enter the audience, and repeat this process as necessary.
Note: SendGrid's v3 API does not support "Legacy" Transactional Templates, thus they are not supported by this integration. If you have any legacy templates in your SendGrid account, they will not be available to choose from when selecting the template for this job. Please ensure that you first migrate any existing legacy template you may want to use. See SendGrid's legacy template migration documentation here.
Fields
As mentioned above, the payload to the SendGrid Mail Send endpoint is populated with the following keys under personalizations.dynamic_template_data:
- User Fields: Populated as key/value pairs where the key is the name of the user field.
- Content Recommendations: Stored under the
recommendationskey. See the example below for formatting.
Example email payload:
{
    "template_id": "abc",
    "from": {
        "email": "[email protected]"
    },
    "reply_to": {
        "email": "[email protected]"
    },
    "personalizations": [{
        "to": [{
            "email": "[email protected]",
            "name": "Full Name"
        }],
        "dynamic_template_data":{
            "name":"Sample Name",
            "address01":"1234 Fake St.",
            "address02":"Apt. 123",
            "city":"Place",
            "recommendations": [
                {
                    "url":"www.getlytics.com/blog/post/intent_through_content",
                    "title":"Understanding User Intent Through Content",
                    "description":"Customer Intent comes from understanding the connection between engagement and its contexts. Content modeling and affinity graphs makes interpretation of intent a lot easier. Learn how marketers can benefit from this.",
                    "topics":[
                        "customer data platform",
                        "data science",
                        "content marketing",
                        "personalization"
                    ],
                    "topic_relevances":{
                        "content marketing":1,
                        "customer data platform":1,
                        "data science":1,
                        "personalization":1
                    },
                    "primary_image":"https://www.getlytics.com/img/blog/posts/intent_through_content/intent_through_content-bg.gif",
                    "author":"",
                    "created":"2016-06-08T16:11:45.599594093Z",
                    "id":"-3435113786560588929",
                    "sitename":"Lytics",
                    "stream":"default",
                    "path":[
                        "blog",
                        "blog/post",
                        "blog/post/intent_through_content"
                    ],
                    "aspects":[
                        "article"
                    ],
                    "language":"unknown",
                    "updated":"2016-06-09T12:49:36.870359765Z",
                    "fetched":"2016-06-09T12:49:35.812654441Z",
                    "meta":[
                        "og:locale/en_us",
                        "og:site_name/lytics",
                        "og:title/understanding user intent through content",
                        "og:type/article",
                        "og:url/https://www.getlytics.com/blog/post/intent_through_content"
                    ],
                    "confidence":0.5916079783099615,
                    "visited":true
                }
            ]
        }
    }]
}
Configuration
Follow these steps to set up and configure the SendGrid triggered email export in the Lytics platform. If you are new to creating jobs in Lytics, see the Destinations documentation for more information.
- Select SendGrid from the list of providers.
- Select the Export Audiences (Triggered Emails) job type from the list.
- Select the Authorization you would like to use or create a new one.
- Enter a Label to identify this job you are creating in Lytics.
- (Optional) Enter a Description for further context on your job.
- In the Audience drop-down list, select a Lytics audience. These are the users who will receive the email.
- In the From Email Address field, enter the email address that you would like the email to appear to be sent from.
- In the Template drop-down list, select the template you would like to use. (This list is populated with the dynamic transactional templates that exist in your SendGrid account. If you don't see the template you wanted to use, double-check the Dynamic Transactional Templates section of your SendGrid account)
- (Optional) Under Show Advanced Options, you have additional configuration options you may wish to set/change:
- (Optional) From the Email Field drop-down list, select the Lytics user field in your account that contains the user's email address. By default, this will simply "Email Address", but if there is another field you'd like to use, you can change it here.
- (Optional) In Name Field drop-down list, you can optionally select the Lytics user field that contains the email recipient's name (eg, "Full Name").
- (Optional) In Fields to Include, you can select additional Lytics user fields that you would like to send to SendGrid in order to personalize the email. (See the personalize the email section below.)
- (Optional) Select Existing Users to send emails to users who already exist in the selected audience.
- Click Start Export.

Personalizing the Email
In this integration, you can send Lytics user fields to SendGrid for use in personalizing the email. It's important to design and test your template carefully before setting up this job to ensure your emails will look the way you want them to.
SendGrid dynamic templates support Handlebars syntax for substitution (see SendGrid's docs about using Handlebars here), so you just need to make sure that your template has the right variable name for the Lytics user field that are being sent.
Let's say you want to personalize our email to show a known user's first name in the greeting line. There is a user field, called "First Name" (the slug for which is first_name). You can see the slug for the field in parentheses in the "Fields To Include" section when you are configuring the job.
In SendGrid, the template HTML should look something like this (such that the variable name matches the Lytics user field slug exactly):
<h1>Welcome, {{first_name}}!<h1>Import Audiences (Legacy)
Importing user and activity data from SendGrid results in new users and/or existing user profiles supplemented with SendGrid campaign activity data. You can use this data to build and refine your existing Lytics audiences to power better, cross-channel campaigns.
Only use this job if you are still using SendGrid's legacy marketing campaigns API
For more information, see how to migrate from legacy marketing campaigns. If you are using the current Marketing API in SendGrid, please use the standard Import Users job.
Integration Details
- Implementation Type: Server-side Integration
- Implementation Technique: REST API Integration, Webhook Integration
- Frequency: User data is Batch Integration imported daily, on a continuous basis. Activity data, if configured, is received in Real-time Integration
- Resulting Data: Full User Profiles for all SendGrid contacts or users in the selected lists. If configured, activity data related to marketing campaigns and transactional emails at the event level will be collected as additional User Fields.
This integration utilizes the SendGrid APIs to receive user data. On each run of the job, it will:
- Query for all contacts in your SendGrid account, or if you've configured Import Lists, it will query for recipients of those lists.
- For each contact that has been updated since the last run of the workflow (or for all users on the first run of the job) it will:
- Query for list membership of that user.
- Ingest the collected user data into the
sendgrid_usersstream.
If the Import email events option is selected during the configuration process, on the first run of the job it will also:
- Check if webhooks are set up in the SendGrid account.
- Automatically apply the proper settings to your SendGrid account to enable activity data to be sent to Lytics.
- After this, user activity is received in Lytics via webhook, reformatted on ingestion, and available in the
sendgrid_activitystream.
Note: If you've already configured webhooks to send to another destination in your account, this job will not overwrite your existing settings. You can manually set up SendGrid webhooks to go to Lytics by following these instructions.
Fields
The following fields are included in the default mapping of the sendgrid_users stream:
| Source Field | Lytics User Field | Description | Type |
|---|---|---|---|
email unique id | string | ||
| emaildomain | Email Domain | string | |
| first_name | first_name | First Name | string |
| id | sendgrid_id unique id | SendGrid User ID | string |
| last_clicked | sg_last_clicked | Last Clicked | date |
| last_emailed | sg_last_emailed | Last Emailed | date |
| last_name | last_name | Last Name | string |
| last_opened | sg_last_opened | Last Opened | date |
| list_ids | sg_list_ids | SendGrid List IDs | []string |
| list_names | sg_list_names | SendGrid Lists | []string |
Lytics will import any and all custom fields from SendGrid, however this stream does not automatically map these fields. If you would like to map the imported custom fields to Lytics user fields, contact customer support for assistance.
The following fields are included in the default mapping of the sendgrid_activity stream:
| Source Field | Lytics User Field | Description | Type |
|---|---|---|---|
| event | email_open_ct email_sent_ct email_click_ct email_complaint_ct email_bounce_ct sg_email_opens sg_email_action | Email Opened Email Send Email Clicked Email Complaint Email Bounced SendGrid Email Opens SendGrid Email Actions | int int int int int int map[string]int |
| timestamp | last_active_ts email_lastopen_ts email_firstopen_ts email_last_sent_ts email_first_sent_ts email_lastclick_ts email_firstclick_ts email_last_complaint_ts email_first_complaint_ts email_last_bounce_ts email_first_bounce_ts | Last Active Last Email Opened First Email Opened Last Email Sent First Email Clicked First Email Sent Last Email Clicked Last Email Complaint First Email Complaint Last Email Bounced First Email Bounced | date date date date date date date date date date date |
| bounce_type | sg_bounce_type | SendGrid Bounce Type | []string |
| reason | sg_error_reason | string | |
| category | email_category | Email Categories | map[string]int |
| url | email_urls hashedurls | Email Urls Clicked on Hashed Urls Visited | []string map[string]int |
| marketing_campaign_name | sg_campaigns | SendGrid Campaigns | set |
| "email" | channels last_channel_activities | Channels Last Activity By Channel | []string map[string]date |
email unique idemaildomain | Email Email Domain | string string | |
| experience_id | sg_impressions sg_conversions | Reached with SendGrid Experience Converted on SendGrid Experience | map[string]int map[string]int |
Configuration
Follow these steps to set up and configure a legacy import of SendGrid users in the Lytics platform.If you are new to creating jobs in Lytics, see the Data Sources documentation for more information.
-
Select SendGrid from the list of providers.
-
Select the Import Audiences(Legacy) job type from the list.
-
Select the Authorization you would like to use or create a new one.
-
Enter a Label to identify this job you are creating in Lytics.
-
(Optional) Enter a Description for further context on your job.
-
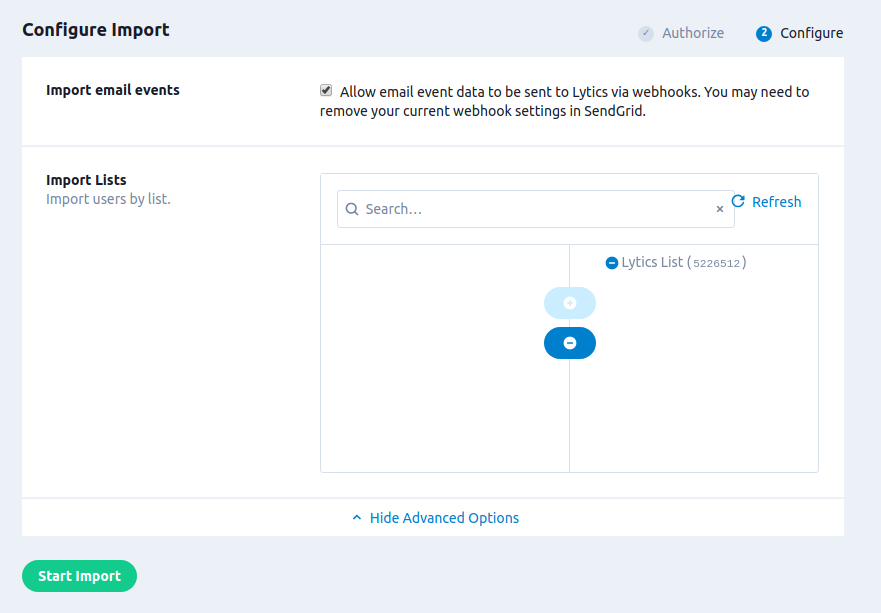
(Optional) Select the Import email events checkbox if you want to import activity data via webhooks. As noted above, this will only turn on webhooks if they are not already configured to another destination within your SendGrid account. You can also manually set up SendGrid webhooks to go to Lytics by following these instructions.
-
(Optional) Under Advanced Options you may select a limited number of lists to import using the Import Lists selection. If not selected, the import will default to collect data on all contacts.
-
Click Start Import.

Export Audiences (Legacy)
Exporting a Lytics audience to SendGrid allows you to send a Marketing Campaign email to your users based on your own, relevant targeting criteria, such as: cross-channel behavior, content affinities, and more.
Only use this job if you are still using SendGrid's legacy marketing campaigns API
For more information, see how to migrate from legacy marketing campaigns. If you are using the current Marketing API in SendGrid, please use the standard Export Users job.
Integration Details
- Implementation Type: Server-side Integration
- Implementation Technique: REST API Integration and Audience Trigger Integration
- Frequency: Real-time Integration, with a one-time Backfill of the audience after setup.
- Resulting Data: Lytics users that are a member of the selected audience(s) are exported as SendGrid contacts. A new SendGrid segment is created for each corresponding Lytics audience on the "ALL CONTACTS" list, or the list selected during configuration.
This integration utilizes the SendGrid APIs to send user data. Once the user initiates an export the job will:
- Create a new custom field in SendGrid called
lytics_segmentsto record Lytics audience membership. - Create new SendGrid segment(s) on the list selected or on the "ALL CONTACTS" list if no list was selected in configuration.
The SendGrid segment(s) created by the job will ultimately contain the users from the exported Lytics audience(s). For example, if a Lytics audience named "High Value Users" with the id 87fa039a5d6649a68026a94c0c6d3f5e is exported to SendGrid, you will see a new segment in SendGrid named "High Value Users." The definition of this segment will be lytics_segments contains the word 87fa039a5d6649a68026a94c0c6d3f5e.

After a backfill, the job will receive real-time updates when a user enters or exits the audience. For each user to export, regardless if the user is being added as part of the backfill, or they're entering/exiting the audience in real-time, it will:
- Create the users as contacts in SendGrid.
- If a list was selected in configuration it will then add the recipients to the list.
The lytics_segments field is automatically populated with a comma separated list of Lytics audience IDs the user is currently a member of. That is, once a user leaves the audience in Lytics, this field will be updated in SendGrid, and they will be removed from the SendGrid segment. Users will not automatically be removed from your SendGrid account, or the list your segment is on.
Fields
By default, Lytics exports the following fields to SendGrid. Note that you can customize the Lytics source fields as part of the job configuration:
| Lytics User Field | Description | SendGrid Field | Type |
|---|---|---|---|
| last_name | Last Name | last_name | string |
| first_name | First Name | first_name | string |
| string | |||
| lytics_segments | string |
You can also export any Lytics user field to a custom SendGrid field, so long as the field type is a string, int or date.
Configuration
Follow these steps to set up and configure a legacy export of SendGrid users in the Lytics platform.If you are new to creating jobs in Lytics, see the Destinations documentation for more information.
- Select SendGrid from the list of providers.
- Select the Export Audiences (Legacy) job type from the list.
- Select the Authorization you would like to use or create a new one.
- Enter a Label to identify this job you are creating in Lytics.
- (Optional) Enter a Description for further context on your job.
- Using the Audiences input, you may select Lytics audiences to export to SendGrid. Audiences in the right column will be exported.
- To use a non-default user field for email, select a field from the Email Field dropdown.
- (Optional) Toggle Show Advanced Options to reveal the following options.
- (Optional) Select a field from the First Name Field dropdown to use a non-default user field for first name.
- (Optional) Select a field from the Last Name Field dropdown to use a non-default user field for last name.
- (Optional) Select a list from the Export to List dropdown if you would like to export your users to segment(s) on a list within SendGrid.
- (Optional) Using the Custom Field Mappings you can map additional Lytics User fields to custom fields in SendGrid.
- Click Start Export.

Experiences
Lytics Experiences## Experience Import
Like all Experience enabled providers, you can import Experiences from SendGrid to Lytics. During the import process, you will be asked to select an authorization. Read the SendGrid authorization documentation for more information.

Tactics
SendGrid Experiences in Lytics support the following tactics:
- Single Send - Sync a Lytics audience for a one-time email blast.
- Legacy Marketing Campaign - Sync a Lytics audience for a one-time email blast to a legacy contact list for use in a legacy campaign.
- Transactional Email - Send a transactional email to audience members whenever they enter a Lytics audience.
The tactic for an Experience is determined by the type of email created in SendGrid, single send, campaign, or transactional template. The import list is generated using all three of the endpoints in SendGrid.
Configuration
After importing a SendGrid Experience you can configure it for activation. All tactics for SendGrid Experiences have the same three configuration steps within the Experience Editor:
- Target - select the target audience for your Experience.
- Configure SendGrid - set up how the audience for your Experience will be exported. This step will match the configuration instructions of the following jobs based on tactic:
- Export Audiences for Single Send tactics.
- Export Audiences (Triggered Emails) for Transactional Email tactics.
- Export Audiences (Legacy) for Legacy Marketing Campaign tactics.
The activation will generally function the same as the corresponding job, but without the Audience selection, as that is configured by the Target step in the Experience editor.
- Configure Delivery - choose to turn the Delivery Optimization feature on or off. Delivery Optimization is only supported by Transactional Email experiences because it is the only real time Experience type; Single Send, and Legacy Marketing Campaign Experiences are scheduled to send at a specific time and therefore cannot benefit from Delivery Optimization.
Once you've finished configuring the Experience you can save and activate it.
Activation
Single Send and Legacy Marketing Campaign activation pushes users to a SendGrid contact List that you select and creates a segment of users to assign to your campaign, and function similarly to the Export Audiences, and the Export Audiences (Legacy) jobs respectively. Transactional Email Experiences trigger real-time emails using the Export Audiences (Triggered Emails) job.
Single Send Tactics
When you activate this Experience, users will be pushed to a SendGrid contact list, and a segment will be created for the Experience in SendGrid.
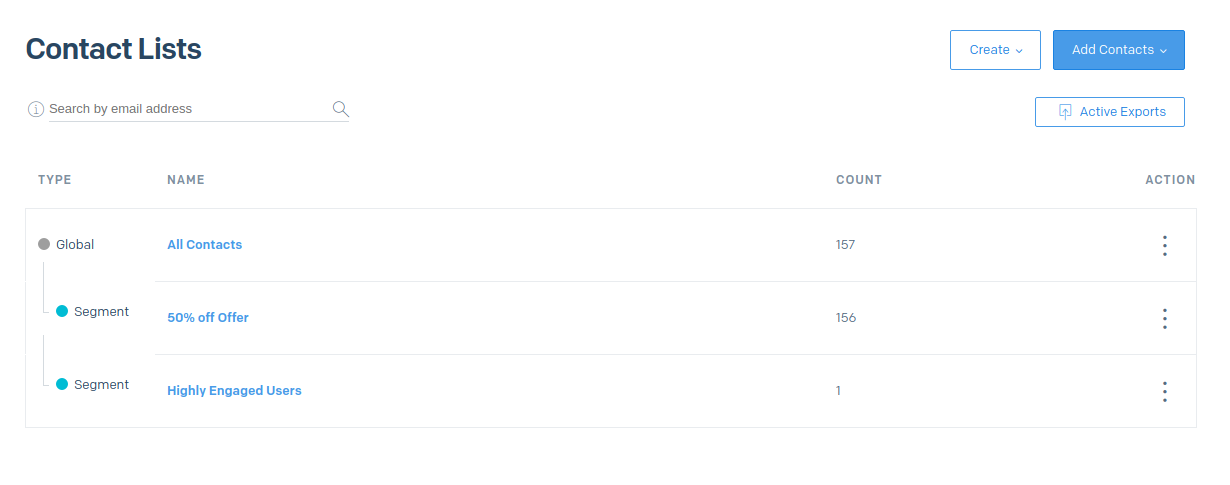
- Ensure that a new segment was created and populated in your SendGrid account. Navigate to Marketing > Contacts. (If you have the legacy marketing campaigns enabled use the Marketing tab that is marked as NEW).
- You should see a new segment under the list you selected during configuration. This segment should have the same name as your Experience in Lytics and will have a single contains rule.
- Next you will assign this segment to your single send campaign. Navigate to Marketing > Single Sends And click on the single send you imported.
- Configure your single send to use the segment by selecting the segment under the Send To in the Recipients of the email editor.
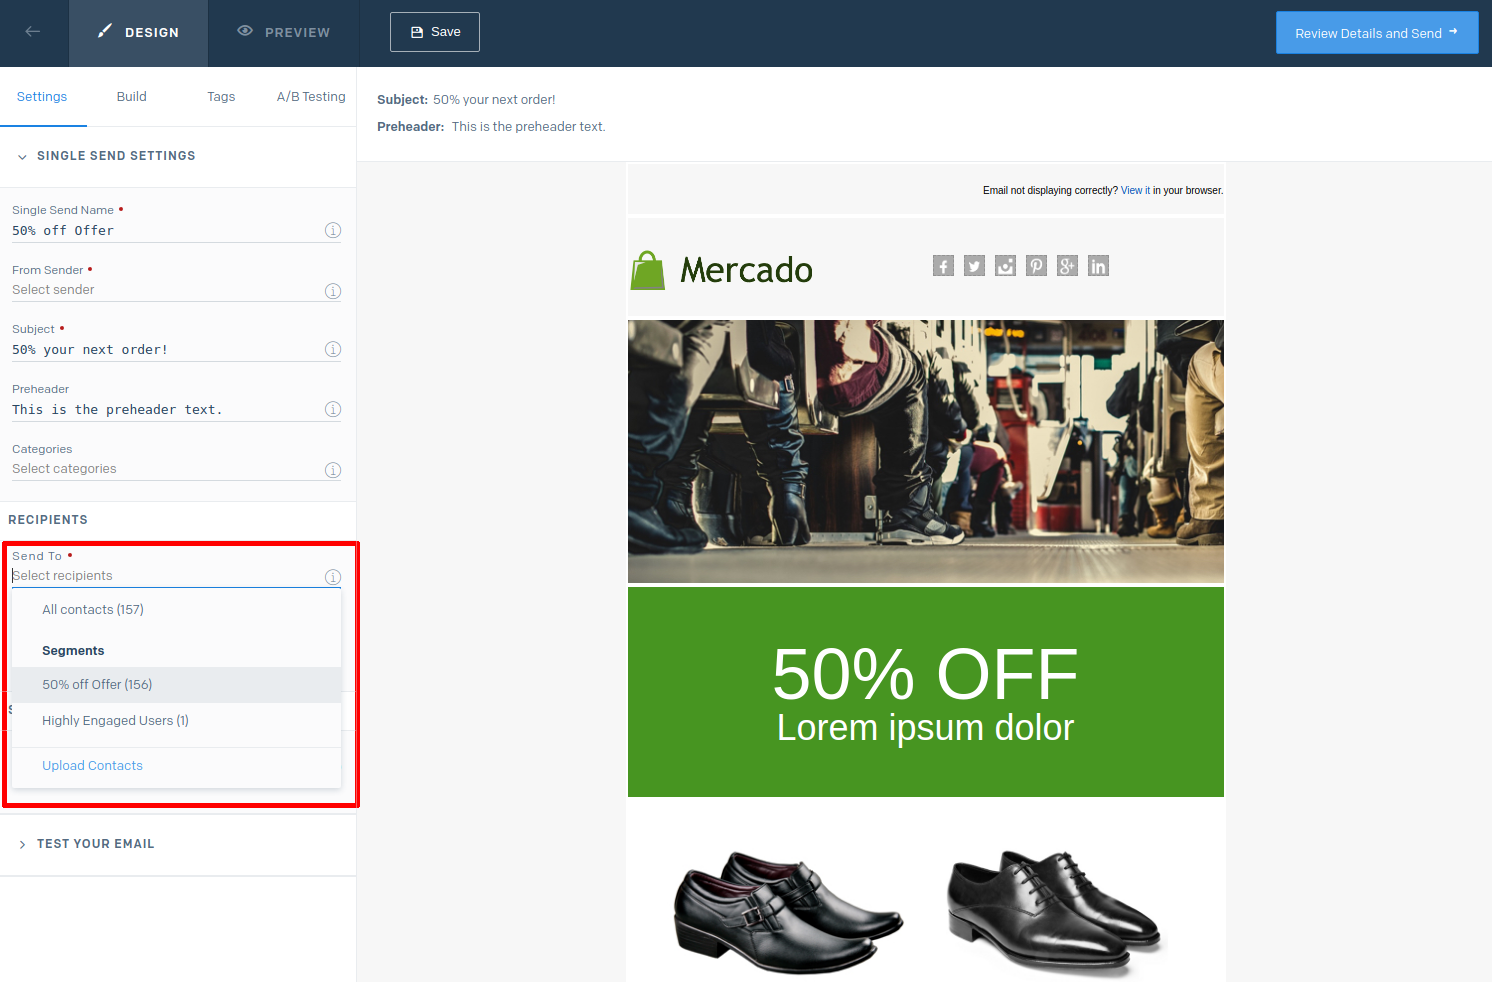
- Once your email is ready to send, click Review Details and Send to proceed with the sending process.


Legacy Marketing Campaign Tactics
When you activate this Experience, users will be pushed to a legacy contact list in SendGrid, and a segment will be created for the Experience.
- Ensure that a new segment was created and populated in your SendGrid account. Navigate to Marketing > Contacts. (If you have new marketing campaigns enabled use the Marketing tab that does not say NEW).
- You should see a new segment under the list you selected during configuration. This segment should have the same name as your Experience in Lytics and will have a single contains rule.
- Next you will assign this segment to your single send campaign. Navigate to Marketing > Campaigns And click on the marketing campaign you imported.
- Configure your marketing campaign to use the segment by selecting the segment under the Send To in the Recipients of the campaign editor.
- Once your email is ready to send, click Review Details and Send to proceed with the sending process.
Transactional Email Tactics
After you activate this Experience, emails will automatically begin sending when users enter the audience in Lytics. No further configuration is necessary assuming your HTML template is ready to go. Confirm that emails are sending, you can check your SendGrid email activity feed once new users have entered the audience in Lytics.
Metrics
SendGrid metrics are collected through webhooks. You must enable webhooks as described in that doc for Lytics to populate the reach and conversion metrics for SendGrid Experiences.
Note: If you are already running the Import Audiences job, webhooks should automatically be configured to send to Lytics.

Metrics from the SendGrid are mapped to Lytics user fields as follows:
-
Reach - Open events in Sendgrid are mapped to Lytics impressions.
-
Converted - Click events in Sendgrid are mapped to Lytics conversions.
These events are also mapped to the Lytics user fields Reached with SendGrid Experience and Converted on SendGrid Experience, which are available in the audience builder so that you can create audiences of users who have been reached by or converted on your SendGrid Experiences.

Configuring Webhooks
Lytics highly recommends setting up SendGrid event notifications to post event data to the Lytics. This will allow Lytics to get real-time activity data such as clicks, opens, etc. on your marketing campaigns and transactional emails. If you are running the SendGrid Import Audiences, the job will configure webhooks for you. However if you want to set them up manually, or you had previously configured webhooks to send to another system, you may need to update your settings.
Lytics requires that webhooks are enabled to use SendGrid Experiences as part of the Lytics Canvas because it allows for the collection of reporting metrics for your SendGrid Experiences.
To set up event notifications to go to Lytics, you will need to have a Lytics API token ready, you can read how to generate a new API token if you do not already have one. Then follow these steps:
- Login to your SendGrid account.
- Navigate to Mail Settings under the Settings menu.
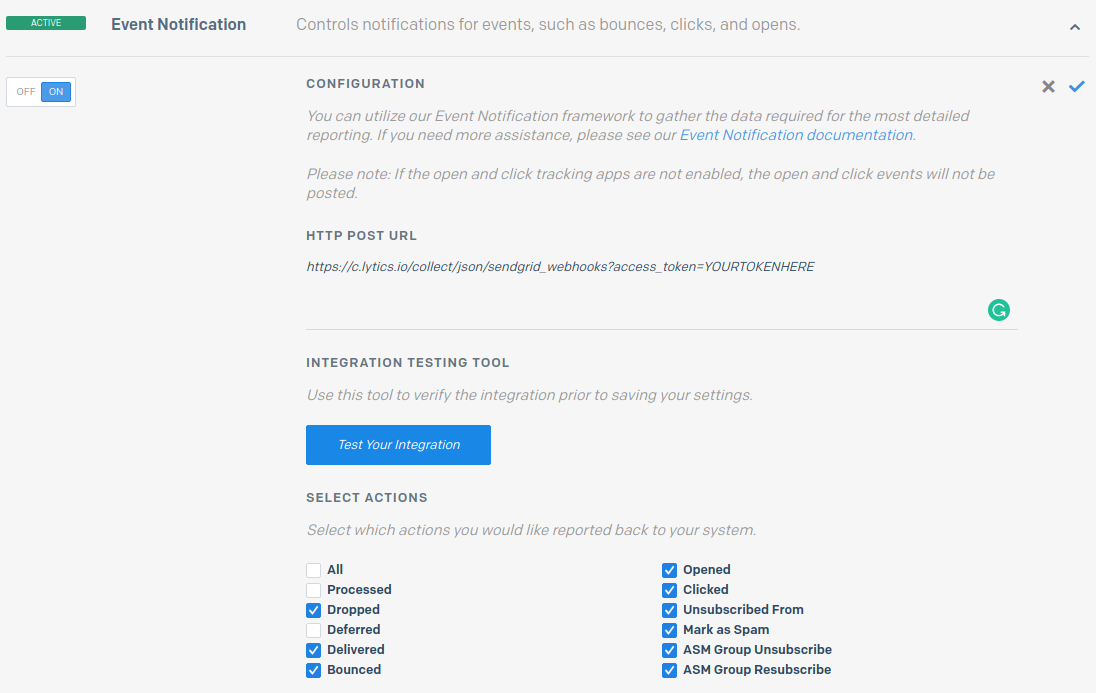
- Click on Event Notification to open your webhook settings.
- Click edit in the top right corner to change your event notification settings.
- In the HTTP POST URL textbox, enter the following URL:
https://c.lytics.io/collect/json/sendgrid_webhooks?access_token={API_TOKEN}
Replace{API_TOKEN}with your Lytics API token. - Under Select Actions check the boxes for the events you would like to recieve in Lytics. You may select All, or the following event types are recommended for collection:
- Dropped
- Delivered
- Bounced
- Opened
- Clicked
- Unsubscribed From
- Mark as Spam
- ASM Group Unsubscribe
- ASM Group Resubscribe
- Once you've selected event types, click the check mark button in the top right corner. Then make sure you toggle the button in the left-hand corner to On.

Lytics will then receive real-time event data to the sendgrid_webhooks stream. If you've run the SendGrid Import Audiences job, default mapping is automatically provided. Otherwise, contact Lytics support to add the mappings for SendGrid activity in your account.
Updated 3 months ago