

Webhooks
Overview
Webhooks are commonly used in conjunction with custom development. They are an easy way to have your product or application receive a signal from Lytics when we notice a change in a user's state (enter/leave audience). This can be very valuable for triggering changes in multiple systems without asking our platform for an update. Instead, we 'tell' your system when something has changed so that you can take action. If an audience definition needs to be changed and it has an active webhook, we recommend stopping the webhook workflow and recreating it after making the changes.
If you use webhooks to export an audience that relies on a time-based trigger, for example, users who have been modified within a window of time, the window must be at least 30 minutes. Smaller windows may be unreliable due to the pipeline necessary for checking audience membership at a specific time.
Combining Lytics and webhooks with lightweight web apps offers powerful ways to deliver custom experiences across any channel. Check out the Mobile Messaging with Lytics Webhooks use case for a real-world example.
Authorization
Complete the following steps to authorize your target webhooks resource. If no authorization is required, you may select the Webhook endpoint does not require authorization option below.
If you are new to creating authorizations in Lytics, see the Authorizations documentation for more information.
- Select Webhook from the list of providers.
- Select the method for authorization. Webhooks support the following authorization methods:
- Enter a Label to identify your authorization.
- (Optional) Enter a Description for further context on your authorization.
- Complete the configuration steps needed for your authorization. These steps will vary by method.
- Click Save Authorization.
Provide authorization as request header or parameter
To provide authorization as a request header or parameter you will need to enter the following:
- In the Label text box, enter a name for the authorization
- (optional) In the Description text box, enter a description for this authorization
- (optional) In the Webhook Request Headers text box, enter headers for the webhook POST request. Add a new line for each header as key:value e.g.
Authorization: some-token. - (optional) In the Webhook Request Parameters text box, enter URL parameters for the webhook POST request. e.g.
param-key1=value1¶m-key2=value2.

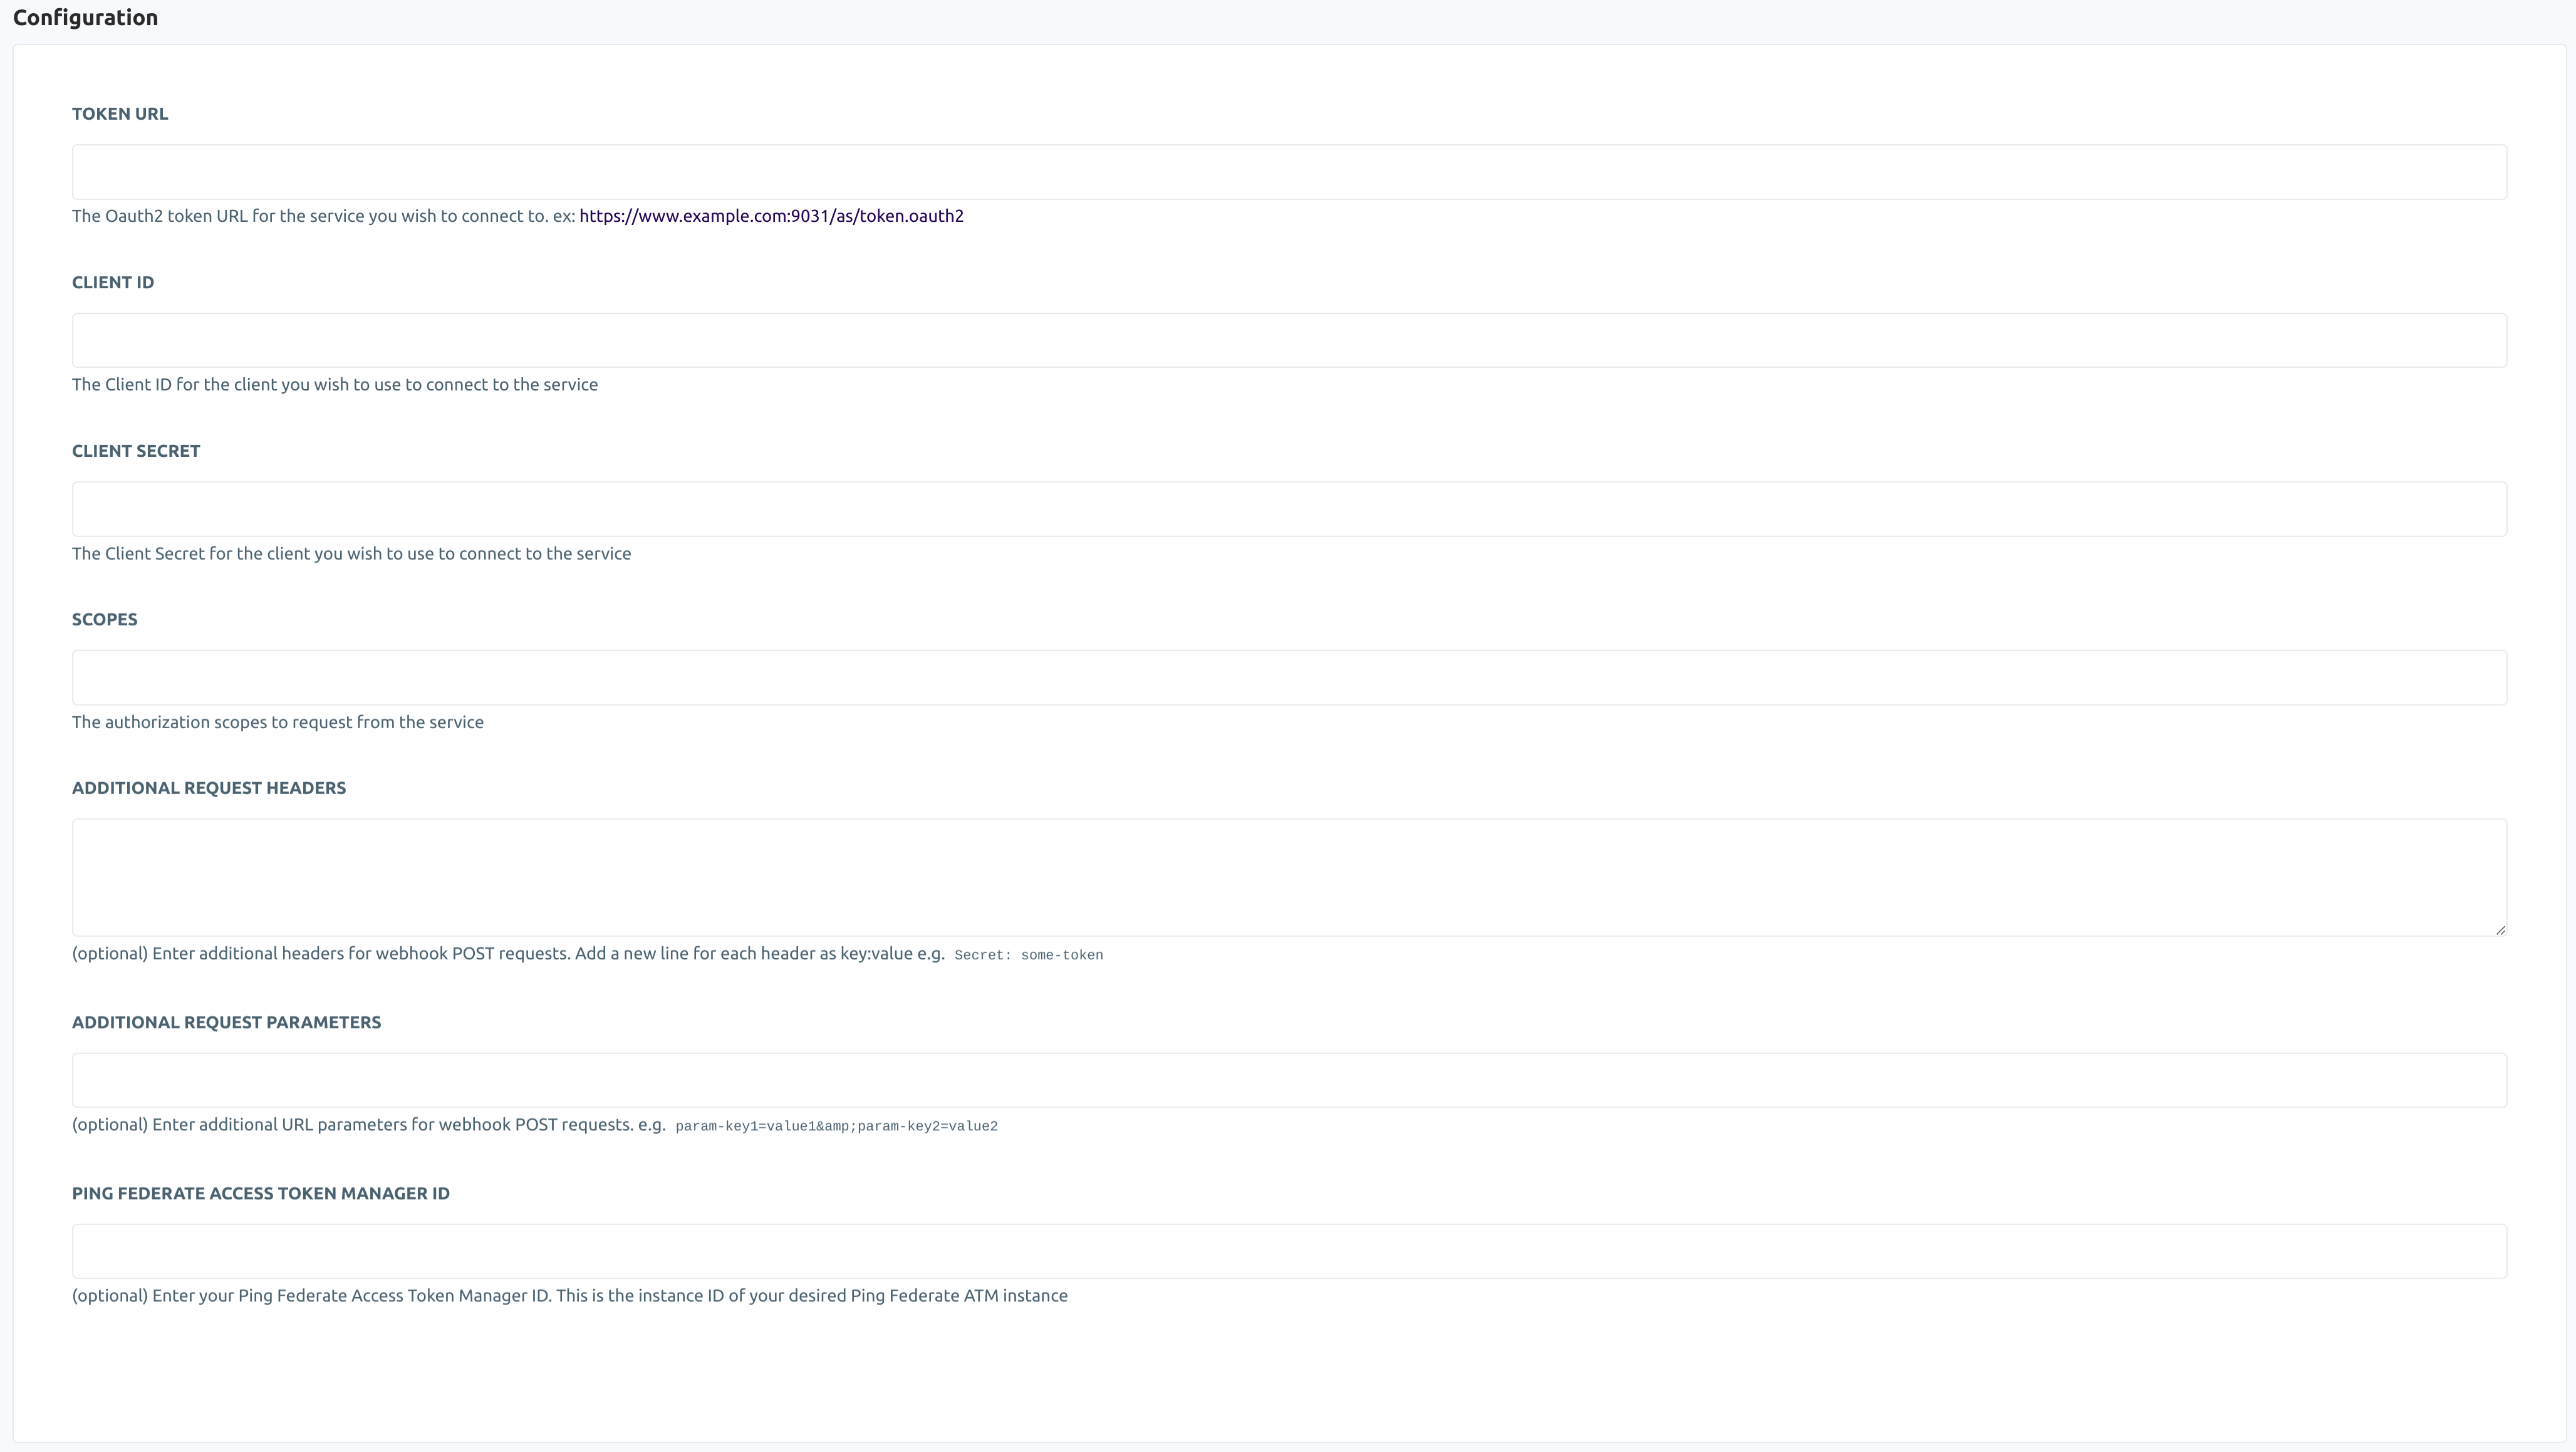
OAuth 2.0 Client Credentials Grant
Before attempting to create an Oauth 2.0 Client Gredentials Grant authorization, make sure the service you are connecting with supports authenticating via the client_credentials grant type. For authorizing with an OAuth 2.0 Client Credentials Grant you will need the following credentials. Once these are submitted, they will be used to retrieve an access token from the Token URL and stored securely in order to retrieve a new token when the existing one expires. When a job is configured using this authorization, the access token will be included in calls from the export as a header in the form Authorization: Bearer YourAccessToken.
- In the Label text box, enter a name for the authorization
- (optional) In the Description text box, enter a description for this authorization
- In the Token URL text box, enter the Oauth2 token URL for the service you wish to connect to. ex: https://www.example.com:9031/as/token.oauth2.
- In the Client ID text box, enter the Client ID for the client you wish to use to connect to the service.
- In the Client Secret password box, enter the Client Secret for the client you wish to use to connect to the service.
- (optional) In the Scopes text box, enter the authorization scopes to request from the service.
- (optional) In the Webhook Request Headers text box, enter Enter headers for the webhook POST request. Add a new line for each header as key:value e.g.
Header1: values. If your webhook api server accepts authorization in a different format other than the header asAuthorization: Bearer {token}, please specify it here with the format. Use{token}as placeholder for access token. We will replace{token}with actual token when sending the request. - (optional) In the Webhook Request Parameters text box, enter Enter URL parameters for the webhook POST request. e.g.
param-key1=value1¶m-key2=value2. If your webhook api server accepts authorization in a different format other than the header asAuthorization: Bearer {token}, please specify it here with the format. Use{token}as placeholder for access token. We will replace{token}with actual token when sending the request. - (optional) In the Ping Federate Access Token Manager ID, enter your Ping Federate Access Token Manager ID. This is the instance ID of your desired Ping Federate ATM instance.
Audience Triggers
Use this job to send Lytics audience enter/exit event triggers to your webhooks URL. If you use webhooks to export an audience that relies on a time-based trigger, for example, users who have been modified within a window of time, it is important that the window be at least 30 minutes. Smaller windows may not be reliable due to the pipeline necessary for checking audience membership at a specific time.
Integration Details
- Implementation Type: Server-side Integration
- Type: REST API Integration
- Frequency: Real-time Integration with an optional one-time Backfill of the audience after setup.
- Resulting Data: Lytics User Fields sent to webhooks URL.
Fields
By default, the job will send all the user fields as a JSON payload of the POST request to the configured webhooks URL. There are two kinds of JSON payloads for POST requests: the Lytics default version, and a CloudEvents version.
Lytics default:
{
    "id": "7076027172059065053",
    "data": {
        "_created": "2020-07-15T08:55:43.041-07:00",
        "_cust_sz": 118,
        "_internal_sz": 33,
        "_modified": "2020-07-15T08:55:43.041-07:00",
        "_num_aliases": 1,
        "_num_conflicts": 0,
        "_num_days": 1,
        "_num_events": 1,
        "_num_streams": 1,
        "_split": 12,
        "_streamnames": [
            "default"
        ],
        "_total_sz": 151,
        "channels": [
            "web"
        ],
        "email": "[email protected]",
        "first_name": "Beth",
        "firstvisit_ts": "2020-07-15T08:55:43.041-07:00",
        "hourly": {
            "15": 1
        },
        "hourofweek": {
            "87": 1
        },
        "is_bot": "f",
        "is_mobile": "t",
        "last_active_ts": "2020-07-15T08:55:43.041-07:00",
        "last_channel_activities": {
            "web": "2020-07-15T08:55:43.041-07:00"
        },
        "last_name": "Izzi",
        "lastvisit_ts": "2020-07-15T08:55:43.041-07:00",
        "name": "Beth Izzi",
        "score_frequency": 99,
        "score_intensity": 0,
        "score_momentum": 99,
        "score_propensity": 0,
        "score_quantity": 100,
        "score_recency": 100,
        "segment_events": [
            {
                "id": "42976a269a5e6b9d06c681b1c27292df",
                "event": "enter",
                "slug": "emailzz5",
                "enter": "2020-10-14T13:27:33.916374949-07:00"
            }
        ],
        "user_agent": "python-requests",
        "user_attributes": {
            "value": "681"
        }
    },
    "meta": {
        "object": "user",
        "subscription_id": "36e243f8fd8f4530bbd330fa7fb1a685",
        "timestamp": "2020-10-14T13:27:34.038154562-07:00"
    }
}
Lytics default audience enter event with user fields selected:
{
  "id": "15761203643149024539",
  "data": {
    "first_name": "Joe",
    "last_name": "Flow",
    "segment_events": [
      {
        "id": "efdcc4da20554be02e90c563f69bc0ec",
        "event": "enter",
        "slug": "first_name_joe",
        "enter": "2023-05-25T23:09:59.872199615Z"
      }
    ]
  },
  "meta": {
    "object": "user",
    "subscription_id": "f825f096718d07c65b9d6a94a4cc0c35",
    "timestamp": "2023-05-25T23:10:04.651979584Z"
  }
}
Lytics default audience exit event with user fields selected:
{
  "id": "15761203643149024539",
  "data": {
    "first_name": "Joseph",
    "last_name": "Flow",
    "segment_events": [
      {
        "id": "efdcc4da20554be02e90c563f69bc0ec",
        "event": "exit",
        "slug": "first_name_joe",
        "exit": "2023-05-25T23:09:59.872199615Z"
      }
    ]
  },
  "meta": {
    "object": "user",
    "subscription_id": "f825f096718d07c65b9d6a94a4cc0c35",
    "timestamp": "2023-05-25T23:10:04.651979584Z"
  }
}
Lytics default user field change event:
{
  "id": "12291095485723374960",
  "data": {
    "city": "Portland",
    "email": "[email protected]",
    "first_name": "Joseph",
    "segment_events": [
      {
        "id": "163bda069207c88cfdb7c84e06b9270f",
        "event": "change",
        "slug": "first_name_joe"
      }
    ]
  },
  "meta": {
    "object": "user",
    "subscription_id": "5168beb8415c3d66363a892b3aac5f1c",
    "timestamp": "2023-05-26T21:08:19.985560308Z"
  }
}
CloudEvents format:
{
  "specversion": "1.0",
  "id": "6449017691630140398",
  "source": "/work/abcd42a455d7365e08d5f4ce321e4bacd",
  "type": "com.lytics.audience.user.event",
  "datacontenttype": "application/json",
  "time": "2023-05-10T23:27:53.568929003Z",
  "data": {
    "_created": "2020-07-15T08:55:43.041-07:00",
    "_cust_sz": 118,
    "_internal_sz": 33,
    "_modified": "2020-07-15T08:55:43.041-07:00",
    "_num_aliases": 1,
    "_num_conflicts": 0,
    "_num_days": 1,
    "_num_events": 1,
    "_num_streams": 1,
    "_split": 12,
    "_streamnames": [
        "default"
    ],
    "_total_sz": 151,
    "channels": [
        "web"
    ],
    "email": "[email protected]",
    "first_name": "Beth",
    "firstvisit_ts": "2020-07-15T08:55:43.041-07:00",
    "hourly": {
        "15": 1
    },
    "hourofweek": {
        "87": 1
    },
    "is_bot": "f",
    "is_mobile": "t",
    "last_active_ts": "2020-07-15T08:55:43.041-07:00",
    "last_channel_activities": {
        "web": "2020-07-15T08:55:43.041-07:00"
    },
    "last_name": "Izzi",
    "lastvisit_ts": "2020-07-15T08:55:43.041-07:00",
    "name": "Beth Izzi",
    "score_frequency": 99,
    "score_intensity": 0,
    "score_momentum": 99,
    "score_propensity": 0,
    "score_quantity": 100,
    "score_recency": 100,
    "segment_events": [
        {
            "id": "42976a269a5e6b9d06c681b1c27292df",
            "event": "enter",
            "slug": "emailzz5",
            "enter": "2020-10-14T13:27:33.916374949-07:00"
        }
    ],
    "user_agent": "python-requests",
    "user_attributes": {
        "value": "681"
    }
  }
}
Configuration
Follow these steps to set up and configure an Audience Trigger Webhooks. If you are new to creating jobs in Lytics, see the Jobs Dashboard documentation for more information.
- Select Webhooks from the list of providers.
- Select the Audience Triggers Webhook job type from the list.
- Select the authorization you previously created or proceed selecting Use Webhook endpoint does not require authorization instead option.
- Enter a Label to identify this job you are creating in Lytics.
- (Optional) Enter a Description for further context on your job.
- From the Audiences list, select the Lytics audiences that you would like to emit events from.
- In the Webhook URL textbox, enter your webhooks URL that accepts the POST request with content
application/json. The webhook URL must have thehttpsscheme. If you need to generate a dynamic URL using data on the Lytics profile or the job configuration, select a Template from the dropdown menu that outputs a single string with the URL you'd like to send to. For more information about creating and managing templates, see the templates documentation. - (Optional) From the HTTPMethod list, select the HTTP method to use for the webhook request. If not provided, the default method is POST.
- Select the CloudEvents checkbox to emit events in the CloudEvents format.
- (Optional) For CloudEvents exports, set a custom CloudEvents Type. If left empty, the default type is
com.lytics.audience.user.event. - (Optional) For CloudEvents exports, set a custom CloudEvents Source. If left empty, the default source is
/work/id. - (Optional) Select the Existing Users checkbox to emit events for the users already part of the selected Lytics audience, what we call a "backfill." They will be sent as
enteredevent type. - (Optional) Select one of the following from the Audience Trigger Events dropdown to select what type of audience events to send a webhook.
- Enter and Exits send a webhook when a user enters and exits a Lytics audience.
- Enter send a webhook only when a user enters Lytics audience. Audience exits are ignored.
- Exits send a webhook only when a user exits a Lytics audience. Audience enters are ignored.
- (Optional) From Export Fields, select the list of Lytics user fields that you would like to export. If none are selected, the job will export all the user fields by default.
- (Optional) From Fields to Trigger, select up to 75 user fields to trigger user change events. For any user in the exported audience, if any of the selected field values change, then the user will be sent to the webhook.
- (Optional) Select the Batch Events checkbox to batch user events, and send events as an array of in the payload. Batches will be sent every 1 second or immediately when the batch size specified
- (Optional) For batched events specify in Batch Size the max number of user events to be sent in each batch. If left empty, the default batch size is 10.
- (Optional) Set the Worker Count as the maximum number of simultaneous webhooks calls that can be handled at once (max 20). If this value isn't set, the default is 5 workers.
- (Optional) In the Do not retry for HTTP Status add HTTP status codes that you would like to ignore. E.g., 401, 402 etc. Learn more below in Error Handling.
- Click Complete to start the Audience Trigger Webhook job.
Webhook User Enrichment
Improve the performance of your ads campaign by enriching Lytics user profiles with the help of responses from the webhook server.
Integration Details
- Implementation Type: Server-side Integration
- Type: REST API Integration
- Frequency: Real-time Integration with an optional one-time Backfill of the audience after setup.
- Resulting Data: Lytics User Fields sent to webhooks URL.
Once the job is started, it will:
- Create the payload using the template with the users fields selected during configuration.
- Sends tha payload to the webhook server and posts the response in the data stream along with the user's BY field information.
- The job will then repeat steps 1 and 2 as user enters/exits the selected audience.
Fields
By default, the job will send selected user fields as a JSON payload of the POST request to the configured webhooks URL. The response from the webhook server is then posted in the Lytics data stream webhook_enrichment(configurable).
For example: If below is the payload sent to webhook server:
{
    "email": "[email protected]"
}
and the webhook server returns with below JSON response:
{
    "address":
    {
        "city": "Portland",
        "country": "US"
    },
    "email": "[email protected]",
    "interests":
    [
        "shopping",
        "reading",
        "watching"
    ],
    "name": "Abc Test"
}
then the job will post below JSON in the data stream:
{
    "origin":
    {
        "lytics_byfield1": "value1",
        "lytics_byfield2": "value2"
    },
    "response":
    {
        "address":
        {
            "city": "Portland",
            "country": "US"
        },
        "email": "[email protected]",
        "interests":
        [
            "shopping",
            "reading",
            "watching"
        ],
        "name": "Abc Test"
    }
}
The origin fields contains all the BY field values for the user so that the response can be attached to the user profile via Queries & LQL. Below table shows the data that will be posted in datastream for above JSON:
| FieldName (datastream) |
|---|
| origin.lytics_byfield1 |
| origin.lytics_byfield2 |
| response.address.city |
| response.address.country |
| response.email |
| response.interests |
| response.name |
Configuration
Follow these steps to set up and configure a Webhook User Enrichment job. If you are new to creating jobs in Lytics, see the Jobs Dashboard documentation for more information.
- Select Webhooks from the list of providers.
- Select the Webhook User Enrichment job type from the list.
- Select the authorization you previously created or proceed selecting Use Webhook endpoint does not require authorization instead option.
- Enter a Label to identify this job you are creating in Lytics.
- (Optional) Enter a Description for further context on your job.
- From the Audiences list, select the Lytics audiences that you would like to enrich.
- From the Stream input, select the data stream where the data will be posted or enter a name to create a new stream. If no stream is selected, the data will be posted in
webhook_enrichmentstream. - (Optional) Using the Template ID input, select the template that has format for the request JSON body.
- In the Webhook URL textbox, enter your webhooks URL that accepts the POST request with content
application/json. The webhook URL must have thehttpsscheme. If you need to generate a dynamic URL using data on the Lytics profile or the job configuration, select a Template from the dropdown menu that outputs a single string with the URL you'd like to send to. For more information about creating and managing templates, see the templates documentation. - (Optional) From the HTTPMethod list, select the HTTP method to use for the webhook request. If not provided, the default method is POST.
- From Export Fields input, select the list of Lytics user fields that will be the part of request payload. Only the selected user fields are sent.
- (Optional) Select the Existing Users checkbox to enrich the existing users in the selected Lytics audiences, what we call a "backfill."
- (Optional) Select the Batch Events checkbox to batch user events, and send events as an array of in the payload. Batches will be sent every 1 second or immediately when the batch size specified
- (Optional) For batched events specify in Batch Size the max number of user events to be sent in each batch. If left empty, the default batch size is 10.
- (Optional) Set the Worker Count as the maximum number of simultaneous webhooks calls that can be handled at once (max 20). If this value isn't set, the default is 5 workers.
- (Optional) In the Do not retry for HTTP Status add HTTP status codes that you would like to ignore. E.g., 401, 402 etc. Learn more below in Error Handling.
- Click Complete to start the Webhook User Enrichment job.
Error Handling
Webooks jobs are set up with a basic retrying mechanism on top of the standard job retrying for Lytics jobs.
When a webhook request encounters a non-200 status code, the request will be retried unless the HTTP status code is in the do not retry list explained below. The job will retry errored requests until the job encounters 10 failed requests. Once 10 failed requests are encountered, the job will return an error, and enter into the normal Lytics job retry schedule as described here. If the error persists, then the job will go into a failed state.
The following http request status codes are not retried since retrying will most likely result in the same status:
- 400 - Bad Request
- 404 - Not found
- 413 - Request Entity Too Large
When setting up a webhook job, more status codes can be added to the never retry list by entering status codes into Do not retry for HTTP Status configuration.
Requests that encounter a status code that is not retried, will be marked as omitted with the cause logged in the job logs. These request will notcause the job to error.
If the server returns a Retry-After directive in the header, the job will go into sleeping state for the duration or until the time specified. The job will not error in this case, and the request will be retried when the job runs next.