

Overview
Pinterest is an image sharing and social media service designed to enable saving and discovery of information. Integrating Lytics with Pinterest enables you to send Lytics audiences to target Pinterest users via ad exchange.
Authorization
If you haven't already done so, you will need to set up a Pinterest Business account before you begin the process described below. If you are new to creating authorizations in Lytics, see the Authorizations Dashboard documentation for more information.
- Select Pinterest from the the list of providers.
- Select the method for authorization. Note that different methods may support different job types. Pinterest supports the following authorization methods:
Pinterest Sign-In
If you haven't already done so, you will need to set up a Pinterest Business account before you begin the process described below.
The Pinterest account used for authorization must have Admin or Audience level permissions to enable the Pinterest Audience Export. More details on Pinterest Account permissions can be found here.
If you are new to creating authorizations in Lytics, see the Authorizations documentation for more information.
- Select Pinterest from the list of providers.
- Select the Pinterest Sign-In method for authorization.
- Enter your Pinterest login credentials in the login popup.
- In the Label text box, enter a name for the authorization
- (optional) In the Description text box, enter a description for this authorization
- Click Save Authorization.
Pinterest Conversion Token
If you haven't already done so, you will need to set up a Pinterest Business account before you begin the process described below. Pinterest Conversion Token you will need to generate a conversion token, follow these instructions to generate a token.
- Select the Pinterest Conversion Token method for authorization
- In the Label text box, enter a name for the authorization
- (optional) In the Description text box, enter a description for this authorization
- In the Token text box, enter your Pinterest Conversion Token credential.
- In the Account ID text box, enter your Pinterest account ID.
Pinterest: Conversions Export
Push your conversions to Pinterest. These conversions can then be used for re-targeting in campaigns and can be reviewed in conversion reporting for improved conversion visibility.
Authorization
Pinterest conversions export supports the following authorization type:
Integration Details
- Implementation Type: Server-side
- Implementation Technique: REST API, Audience triggers
- Frequency: Real-time
- Resulting data: Conversions in Pinterest.
This integration uses the Pinterest Marketing API to send the Lytics audience users as conversion events. Once the job is started, it will:
- Optionally Scan existing audience, and for each user it will extract the conversion information based on the job's configuration.
- Send each user to Pinterest as a conversion using the Conversion Events API
- The export job will run continuously. Lytics audience membership (enters and exits) will be sent to the Pinterest Conversion Events API as they occur.
Fields
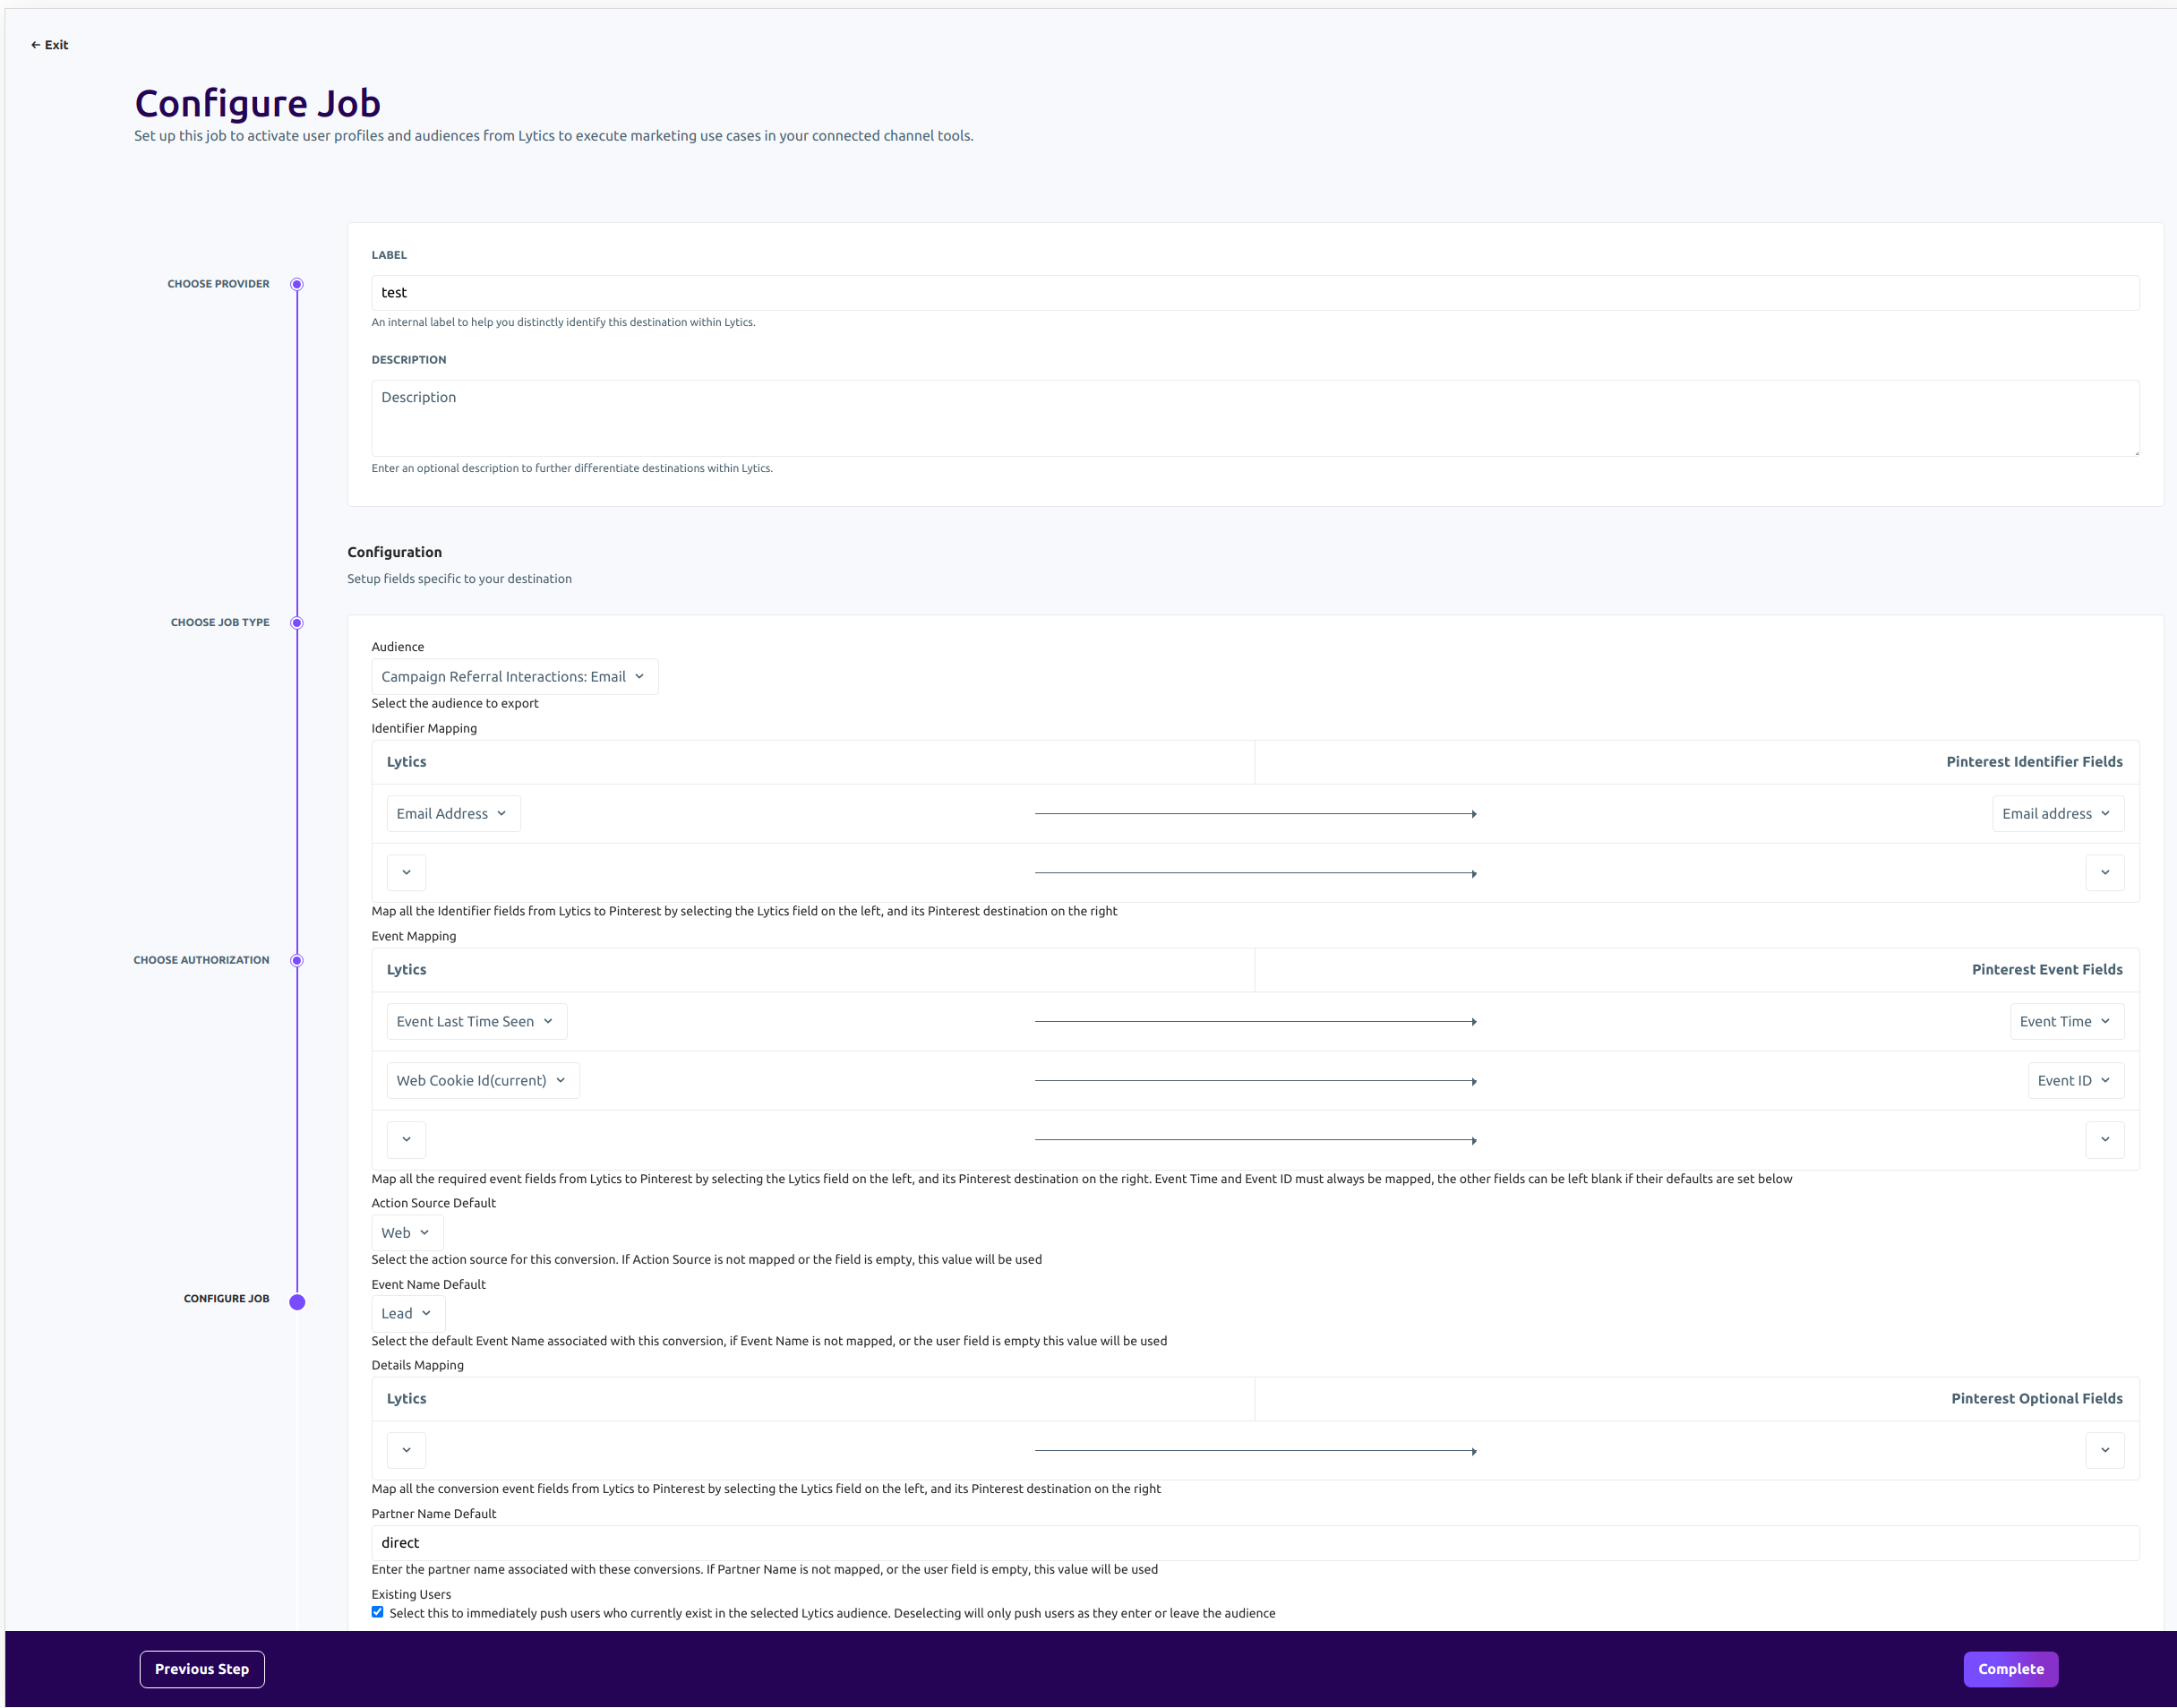
The export job lets you map user fields to Pinterest conversion fields. There are three types of mapping: identifiers, event, and details.
- The Identity Mapping lets you map user fields to identifiers in Pinterest. At least one set of identifiers must be mapped. If Pinterest requires an identifier to be hashed, the export will check if it is already a valid SHA256 hash, or if not will hash the identifier before sending it. The export will handle conversions between arrays and single values.
- The Event Mapping config lets you map information from user fields to the required event information fields, you can map the Event Name, Action Source, Event Time, and Event ID. The Event Time and Event ID must be mapped; Event Name and Action Source can have default values configured.
- Details Mapping allows mapping of optional fields to the conversion, such as Click ID, Conversion Value, Content IDs etc. These fields should be mapped if available to give betting insights into your conversions.
Configuration
Follow these steps to set up and configure an export job for Pinterest in the Lytics platform. If you are new to creating jobs in Lytics, see the Jobs Dashboard documentation for more information.
- Select Pinterest from the list of providers.
- Select the export Conversion Export from the list.
- Select the Authorization you would like to use or create a new one.
- Enter a Label to identify this job you are creating in Lytics.
- (Optional) Enter a Description for further context on your job.
- Select the audience to export.
- From the Identifier Mapping input, map all the Identifier fields from Lytics to Pinterest by selecting the Lytics field on the left, and its Pinterest destination on the right.
- From the Event Mapping input, map all the required event fields from Lytics to Pinterest by selecting the Lytics field on the left, and its Pinterest destination on the right. Event Time and Event ID must always be mapped, the other fields can be left blank if their defaults are set below. If the Event Time user field is empty, then the current time will be used. Note: we recommend mapping a Lytics field of type
DATEfor Event Time. If a string or integer field is mapped, the integration will make a best-effort attempt to parse the date, which can produce unexpected results for ambiguous formats. - (optional) In the Action Source Default drop down, select the action source for this conversion. If Action Source is not mapped or the field is empty, this value will be used.
- (optional) In the Event Name Default drop down, select the Event Name associated with this conversion.
- (optional) From the Details Mapping input, select map all the conversion event fields from Lytics to Pinterest by selecting the Lytics field on the left, and its Pinterest destination on the right.
- (optional) In the Partner Name Default text box, enter the partner name associated with these conversions. If Partner Name is not mapped, or the user field is empty, this value will be used. This may be left blank if no partner is associated with these conversions.
- (optional) Select the Existing Users checkbox to send users already in the audience to Pinterest.
If the value of Event Time is older than an hour, the event will be treated as an offline event and will not be used for conversion targeting. Offline events in Pinterest are available for reporting use-cases.
- Click the Start job button to start the job
Export Audience
Sync Lytics audiences with Pinterest to identify and target the right users to improve the performance of your campaigns.
Integration Details
- Implementation Type: Server-side Integration.
- Implementation Technique: REST API Integration - Audience Trigger Integration
- Frequency: Real-time Integration
- Resulting data:
Pinterest Customer Lists populated with users from the selected Lytics audience.
This integration uses the Pinterest Marketing API to send the Lytics audience users. Once the job is started, it will:
-
Scan the selected Lytics audience and get each user's configured identifier. The job will then use Pinterest's Update Customer List endpoint to send users to your Pinterest Customer List.
-
The export job will run continuously. As users enter or exit the Lytics audience, they will be added to the queue. The queue will be sent to Pinterest every 5 minutes or or when the queue reaches 10,000 users, whichever comes first. For the users that enter the Lytics audience, the job will add the user in the Pinterest Customer List and will remove the user from it as the users exit the Lytics audience.
Fields
The export job gives you an option to send Email, SHA256 Email, or Mobile Ad ID (MAID) to Pinterest to use as the identifier to match users. You can send Email, SHA256 Email, or Mobile Ad ID (MAID) as part of job configuration. A list can only contain one identifier type. All identifiers will be cryptographically hashed with SHA-256 algorithm, if not already SHA-256 hashed.
Configuration
Follow these steps to set up and configure an export job for Pinterest in the Lytics platform. If you are new to creating jobs in Lytics, see the Destinations documentation for more information.
- Select Pinterest from the list of providers.
- Select the export job type from the list.
- Select the Authorization you would like to use or create a new one.
- Enter a Label to identify this job you are creating in Lytics.
- (Optional) Enter a Description for further context on your job.
- Select the audience to export to Pinterest.
- From the Pinterest Ad Account input, select which Pinterest Ad account to create or select the customer list.
- (optional) From the Customer List input, select which Pinterest Customer List to append to. If no list is selected, a new Customer List will be created with name formatted as
Lytics audience-name unix-ts - (optional) From the Email input, select which field contains the user's email. If selected, customer list must by type EMAIL.
- (optional) From the SHA256 Email input, if email addresses are already hashed in Lytics, select which field contains the SHA256 hashed email. If selected, customer list must by type EMAIL.
- (optional) From the Mobile ID input, select which field contains the user's mobile ID. A list can only contain one identifier type. If selected, customer list must by type MAID.

- Click the Start job button to start the job
Updated 5 months ago