
Meta
Overview
Meta Ads Manager is a powerful ad management tool that is designed for advertisers of any experience level. Using Meta Ads Manager, you can run ads on Facebook, Instagram, or Messenger.
Connect Meta Ads with Lytics to access predictive user audiences in your Meta Ads Manager. You can use your rich, behavioral-driven audiences as the target for your ads, or build lookalikes off of these audiences to reach more users who are likely to engage with your brand.
Using the Lytics Canvas, you can manage the cross-channel customer lifecycle and use Meta ad sets as your advertising touchpoint.
Authorization
If you have not already done so, you will need to set up a Meta Ads Manager account before you begin the process described below. If you are new to creating authorizations in Lytics, see the Authorizations Dashboard documentation for more information.
- Select Meta from the list of providers.
- Select the method for authorization. You may authorize in one of two ways. Both of Meta's authorization methods support the Export Audiences and Export Audiences (Web Traffic) job types.
- Meta User
- Business Manager System User (recommended)
Note: Regardless of authorization type, before you can build a custom audience in Meta, you must agree to the Meta Custom Audience Terms of Service.
Meta User
Authorizing as a Meta user will guide you through an Oauth process to authorize access to ad accounts tied to that particular Facebook user. Using Oauth is fast and simple, but can be prone to failure in the long run as authorizations can be canceled if the user changes their password, leaves the organization, and some other authorization invalidating event.
- You will be prompted to login to Facebook and grant permissions. You will then need to enter a description for your authorization.
- Enter a Label to identify your authorization.
- (Optional) Enter a Description for further context on your authorization.
- Complete the configuration steps needed for your authorization.
- Click Save Authorization.

Business Manager System User
Authorizing with a Business Manager System is not tied to a specific user, so it is more reliable in the long-term than the User Oauth, and is valid until revoked in the Business Manager settings. This is the recommended authentication method if possible.
Before creating a system user, your Meta Business Manager must:
- Have an admin user.
- Own a Meta app. You should claim the app and associate it with a business via API or in Business Manager. To see your apps, visit the Meta Apps page. Please note that the app must not be listed as "in development". In development apps are not meant for production or live advertising. Your app must also be associated with the Ads Account ID you want to send audiences to. This can be configured under Advanced Settings for your App.
Once you satisfy these requirements, complete the following steps to set up your authorization:
- Go to Business Settings in Meta. Under Users click System Users, then click Add to create a new System User.
- Give a name to the system user and select Employee as the role, then click Create System User.

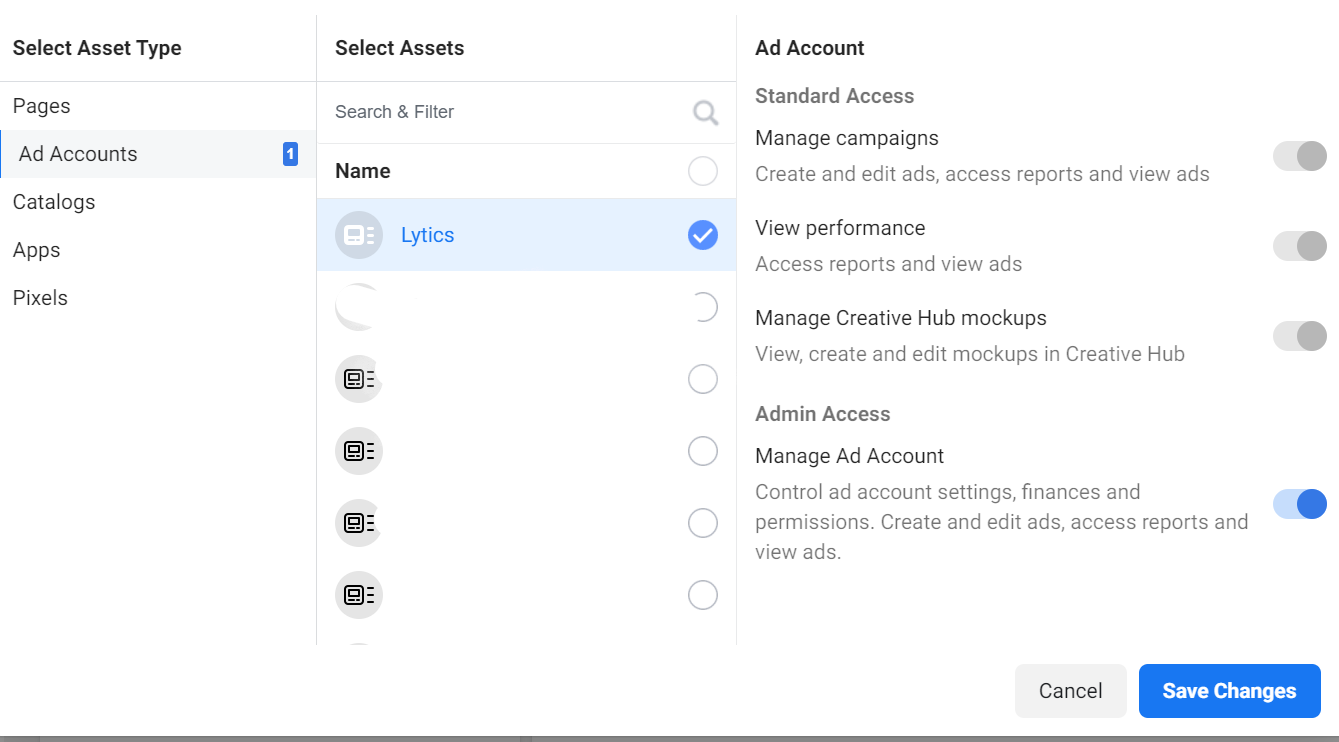
- Assign Ad Accounts to the System User by selecting Add Assets. Then select the Ad Accounts, choose the Ad Account that you would like to push Lytics Audiences to, and then assign it Admin Access - Manage Ad Account
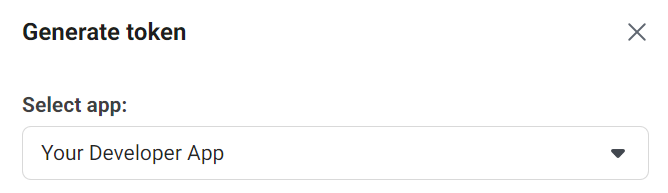
- Next you'll need to generate a token that will be entered into Lytics to make API calls with. To start this, select Generate New Token.
- Select your company's Meta developer app
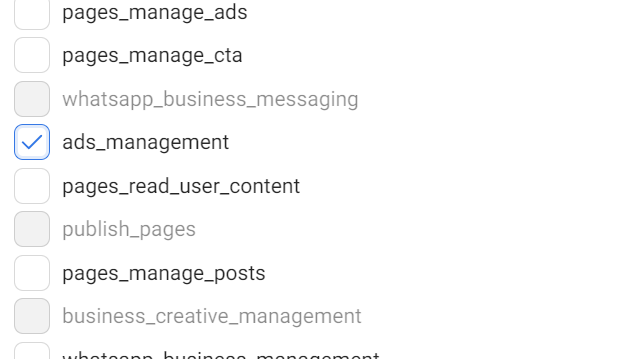
and make sure that ads_management is checked.
Then click on Generate Token - The generated token will be only shown once. Copy it, and keep it handy for authorizing in Lytics.
- Enter a Label to identify your authorization.
- (Optional) Enter a Description for further context on your authorization.
- Enter the Access Token you created in step six.
- Click Save Authorization.


Export Audiences
Sync your Lytics audiences with Meta custom audience lists to target those users in the Meta Ads platform.
Integration Details
- Implementation Type: Server-side Integration.
- Implementation Technique: REST API Integration - Audience Trigger Integration.
- Frequency: Batch Integration that continuously updates at an hourly rate.
- Resulting data: A Meta custom audience populated with users from the Lytics audience selected.
This integration utilizes the Meta Marketing APIs to send user data. Once the export is started the job will:
- Create an audience in Meta Ads called
Lytics {Audience Name}if an existing audience was not specified. - Scan the Lytics audience and hash the selected user identifiers, i.e. email or phone or name and location, which will then be sent to Meta to be added to the newly created audience or an existing one.
- The export will run continuously. As users enter or exit the Lytics audience, they will be added to a queue. The queue will be flushed and updates to the Meta audience will be pushed every hour or until the queue reaches 10,000 users, whichever happens first. Users will be added or removed from the audience appropriately.
Fields
By default, Lytics exports the following fields to Meta. Many of these fields are configurable.
| Lytics User Field | Description | Meta Field | Type |
|---|---|---|---|
| Email Address | string | ||
| first_name | First Name | FN | string |
| last_name | Last Name | LN | string |
| gender | Gender | GEN | string |
| city | City | CT | string |
| state | State | ST | string |
| zipcode | Zip Code | ZP | string |
| country | Country Code | COUNTRY | string |
| phone | Phone Number | PHONE | string |
| mobile_advertisor_id | Mobile Advertisor ID | MADID | string |
| lifetime value | user's lifetime value | LOOKALIKE_VALUE | unit |
Configuration
Follow these steps to set up an Export Audiences job for Meta. If you are new to creating jobs in Lytics, see the Jobs Dashboard documentation for more information.
- Select Meta from the list of providers.
- Select the Export Audiences job type from the list.
- Select the Authorization you would like to use or create a new one.
- Enter a Label to identify this job you are creating in Lytics.
- (Optional) Enter a Description for further context on your job.
- Select your Meta Ads Account ID.
Note: If it says you "must accept Custom Audiences Terms" next to the Ads Account ID, copy and paste the following URL into your browser:https://business.facebook.com/ads/manage/customaudiences/tos/?act=YOUR_ADS_ACCOUNT_ID. ReplaceYOUR_ADS_ACCOUNT_IDwith the account id you wish to use. There you can accept the Meta Ads Custom Audience terms and conditions, and then refresh this list in the Lytics App. - From the Audience input, choose the audience of users to export to Meta.
- From the Email Field input, select the field that contains the users emails.
- If emails in your account are stored as a SHA256 hashes, then from the SHA256 Email input, select the field that contains the SHA256 hash of the user emails. Use this field instead of or in conjunction with the Email Field above.
- Using the Field Mapping input, map the Lytics field on the left to a Meta field on the right for a greater matching resolution. Lytics fields that are mapped to Hashed Meta fields are assumed to be already hashed appropriately for Meta API within Lytics.
Note: The Lifetime Value Meta field specifies the field that contains the lifetime value of this user. The Lytics field mapped to the Lifetime Value Meta field should contain a positive numeric value. If this field is mapped the Meta audience will be created as a value based lookalike audience. In order to use Lifetime Value audiences in Meta, special terms must be accepted athttps://www.facebook.com/customaudiences/value_based/tos/?act=YOUR_ADS_ACCOUNT_ID(you will need to replaceYOUR_ADS_ACCOUNT_IDwith your ads account ID) before creating a value-based audience. - Check the Existing Users checkbox to add users who already exist in the selected Lytics audience during the first batch sync.
- From the Audience Source input, select whether data was collected directly from customers, directly from partners, or from both.
- Optionally add an alternate Audience Name and Audience Description to identify the audience in Meta. If left empty the default name specified above will be used.
- Optionally add an Opt-out Link to be used for the audience in Meta.
- Optionally select an Existing Meta Audience to add users to. If not specified, a new audience custom audience will be created.
- (Optional) From the Duplicate Exports input, select up to 50 additional audiences to send to Meta with the same configuration. Each additional audience will be sent as its own job in Lytics.
- Click Complete.
The custom audience should appear immediately in Meta Ads. When you begin syncing audiences, it may take some time for them to process within Meta.
Audience Sizes in Meta
Immediately after export, in the Meta UI you will see a size of Below 1000 and under this you may see the word Populating. Even if the audience is much larger than 1000 users, Meta will always say Below 1000 if it is Populating. Meta says about this state:
Audience Is Populating
We're finding people who fit your audience criteria. You can start running ads with this audience right away, but be aware that your audience size will increase as the audience is populated.

This process may take a number of days to complete.
If the exported audience has a lot of activity, such as an audience that has users enter/exit every hour, then the Meta status may always say "Populating" since the job is continually sending new data to Meta. If you would like to see the current side of the audience in the Meta UI, the only way is to pause the job in Lytics on the Job Summary page for that job.
Once you've seen the audience size and want to continue adding users, you can unpause the job on the same page by clicking Resume. After resuming, the audience size may go back into the "Populating" and "Below 1000" state.
In addition to the size shown, in the Meta UI, you can click through to the audience and see the Custom audience updated messages on the History tab to see the batches of users that were sent to Meta.
Export Audiences (Web Traffic)
Target people who visit your website using the Meta Pixel. Create audience definitions powered by Lytics that can be used as custom website audiences or lookalike audiences in Meta Ads.
Integration Details
- Implementation Type: Server-side Integration and Client-side Integrations.
- Implementation Technique: JavaScript Tag Integration and REST API Integration.
- Frequency: Real-time Integration
- Resulting data: A Meta website custom audience populated with users who have visited your website and meet the criteria of your Lytics audience.
The client-side part of this integration uses the Lytics JavaScript Tagand Meta Pixel to sync users who are members of API enabled Lytics audiences. This will include anonymous users where the export custom audience integration can only sync known users.
Once a user visits a page of your website where both tags are installed, the following will happen:
- The Lytics tag will check for the existence of the Meta Pixel.
- If found, the Lytics tag will retrieve a list of API Enabled audiences the current user is a member of.
- The Lytics tag will send this audience list to Meta via a standard tracking event using the Meta Pixel.
Since Lytics tag sends users as they are matched during web site visits, the audience will usually be smaller then what you see in the UI. A troubleshooting step for user verification would be to create an audience with web_visitor last visit within a specific recent time window (e.g. last 30 days).
The server-side workflow of this integration uses the Meta Marketing API to create custom website audiences in Meta that are populated by the users synced through the client-side integration. After running the job:
- Lytics will create Meta Website Custom Audience definitions in Meta Ads for the Lytics audiences selected during configuration.
- If no audiences were selected during configuration, all API-enabled audiences for the account will be automatically created in Meta. The job will run continuously checking every 5 minutes for new API-enabled audiences created in Lytics. If a new audience is found, a matching audience will be created in Meta.
Fields
Lytics does not send any fields to Meta as part of this integration beyond the event field necessary for recording audience membership. The job only creates audience definitions in Meta Ads that can be used for targeting.
Configuration
Follow these steps to set up and configure the job to create Meta website custom audience definitions in the Lytics platform.
Setting up the JavaScript Tags
-
If you haven't done so already, add the Meta Pixel to your website. See Meta documentation for assistance adding the Meta Pixel and adding the Meta Pixel using Google Tag Manager.
-
Also ensure that the Lytics JavaScript tag has been installed. This integration needs both tags present to work properly.
-
Once you have added the tag and pixel to your site, enable API access for the Lytics audience(s) you would like to target.
-
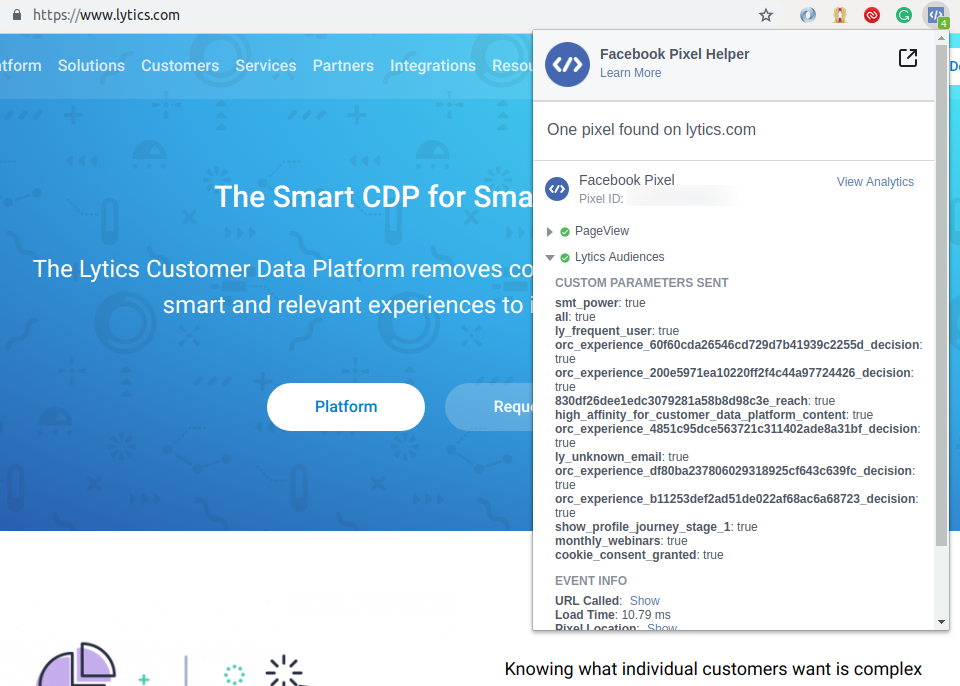
You can verify that Meta is receiving Lytics audience membership via events. Use the Meta Pixel Helper Chrome extension to help verify this:
-
Proceed with the job steps below to make this user data available for targeting in Meta.
Setting up the Job
- Select Meta from the list of providers.
- Select the Export Audiences (Web Traffic) job type from the list.
- Select the Authorization you would like to use or create a new one.
- Enter a Label to identify this job you are creating in Lytics.
- (Optional) Enter a Description for further context on your job.
- From the Meta Ads Account ID input, select the account ID for this custom audience.
Note: If it says you "must accept Custom Audiences Terms" next to the Ads Account ID, copy and paste the following URL into your browser:https://business.facebook.com/ads/manage/customaudiences/tos/?act=YOUR_ADS_ACCOUNT_ID. ReplaceYOUR_ADS_ACCOUNT_IDwith the account id you wish to use. There you can accept the Meta Ads Custom Audience terms and conditions, and then refresh this list in the Lytics App. - From the Pixel input, add your Pixel to automatically create a Meta Custom Web Traffic Audience for all public Lytics audiences.
- From the Audiences input, select a set of audiences to do a one-time export to Meta. If none are selected, a Meta Web Audience will be created for every public audience in Lytics.
- Click Start Export.
You should now see the website custom audiences in Meta Ads. They may already be populated if your audience was previously API enabled, or they may need time to populate as users visit your website. You can also build a lookalike audience with Lytics and Meta based on these users.
Export Audiences (Conversion API)
Send Lytics Audience events to the Meta Conversion API to improve your ad campaign performance.
Integration Details
- Implementation Type: Server-side Integration.
- Implementation Technique: API Integration - Audience Trigger Integration.
- Frequency: Batch Integration that is continuously pushed every ten minutes.
- Resulting data: Meta server events populated with Lytics user fields value for the users from the selected Lytics Audiences.
This integration uses the Meta Conversion API to send the Lytics audiences events. Once the job is started, it will:
- Scan the Lytics audiences. Adds user's data parameters. It also adds the custom data paramter and Lytics audience membership information for the selected audiences for the user being exported in the Meta server events payload. It then sends the payload to Meta.
- The export will run continuously. As users enter or exit the Lytics audience, they will be added to a queue. The queue will be sent to Meta every five minutes or until the queue reaches 1,000 users, whichever happens first.
Fields
You can send Lytics user fields to Meta's Conversion API as custom data parameters. You can also send the Lytics audience membership to Meta. An example of the payload that is sent to Meta Conversion API is:
[
    {
        "action_source": "email",
        "custom_data":
        {
            "content_ids":
            [
                "123456"
            ],
            "content_name": "product name",
            "currency": "USD",
            "lytics_audience_slug_1": true,
            "lytics_audience_slug_2": false,
            "lytics_audience_slug_3": true,
            "num_items": 10,
            "value": 123,
            "lytics_field_1": "field_value_1",
            "lytics_field_2": "field_value_2"
        },
        "event_id": "sample-event-id",
        "event_name": "Purchase",
        "event_source_url": "https://www.some-website.com",
        "event_time": 1654729272,
        "user_data":
        {
            "em": "e43763399e5318f14cd7473c4902a6b319343d577ec8283898a5edf9dbc6d711"
        }
    }
]
Configuration
Follow these steps to set up and configure an Export Audiences to Conversion API job for Metak. If you are new to creating jobs in Lytics, see the Destinations documentation for more information.
- Select Meta from the list of providers.
- Select the export Export Audiences to Conversion API from the list.
- Select the Authorization you would like to use or create a new one.
- Enter a Label to identify this job you are creating in Lytics.
- (Optional) Enter a Description for further context on your job.
- Select the Audiences to export to Meta Conversion API.
- From the Meta Ads Account ID input, select your Meta Ads Account. Note: If it says you "must accept Custom Audiences Terms" next to the Ads Account ID, copy and paste the following URL into your browser:
https://business.facebook.com/ads/manage/customaudiences/tos/?act=YOUR_ADS_ACCOUNT_ID. ReplaceYOUR_ADS_ACCOUNT_IDwith the account ID you wish to use. There you can accept the Meta Ads Custom Audience terms and conditions, and then refresh this list in the Lytics App. - From the Pixel input, select your Meta Pixel to link the Lytics audience(s) events.
- In the Event Type textbox, enter event type. You can select from Meta's standard event or can type your custom event name. If not provided, events will be sent with Lytics Audiences name.
- (Optional) From the Event ID input, select the Lytics user field that has Meta's Event Id field which will be used for event de-duplication process.
- (Optional) From the Event Timestamp input, select the Lytics user profile field that contains the time when the actual event occurred. If not provided then we will use the current timestamp when this event is being sent.
- From the Action Source input, select the action source where the conversion occured. If not provided, events will be sent with other as action source.
- From the User Data Parameters Mapping input, map the value from Lytics field to Meta's user data parameters. At least one user field must be mapped. We will hash the field if required according to Meta's requirement.
- (Optional) From the Custom Parameters Mapping input, map the value from Lytics field to Meta's custom data parameters. NOTE: For Purchase event type, currency and value parameter must be mapped.
- (Optional) From the Additional Custom Data, select any additional Lytics userfields to send to Meta as custom data parameters
- (Optional) Using the Currency Code dropdown, specify a currency code if not already mapped above. Required if Purchase event type was selected
- (Optional) Select the Send Lytics Audience Membership checkbox to send audience membership for the selected Lytics audience.
- (Optional) From Fields to Trigger, select up to 75 user fields to trigger user change events. For any user in the exported audience, if any of the selected field values change, then the user will be sent to the Meta conversion api.
- (Optional) From Audience Trigger Events, select which type of audience trigger events to send to Meta conversion api.
- (Optional) Select the Existing Users checkbox to send the users who already exist in the selected Lytics audiences.
- Click Start Export.
Experiences
Lytics Experiences support Meta Ad sets that can be run as stand-alone ad campaigns or as a part of your cross-channel customer life-cycle. Using the Lytics Canvas, you can activate Meta ads with Lytics audiences to re-engage and entice users to convert.
Experience Import
Like all Experience enabled providers, you can import Experiences from Meta to Lytics. During the import process, you will be asked to select an authorization. Read the Meta authorization documentation for more information.
Before you can import, you will also need to select your Meta Ads Account ID since the authorization you select may be associated with multiple ad manager accounts.
Once you've selected an ad manager account, you can import eligible ad sets as Lytics Experiences.

Tactics
During the Experience import process, tactics are determined by the Optimization Goal set during the creation of your ad set in Meta.

Meta Experiences in Lytics support the following tactics:
-
Ad Recall Lift - Optimize for people more likely to remember seeing your ads.
-
App Installs - Optimize for people more likely to install your app.
-
App Downloads - Optimize for app downloads.
-
Brand Awareness - Optimize to reach the most number of users who are likely to spend at least a minimum amount of time on the image or video.
-
Engaged Users - Optimize for people more likely to take a particular action in your app.
-
Event Responses - Optimize for people more likely to attend your event.
-
Impressions - Show the ads as many times as possible.
-
Landing Page Views - Optimize for page views.
-
Lead Generation - Optimize for people more likely to fill out a lead generation form.
-
Link Clicks - Optimize for people more likely to click on the link of the ad.
-
Offer Claims - Optimize for people more likely to claim the offer.
-
Offsite Conversions - Optimize for people more likely to make a conversion on the site.
-
Page Engagement - Optimize for people more likely to engage with your page.
-
Page Likes - Optimize for people more likely to like your page.
-
Post Engagement - Optimize for people more likely to engage with your post.
-
Reach - Optimize to reach the most unique users each day.
-
Social Impressions - Increase the number of impressions with social context, i.e. with the names of one or more of the user's friends attached to the ad who have already liked the page or installed the app.
-
Video Views - Optimize for people more likely to watch videos.
Configuration
After importing a Meta Experience you can configure it for activation. All tactics for Meta have the same three configuration steps within the Experience Editor:
-
Target - select the target audience for your Experience.
-
Configure Meta - set up how the audience for your Experience will be exported. There are two different methods for syncing audiences to Meta based on the type of audience.

- For an audience of anonymous users, select Create Web Traffic Audiences. Activating this type of Experience will create a new website custom audience in Meta, and users will be dynamically synced to the audience when they visit your website.
- For an audience of known users (users with an email identifier), select Export Audiences. Activating this type of Experience will sync users to a custom audience from a customer list in Meta.
The configuration step will generally function the same as the respective workflow chosen, but without the Audience selection, as that is configured by the Target step in the Experience editor.
-
Configure Delivery - choose to turn the Delivery Optimization feature on or off. Turning on Delivery Optimization means that known users will not be synced to a Meta audience immediately, but instead will wait to sync individual users based on the time that they are most likely to respond to an ad. Depending on the cost metric for your ad, Delivery Optimization may help you save ad spend and see a higher conversion rate.

Once you've finished configuring the Experience, you can save and activate it.
Activation
For all Meta Experiences, activating simply pushes users to an audience within Meta. As mentioned in the configuration step, a Meta Experience functions similarly to the Export Audience workflow. However, there are additional steps necessary to use your new audience with the ad set you imported.
- In your Meta ads manager account, edit the ad set that you activated in Lytics.
- In the Audience Section, select the custom audience that was created when you activated the Experience in Lytics.

- When you're ready to publish the ad set, click the Publish button and your ad will be delivered to users in your audience.
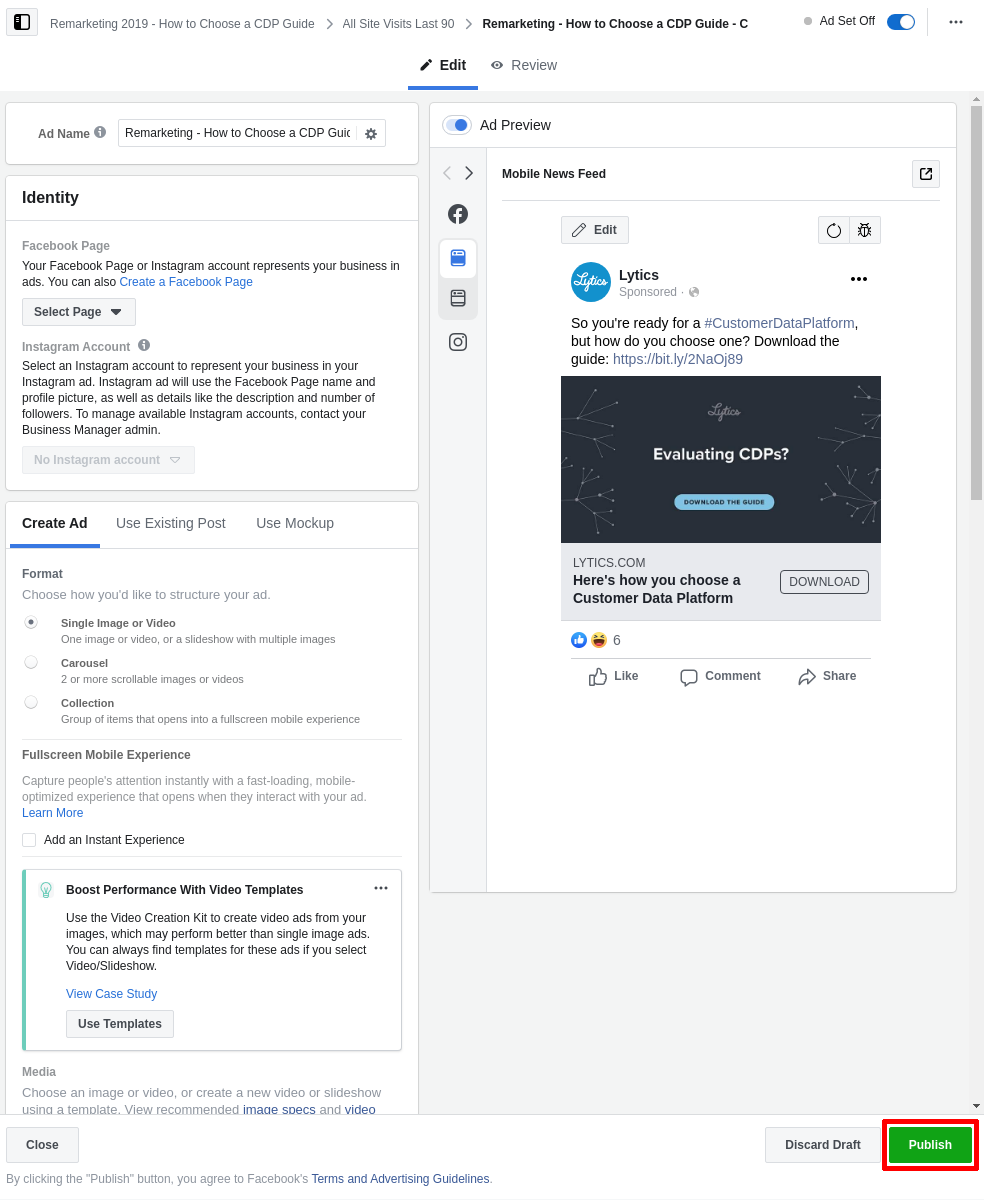


Note: It may take some time for audiences to process and be ready to use in an ad set. Read the Export Audience documentation for further information.
Metrics
There is a workflow that runs in the background to collect aggregate metrics for your Meta Experience metrics. This metrics workflow runs hourly and uses the Meta Insights API to query for conversions and reach.

Currently, only conversion events have user attribution for Meta Experiences, and there is some additional setup necessary to make this work for your ad set. Once configured it means that there is a user field in Lytics which records the click events from an ad set but there is no way of tracking impressions at the user level. The Meta Insight API merely returns an aggregate number based on the event.
Lytics metrics are recorded using the following fields to query against the Meta Insights API:
-
Reach:
reachThe number of people who saw your ads at least once. Reach is different from impressions, which may include multiple views of your ads by the same people. This metric is estimated. -
Converted:
unique_clicksThe number of people who performed a click (all). This metric is estimated. -
Conversion Rate:
unique_ctrThe percentage of people who saw your ad and performed a unique click (all). This metric is estimated.
Conversion Tracking
As mentioned above, Lytics brings in the conversion count for a Meta Experience directly from the Meta API. You can also begin to track click-throughs by adding custom UTM parameters. Follow these steps to configure these custom parameters using Lytics, and you may also refer to the Meta documentation for URL parameters.
-
While editing your ad in Meta, locate the Tracking section, and under URL Parameters click on Build a URL Parameter.
-
It is recommended you fill out the default campaign UTM tracking variables, as Lytics will automatically capture these query parameters when users visit your website.
-
Under Custom Parameters create the following new parameters:
- Parameter Name:
utm_lytics_experienceValue:{{adset.id}}
This dynamic value will be populated with the ID of the ad set so that Lytics will recognize which Experience the user clicked on.
- Parameter Name:
utm_lytics_sourceValue:meta
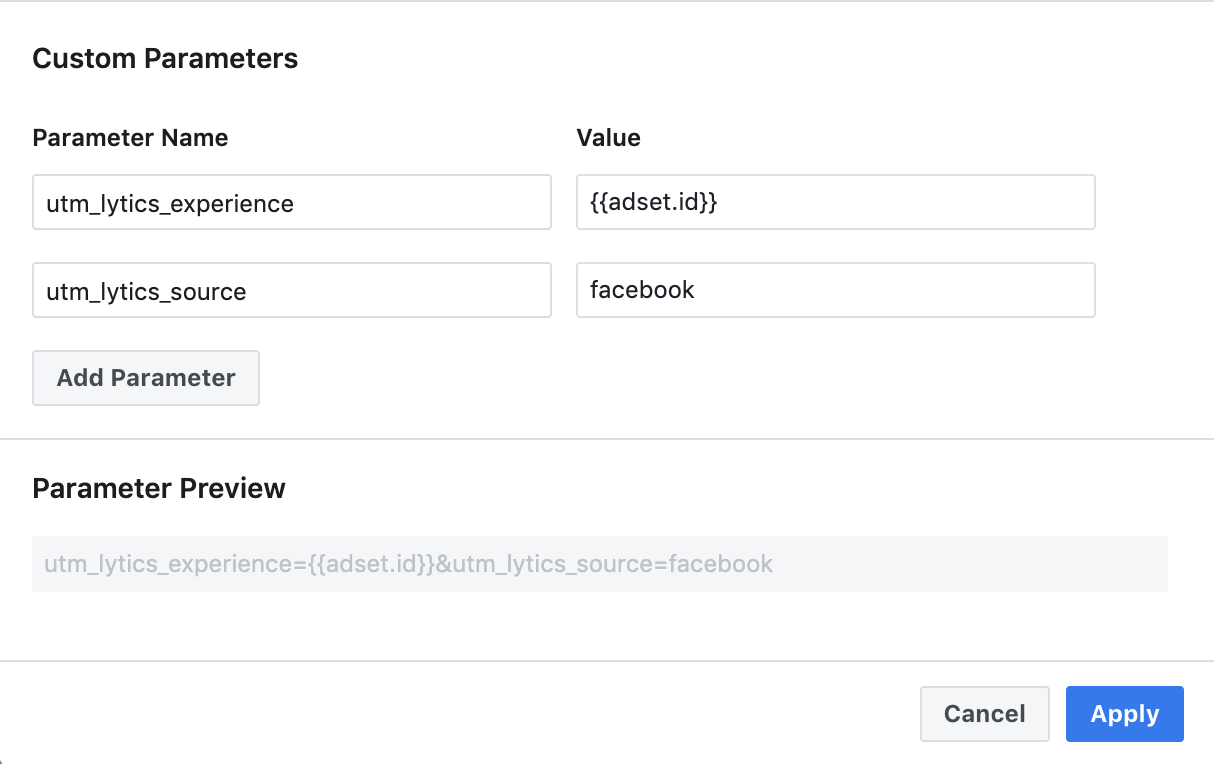
- Parameter Name:
-
Click Apply to save the changes to your URL parameters.
-
Click Publish to save the changes to your ad.

After you've added these parameters and users begin clicking on your ad, you should see values populating the UTM conversions user field in Lytics.
Updated 4 months ago