
Quantcast
Overview
Quantcast is an advertising and audience-measurement platform that helps brands plan, activate, and measure campaigns across the open internet.
Integrating Lytics with Quantcast allows you to export Lytics audiences as server-side conversion events through Quantcast's Conversion API. Rather than relying only on browser pixels, you can drive Quantcast conversions (such as purchase or signup) directly from a Lytics audience — backed by the cross-channel behavior, data science scores, and content affinities that power that audience. The resulting conversions feed Quantcast's measurement and campaign optimization.
Authorization
If you haven't already done so, you will need a Quantcast account before you begin the process described below. If you are new to creating authorizations in Lytics, see the Authorizations documentation for more information.
To connect Lytics and Quantcast you will need your Quantcast account ID (also called a pCode, in the form p-xxxxxxxx). The account ID authenticates the Conversion API and identifies which Quantcast account receives the conversions. You can find it in your Quantcast Measure or Advertise account settings.
Follow the steps below to add this authorization in Lytics:
- Select Quantcast from the list of providers.
- Select the Conversion API method for authorization.
- In the Label text box, enter a name for the authorization.
- (Optional) In the Description text box, enter a description for this authorization.
- In the Account ID (pCode) text box, enter your Quantcast account ID (for example,
p-abc12345). - Click Save Authorization.
Conversion API Export
Export your Lytics audiences to Quantcast as server-side conversion events, so you can drive Quantcast conversions from audience membership and behavior modeled in Lytics.
Integration Details
- Implementation Type: Server-side Integration.
- Implementation Technique: REST API Integration with Audience Trigger Integration.
- Frequency: Real-time Integration with an optional one-time Backfill of the audience after job setup.
- Resulting Data: For each User Profile in the selected audience, a Quantcast conversion event (the event name you configure) is recorded against your account, with the mapped user identifiers and optional context and commerce fields.
This integration uses Quantcast's Conversion API to send Lytics audience activity as conversions. Once the export is started, the job will:
- Run a one-time backfill of the current members of the selected audience, if Existing Users is enabled.
- Listen for real-time audience enter and exit events, plus optional changes to a configured set of user fields.
- Build one conversion per user — assembling the mapped identifiers and any context or commerce fields — and send them to Quantcast in batches. A batch is flushed when it reaches 100 conversions, or every 5 seconds, whichever comes first, so partial batches are not held.
Fields
The export sends each conversion to Quantcast's Conversion API endpoint (POST https://pixel.quantserve.com/conversion?a=<account-id>) as a JSON array of conversion objects. You choose which Lytics user field feeds each field in the job configuration; only mapped fields are included. An example of the payload that is sent to Quantcast is:
[
    {
        "name": "purchase",
        "time": 1698752623,
        "url": "https://shop.example.com/checkout",
        "referer": "https://google.com",
        "orderid": "ORD-1",
        "revenue": 42.5,
        "product_category": "shoes",
        "labels": ["new", "promo"],
        "user":
        {
            "external_id": "cid-123",
            "email": "a33ca7eb40024fc497551c8dc2c5399e8ba42580560a68c8ec48d5cc6e3afc45"
        }
    }
]
Each conversion needs at least one user identifier — a browser token, external ID, hashed email, or a client user agent together with a client IP — otherwise the user is skipped. Lytics hashes email to SHA-256 before sending (an already-hashed value passes through unchanged); time defaults to Quantcast's receive time when unmapped. For the full definition of each field, see Quantcast's Conversion API documentation.
Configuration
Follow these steps to set up and configure a Conversion API export to Quantcast from Lytics. If you are new to creating jobs in Lytics, see the Destinations documentation for more information.
-
Select Quantcast from the list of providers.
-
Select the Quantcast: Conversion API Export job type from the list.
-
Select the Authorization you would like to use or create a new one.
-
Enter a Label to identify this job you are creating in Lytics.
-
(Optional) Enter a Description for further context on your job.
-
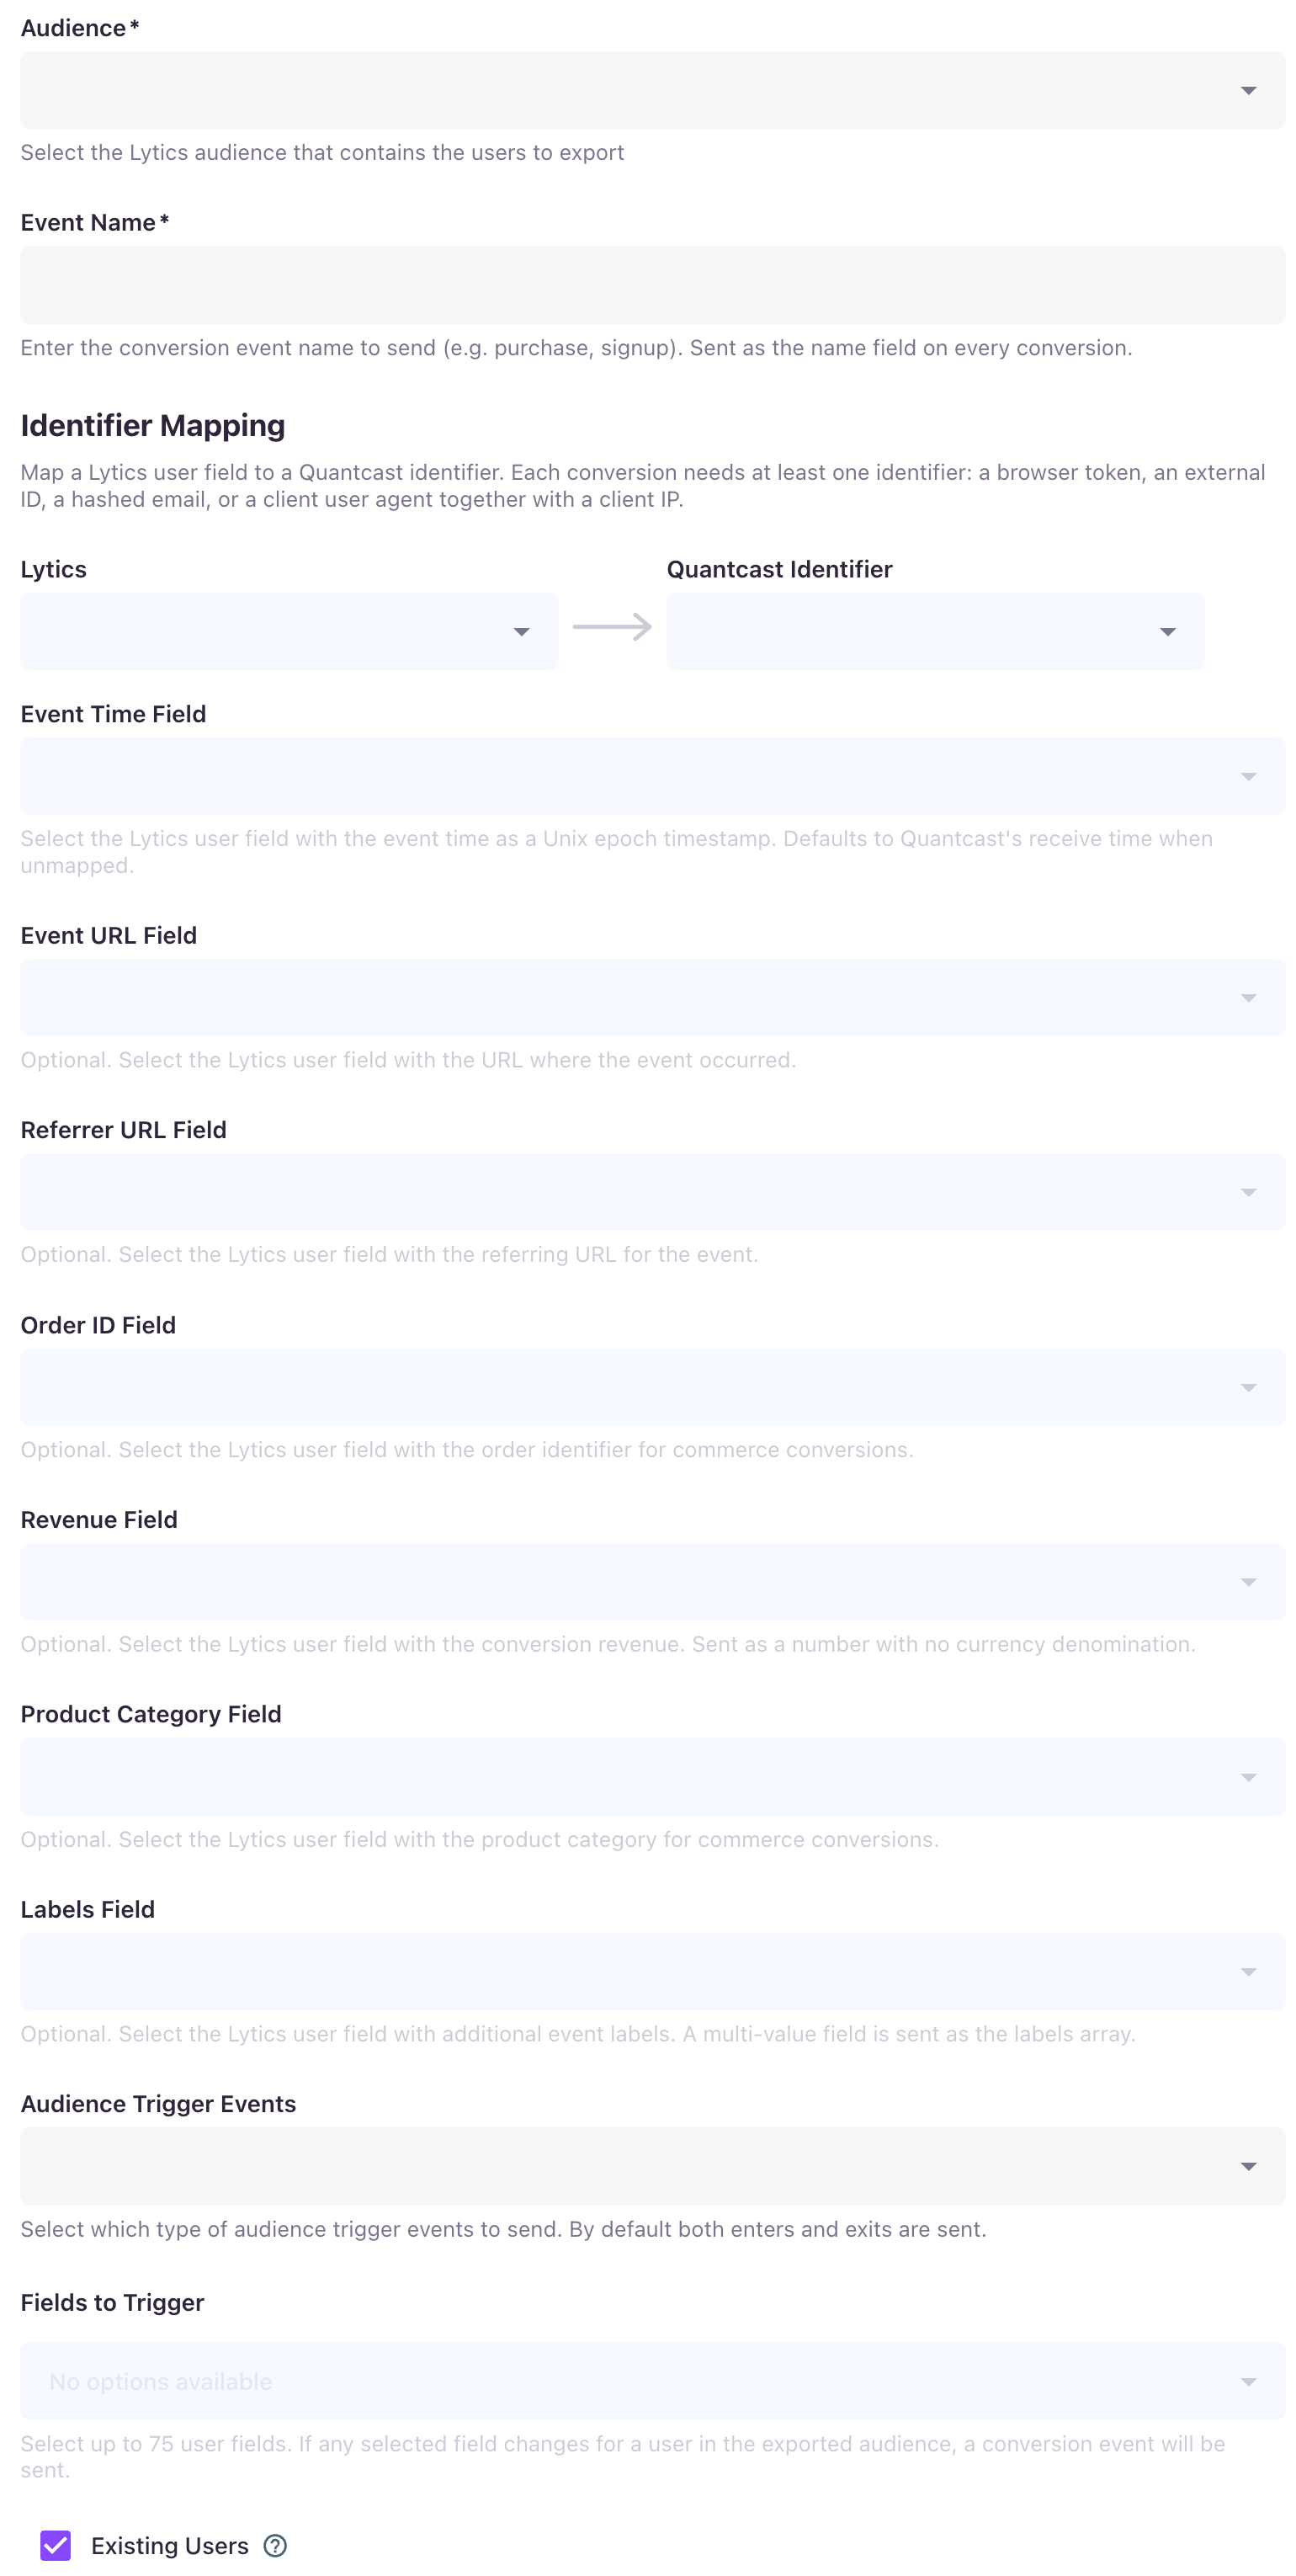
From the Audience input, select the Lytics audience containing the users to export.
-
In the Event Name text field, enter the Quantcast conversion event name to send (for example,
purchaseorsignup). -
From the Identifier Mapping input, map Lytics user fields to Quantcast identifiers by selecting the Lytics field on the left and its Quantcast identifier on the right. At least one identifier mapping is required. See the Fields section for the identifier requirements.
-
(Optional) Map the context and commerce fields (Event Time Field, Event URL Field, Referrer URL Field, Order ID Field, Revenue Field, Product Category Field, Labels Field). See the Fields section.
-
(Optional) Use the Fields to Trigger input to select up to 75 user fields. The export sends a user to Quantcast whenever any selected field changes for a user in the audience.
-
(Optional) From the Audience Trigger Events dropdown, select which audience events trigger an export: Enters and Exits (default), Enters Only, or Exits Only.
-
(Optional) Select the Existing Users checkbox to enable a one-time backfill of the current members of the selected audience to Quantcast immediately.
-
Click Start Export.
You can confirm the export in Quantcast by checking your account's conversion reporting for the events sent by Lytics.
Updated 20 days ago